Use Bulk Actions on a Copy Sheet
When the same change applies to several copy elements, select them and act on all of them at once instead of repeating the action element by element.
 | Note: The actions available in the Bulk Action menu depend on the copy task you are working in. |
 | Important Consideration
|
Bulk Delete
Deletes the selected copy elements.
Available wherever you have edit rights, except in the Translation Language Input and Translation Language Approval tasks, where the copy element itself cannot be deleted.
- Select the checkbox for each required copy element.
- Select Bulk Action.
Note: The menu lists only the actions available at the current stage, each with the number of selected items eligible for it.
- Select Bulk Delete from the Bulk Action menu.
- If Deletion Reason Mandatory is disabled in Copy Manager Settings, then the selected copy elements are deleted immediately. No further steps are needed.
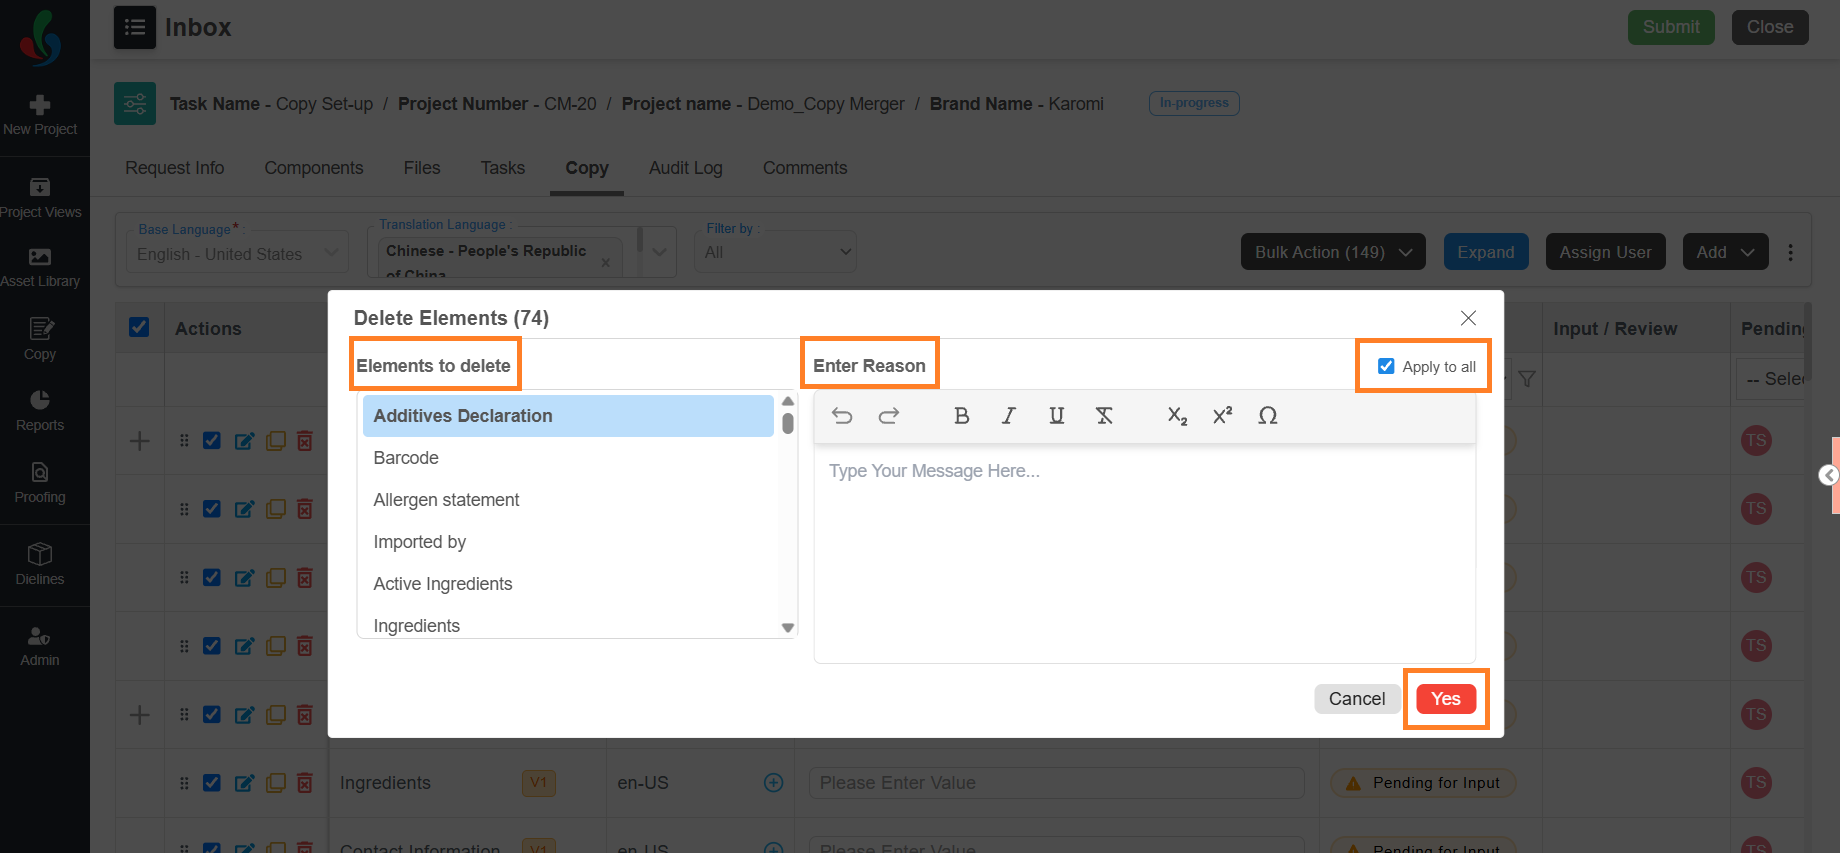
- If Deletion Reason Mandatory is enabled, the Delete Elements dialog is displayed.
- Enter the reason for deletion under Enter Reason.
Note: Apply to all is selected by default, so the reason you enter covers every element. - If required, give elements their own reasons, clear Apply to all.
- Select an element in the Elements to delete list.
- Enter the reason for that element under Enter Reason.
- Repeat for each element in the list.
- Select Yes. The selected copy elements are deleted from the project.
- Enter the reason for deletion under Enter Reason.
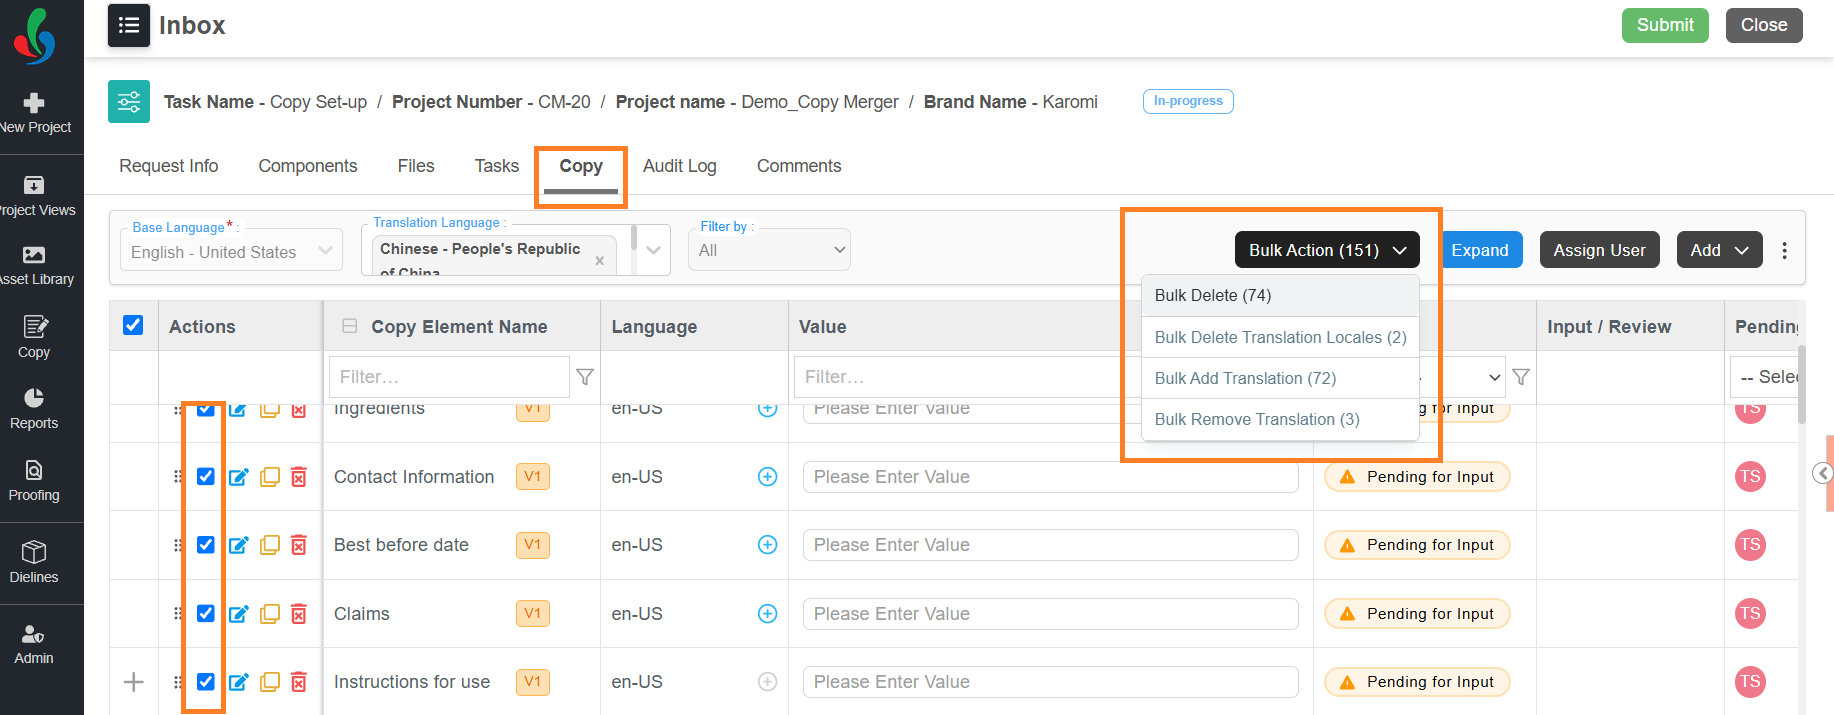
Bulk Add Translation
Adds one or more translation languages to every selected copy element, so you do not have to add them element by element. In an approval task, this action is available only when the copy task is configured to let approval participants modify copy.
- Select the checkbox for each required copy element.
- Select Bulk Action.
Note: The menu lists only the actions available at the current stage, each with the number of selected items eligible for it.
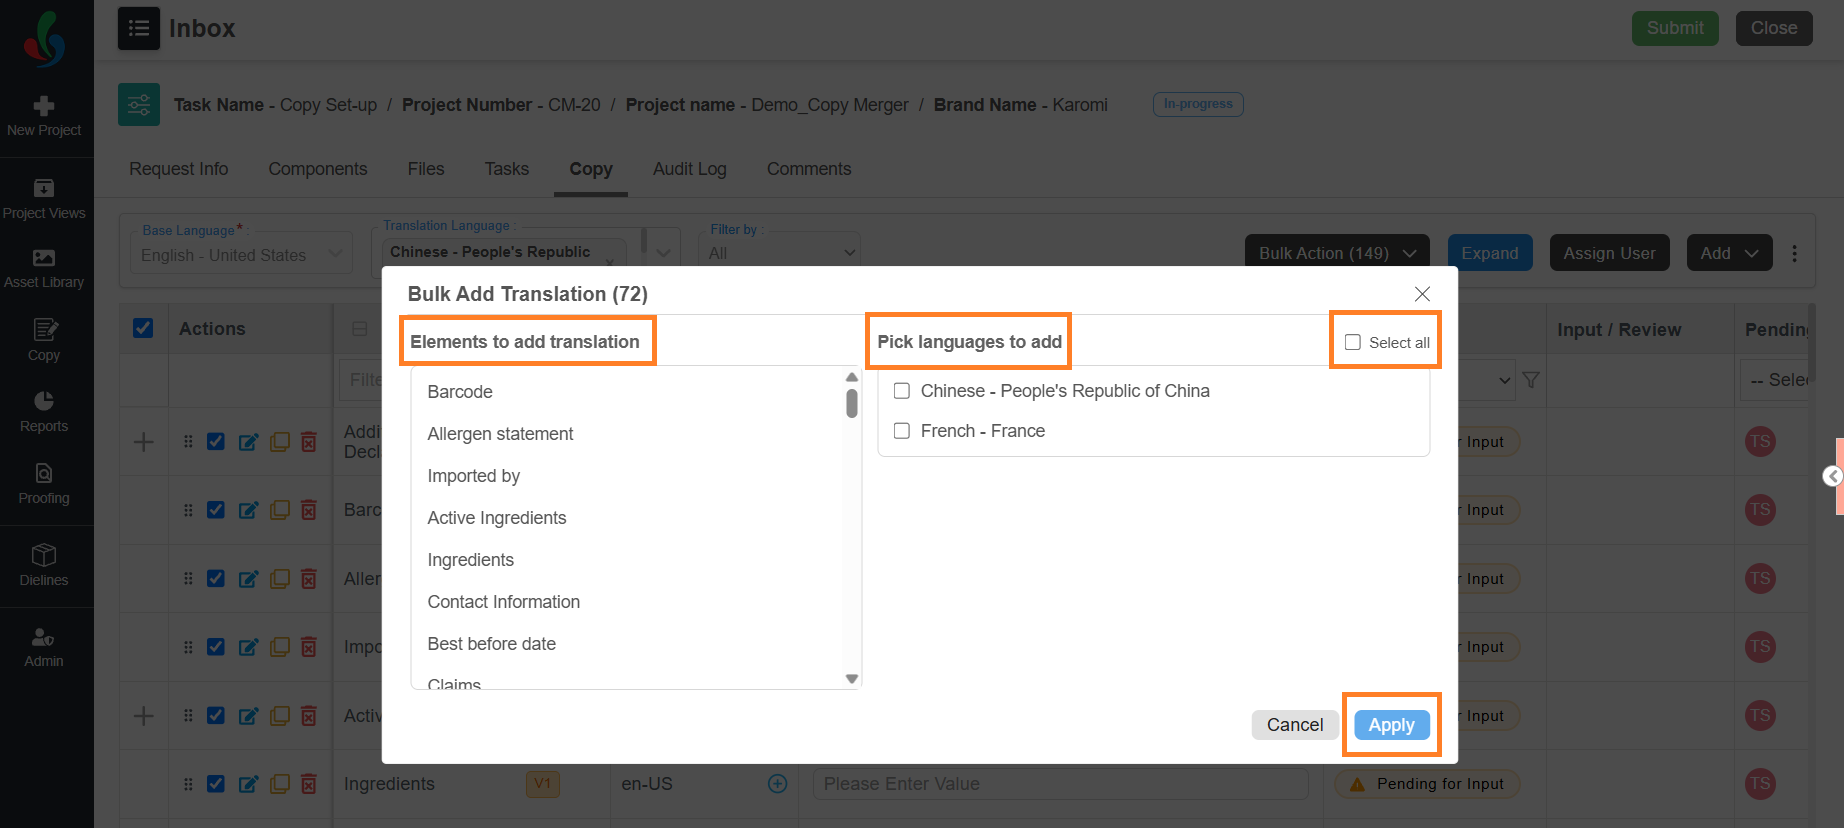
- Select Bulk Add Translation from the Bulk Action menu. The Bulk Add Translation dialog lists the selected copy elements under Elements to add translation.
- Under Pick languages to add, select the required languages, or select Select all.
- Select Apply.
- Each language you selected is added to every copy element that does not already have it, and appears on the copy sheet immediately.
Note: Only the translation languages configured for the project are offered.
Bulk Remove Translation
Removes the languages you choose from every selected copy element. Select the copy elements for this action; their language rows do not need to be selected. Use Bulk Delete Translation Locales instead when the languages to remove differ from one copy element to the next. In an approval task, this action is available only when the copy task is configured to let approval participants modify copy.
- Select the checkbox for each required copy element.
- Select Bulk Action.
Note: The menu lists only the actions available at the current stage, each with the number of selected items eligible for it.
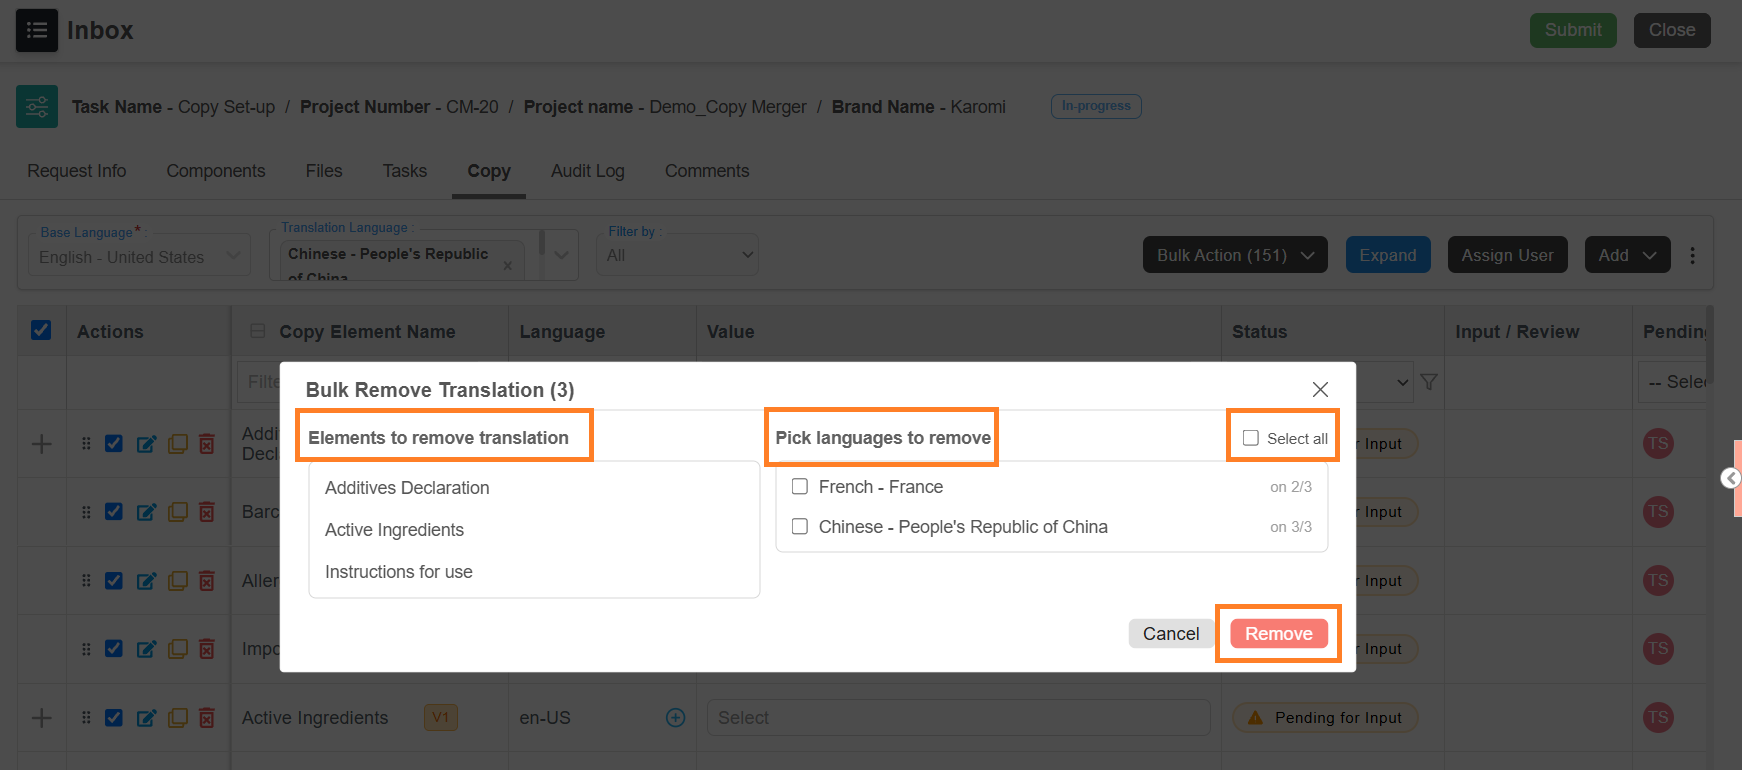
- Select Bulk Remove Translation from the Bulk Action menu. The Bulk Remove Translation dialog lists the selected copy elements under Elements to remove translation.
- Under Pick languages to remove, select the required languages, or select Select all. Each language shows how many of the selected copy elements currently have it.
- Select Remove.
- If Deletion Reason Mandatory is disabled in Copy Manager Settings, the languages are removed immediately. No further steps are needed.
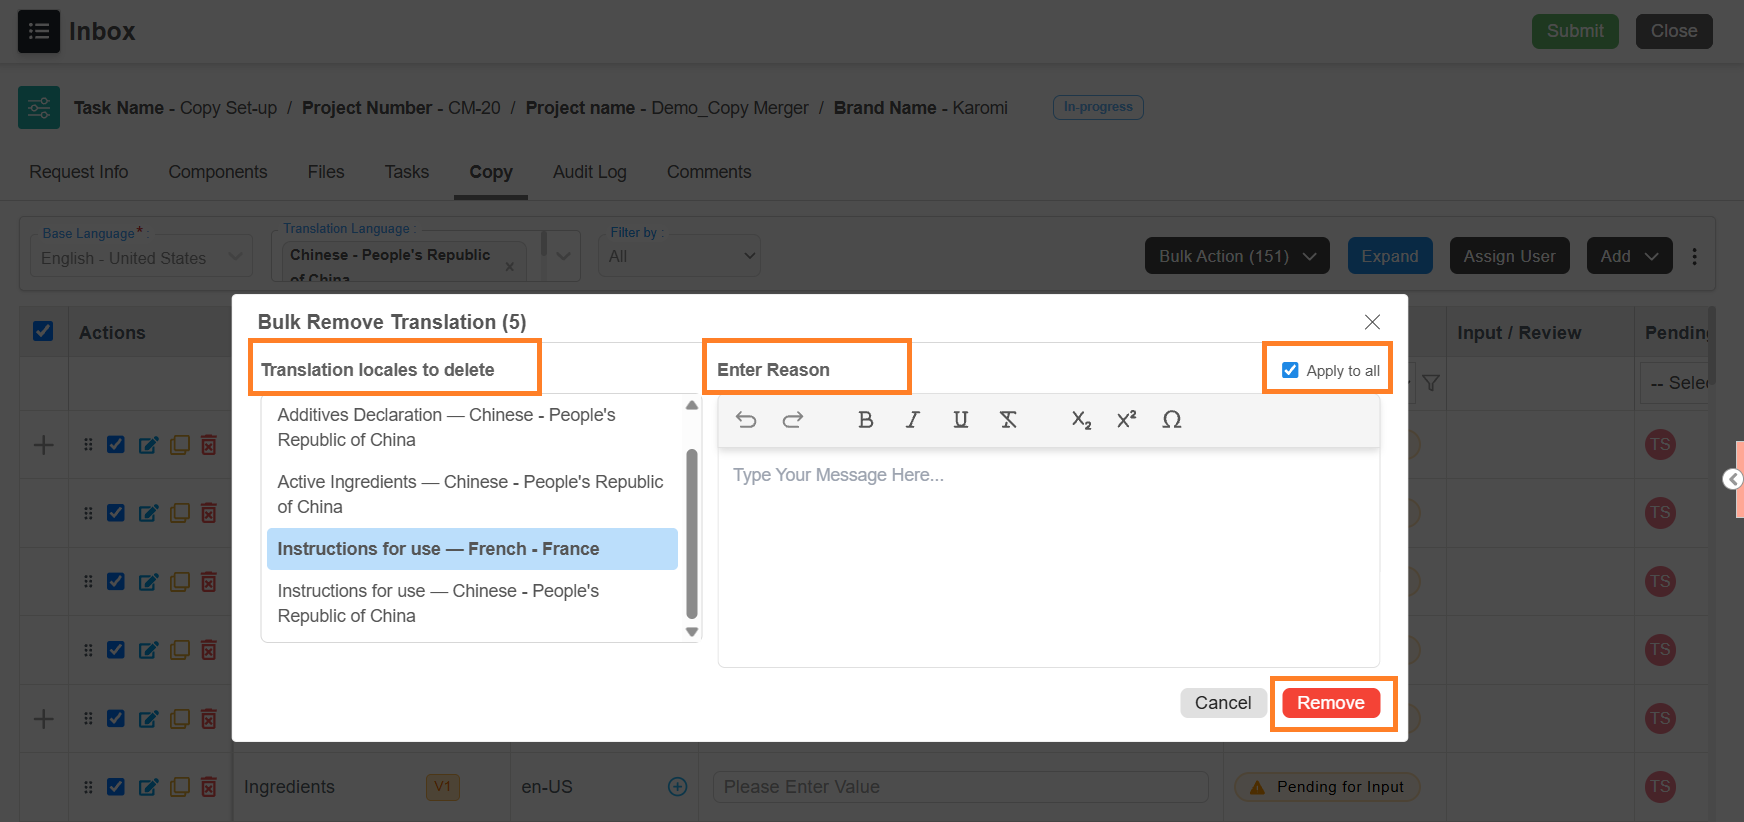
- If Deletion Reason Mandatory is enabled, the dialog asks for a reason and lists each copy element and language to be removed under Translation locales to delete.
- Enter the reason for deletion under Enter Reason.
Note: Apply to all is selected by default, so the reason you enter covers every entry in the list. - If required, give entries their own reasons, clear Apply to all.
- Select an locale element in the Elements to delete list.
- Enter the reason for that entry under Enter Reason.
- Repeat for each entry in the list.
- Select Remove. The languages are removed from every selected copy element. Copy elements that do not have any of the languages you chose are skipped and named in a message.
- Enter the reason for deletion under Enter Reason.
Note: A translation language that is part of a Nutrition Panel is not removed by this action. Remove it from the copy element instead.
Bulk Delete Translation Locales
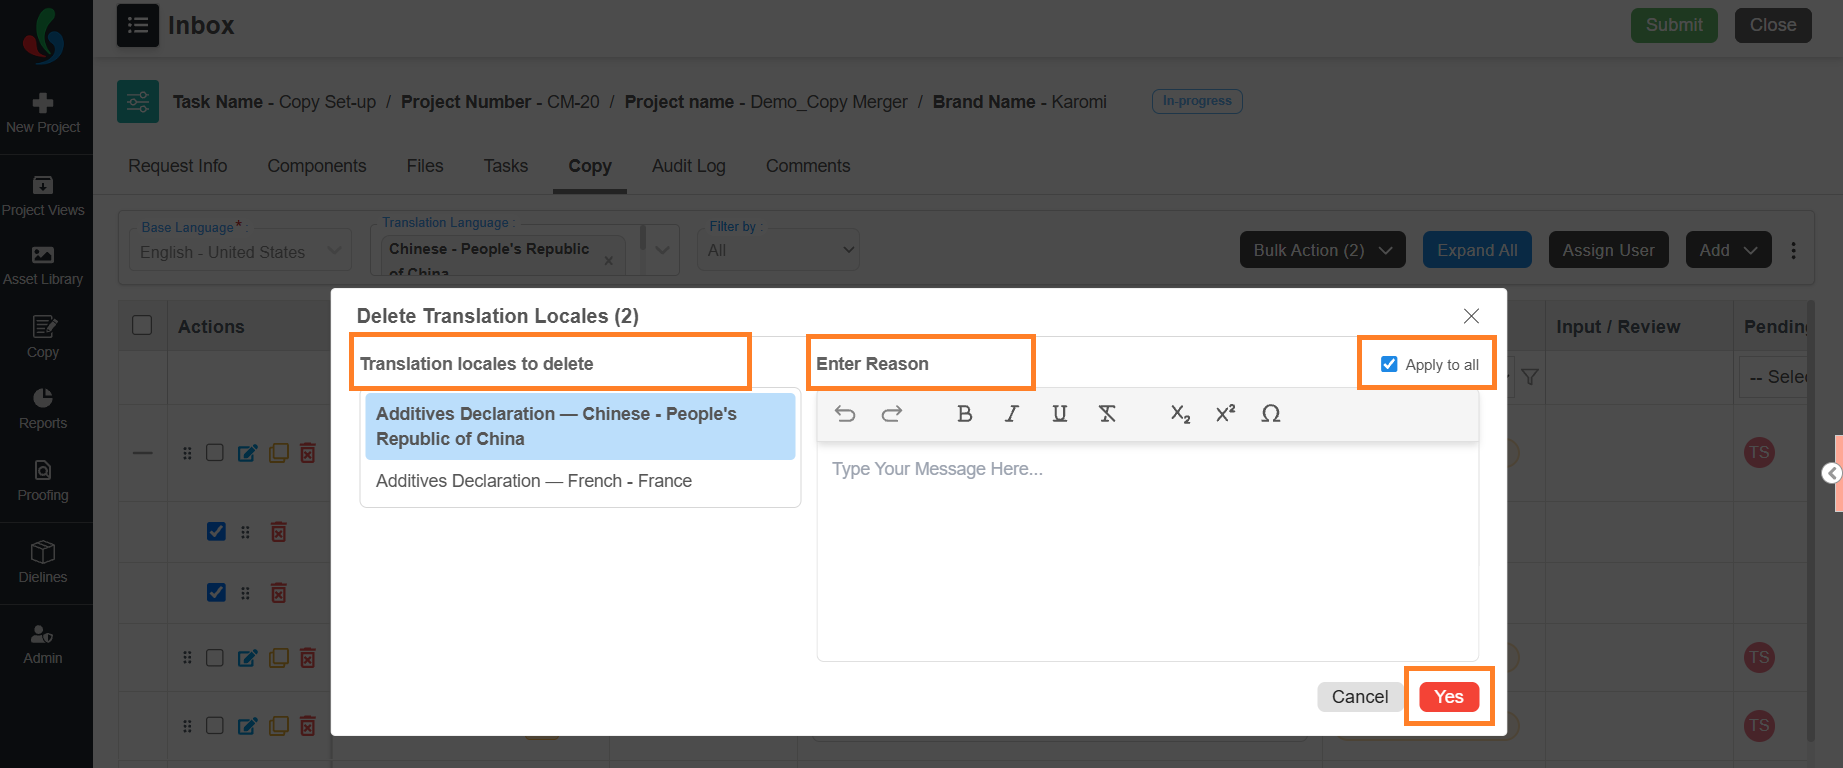
Deletes only the translation language rows you selected. Select the language rows for this action — selecting a copy element does not make it available.
- Select Bulk Delete Translation Locales from the Bulk Action menu.
- If Deletion Reason Mandatory is disabled in Copy Manager Settings, the selected translation languages are deleted immediately. No further steps are needed.
- If Deletion Reason Mandatory is enabled, the Delete Translation Locales dialog is displayed.
- Enter the reason for deletion under Enter Reason.
Note: Apply to all is selected by default, so the reason you enter covers every entry in the list. - If required, give entries their own reasons, clear Apply to all.
- Select an locale element in the Translation locales to delete list.
- Enter the reason for that entry under Enter Reason.
- Repeat for each locale element in the list.
- Select Yes. The selected translation language rows you will be deleted.
- Enter the reason for deletion under Enter Reason.
Bulk Submit
Submits the selected items, exactly as if you had submitted each one individually.
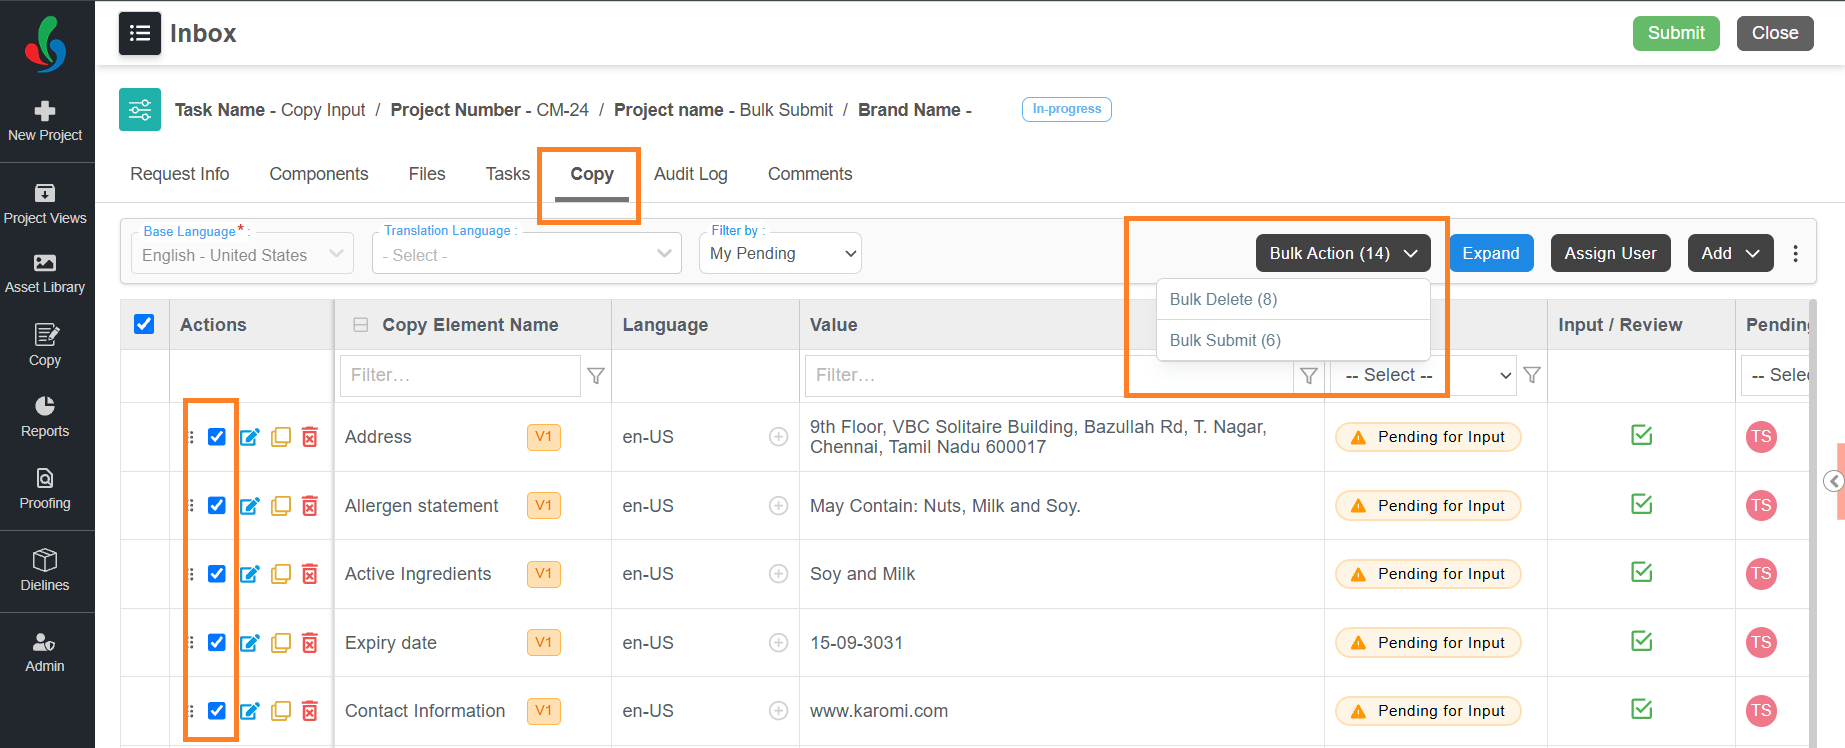
Available in the Copy Input and Translation Language Input tasks. Only the items assigned to you are eligible, and only after a value has been entered. In the Copy Input task, a copy element also needs a component assigned.
- Select the checkbox for each required copy element. In the Translation Language Input task, select the checkbox on each translation language row.
- Select Bulk Action.
Note: The menu lists only the actions available at the current stage, each with the number of selected items eligible for it. - Select Bulk Submit from the Bulk Action menu.
The values are locked and the status changes to Input Given in the Copy Input task, or Translation Given in the Translation Language Input task.
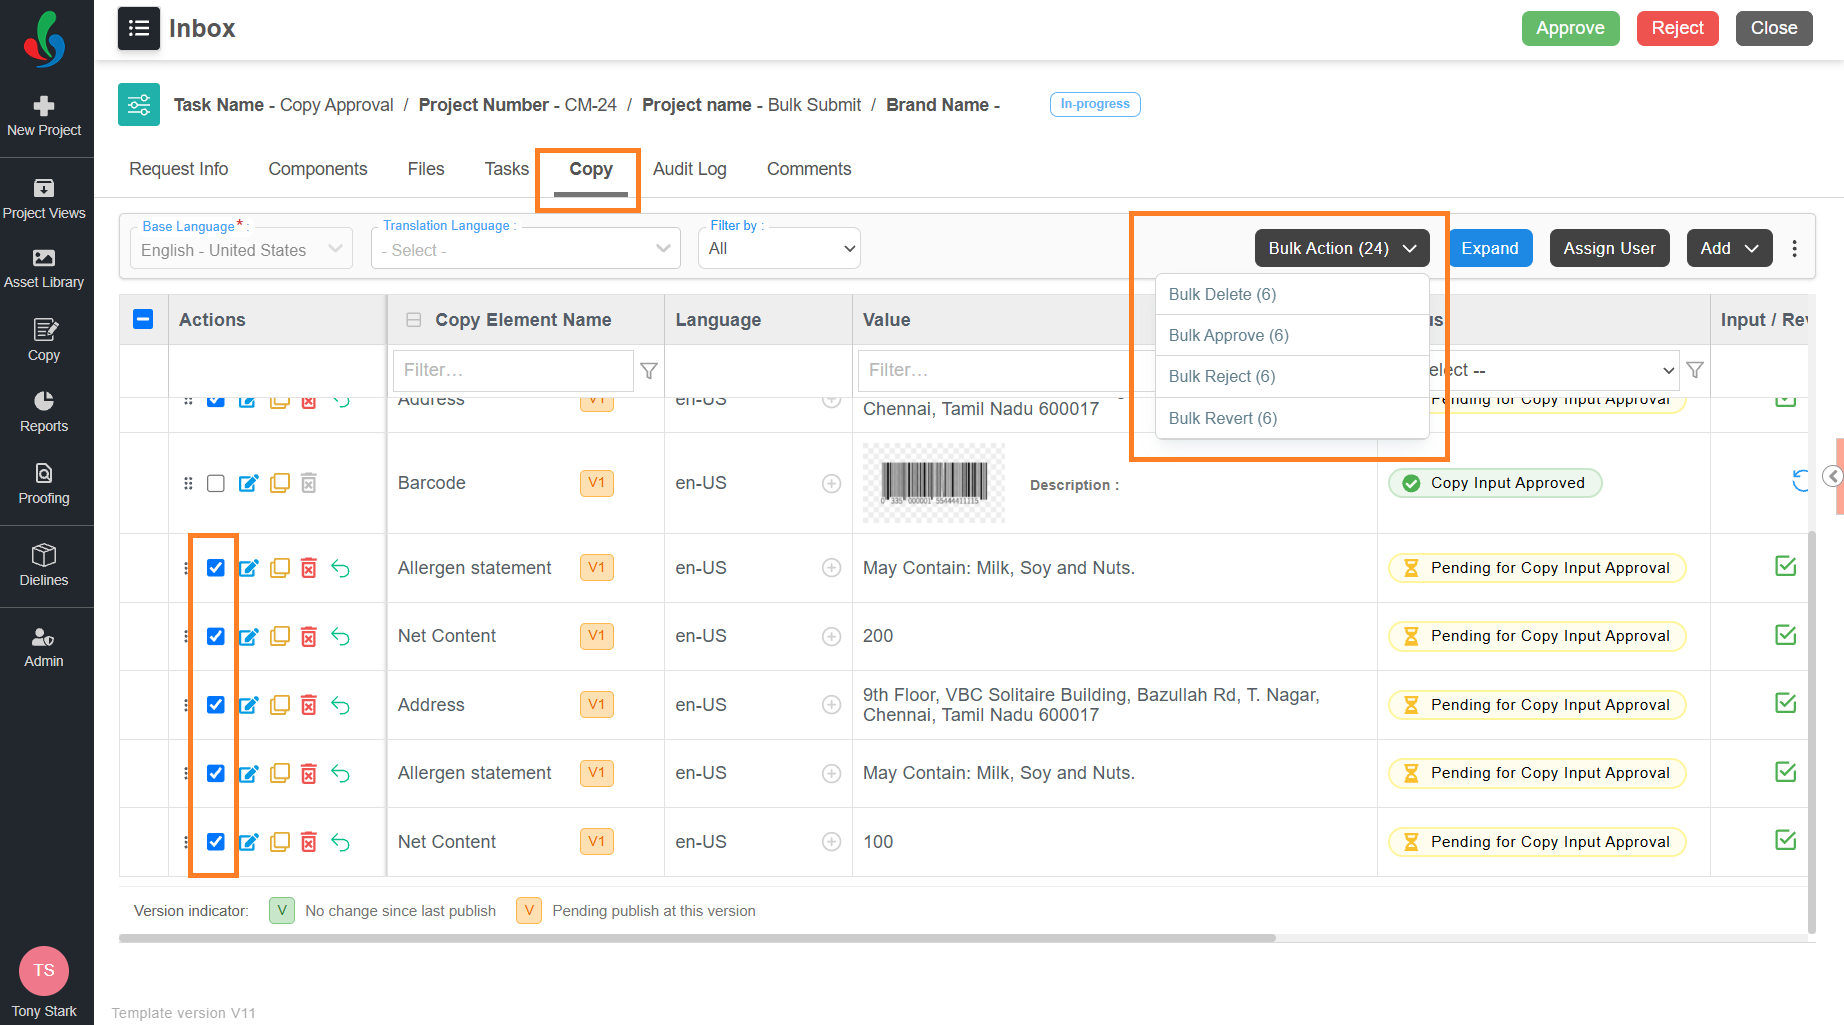
Bulk Approve
Approves the selected items.
Available in the Copy Approval and Translation Language Approval tasks. Only the items assigned to you and still awaiting your decision are eligible.
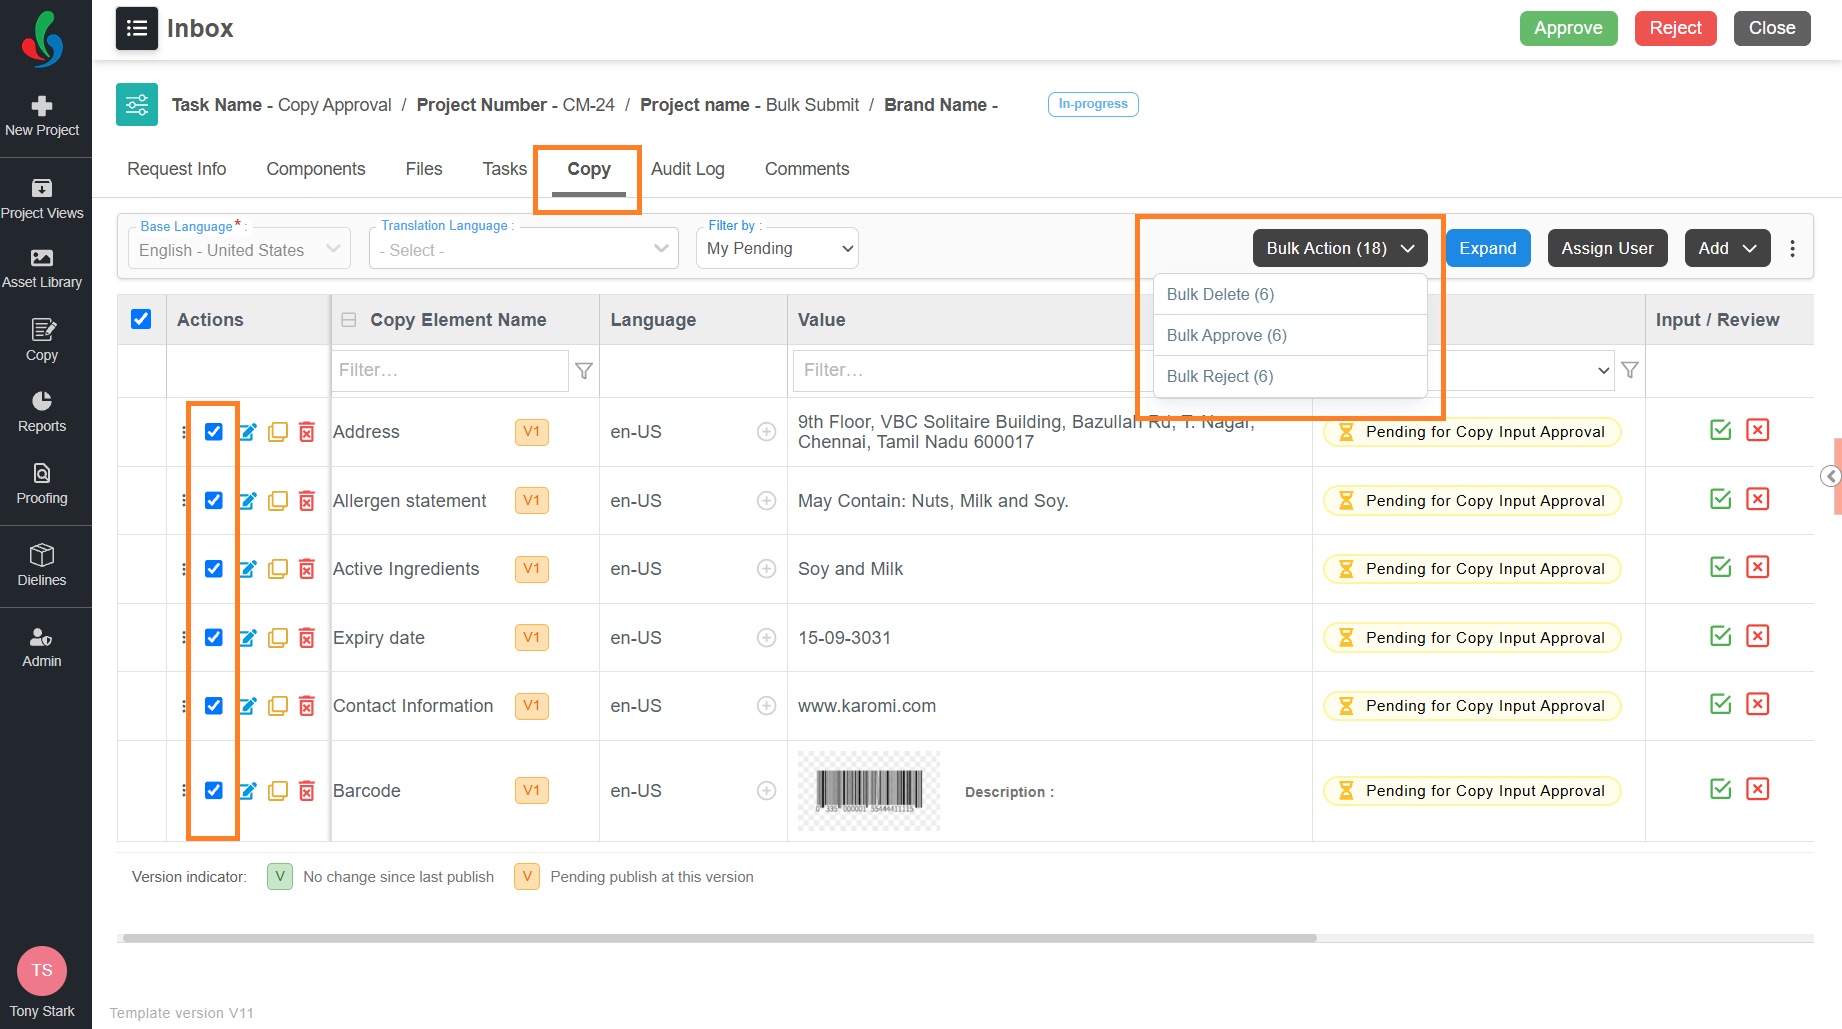
- Select the checkbox for each required copy element. In the Translation Language Approval task, expand the copy element and select the checkbox on each translation language row.
- Select Bulk Action. Note: The menu lists only the actions available at the current stage, each with the number of selected items eligible for it.
- Select Bulk Approve from the Bulk Action menu.
The values are locked and the status changes to Copy Input Approved in the Copy Approval task, or Translation Approved in the Translation Language Approval task.
To change a decision afterwards, select the Undo icon in the Input / Review column for that item, then approve or reject it again.
Bulk Reject
Rejects the selected items and changes their status to Copy Input Rejected in the Copy Approval task, or Translation Rejected in the Translation Language Approval task.
Available in the Copy Approval and Translation Language Approval tasks. Only the items assigned to you and still awaiting your decision are eligible.
- Select the checkbox for each required copy element. In the Translation Language Approval task, select the checkbox on each translation language row.
- Select Bulk Action.
Note: The menu lists only the actions available at the current stage, each with the number of selected items eligible for it. - Select Bulk Reject from the Bulk Action menu.
- If Rejection Reason Mandatory is disabled in Copy Manager Settings, the selected items are rejected immediately. No further steps are needed.
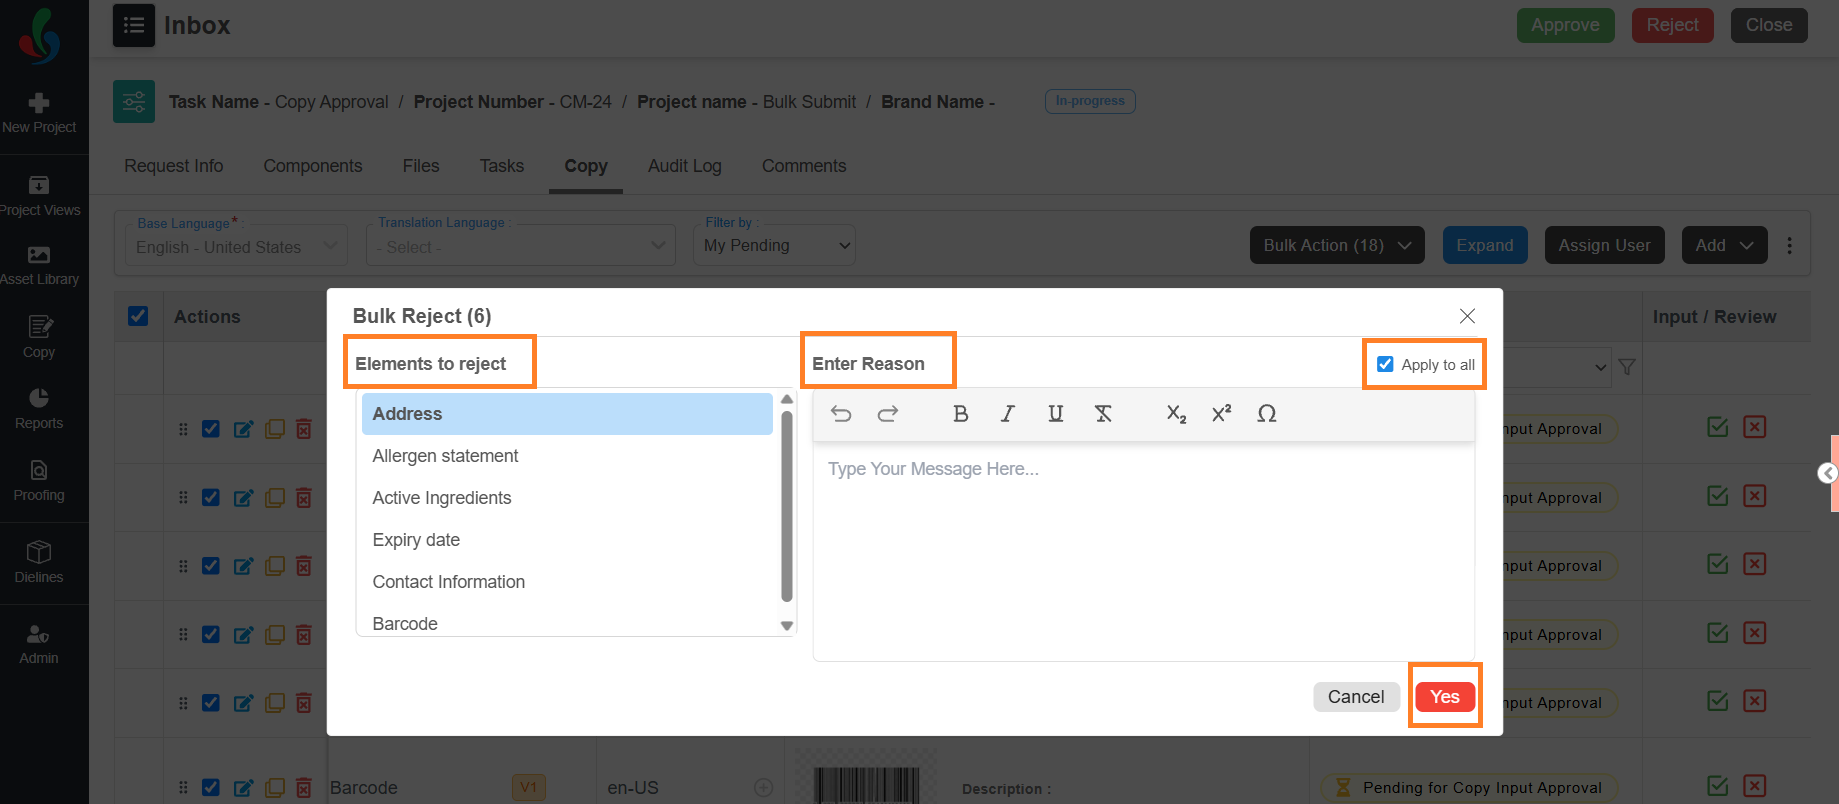
- If Rejection Reason Mandatory is enabled, the Bulk Reject dialog is displayed.
- Enter the reason for rejection under Enter Reason.
Note: Apply to all is selected by default, so the reason you enter covers every item in the list. - If required, give items their own reasons. Clear Apply to all.
- Select an item in the list.
- Enter the reason for that item under Enter Reason.
- Repeat for each item in the list.
- Select Yes. The selected items are rejected.
- Enter the reason for rejection under Enter Reason.
- If Rejection Reason Mandatory is disabled in Copy Manager Settings, the selected items are rejected immediately. No further steps are needed.
Bulk Unapprove
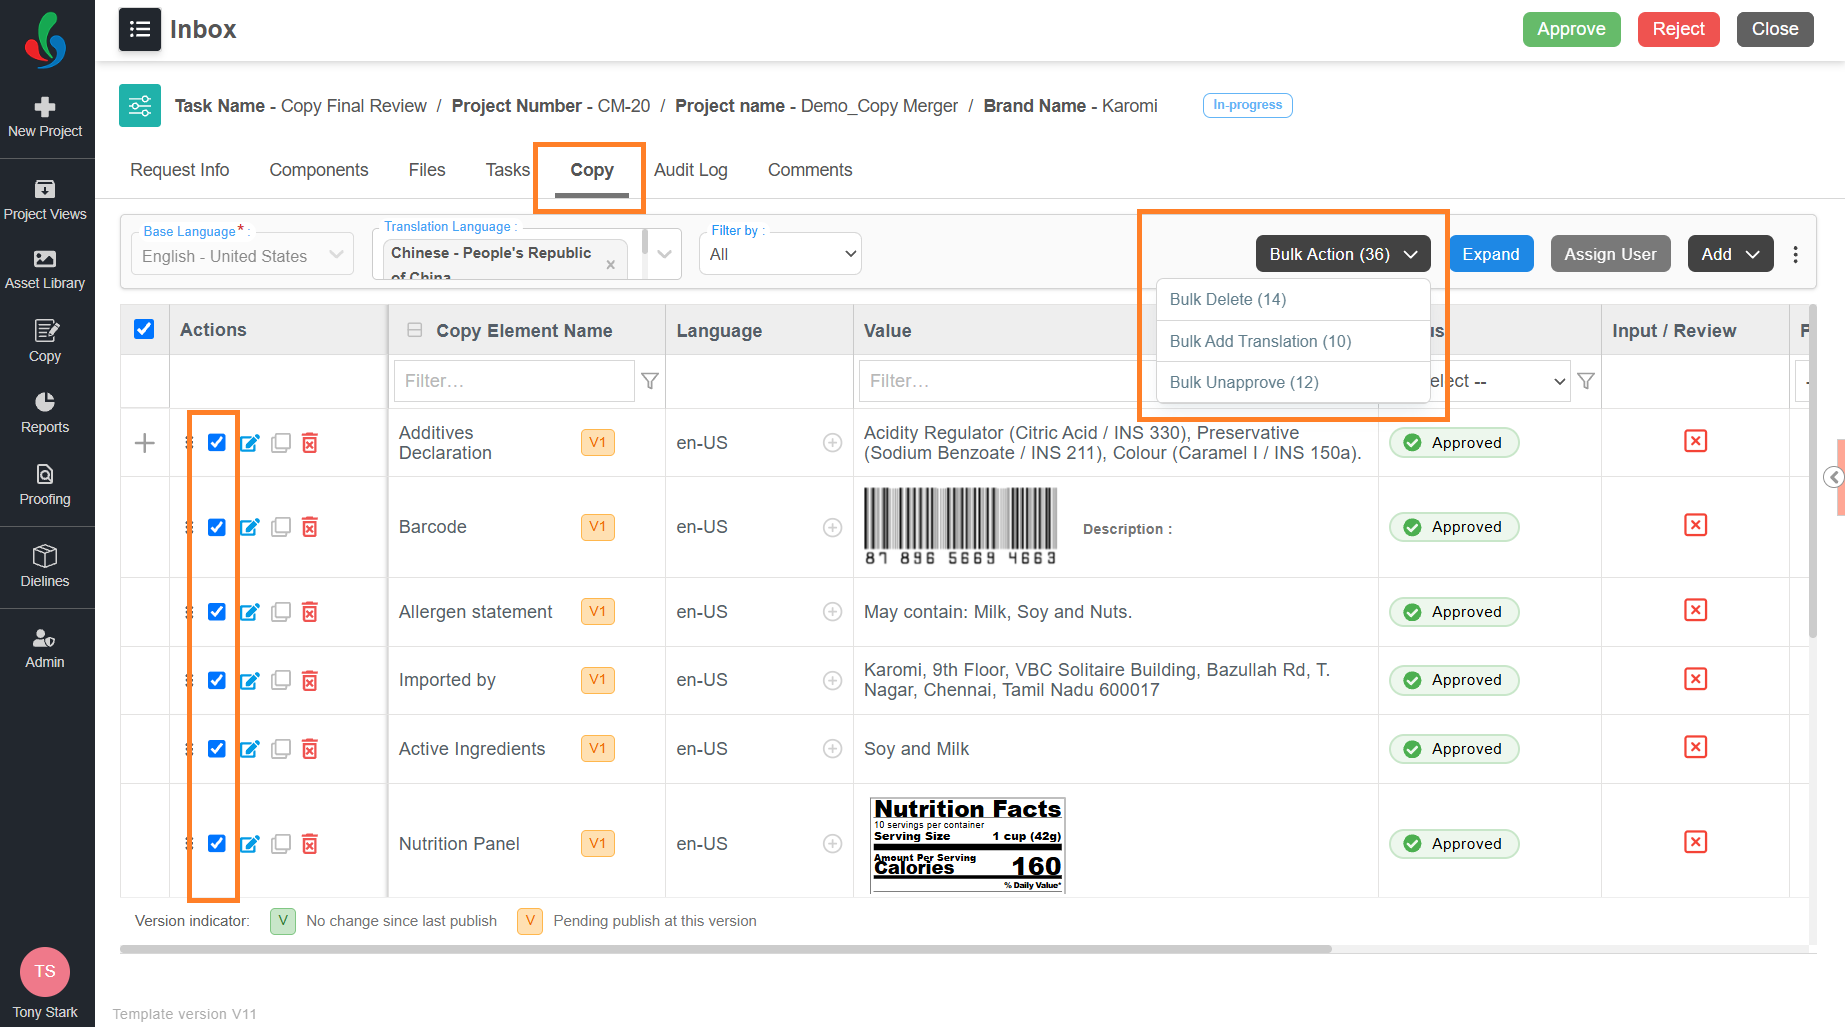
Unapproves the selected copy elements so their values can be edited. Editing and deletion stay locked on a copy element until it is unapproved.
Available in the Artwork Review Edit task.
- Select the checkbox for each required copy element.
- Select Bulk Action.
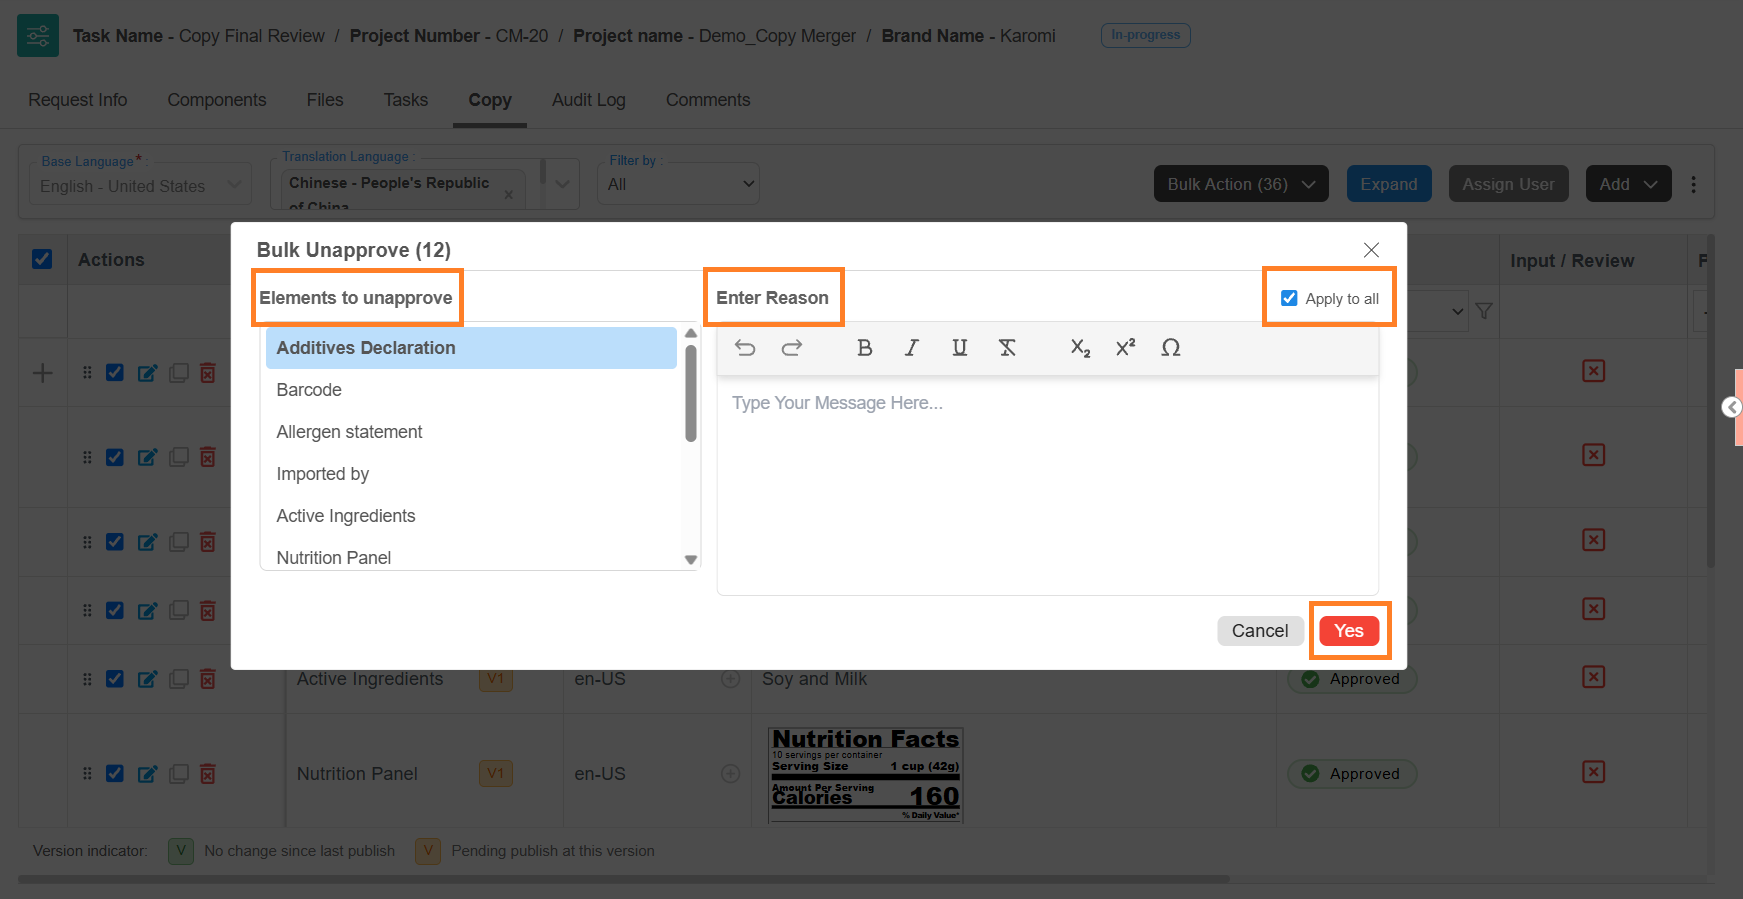
Note: The menu lists only the actions available at the current stage, each with the number of selected items eligible for it. - Select Bulk Unapprove from the Bulk Action menu. The Bulk Unapprove dialog is displayed.
- Enter the reason under Enter Reason.
Note: Apply to all is selected by default, so the reason you enter covers every element. - If required, give elements their own reasons.
- Clear Apply to all.
- Select an element in the list.
- Enter the reason for that element under Enter Reason.
- Repeat for each element in the list.
- Select Yes. The selected copy elements are unapproved.
Bulk Revise
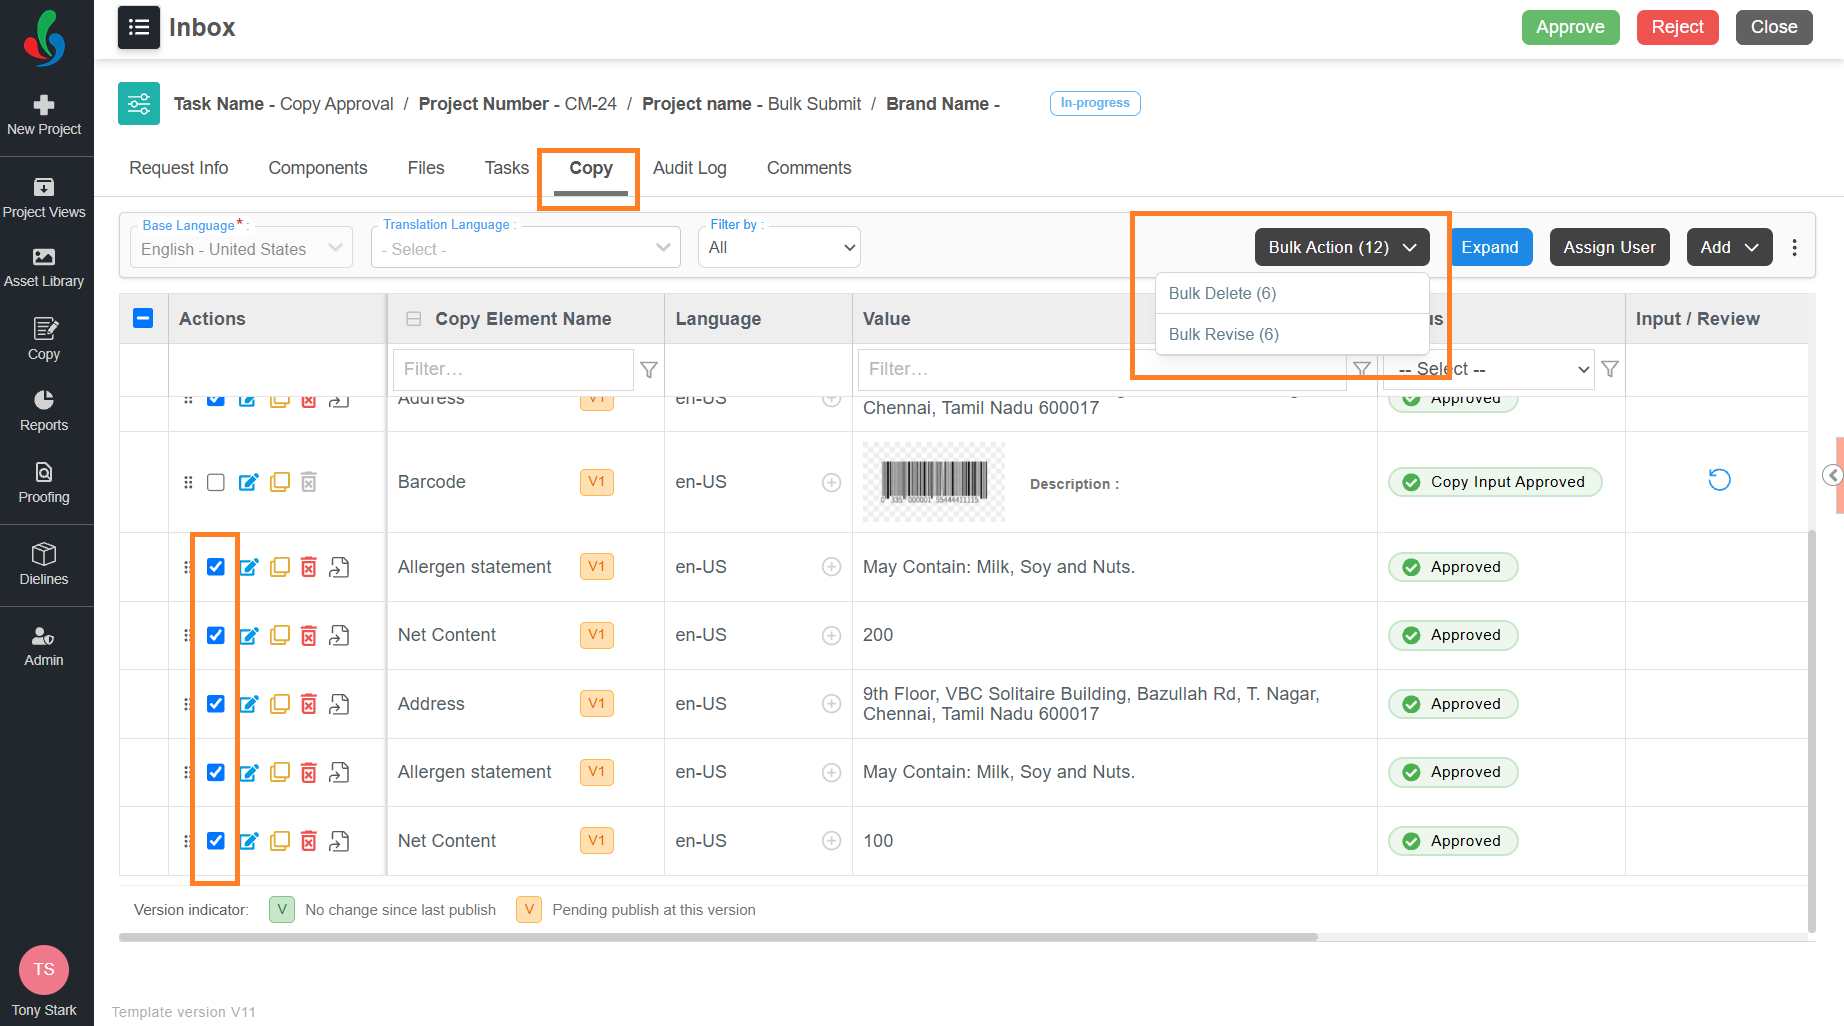
Puts the selected copy elements back into an editable state and restarts their approval. Their status returns to Pending for Input, and every assigned user must approve again from the beginning.
Only approved copy elements are eligible.
- Select the checkbox for each required copy element.
- Select Bulk Action.
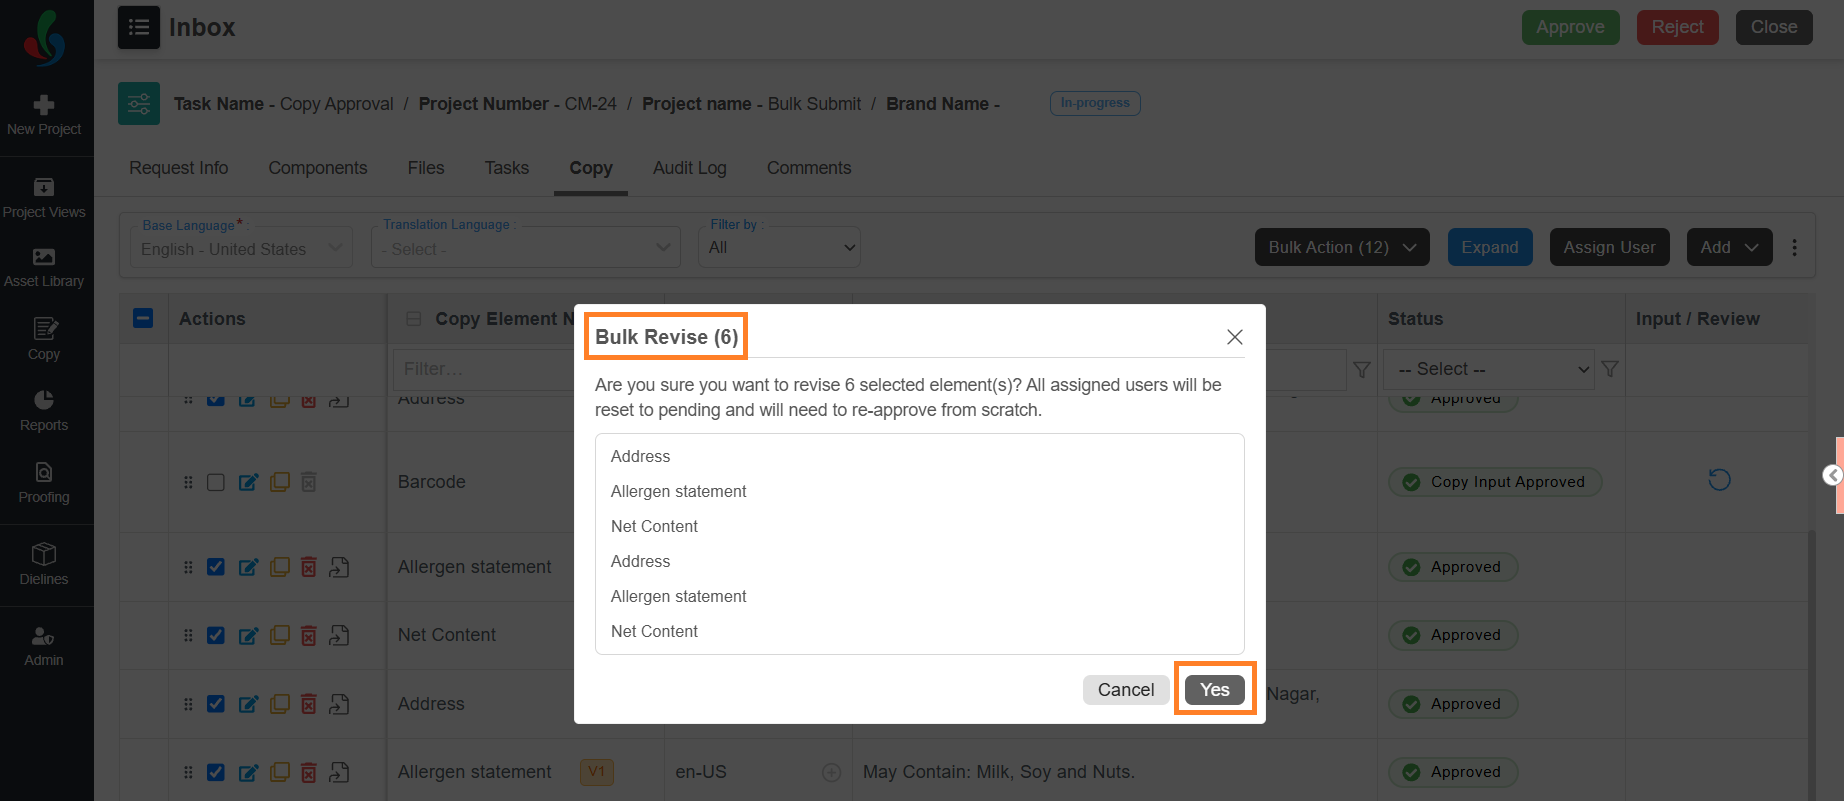
Note: The menu lists only the actions available at the current stage, each with the number of selected items eligible for it. - Select Bulk Revise from the Bulk Action menu.
- Check the copy elements listed in the confirmation dialog, then select Yes.
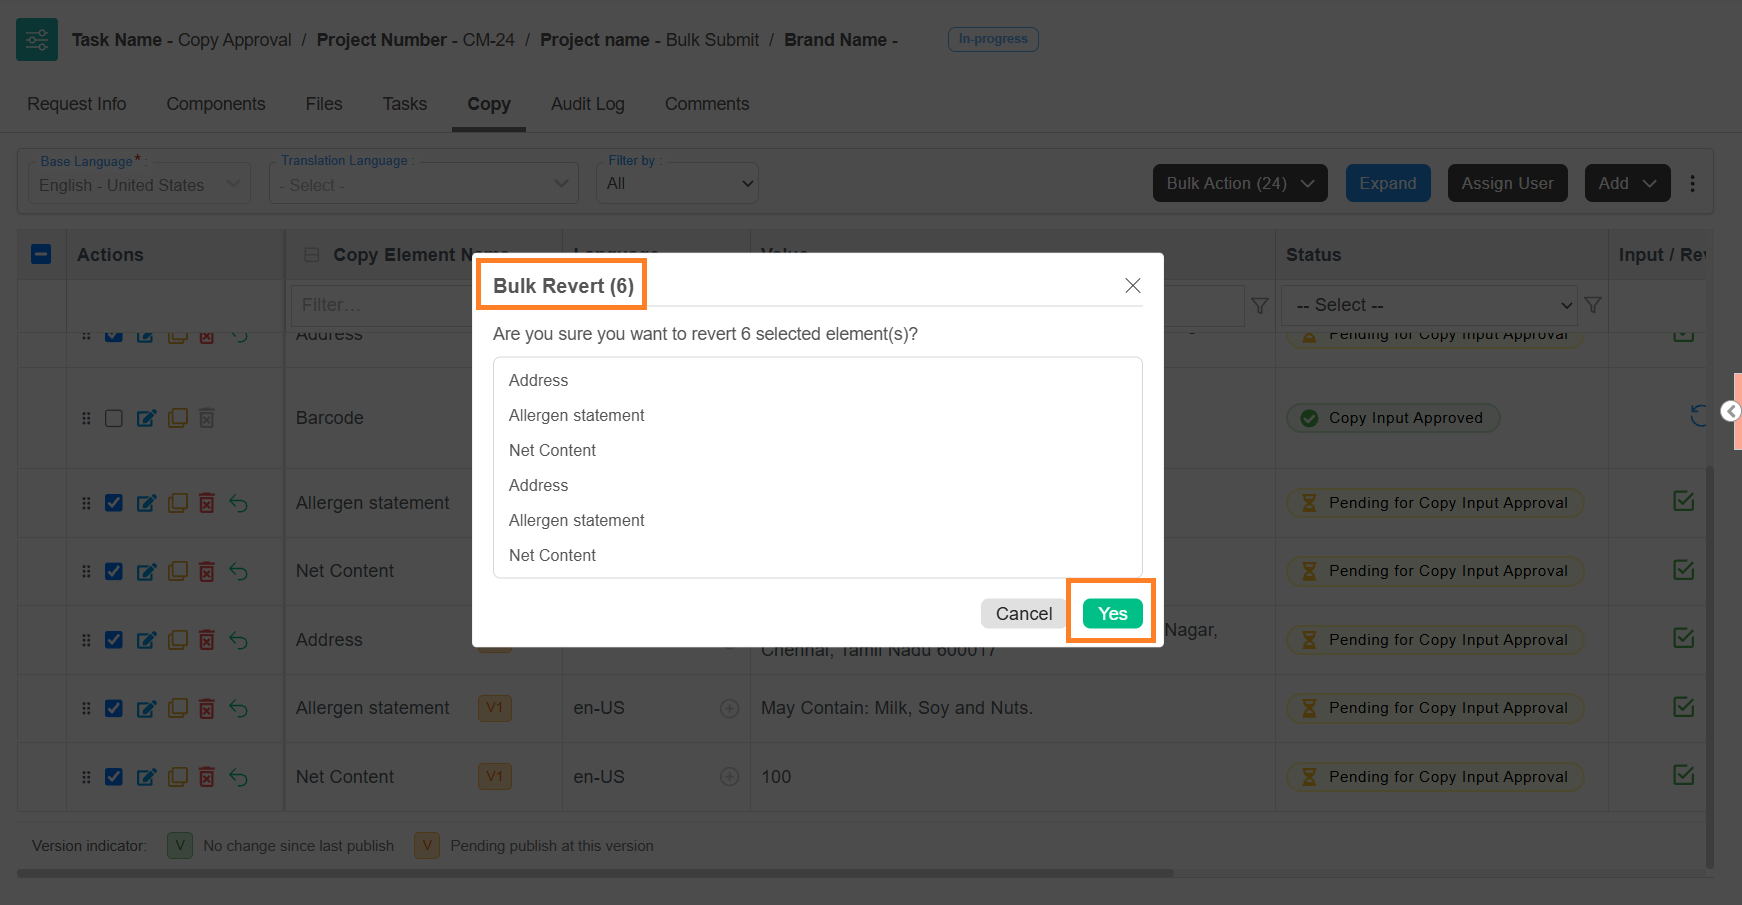
Bulk Revert
Restores the last published value for the selected copy elements.
Only revised copy elements are eligible.
- Select the checkbox for each required copy element.
- Select Bulk Action.
Note: The menu lists only the actions available at the current stage, each with the number of selected items eligible for it. - Select Bulk Revert from the Bulk Action menu.
- Check the copy elements listed in the confirmation dialog, then select Yes.