
Import a Custom Dieline
If your packaging uses a structure that is not available in the built-in Dieline Library — a proprietary carton or an unusual fold — you can import your own dieline (KLD) file and visualise your artwork on it in 3D, just like any built-in template. You can attach a dieline to an artwork directly from the Asset Library or from any project, and add the extracted dieline to the library so it can be reused in later workflows.
| Note: Using Custom Import, you can import cartons and labels (Folding Carton structures). For other packaging types, such as bottles and pouches, contact the ManageArtworks support team to have the models added to your library. |

What You Can Do
What custom import does depends on the file you start with:
- Import a dieline to the library. If the file is on your computer, import it from the Dielines module. The dieline is added to the Custom tab of the Dieline Library, and you can link it to an artwork later through the Dieline Workflow.
- Import a dieline and link it to an artwork. If the dieline is part of an artwork already in ManageArtworks, import it directly from the Asset Library or the Web Viewer. The dieline is added to the library and linked to that artwork in one pass, without creating a workflow or project.
| Note: When you import a dieline from an artwork file, the dieline must sit on its own layer. If the dieline and the artwork content share a layer, the system cannot extract the dieline accurately. |
How to Import a Custom Dieline from the Dielines Module
01. Access Custom Import
- Sign in to your ManageArtworks account.
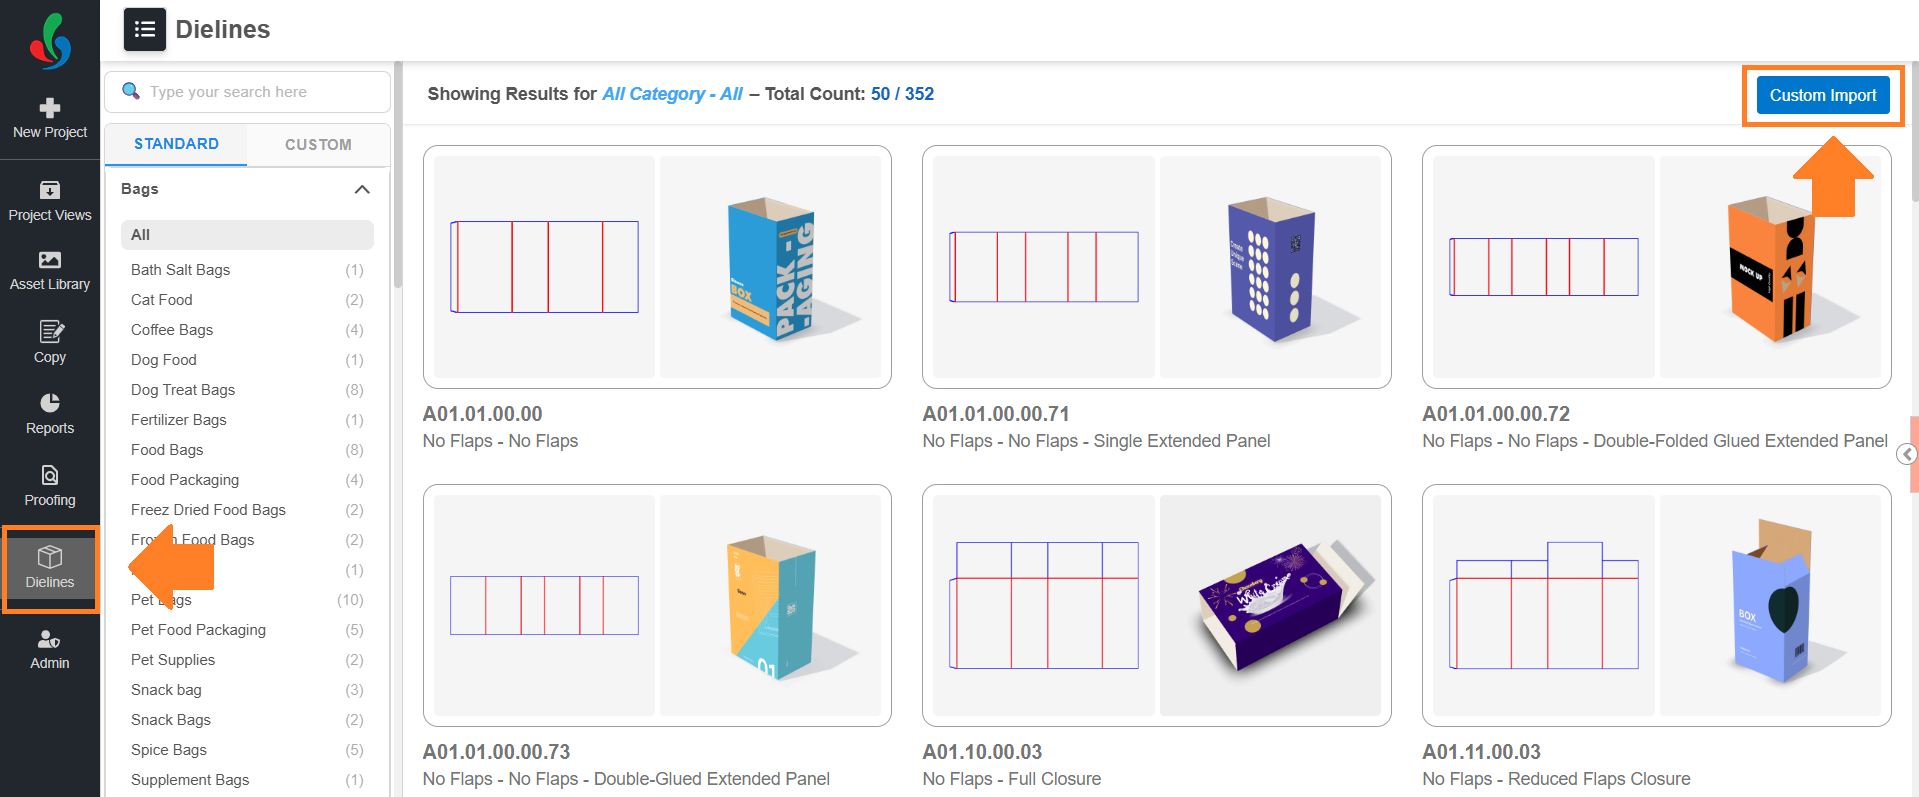
- Navigate to the Dielines module.
- Select Custom Import.
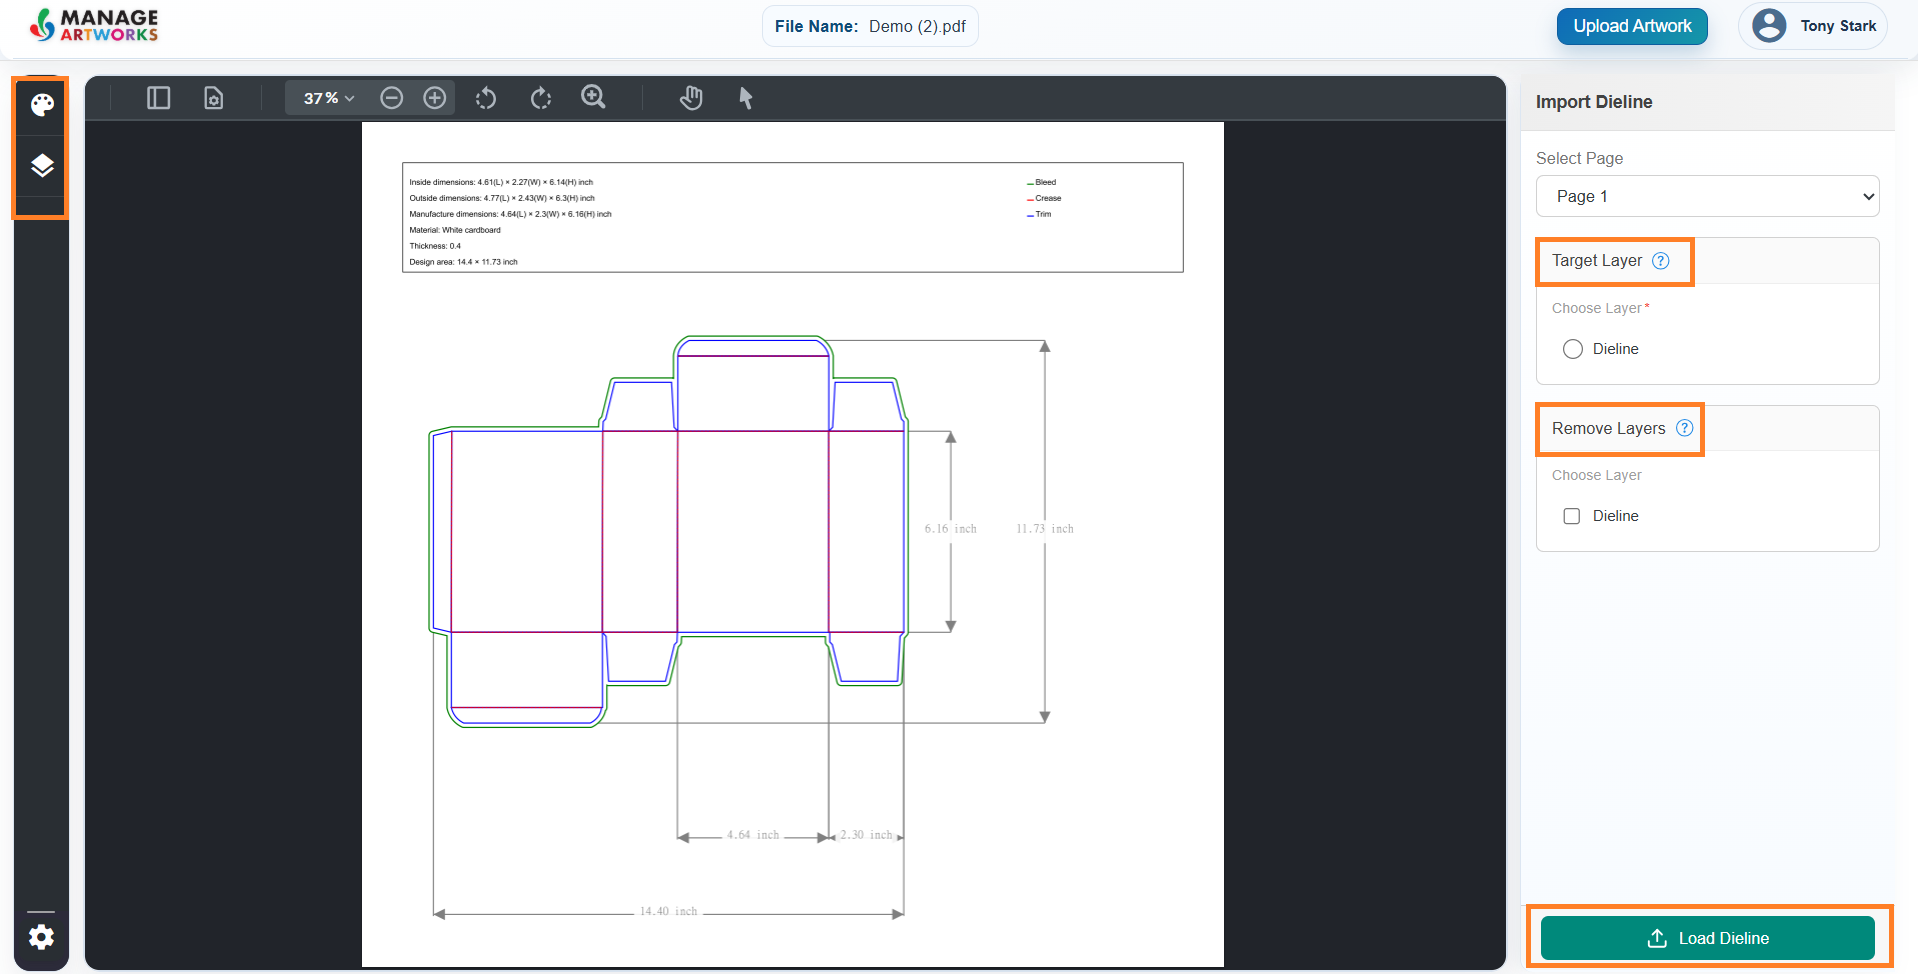
A simplified version of the Web Viewer opens in a new browser tab, containing only the tools needed for dieline import — the Color tool, the Layer tool, and the Import Dieline panel.
02. Upload the File
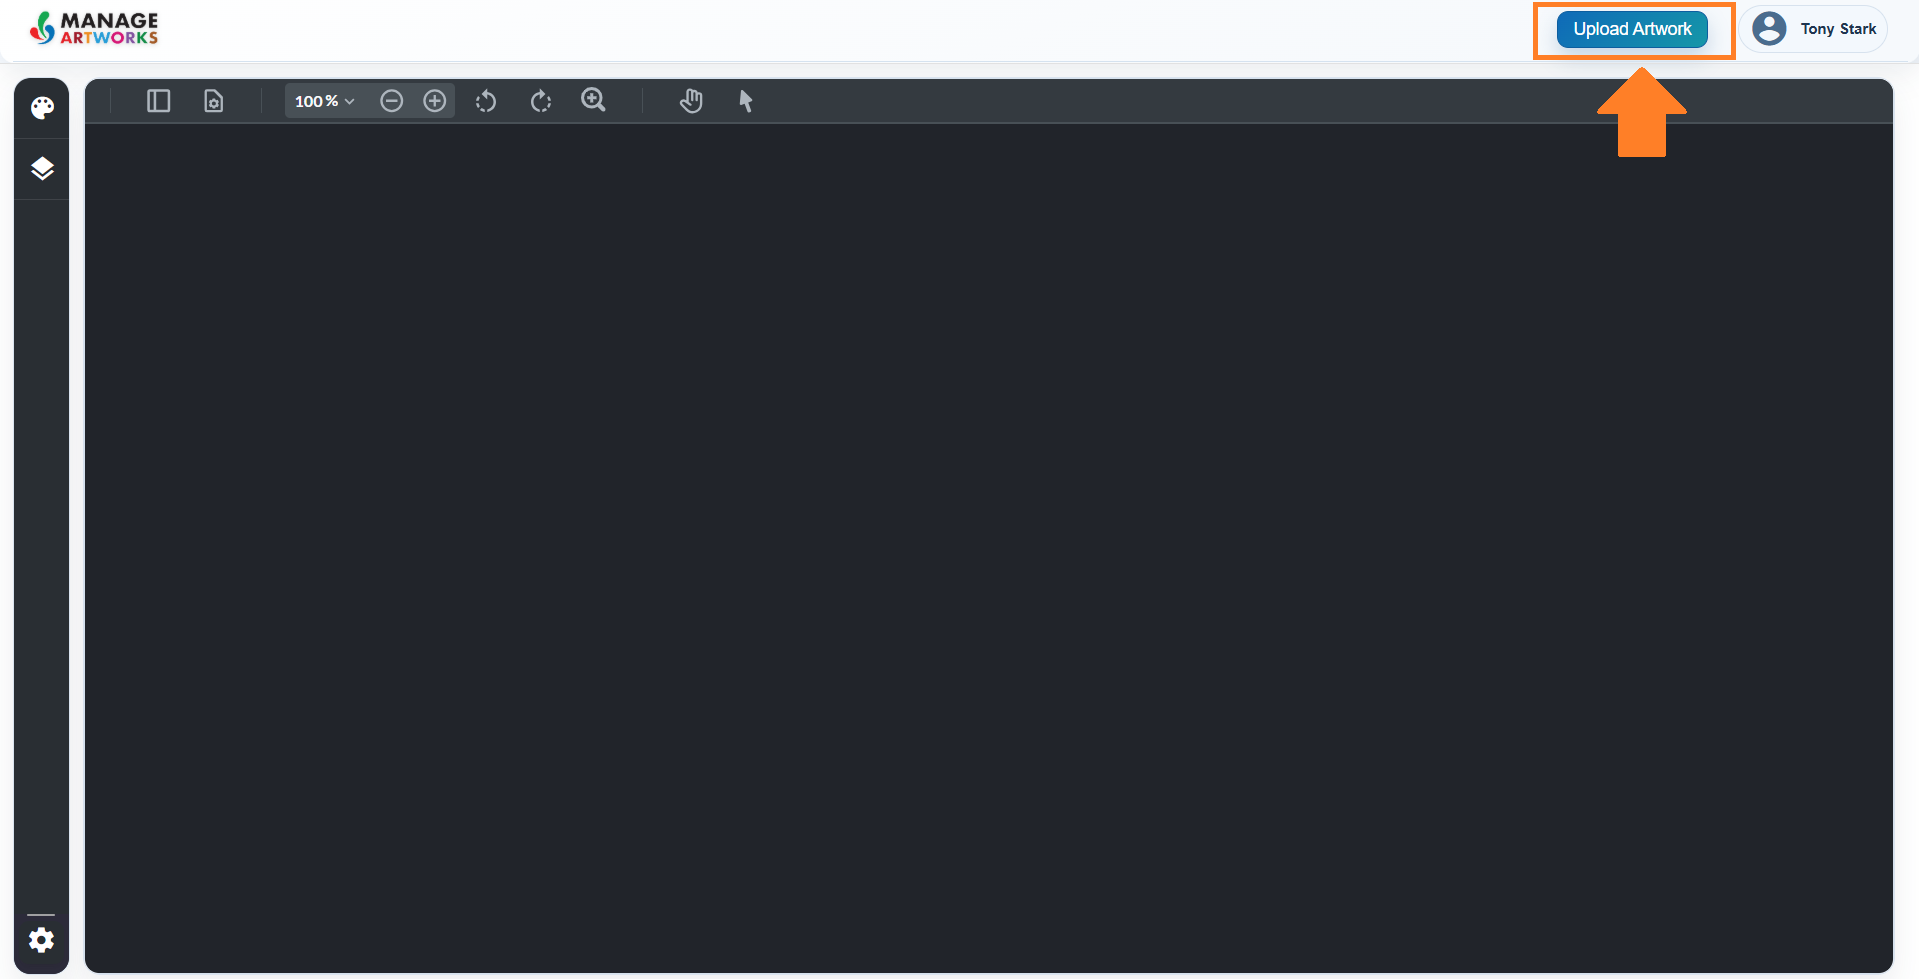
- Select Upload Artwork.
- Browse to the required file and select Open.
Note: You can upload either an artwork file or a dieline file on its own. Only PDF and PDF-compatible AI files are supported.
03. Configure the Dieline Extraction
- Optionally, use the Color and Layer tools to inspect the file and identify the layer that holds the dieline. These tools change only what you see — the layers used for extraction are set with Target Layer and Remove Layers.
- In the Import Dieline panel, configure the following:
Note: A target layer is required. Removing layers is optional, and the target layer cannot be removed.- Select Page — the page that contains the dieline. For example, if the dieline is on page 5 of a 10-page file, select page 5.
- Target Layer — the layer containing the dieline.
- Remove Layers — the layers to exclude from the extraction, such as measurement guides or annotation layers.
- Select Load Dieline.
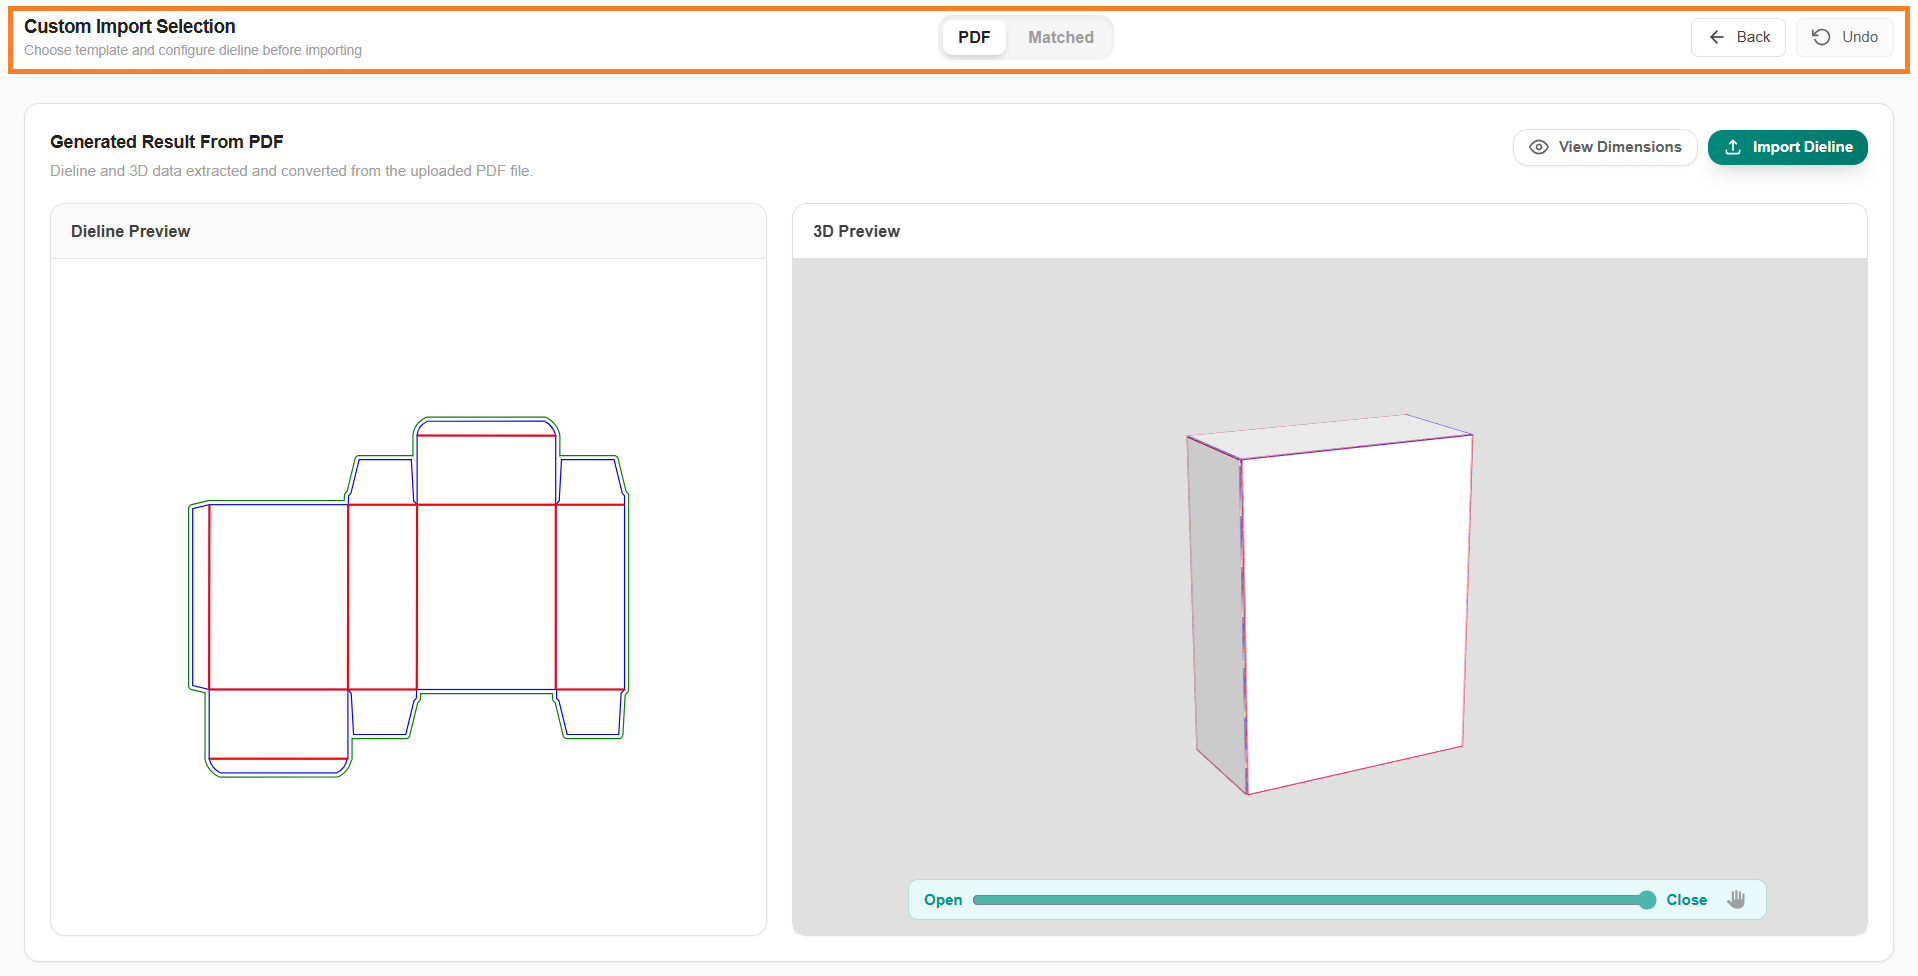
The dieline is extracted and the Custom Import Selection page opens. Use Back to return to the import viewer, or Undo to discard the extraction and reconfigure the settings.
04. Import the Dieline
Note:
|
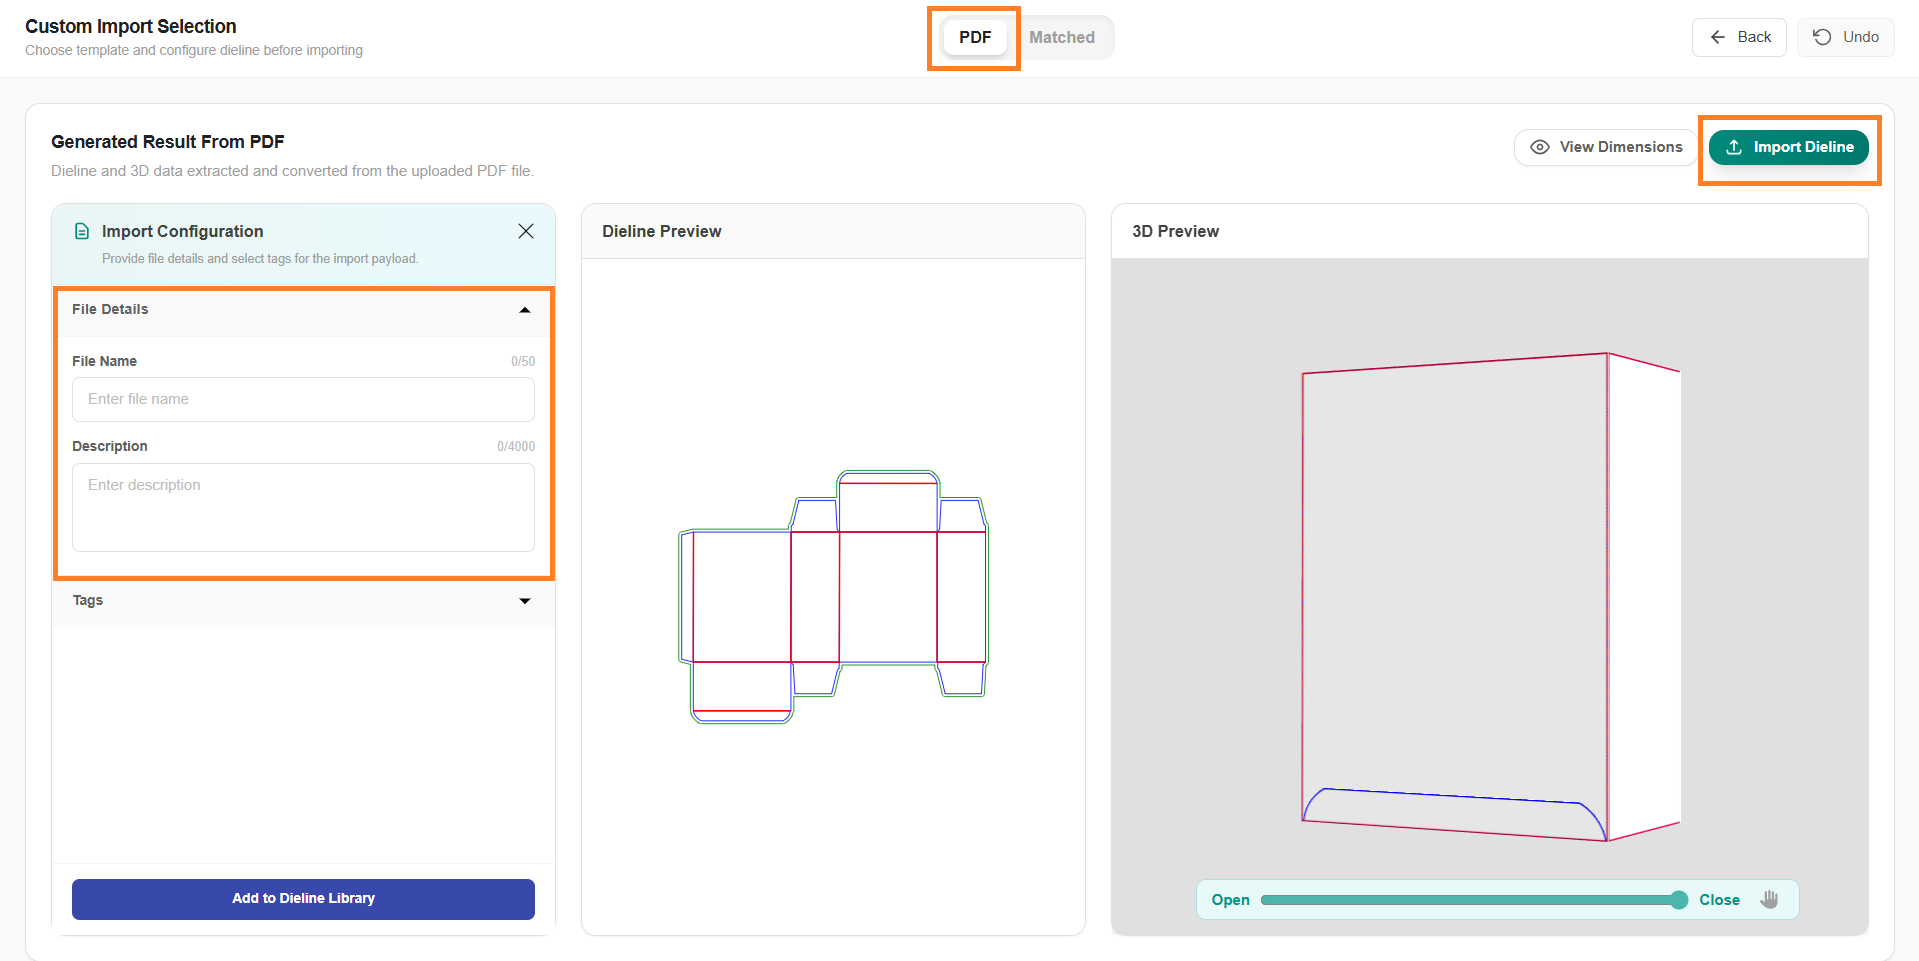
- Select Import Dieline from the top-right corner. The Import Configuration panel opens.
- Under File Details, enter a File Name for the dieline.
Note: You can enter a maximum of 50 characters. The name cannot contain the characters \ / : * ? " < > |. - Optionally, enter a Description.
Note: You can enter a maximum of 4,000 characters.
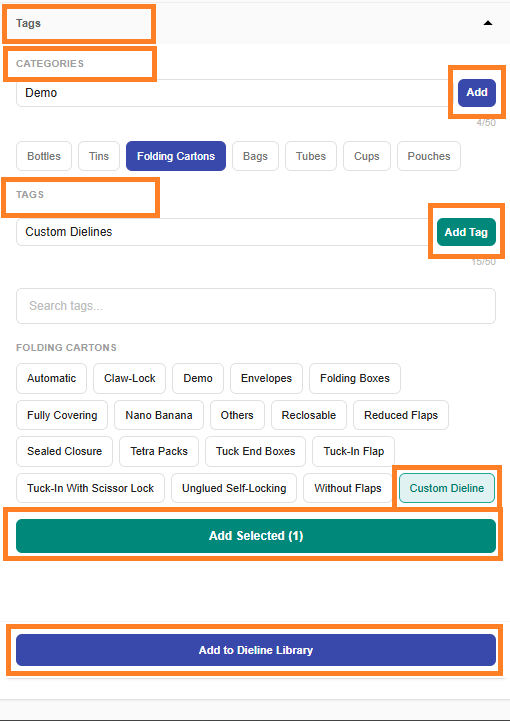
- Under Tags, select a Category for the dieline, or add a new one. The category groups the dieline in the Dieline Library.
- Create a tag, or find an existing one:
- To create a tag, enter the name in the Add Tag field and select Add Tag. The tag appears under the selected category.
- To use an existing tag, find it in the list or search for it.
- Select the required tag.
- Select Add Selected.
Note: You must add at least one tag before you can import the dieline. - Select Add to Dieline Library.
The dieline is saved and appears under the Custom tab of the Dieline Library, with two thumbnails — the dieline layout and the 3D model. If the file includes artwork, the model thumbnail shows the artwork overlaid; otherwise it shows the plain 3D structure.
Note:
|
How to Import a Custom Dieline from the Asset Library or Web Viewer
When the dieline is part of an artwork already in ManageArtworks, you can import it without uploading anything. The artwork is loaded for you, and the extracted dieline is linked to that artwork automatically.
 | Note: The import options appear only for file types configured as Artwork in Admin > Dieline Parameter Configuration. |
- Sign in to your ManageArtworks account.
- Open the import viewer:
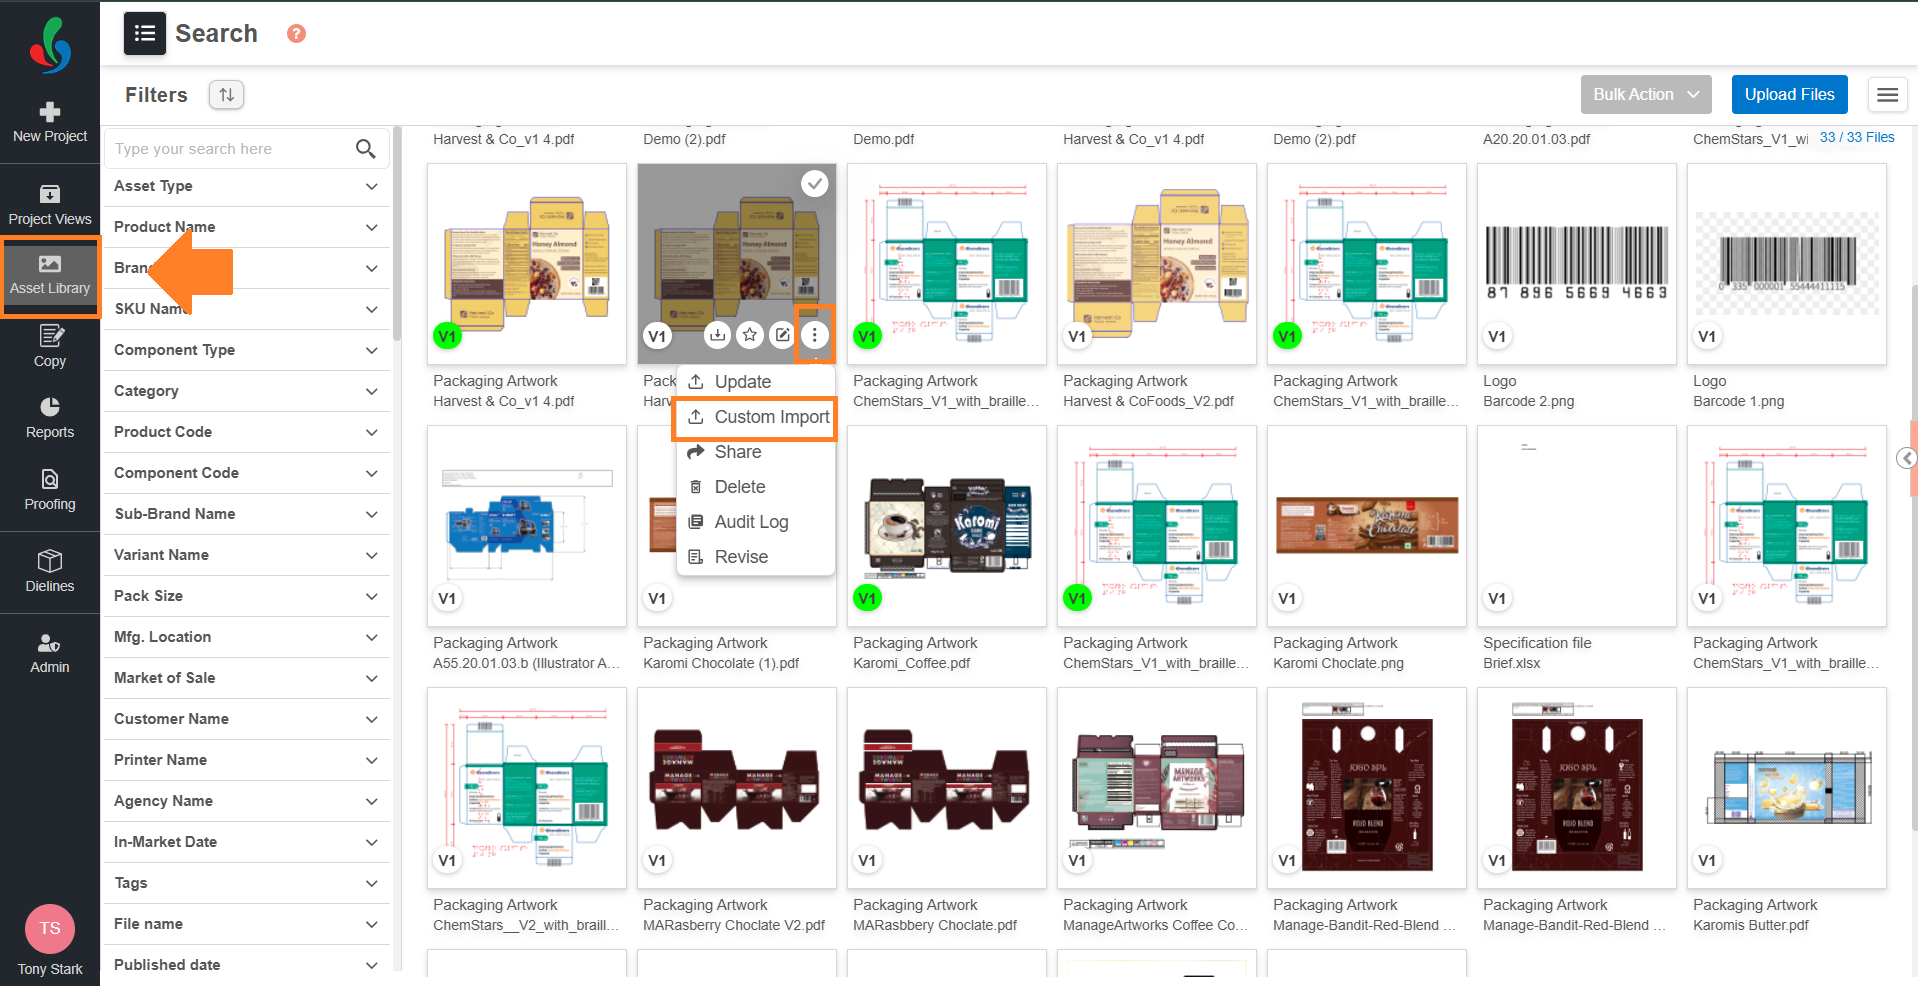
- From the Asset Library: hover over the required artwork, select More Options (⋮), then select Custom Import.
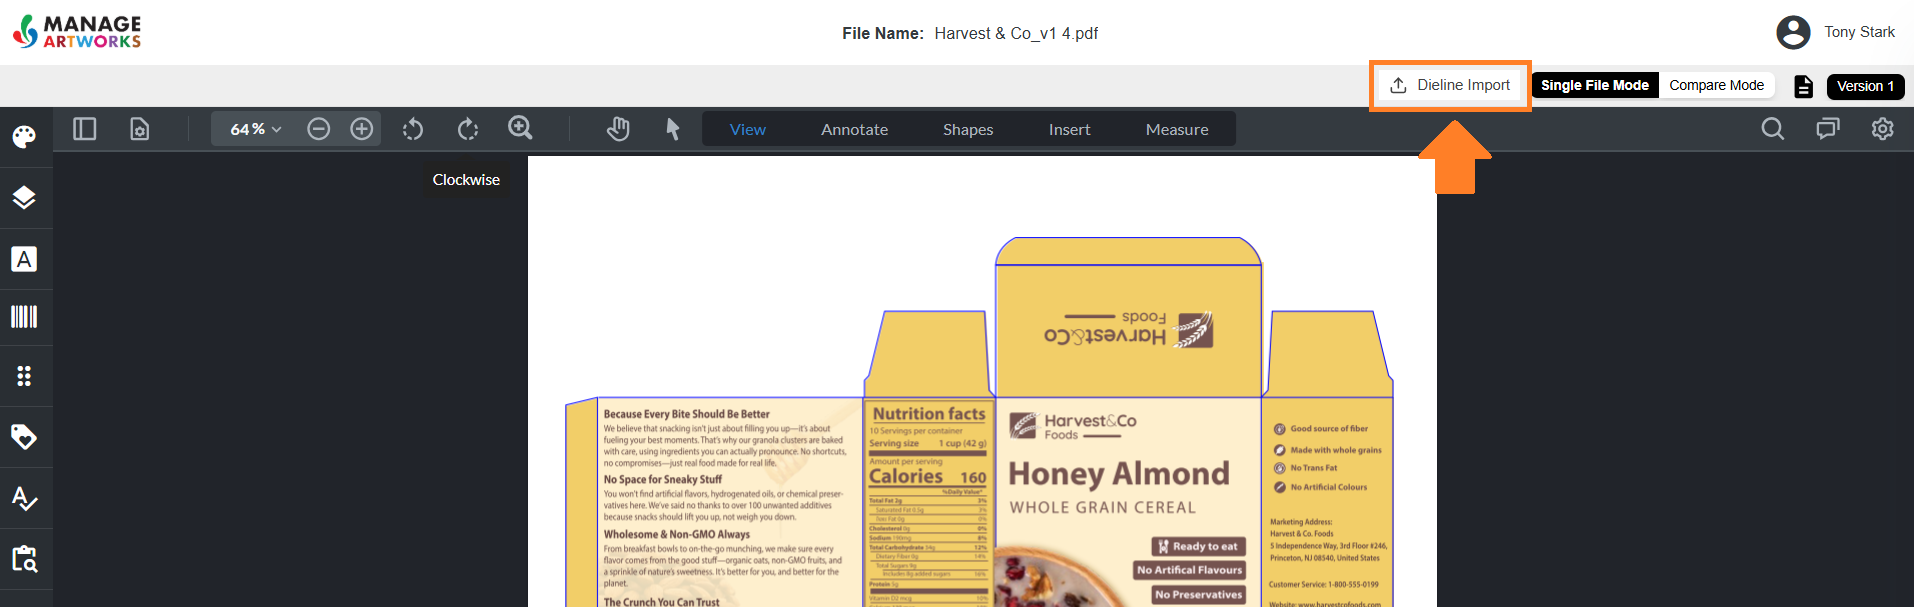
- From the Web Viewer: open the required artwork, then select Dieline Import from the viewer toolbar.
- From the Asset Library: hover over the required artwork, select More Options (⋮), then select Custom Import.
- Configure the dieline extraction. For more information, refer to 03. Configure the Dieline Extraction.
- Import the dieline. For more information, refer to 04. Import the Dieline.
Note: If a matching template already exists in the library, link to it instead of importing a new model. For more information, refer to Link a Matched Dieline.
The dieline is added to the Custom tab of the Dieline Library and linked to the artwork you started from.
The Custom Import Selection Page
The Custom Import Selection page has two tabs, and each leads to a different outcome:
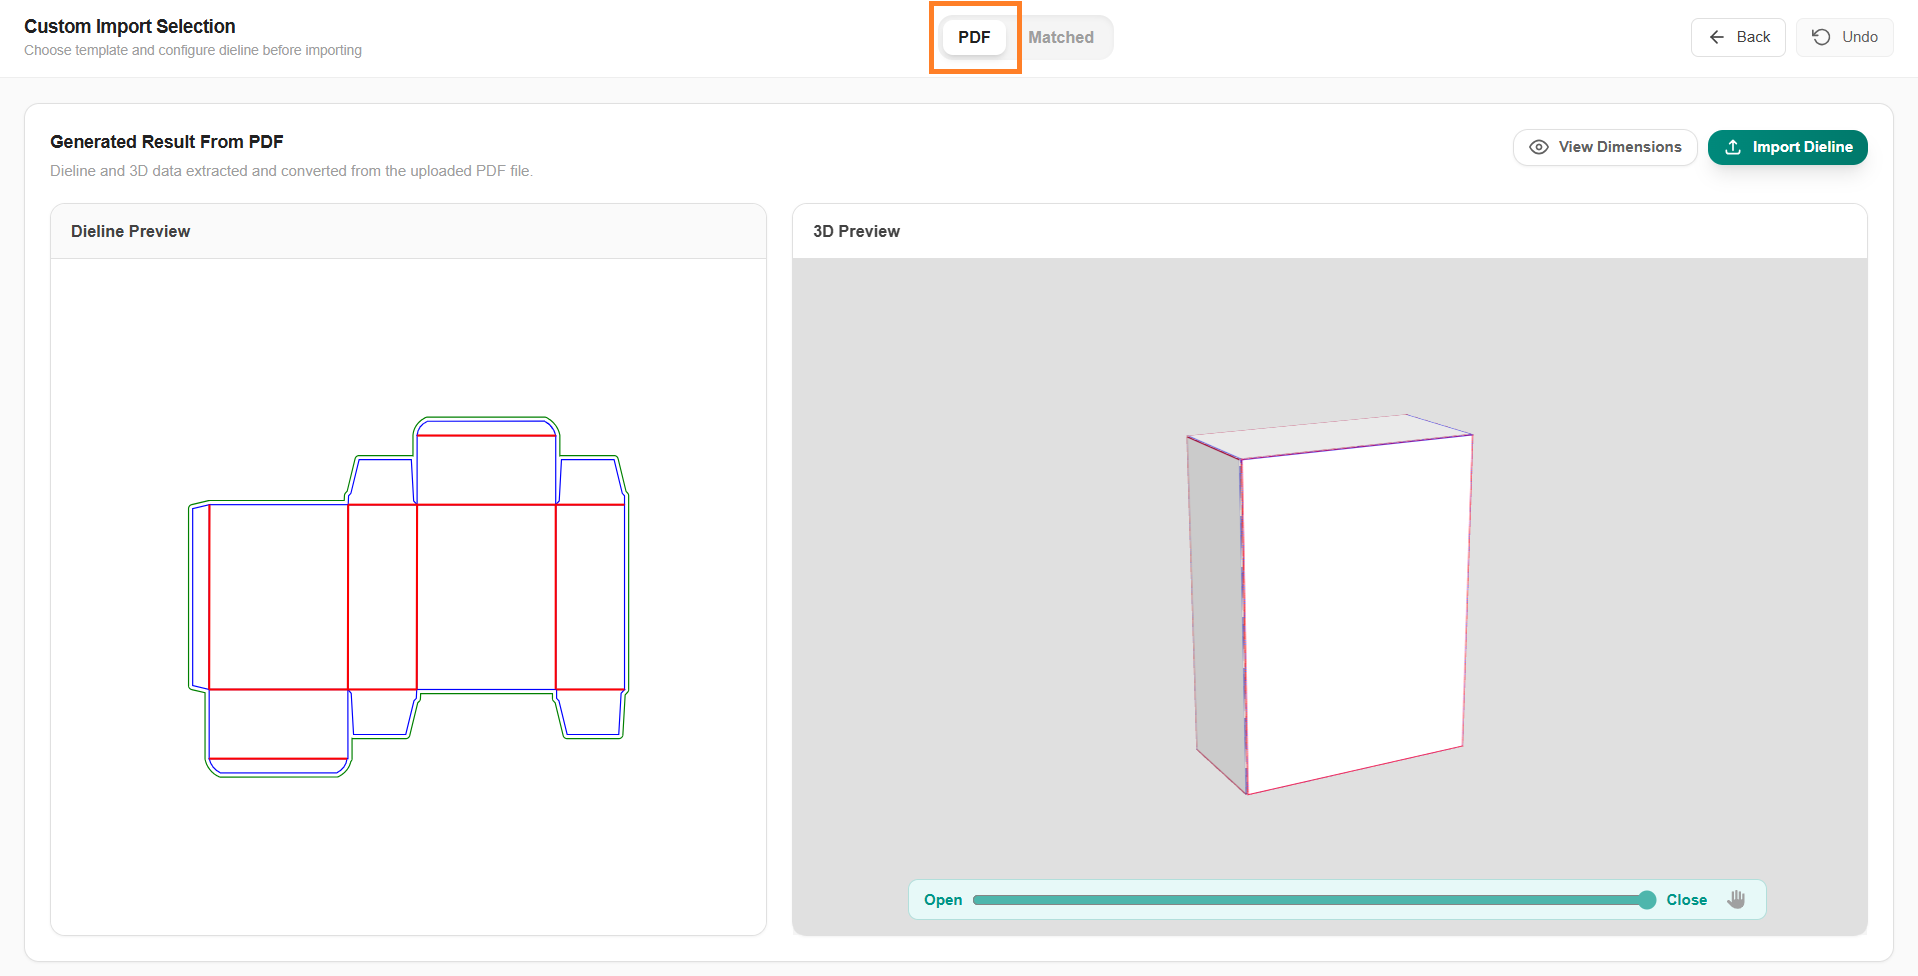
- PDF — check the extracted dieline, then import it as a new model. The Dieline Preview shows the structure in 2D with the standard bleed and trim lines. The 3D Preview shows it as a finished pack: if the file includes artwork, the artwork is overlaid on the model; if it is a dieline file on its own, the model appears in its default 3D view. Use the Open/Close slider to simulate the packaging in different structural positions.
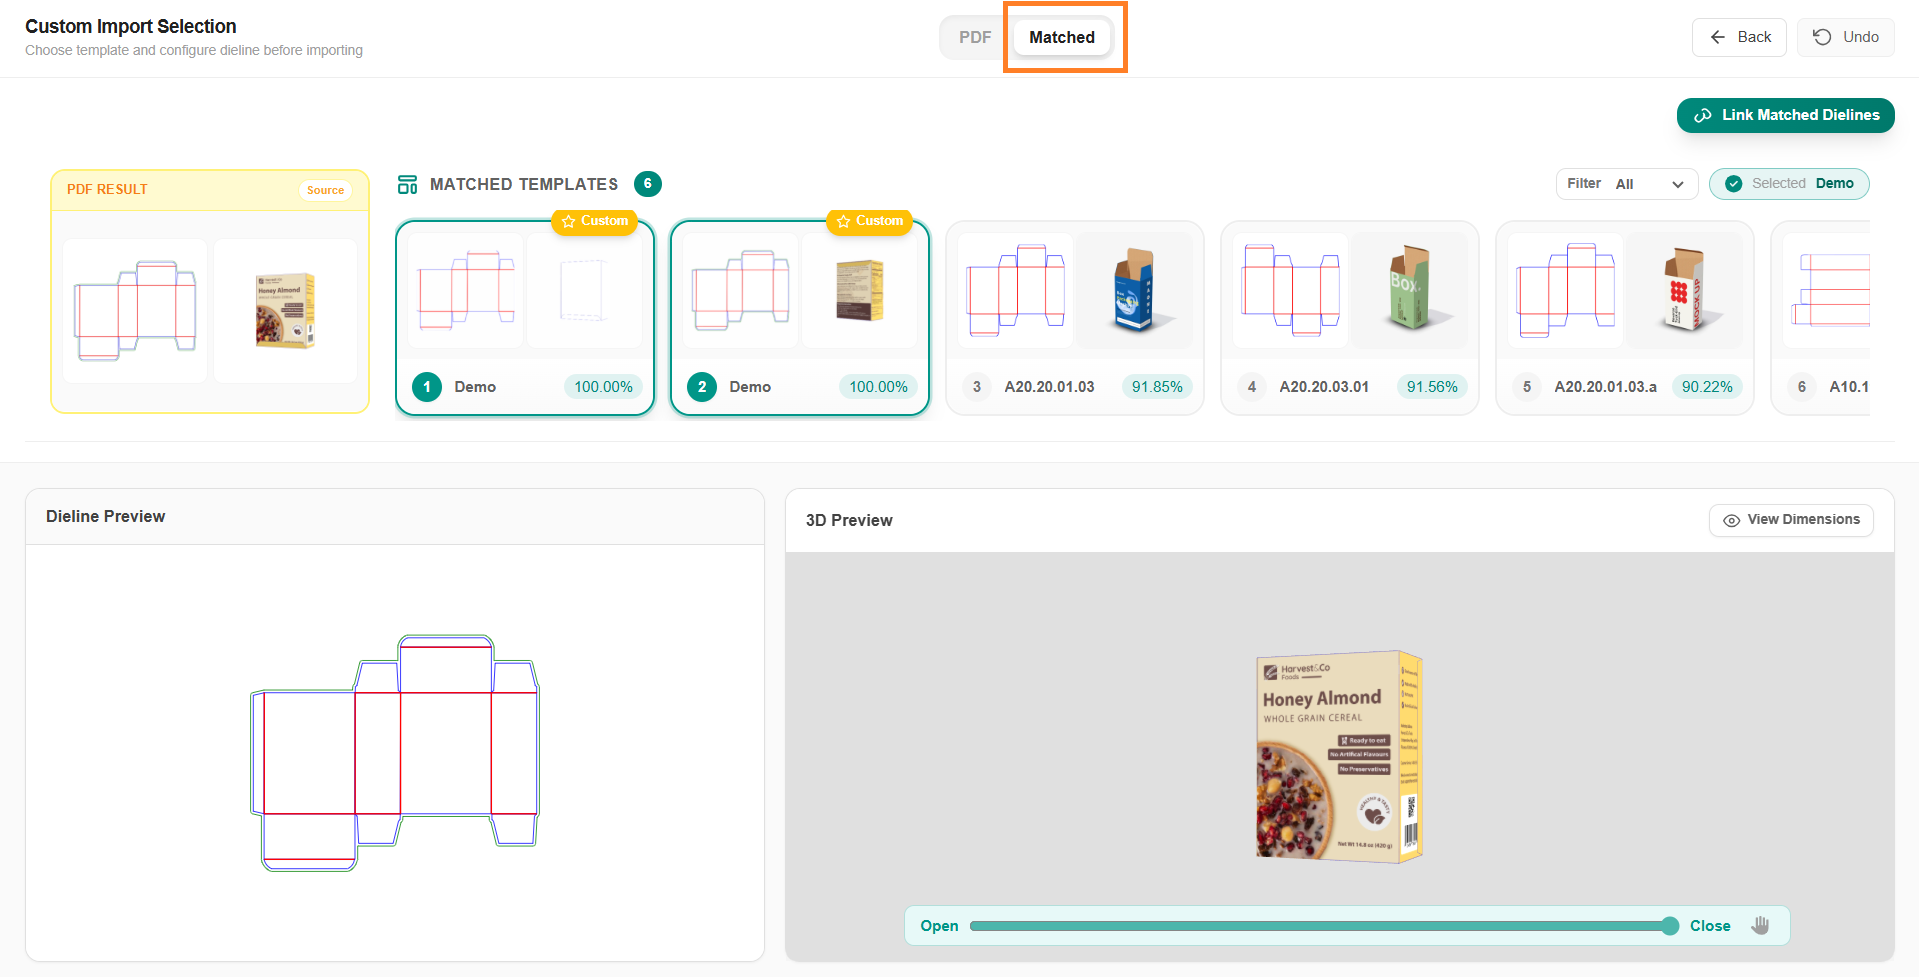
- Matched — compare the extracted dieline against templates already in the Dieline Library, each listed with a match percentage. Templates showing 100% are structurally identical to your dieline. If one of them already fits, link to it instead of importing, so that the library keeps a single model for that structure. Linking is available when you import from the Asset Library or the Web Viewer; from the Dielines module this tab is view-only.
Link a Matched Dieline
Linking to a matched template reuses a model that is already in the Dieline Library, instead of adding a near-duplicate.
| Note: Linking a matched dieline is available only when you start from the Asset Library, or from the Web Viewer opened via the Asset Library. From the Dielines module the Matched tab is view-only, and linking is not available when the artwork was opened from a workflow. |
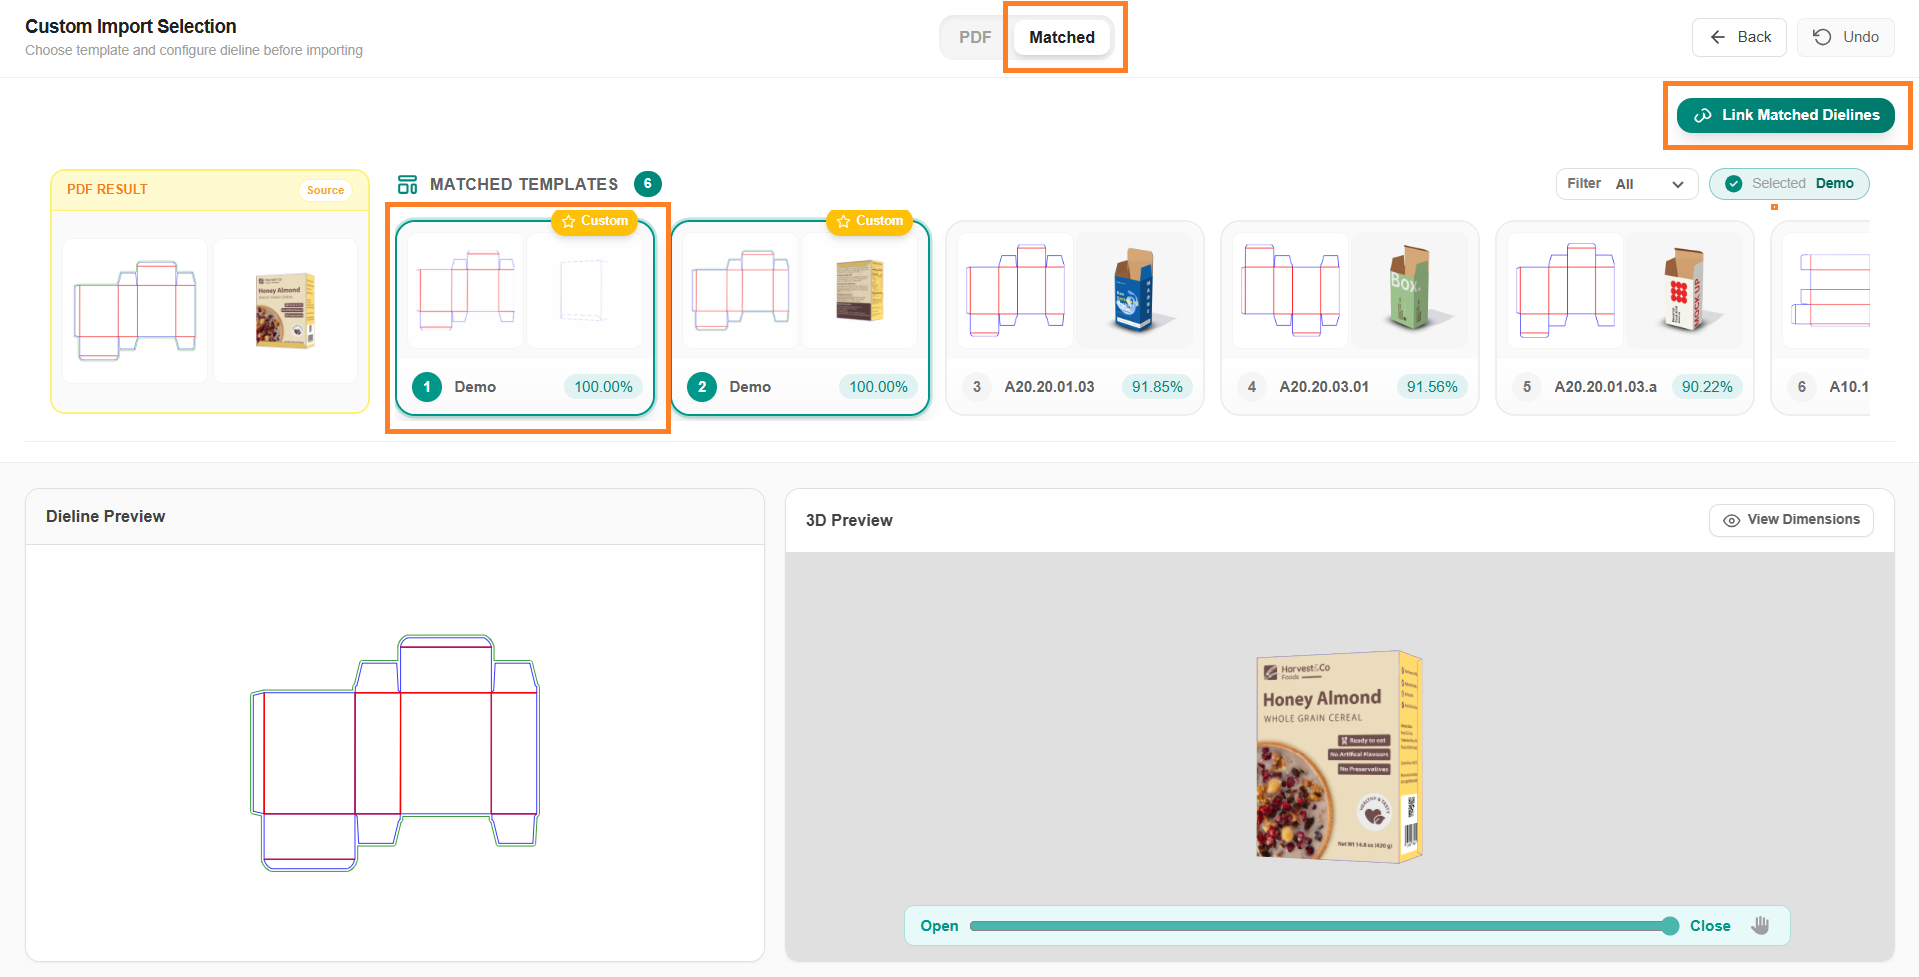
- Select the Matched tab.
- Select the required matched template from the results.
- Select Link Matched Dielines. A preview shows the dimensions and structure of the selected template.
- Select Add to Asset Library. The extracted dieline is linked to the matched template, and to the artwork at the same time.
Note: If the artwork already has a dieline linked, a confirmation is shown before the existing dieline is replaced.
Related Articles
- For more information on using dielines in a project, refer to Dieline Workflow.
- For more information on 3D visualisation, refer to Dieline and 3D Simulation.
- For more information on configuring artwork file types, refer to Dieline Parameter Configuration.
- For more information on editing or deleting imported dielines, refer to Manage Imported Dielines.