Style Profile
The Style Profile feature enables users to define and apply specific formatting rules for Nutrition Facts templates. This ensures consistency and compliance with regional labeling regulations.
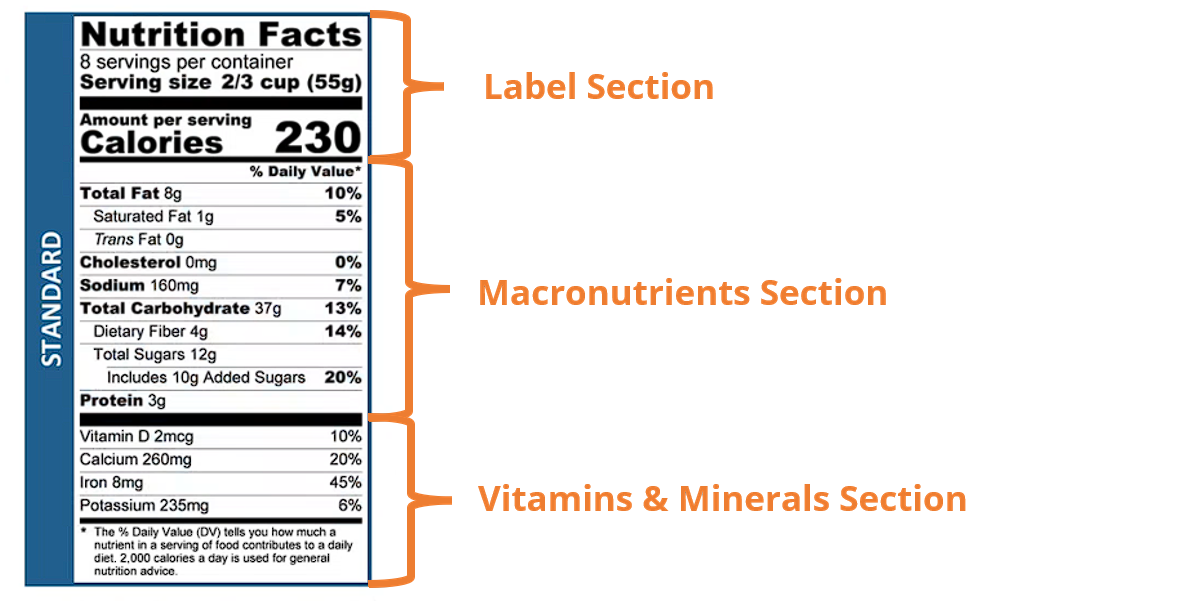
A standard U.S. Nutrition Facts table typically includes three primary sections:
- Label Header – For example, the title Nutrition Facts must appear in bold with each word capitalized.
- Macronutrients – Items like Total Fat, Cholesterol, and Added Sugars. This section may include additional formatting rules such as indents or extra descriptive text (e.g., “Includes 10g Added Sugars”).
- Vitamins & Minerals – Items like Vitamin D or Calcium often follow specific alignment and styling rules.
Regional and Country-Specific Variations
Nutrition Facts templates vary not only by region (e.g., U.S., EU) but also by country within those regions.
For example:
- The European Union follows regulations from the European Food Safety Authority (EFSA).
- However, Spain may enforce additional guidelines from the Spanish Agency for Food Safety and Nutrition.
How Style Profile Helps
- With Style Profile, you can, define regulatory authorities (e.g., FDA, EFSA).
- Customize formatting rules for each element such as set text to bold, uppercase/lowercase, Apply indents, add prefixes/suffixes (e.g., “Includes” for Added Sugars) and much more.
- Ensure accuracy and consistency with official templates.
This configuration allows teams to easily generate compliant Nutrition Facts tables directly within the system, ready for use in packaging artwork.
How do I add a new Style Profile?
Add a New Style Profile
- Log in to your ManageArtworks account.
- Navigate to the Admin module.
- Under Copy Profile Settings, click Style Profile.
- To add a new style profile:
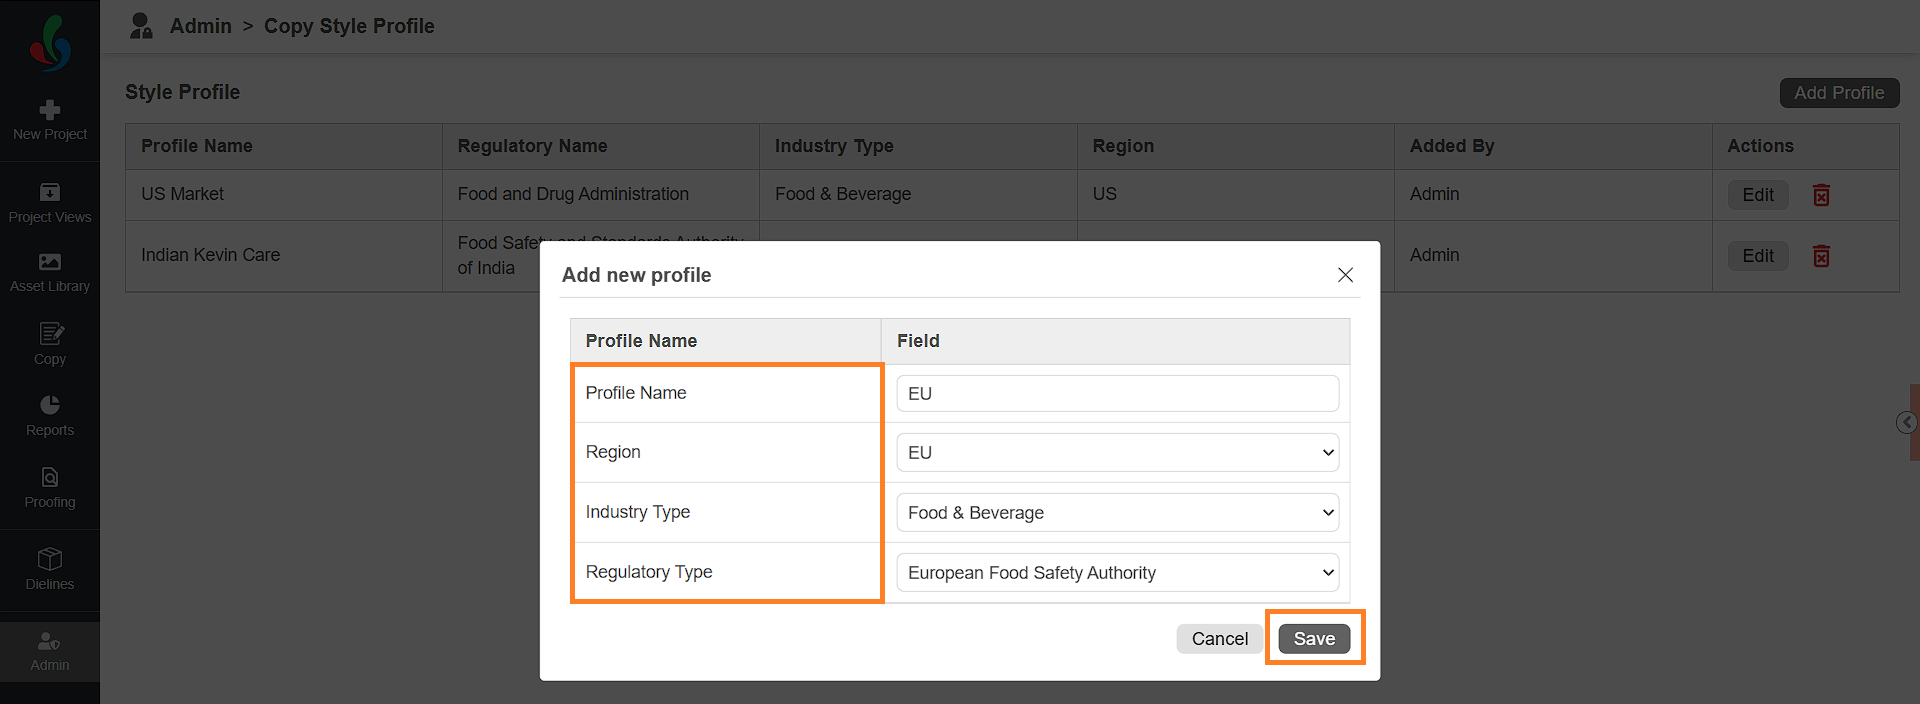
- Click the Add Profile button in the upper-right corner of the screen.
- In the Add New Profile pop-up window, provide the following details:
- Profile Name: Enter a desired name for the style profile.
- Region: Click the drop-down menu associated with it and select the desired region.
- Industry Type: Click the drop-down menu associated with it and select the relevant industry type.
- Regulatory Type: Click the drop-down menu associated with it and select the applicable regulatory body.
- Click the Save button to add the profile to the system.
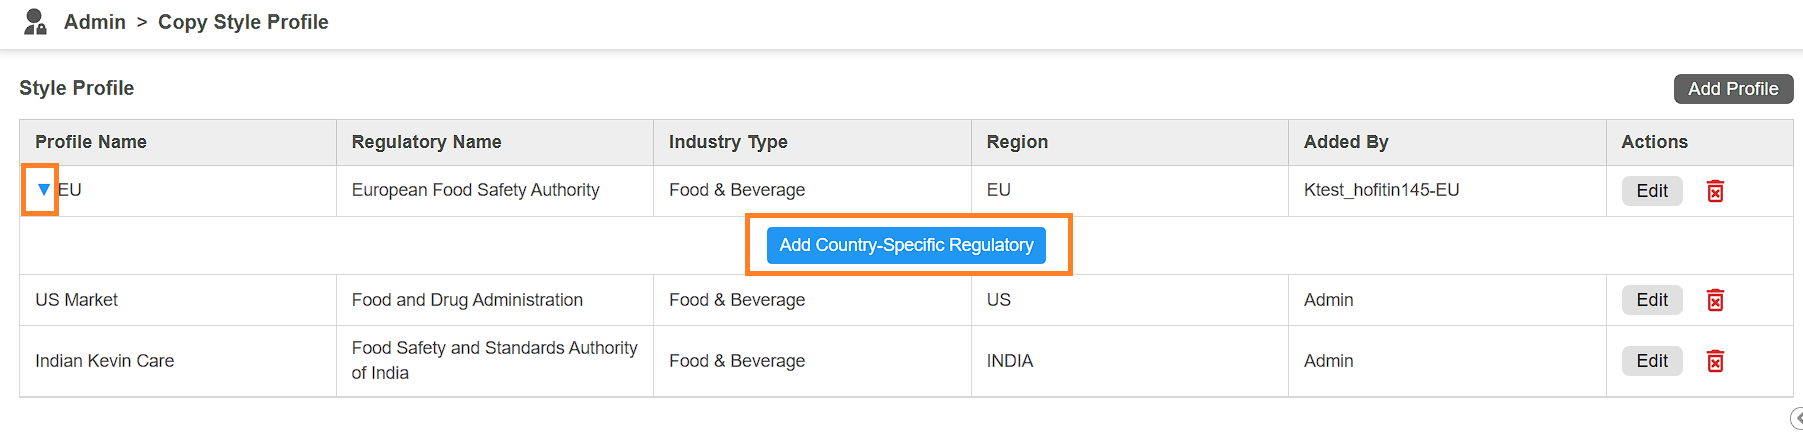
- Once added, if the region requires country-specific rules add Country-Specific Regulation body.
- To add country-specific regulations body (Optional):
- Expand the region profile by clicking the expand icon next to the profile name.
- Click Add Country Specific Regulatory.
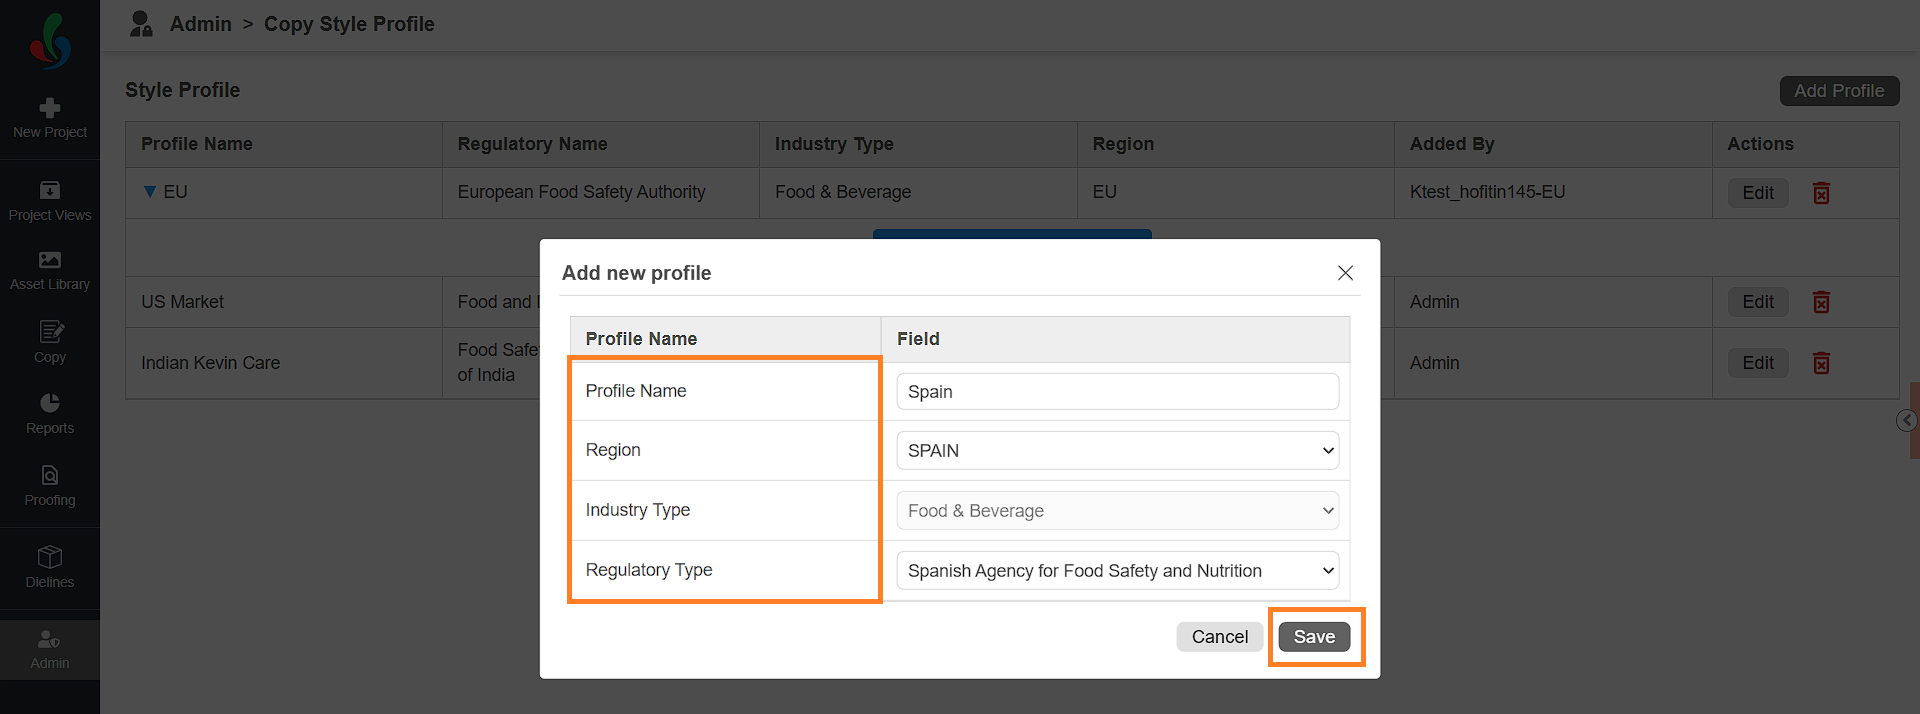
- In the Add New Profile pop-up window, fill out the following fields:
- Profile Name: Enter the name for the country-specific profile.
- Region: Click the drop-down menu associated with it and select the desired region.
- Industry Type: Since the configuration is inside the region, it cannot be edited.
- Regulatory Type: Click the drop-down menu associated with it and select the applicable regulatory body.
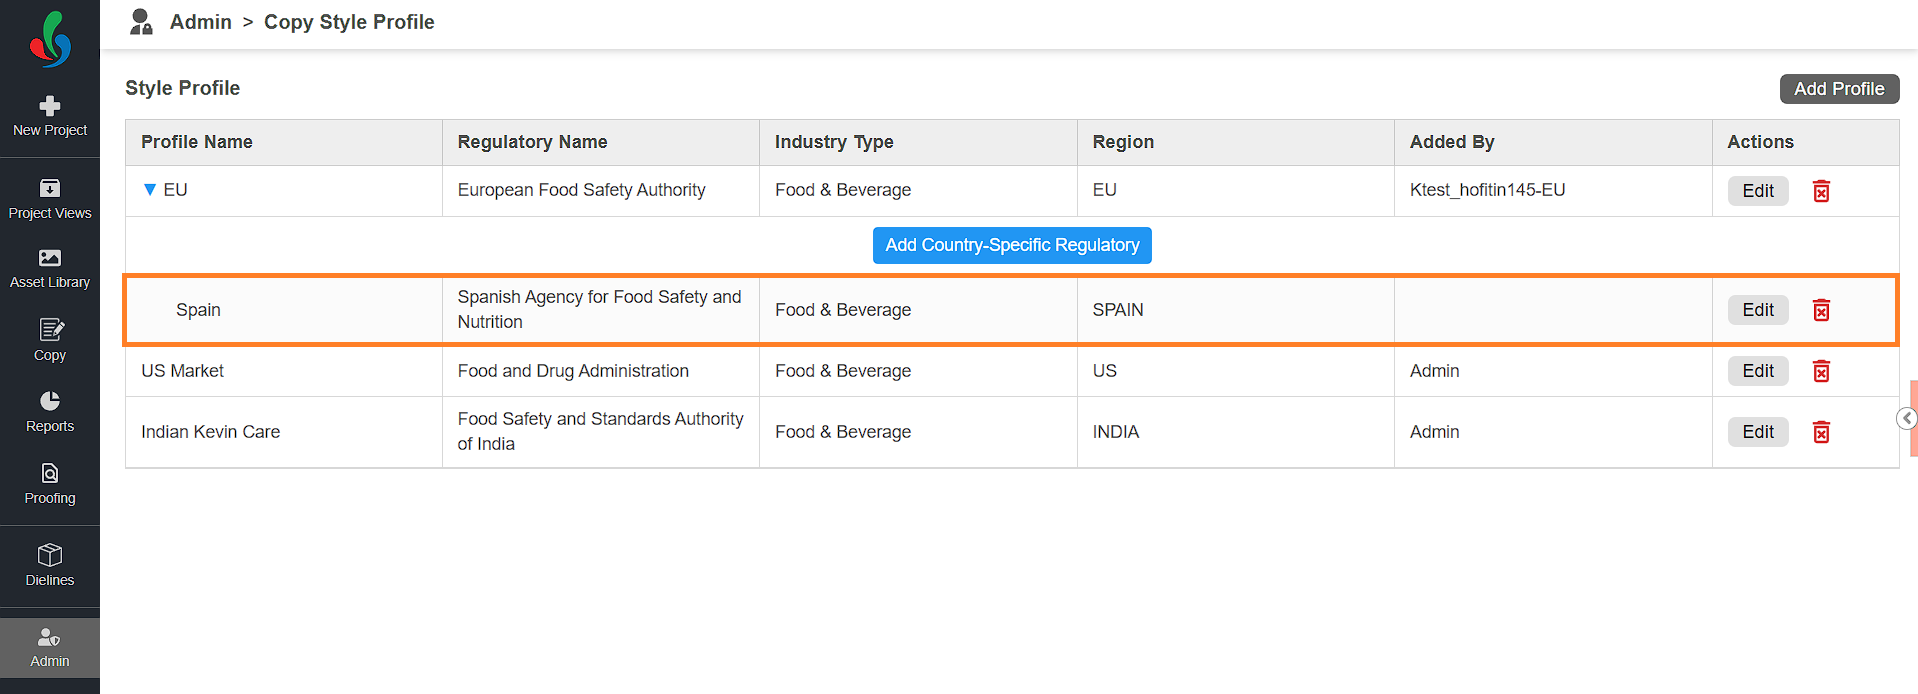
- Click the Save button to add the country-specific profile
- Next, proceed to configure element styles based on the regulatory profile you’ve added. This ensures that your nutrition facts tables comply with regional or country-specific guidelines.

How do I configure element's style for the Style Profile?
Configure/Edit Element Styles
Customize formatting rules for each element such as set text to bold, uppercase/lowercase, Apply indents, add prefixes/suffixes (e.g., “Includes” for Added Sugars) and much more
- Log in to your ManageArtworks account.
- Navigate to the Admin module.
- Under Copy Profile Settings, click Style Profile.
- Click the Edit button associated with the style profile you want to modify.
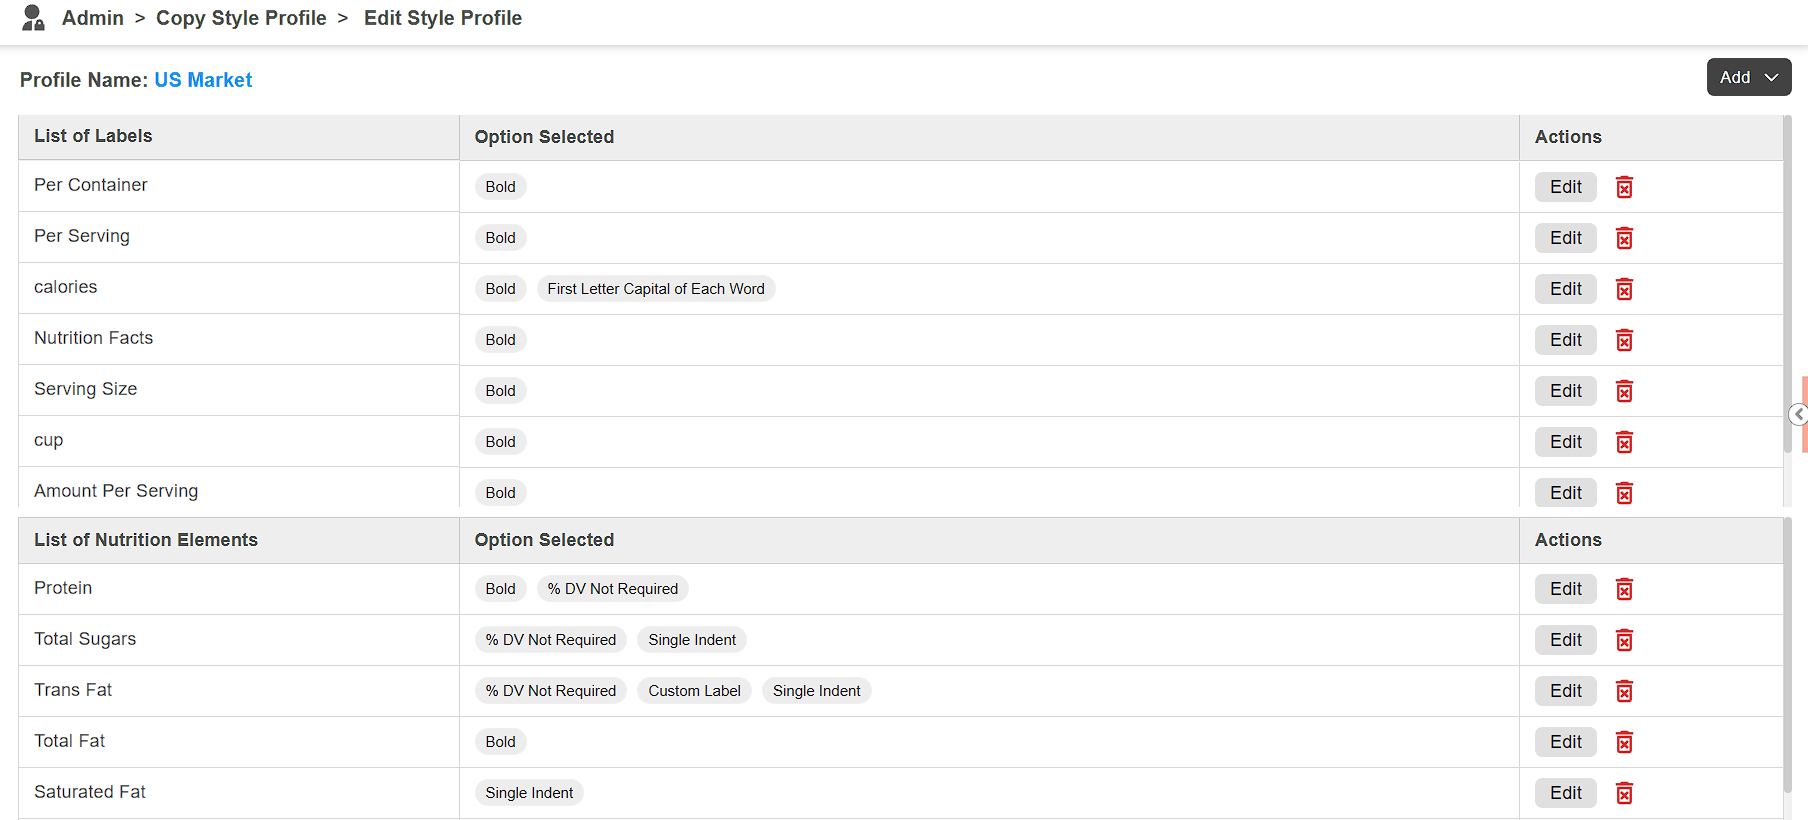
- You will be directed to the Edit Style Profile page, which contains two separate tables:
- Label Elements
- Nutrition Elements
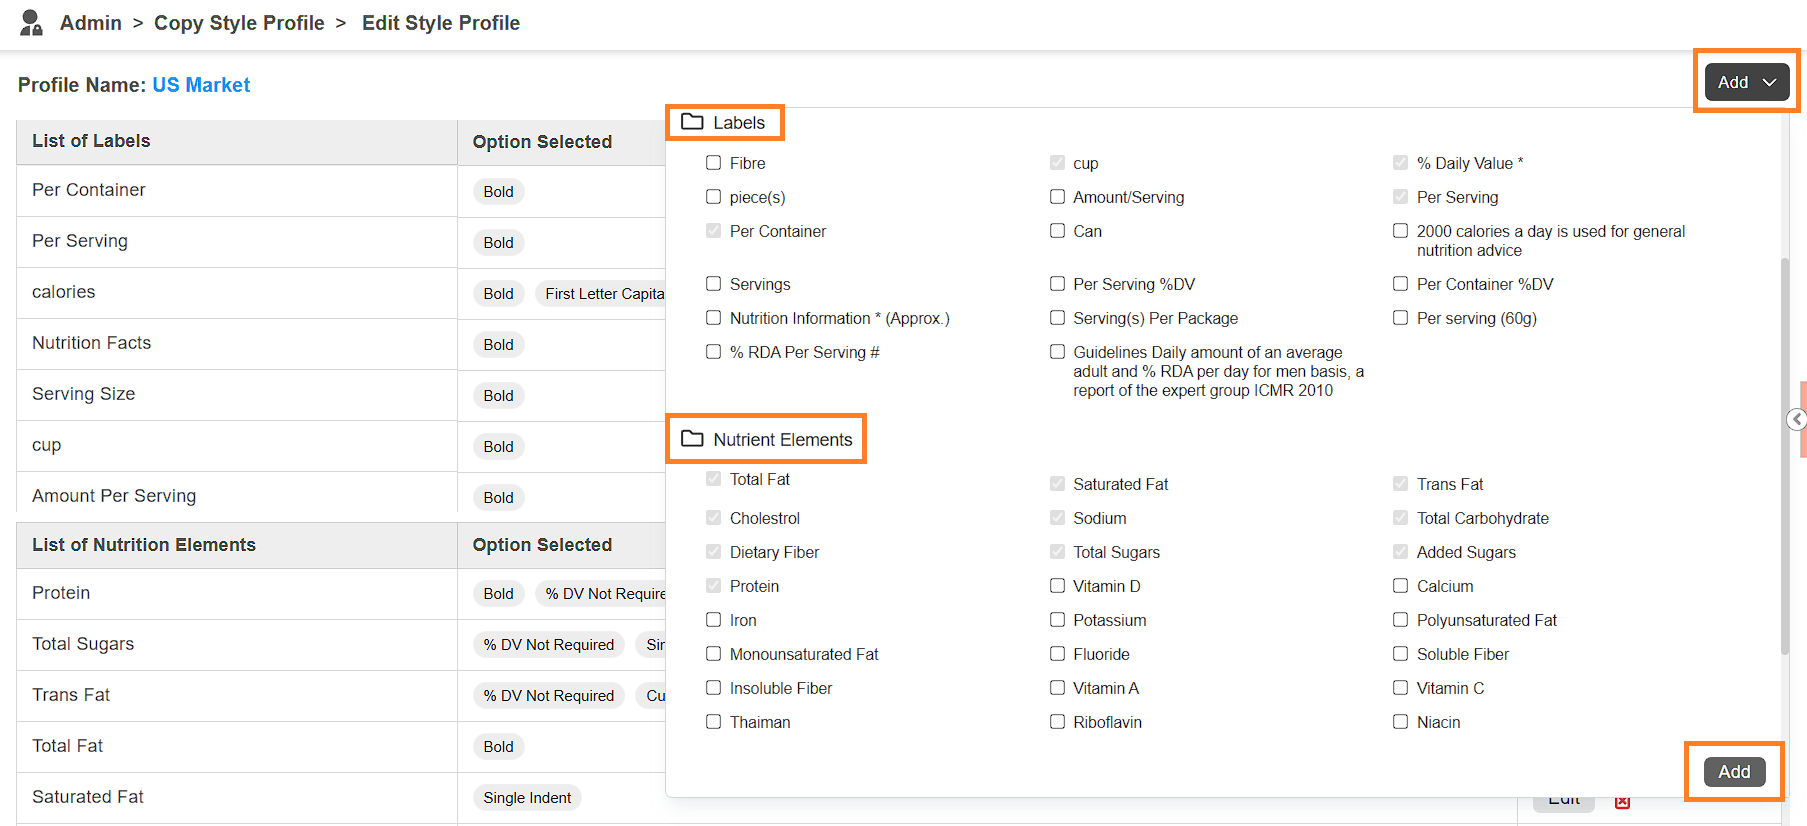
- Add Elements for Styling:
- Click the Add dropdown button.
- You’ll see a lists of Label and Nutrition Elements available in the system.
- Select the desired elements by checking the boxes next to them.
- Click Add to include them in the appropriate table.
- Once elements are added, style it as desired.
- Styling options differ between Label and Nutrition Elements.
- Styling Label Elements:
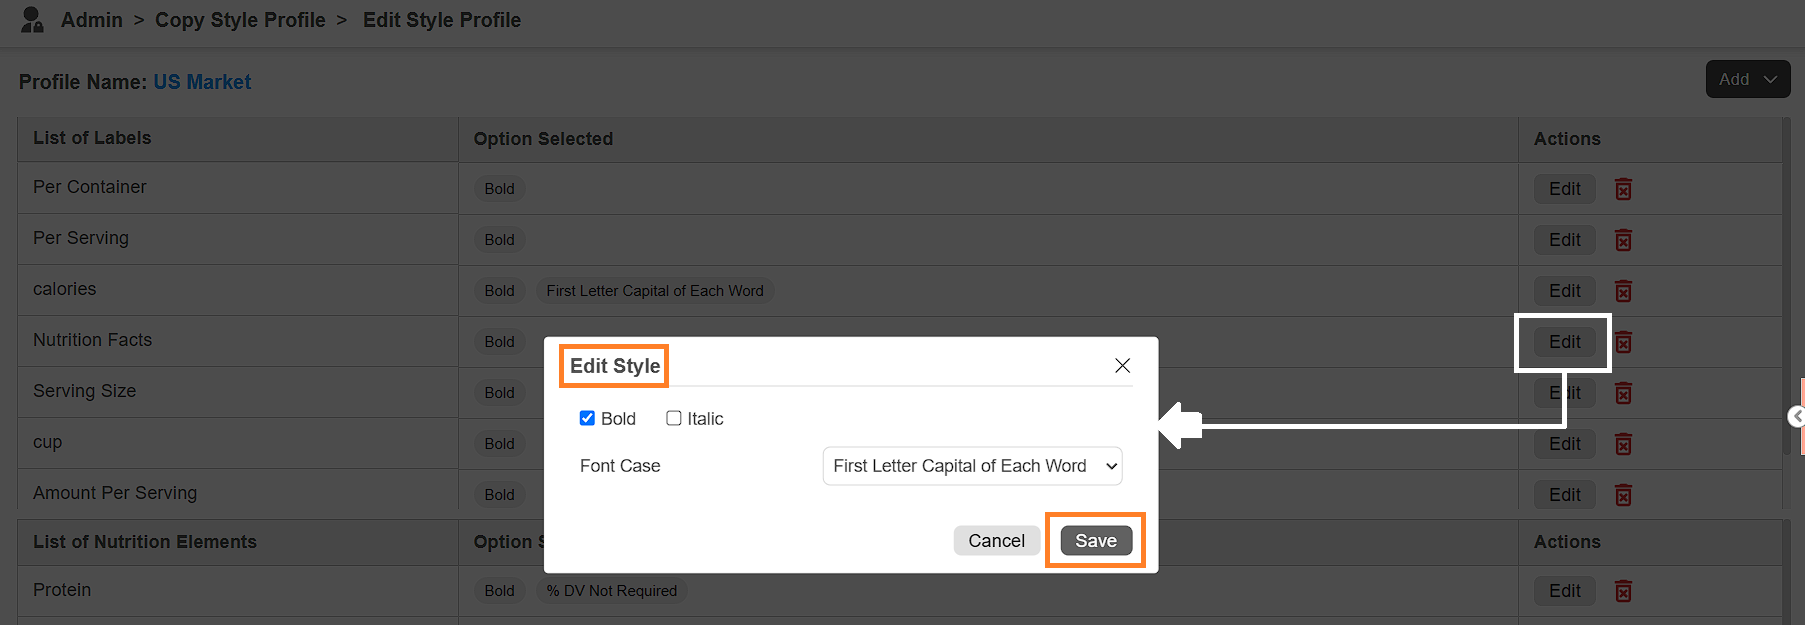
- Click the Edit button next to a label element.
- In the Edit Style popup:
- Bold: Select it to display the label element in bold.
- Italic: Select it to italicize the label element.
- Font Case: Choose desired text format for the label element from options like Uppercase, Lowercase, or First Letter Capital of Each Word.
- Click Save to apply your changes.
- Once styled, the element will appear in the selected style in matching region nutrition facts template creation or modification.
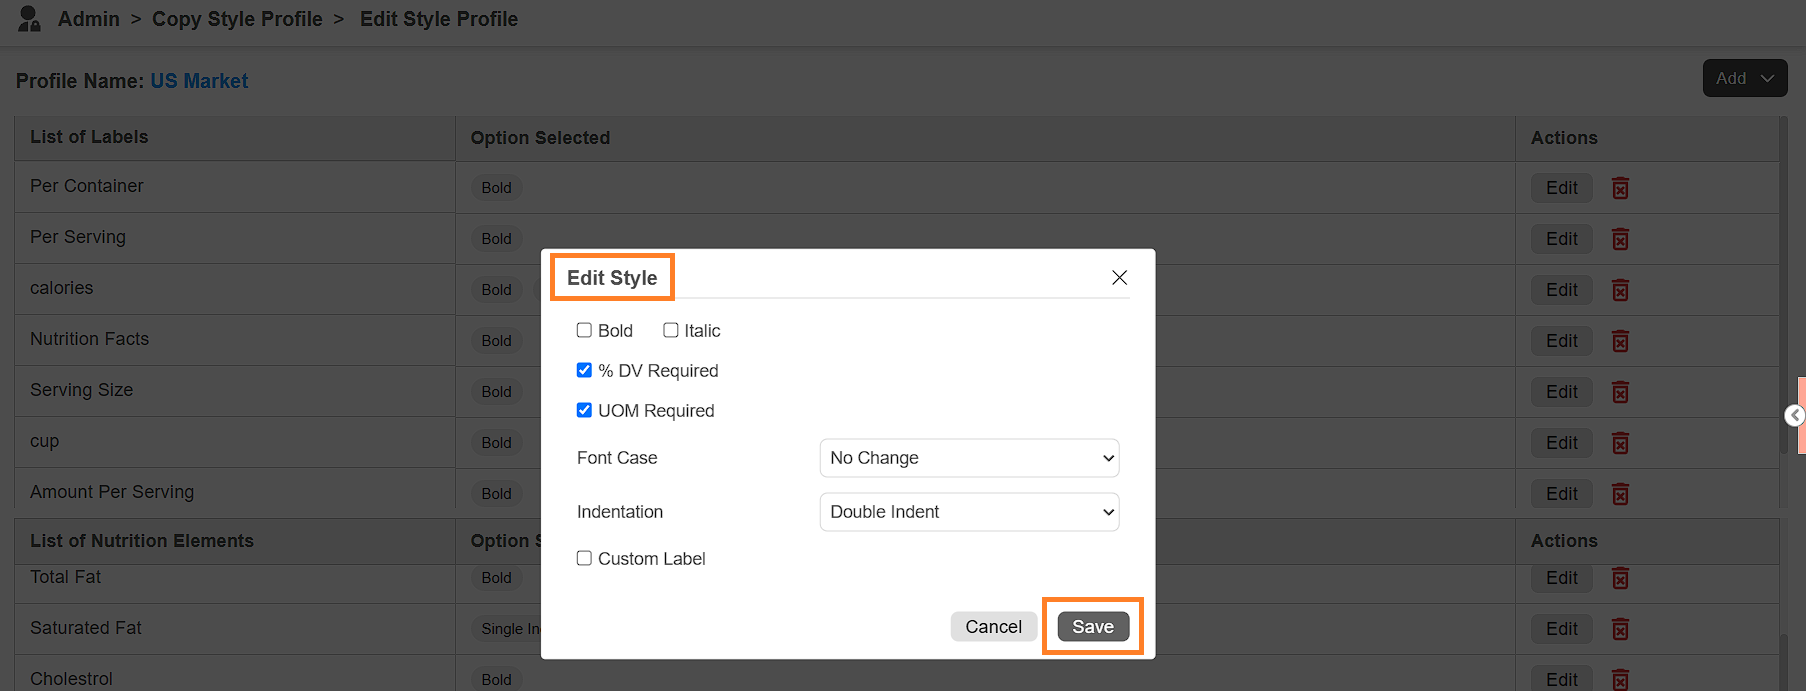
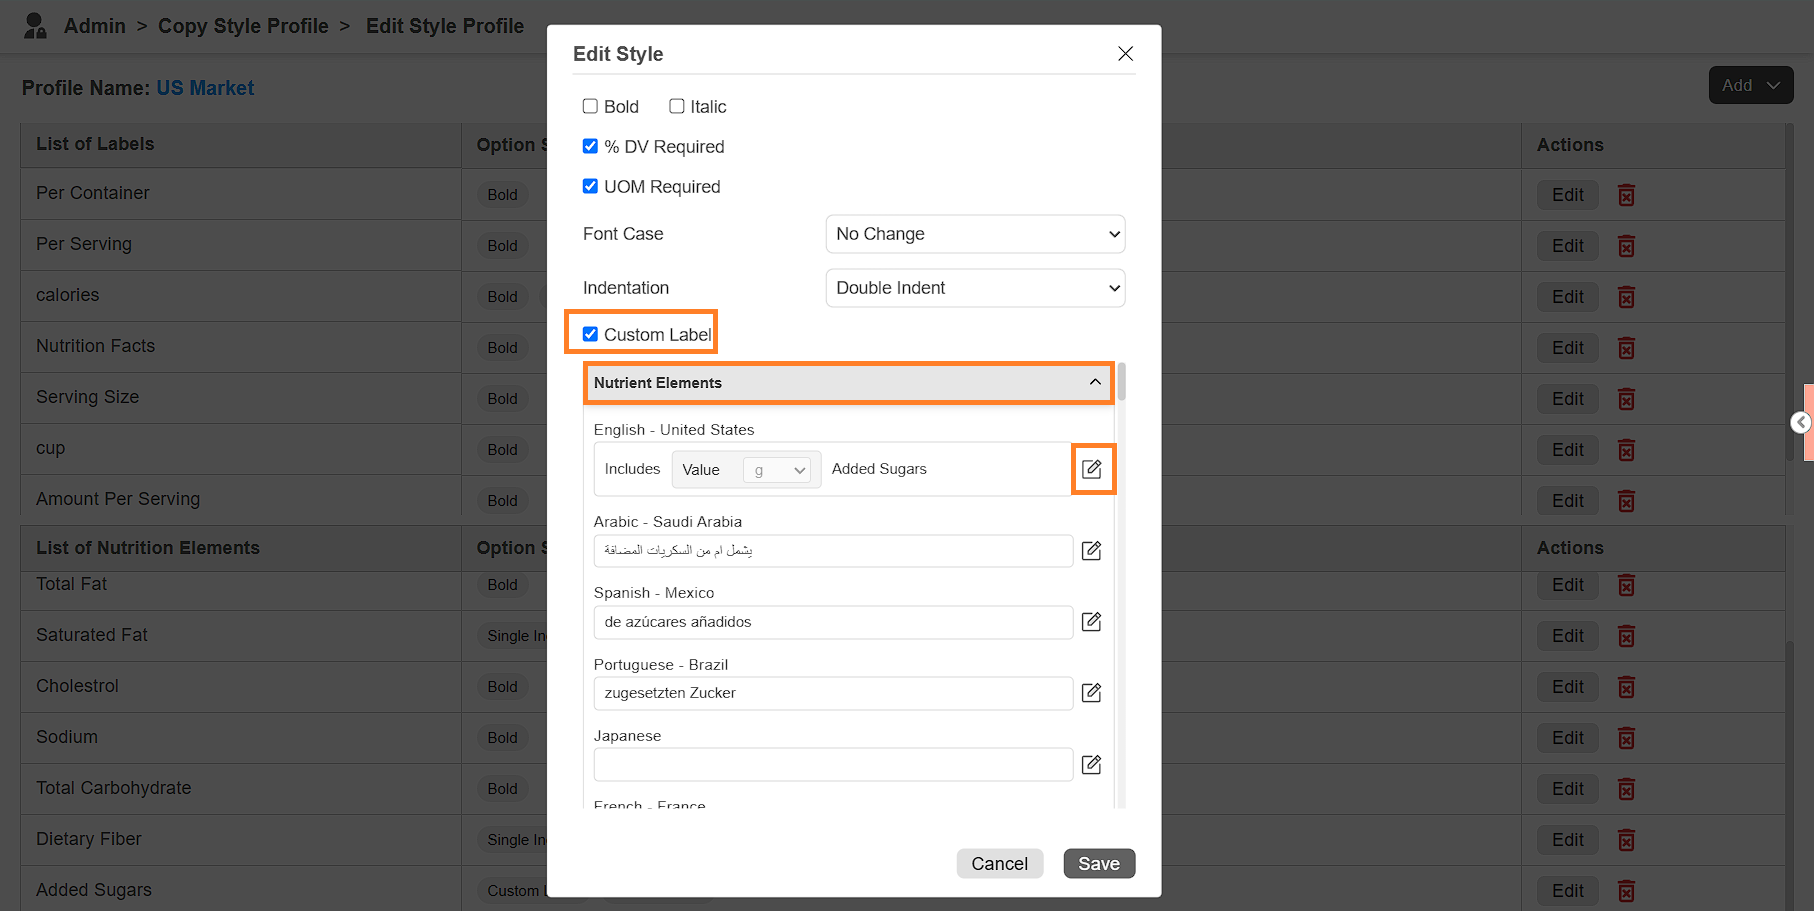
- Styling Nutrition Elements:
- Click the Edit button next to a nutrition element.
- In the Edit Style popup, you can customize the following:
- Bold and Italic options
- % DV Required: Enable if the percentage daily value is needed along with the element.
- UOM Required: Enable if the unit of measurement is required along with the element.
- Font Case: Select a desired text format.
- Indentation: Choose Single Indent or Double Indent as needed.
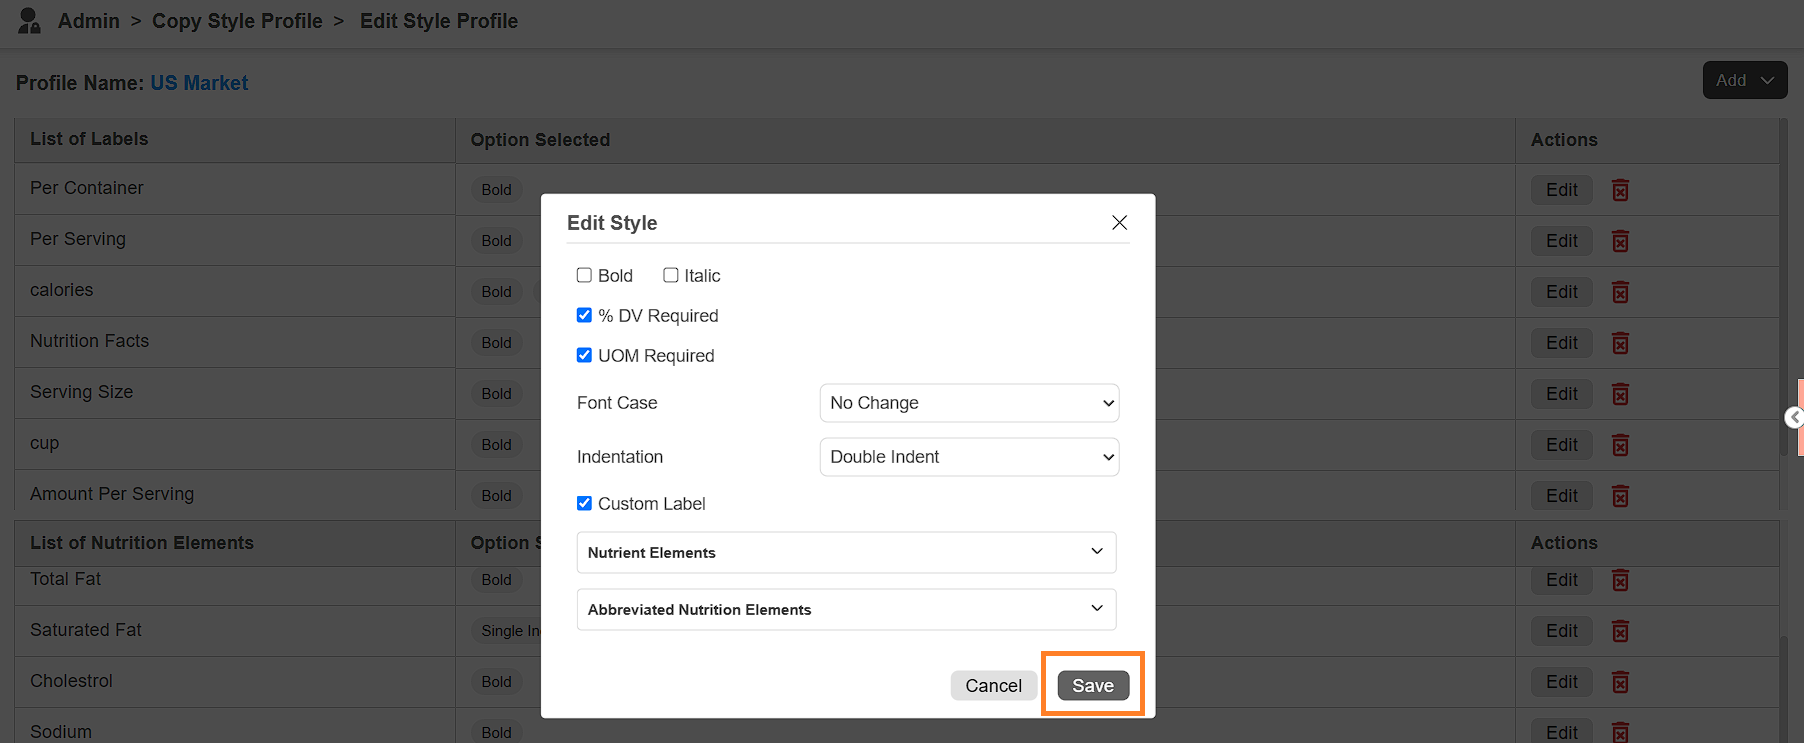
- Custom Label: Enable this to add a custom display text for the element.
- Configure Custom Labels (Optional):
Enable Custom Label- Expand the Nutrient Elements or Abbreviated Nutrition Elements section.
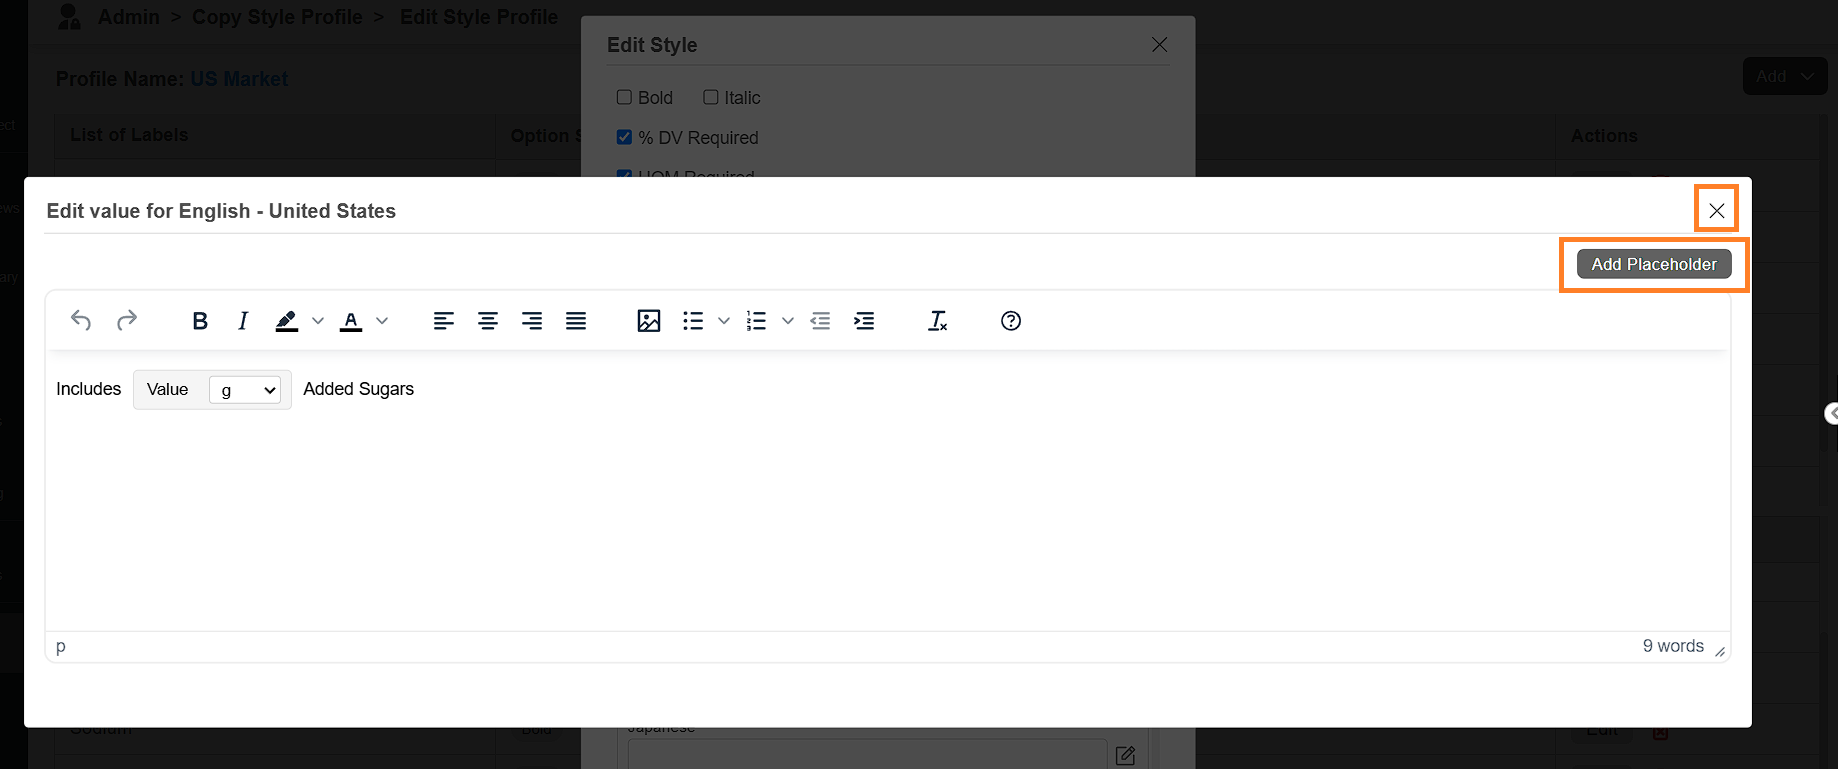
- Click the Edit button next to the desired language for the element.
- In the popup:
- Enter the custom label text (e.g., for Added Sugars, enter: Includes 10g Added Sugars).
- To add dynamic measurements, insert placeholders:
- Click Add Placeholder and configure the unit of measurement.
- To remove a placeholder, hover over it and click the delete icon.
- Close the popup once editing is complete.
- Configure Custom Labels (Optional):
- Click Save to apply the custom style to the element.
- Once styled, the element will appear with the configured settings in matching region nutrition facts template creation or modification. You must return to this section to make further changes.
- Styling Label Elements: