Customize Email Alerts (Enterprise Plan)
 | Note: Customization options differ between the Growth and Enterprise plans. This article explains how to customize email alerts in the Enterprise plan. To learn about email alert customization in the Growth plan, see [Customize Email Alerts (Growth Plan)]. For a comparison of all ManageArtworks plans, click here. |
With the Enterprise Plan, ManageArtworks offers extensive customization options, allowing users to clone and fully tailor email templates to match their workflow needs. This includes:
- Workflow-Specific Email Customization – Configure emails to trigger only for specific projects/workflows and tasks.
- Trigger Control – Define whether an email should be sent at the start or completion of an activity.
- Email Restrictions – Limit email notifications to specific users or roles.
- Email Enablement/Disabling – Choose to enable or disable email triggers for selected tasks.
The Customize Email Alerts feature provides flexibility, improves clarity, and ensures consistency in communication, aligning email notifications with your organization’s processes.
Predefined and Customizable Email Templates
Similar to the Growth plan, the Enterprise plan includes a set of predefined email templates. However, the Enterprise plan also offers an additional Artwork Share Alert, Add Participant in Current Task template and advanced customization options.
With the Enterprise plan, users can clone any predefined template and edit it to suit their organization’s requirements. This includes configuring:
- Workflow-specific email triggers
- Task-based conditions
- Recipient-specific restrictions.
 | Note: The Clone option is not available for the Artwork Share Alert template. Only basic customization of the default template is supported. |
Default Email Templates:
- Approval Email – Sent automatically when a task is approved.
- Forward Email Alert – Notifies recipients when a request is forwarded.
- Initiation Email – The email triggered upon project initiation, notifying all assigned participants that the project has started and that they are responsible for one or more tasks.
- New Task Email – The email triggered upon task/activity starts and alerts task/activity participants about the new task assigned to them.
- Project Complete Email – Notifies all participants upon successful project completion.
- Rejection Email – Notifies users when a task is rejected.
- Task Reminder Email – Sends reminders for overdue tasks.
- Terminated Project Alert – The email triggered upon project termination, notifying all assigned participants that the project has been terminated.
- Artwork Share Alert – Exclusive to the Enterprise plan; notifies users when artwork is shared.
- Add Participant in Current Task – Exclusive to the Enterprise plan; Notifies the workflow initiator that the task has no assigned participants, prompting them to take action.
| Note: Advanced configuration options are available only for cloned templates. While predefined system templates allow basic customization—such as editing the subject line, body content, footer, and recipients—their structure and behavior are fixed and cannot be changed. When a predefined template is cloned and customized, the cloned version overrides the default template. For example, if you clone a predefined template and configure it similarly, only the cloned template will be triggered during the workflow. |
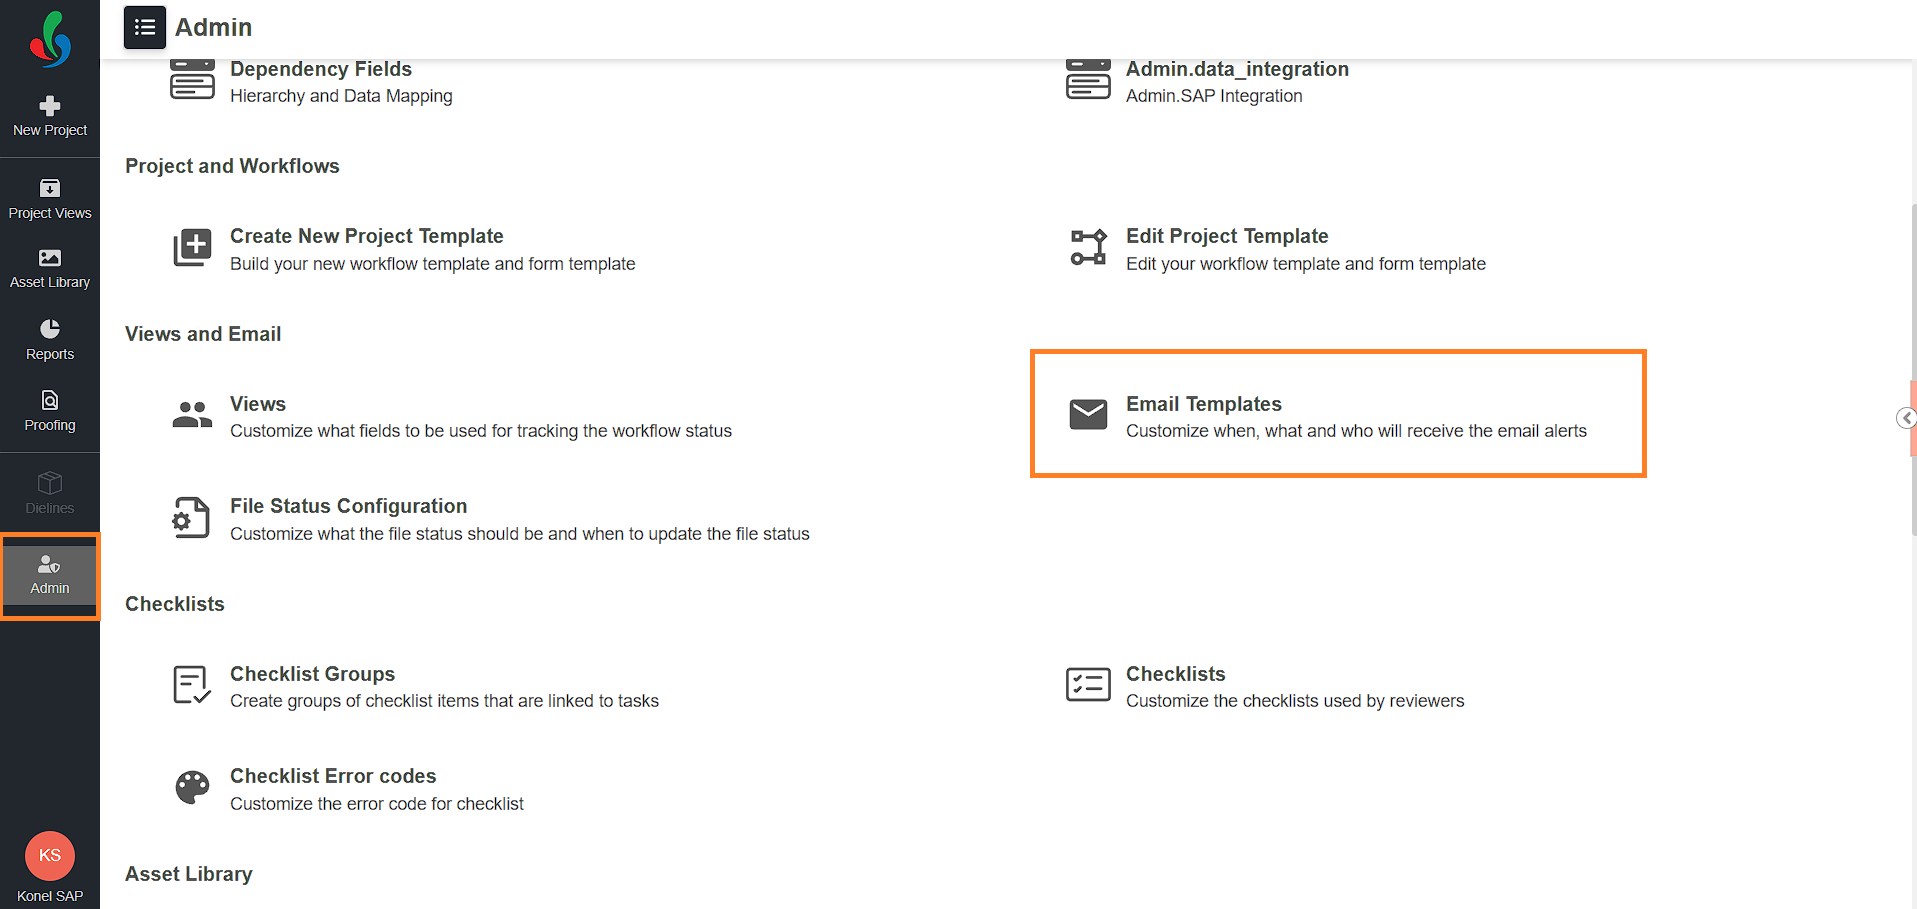
Access Email Templates
How do I access Email Templates?
To access the Email Templates feature in ManageArtworks:
- Log in to your ManageArtworks account.
- Navigate to the Admin module.
- Click the Email Templates tab.
Customize Email Alerts
ManageArtworks allows you to customize predefined email templates or clone them for advanced editing, depending on your organization's tone.
How do I customize the email alerts in enterprise plan?
Customizing Pre-defined Email Templates (System Templates)
You can edit the content of predefined system templates to align with your organization's tone and messaging. However, structural changes (such as layout or workflow logic) are restricted.
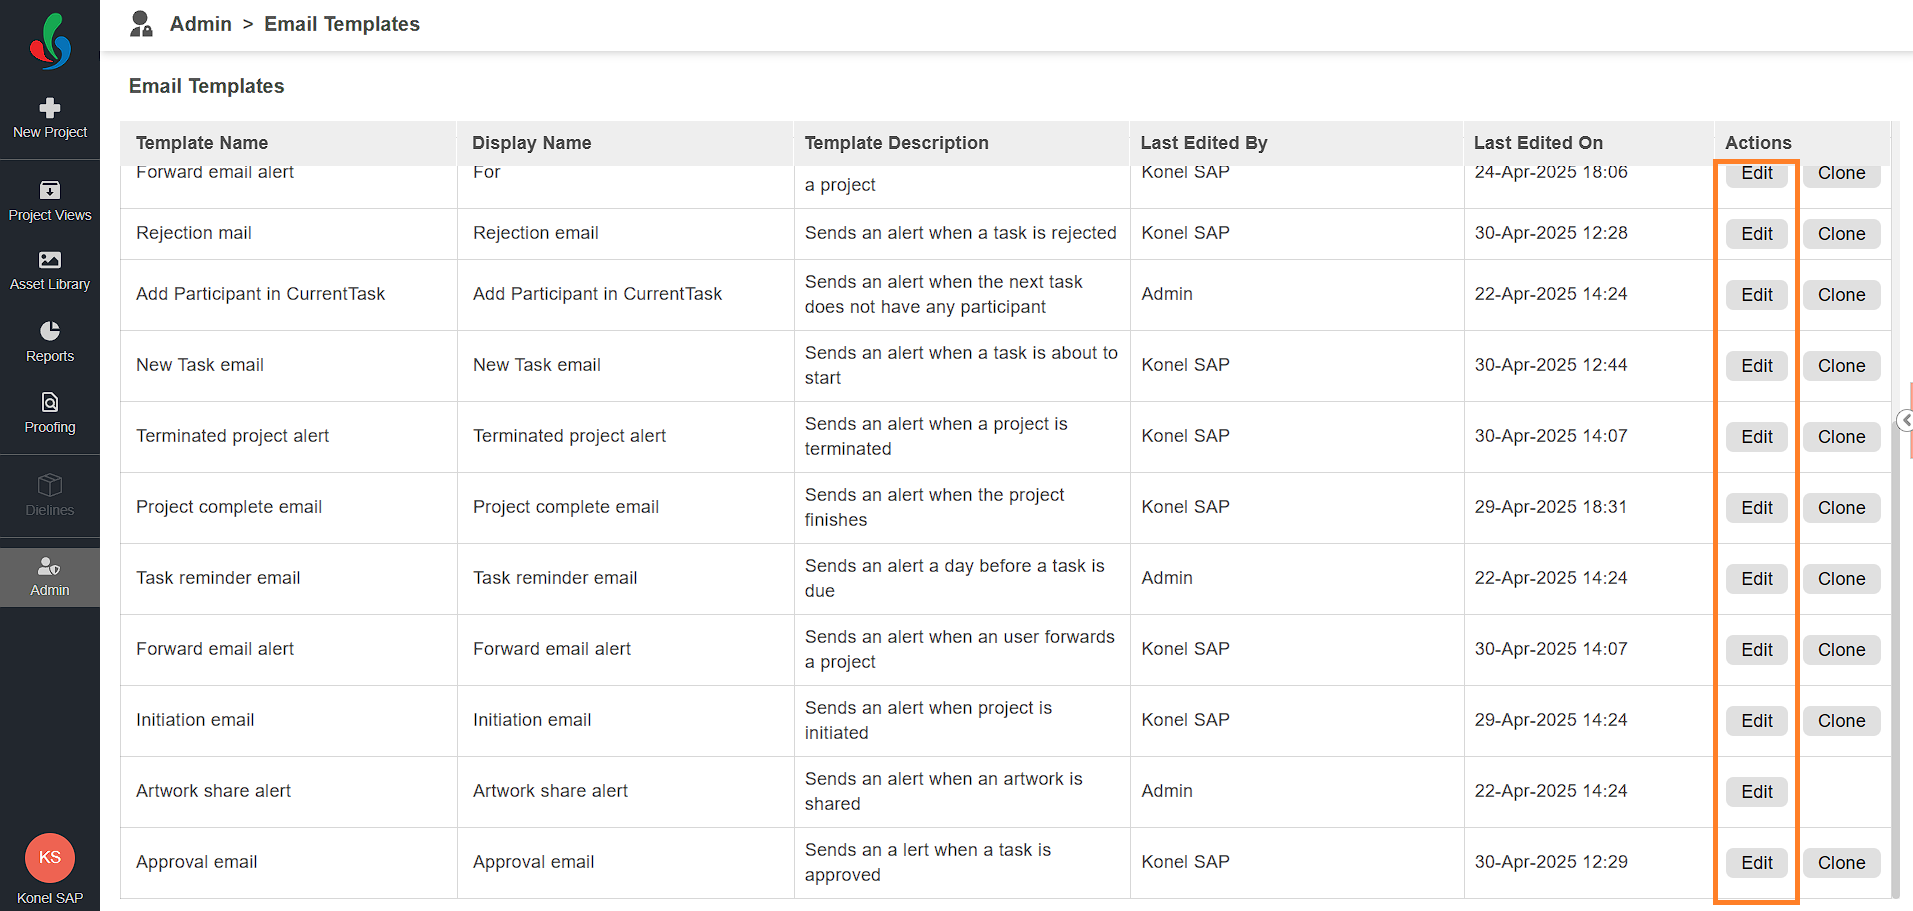
To customize pre-defined email template:
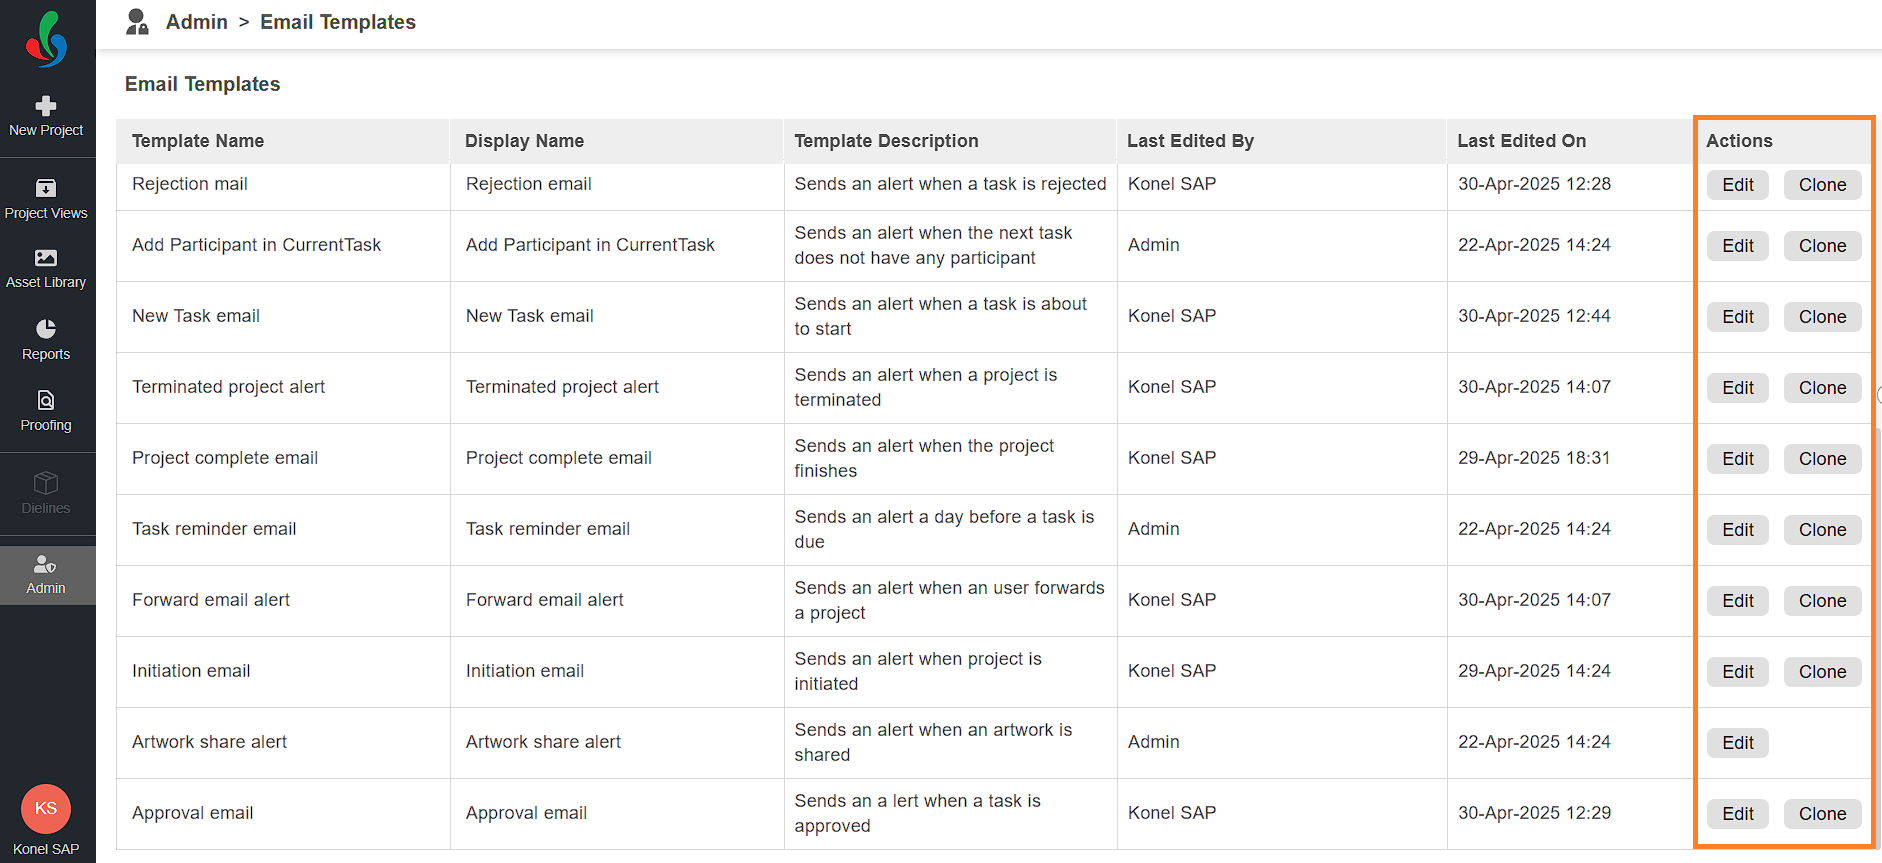
- Go to Admin > Email Templates.
- Locate the template you want to modify and click the Edit icon in the Action column.
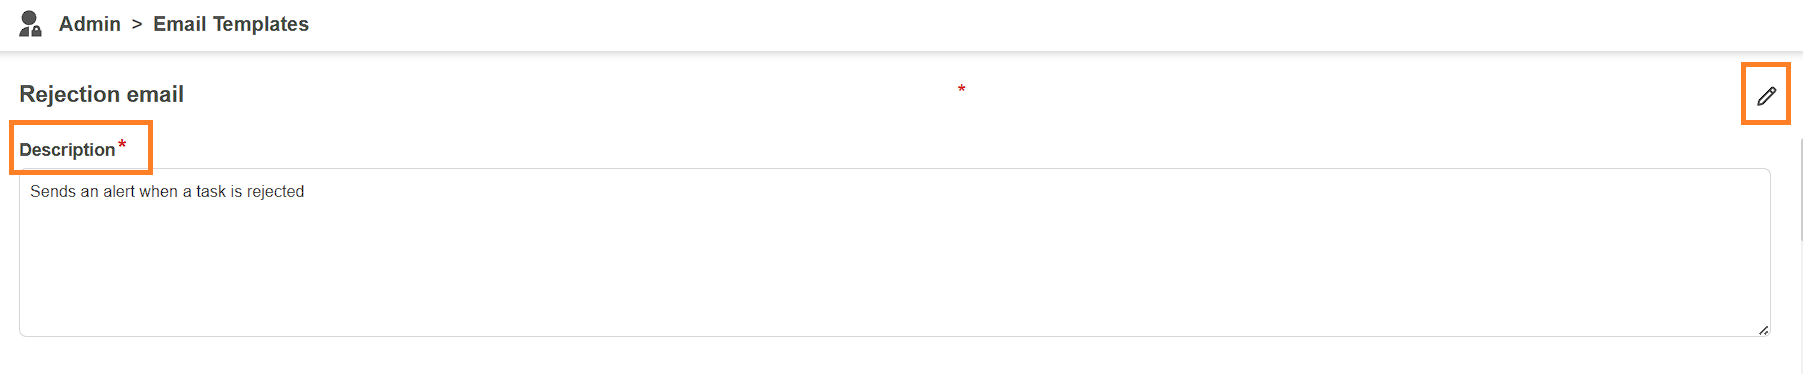
- Edit the template details:
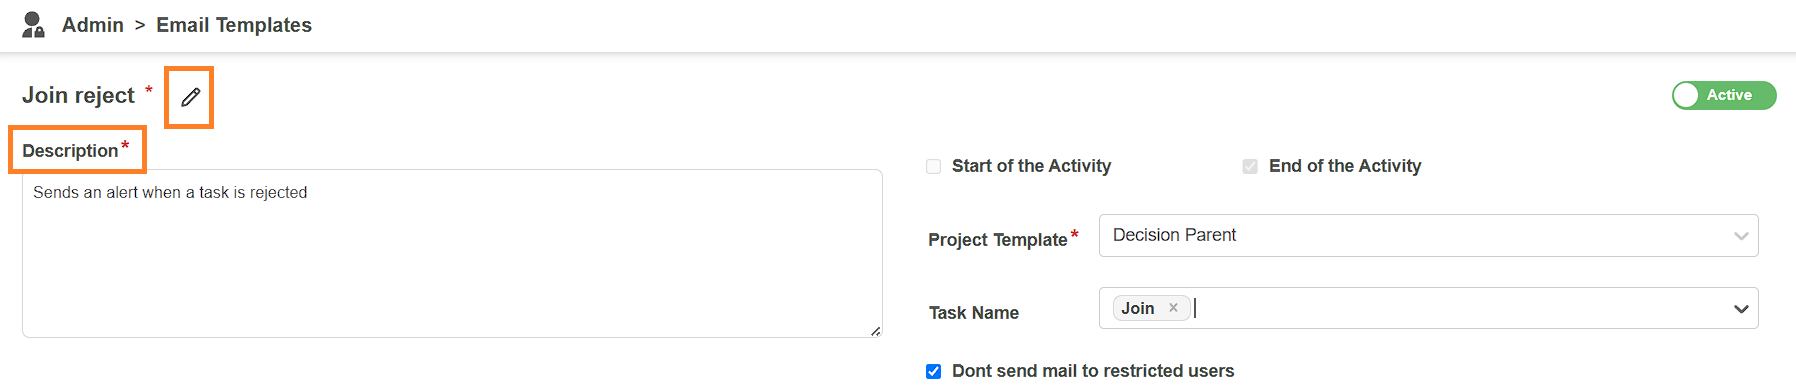
- Template Name: Click the pencil icon next to the name and enter a descriptive title (for example, Project Completion Notification).
- Description: Clearly describe the purpose of this email template.
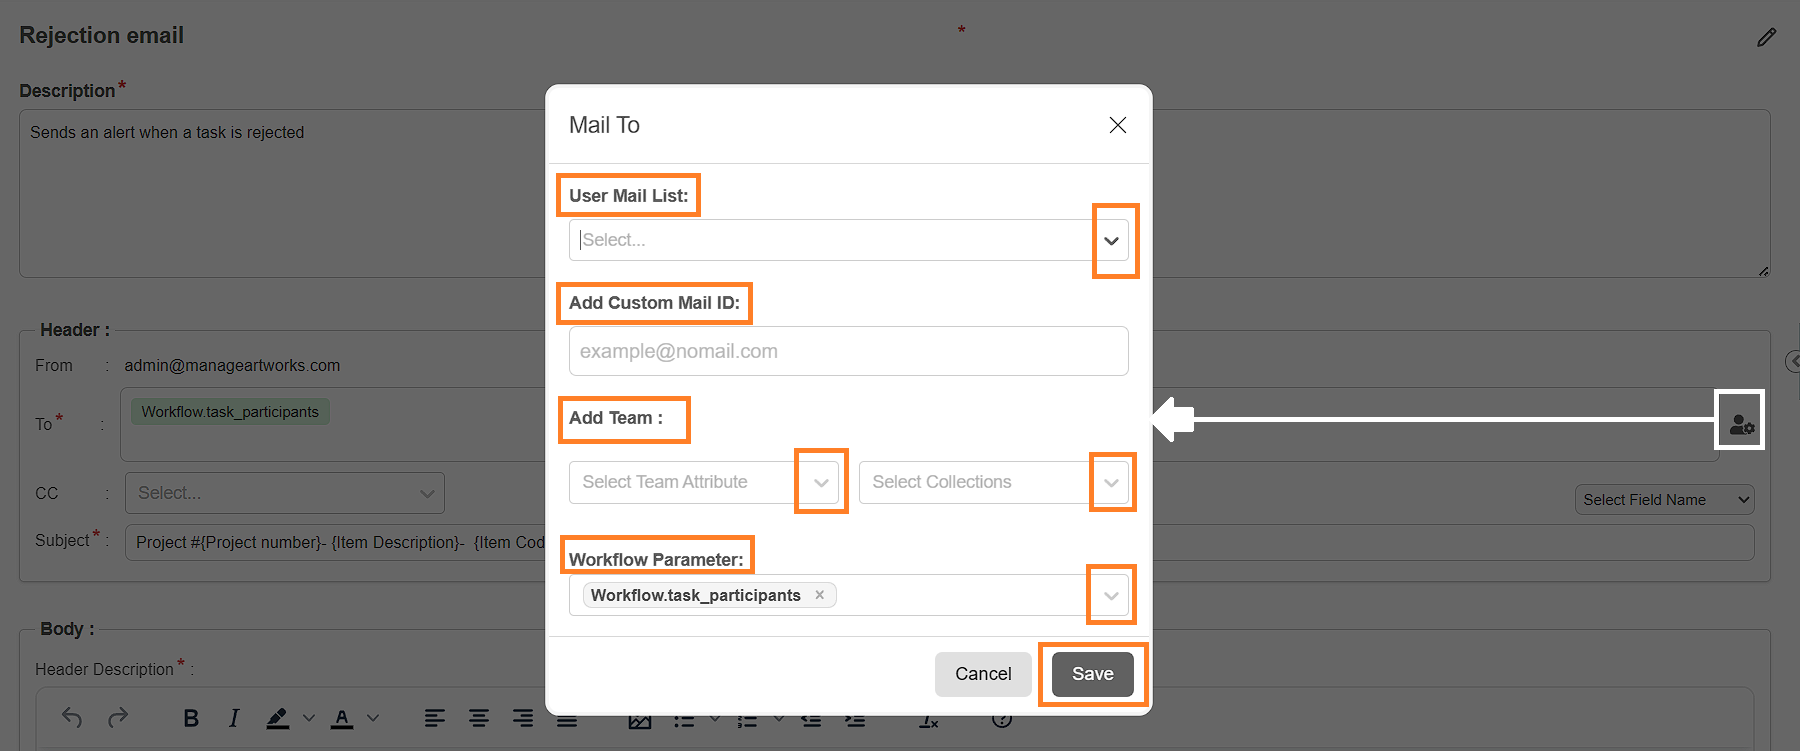
- Configure the Email Header:
- "To" List:
- Click the user settings icon next to the To field.
- In the Mail To pop-up:
- User Mail List: Use the drop-down to select specific users.
- Add Custom Mail ID: Manually enter email addresses and press Enter to add them.
- Add Team:
- Choose a team attribute (such as Department).
- Select the relevant collection (such as Legal).
- Workflow Parameter: Choose from predefined workflow-based recipient groups (for example, Workflow.all_participants).
- Click Save to apply your selections.
- Click the user settings icon next to the To field.
- "CC" List: Use the drop-down to select additional recipients who should receive a copy of the email.
- Subject:
- Enter a subject line that reflects the content of the email.
- To insert dynamic fields, use the Select Field Name drop-down. Field placeholders like
{Project Type}will be replaced with actual values when the email is sent.
- "To" List:
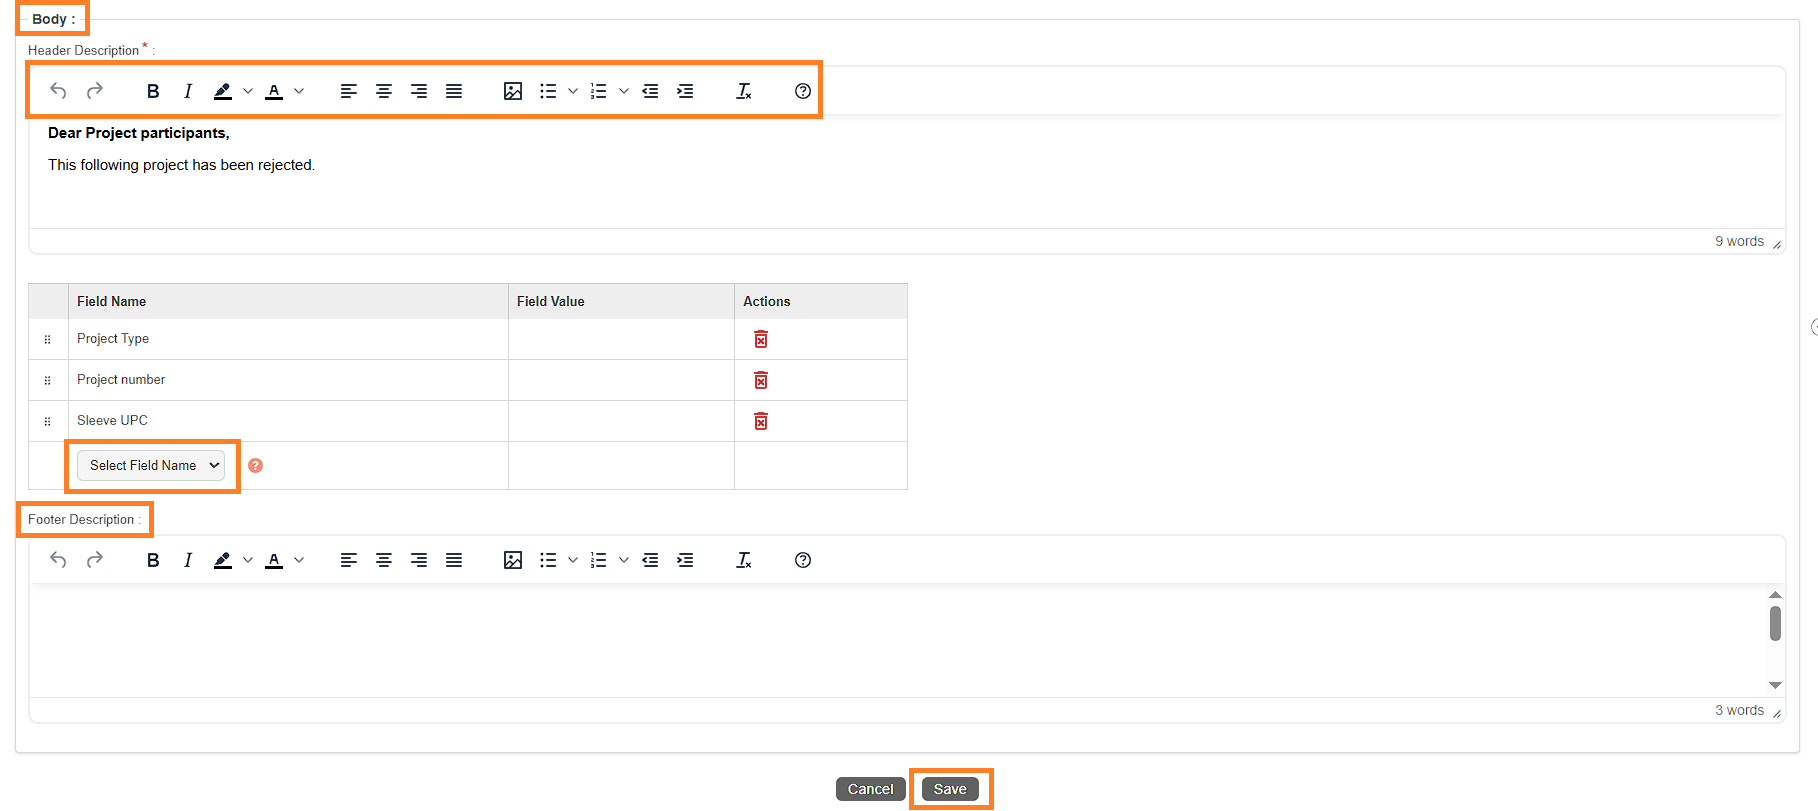
- Customize the Email Body:
- Use the rich text editor to format the body content and clearly convey the message.
- To insert project-specific data:
- Use the Select Field Name drop-down to add dynamic placeholders.
- To remove a field, click the delete icon in the corresponding row.
- The email body dynamically displays values based on the selected project or task, ensuring personalized and accurate information for recipients.
- Update the Footer:
- Modify the footer section to include your company’s standard email signature or any compliance message.
- Click the "Save" button to apply your customizations.


Clone and Customize Email Templates
Users on the Enterprise Plan can clone system-defined email templates to gain full control over both the email content and its triggering logic. This feature allows for precise alignment with your organization’s communication standards and workflow requirements.
Clone an Email Template
To clone a email template:
| Note: The Clone option is not available for the Artwork Share Alert template. Only basic customization of the default template is supported. |
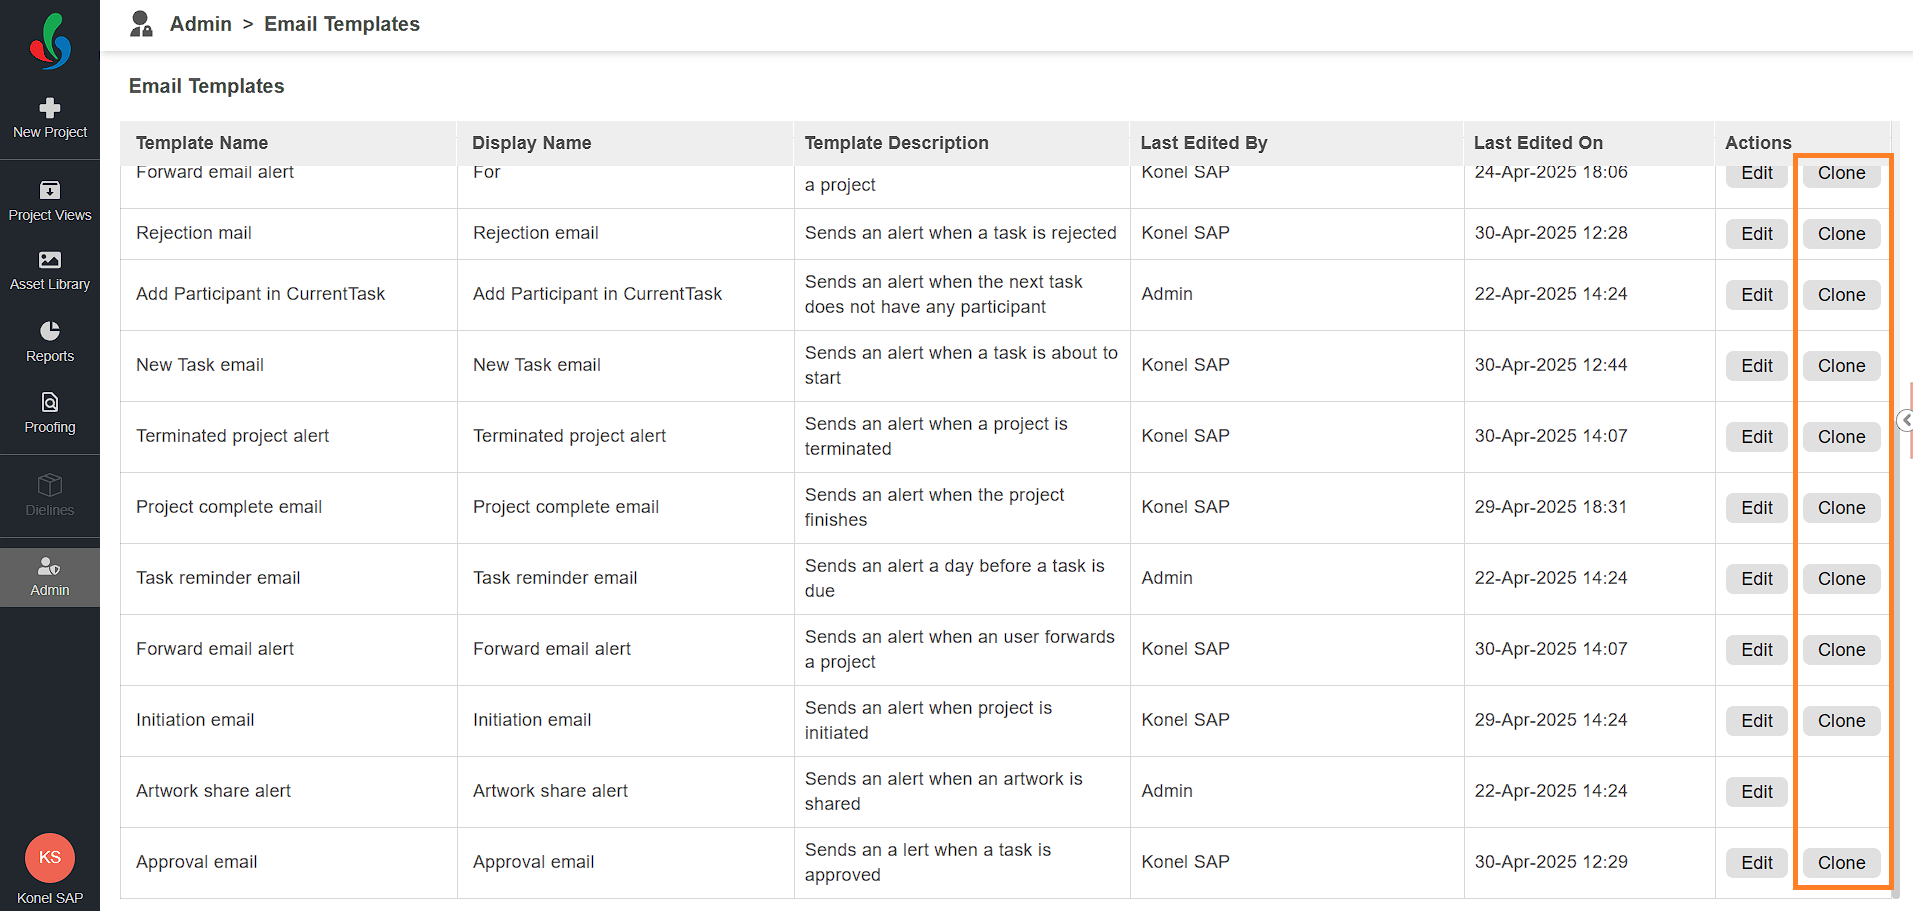
- Go to Admin > Email Templates.
- Locate the template you want to clone.
- Click the Clone button in the Action column associated with the template.
- A duplicate of the template is created, and the system navigates you to the Edit screen.
- Enter a descriptive name for the cloned template.
- Make the desired changes immediately, or click Save to store the cloned template and customize it later.
Note: To continue editing, refer to the Customize a Cloned Email Template section starting from step 4.
Customize a Cloned Email Template
Once you've cloned a template, you can update its name, define its purpose, configure workflow-specific triggers, and edit the email content.
To customize a cloned email template:
| Note: If you are editing the template immediately after cloning, skip steps 1, 2 and 3. |
- Navigate to Admin > Email Templates.
- Click the Edit button associated with the cloned template.
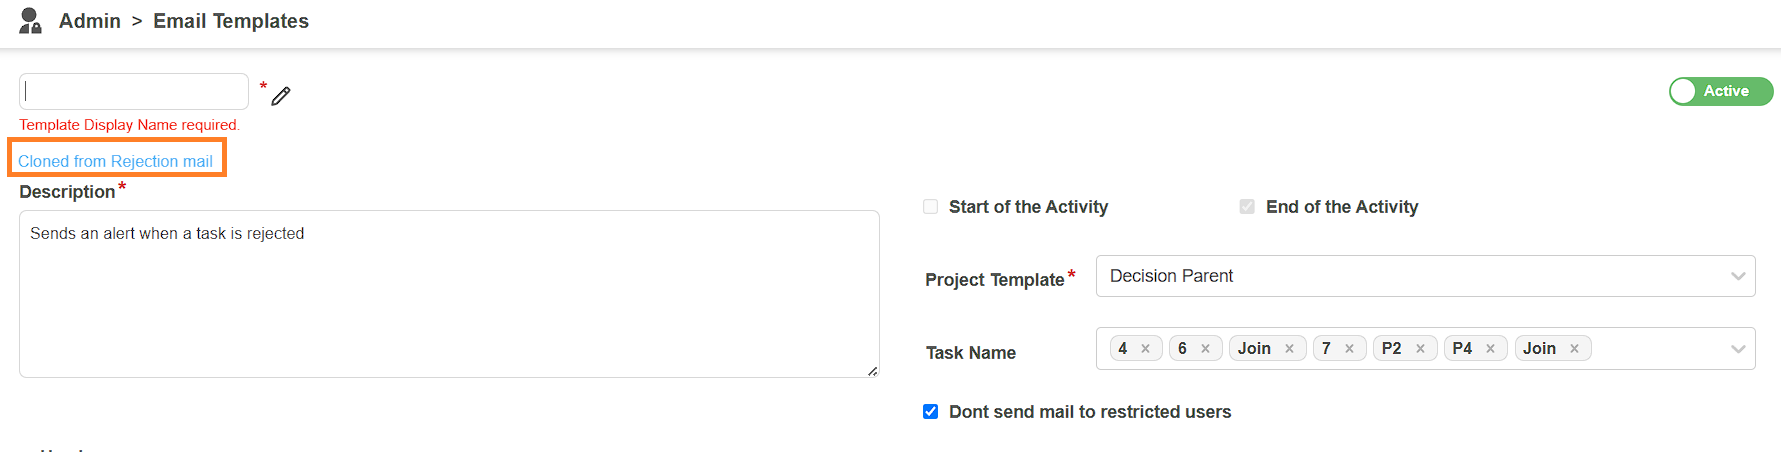
- Rename the template:
- Click the pencil icon next to the template name.
- Enter a clear and descriptive name (for example, Print Proof Approval).
- Add a brief description in the Description field to explain the template’s purpose.
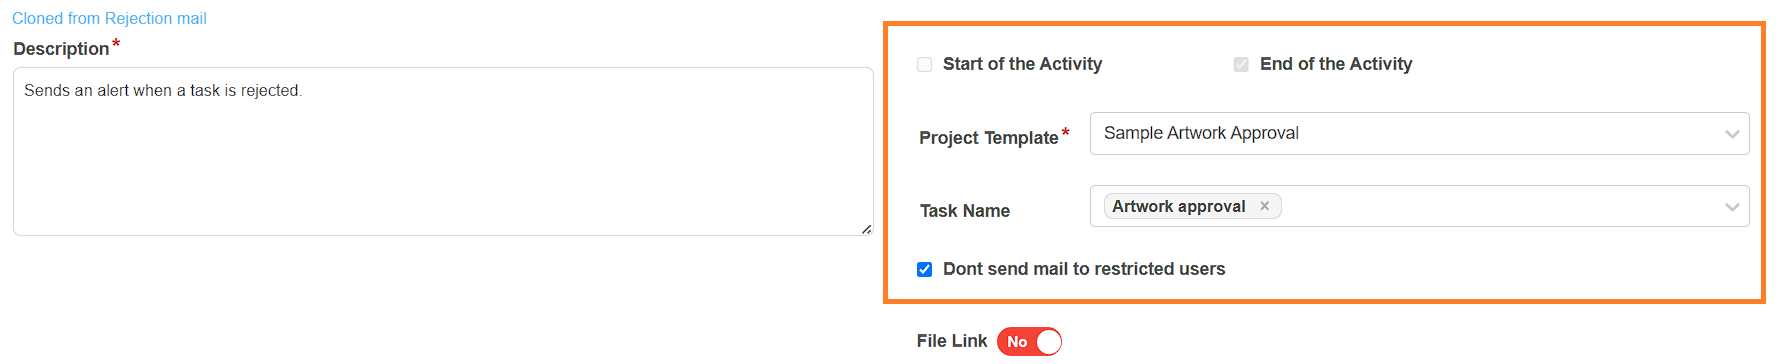
- Configure Workflow Settings:
These settings control when and under what conditions the email is triggered.
Note: Some settings may be preselected and locked depending on the logic of the original system template. For example, when cloning a Rejection Mail Template, the End of the Activity trigger will be locked and enabled by default. So based on which cloned template that you are configuring, you can modify the below settings.- Project Template - Select the project/workflow template where the email will be triggered.
- Task Name (optional) - Choose a specific task as the trigger.
Note: The available tasks depend on the cloned template’s logic. For example, when using Rejection or Approval templates, only Decision tasks from the selected workflow will be available for selection. - Active/In-active Toggle - Enable or disable the email notification without deleting it.
- Don't send mail to restricted users - Select this option to prevent emails from being sent to restricted users.
- Start of the Activity - Select this option to trigger the email when the selected task starts.
- End of the Activity - Select this option to trigger the email when the selected task is completed.
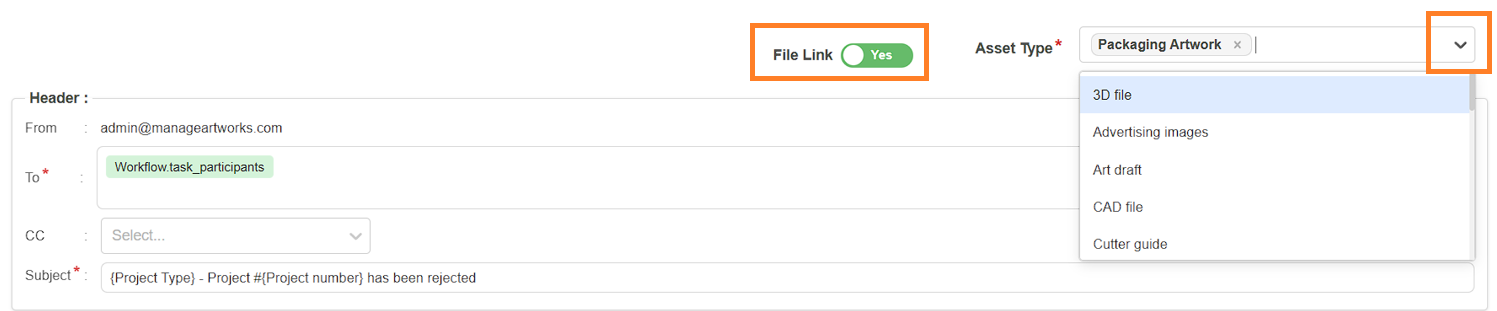
- File Link
The File Link option allows you to specify which asset types (file types) should be included in the email notification.- To configure the file link settings:
- Toggle File Link to Yes.
- From the Asset Type drop-down, select one or more asset types to include.
- Only files matching the selected asset types will be shared via email.
- Example: If a project contains three files of different asset types and you select two of those types, only the files matching the selected types will be attached to the email.
- This ensures that users receive only relevant files based on the configuration, enhancing email precision and reducing unnecessary attachments. Additionally, restricted users are allowed access only to specific asset types. If a restricted user is not authorized to access the selected asset types, they will not receive any attachments.
- Recipients can click the file link in the email to download and access the shared files.
Note: By default, all file links included in email notifications expire after three days. You can update this duration in the Admin > Share Link Validity settings.
- To configure the file link settings:
- Configure the Email Header:
- "To" List:
- Click the user settings icon next to the To field.
- In the Mail To pop-up:
- User Mail List: Use the drop-down to select specific users.
- Add Custom Mail ID: Manually enter email addresses and press Enter to add them.
- Add Team:
- Choose a team attribute (such as Department).
- Select the relevant collection (such as Legal).
- Workflow Parameter: Choose from predefined workflow-based recipient groups (for example, Workflow.all_participants).
- Click Save to apply your selections.
- Click the user settings icon next to the To field.
- "CC" List: Use the drop-down to select additional recipients who should receive a copy of the email.
- Subject:
- Enter a subject line that reflects the content of the email.
- To insert dynamic fields, use the Select Field Name drop-down. Field placeholders like
{Project Type}will be replaced with actual values when the email is sent.
- "To" List:
- Customize the Email Body:
- Use the built-in rich text editor to compose and format your message.
- To add project-specific fields in the email body:
- Use the Select Field Name drop-down to add dynamic placeholders.
- To remove a field, click the delete icon in the corresponding row.
- The email body dynamically displays values based on the selected project or task, ensuring personalized and accurate information for recipients.
- Update the Footer:
- Modify the footer section to include your company’s standard email signature or any compliance message.
- Click Save to apply all customizations to the cloned email template.