Nutrition Fact Templates
The Nutrition Fact Template allows users to set up a predefined structure for nutrition facts tables. All formatting, order, and layout details are configured in advance, so at runtime, users only need to enter the values—ensuring consistency in appearance across all artworks.
By default, nutrition templates for specific regions are available in Copy Manager. Users can modify existing templates, clone and update them, or create new template from scratch.
How do I create a new Nutrition Fact Template?
Create a New Nutrition Fact Template
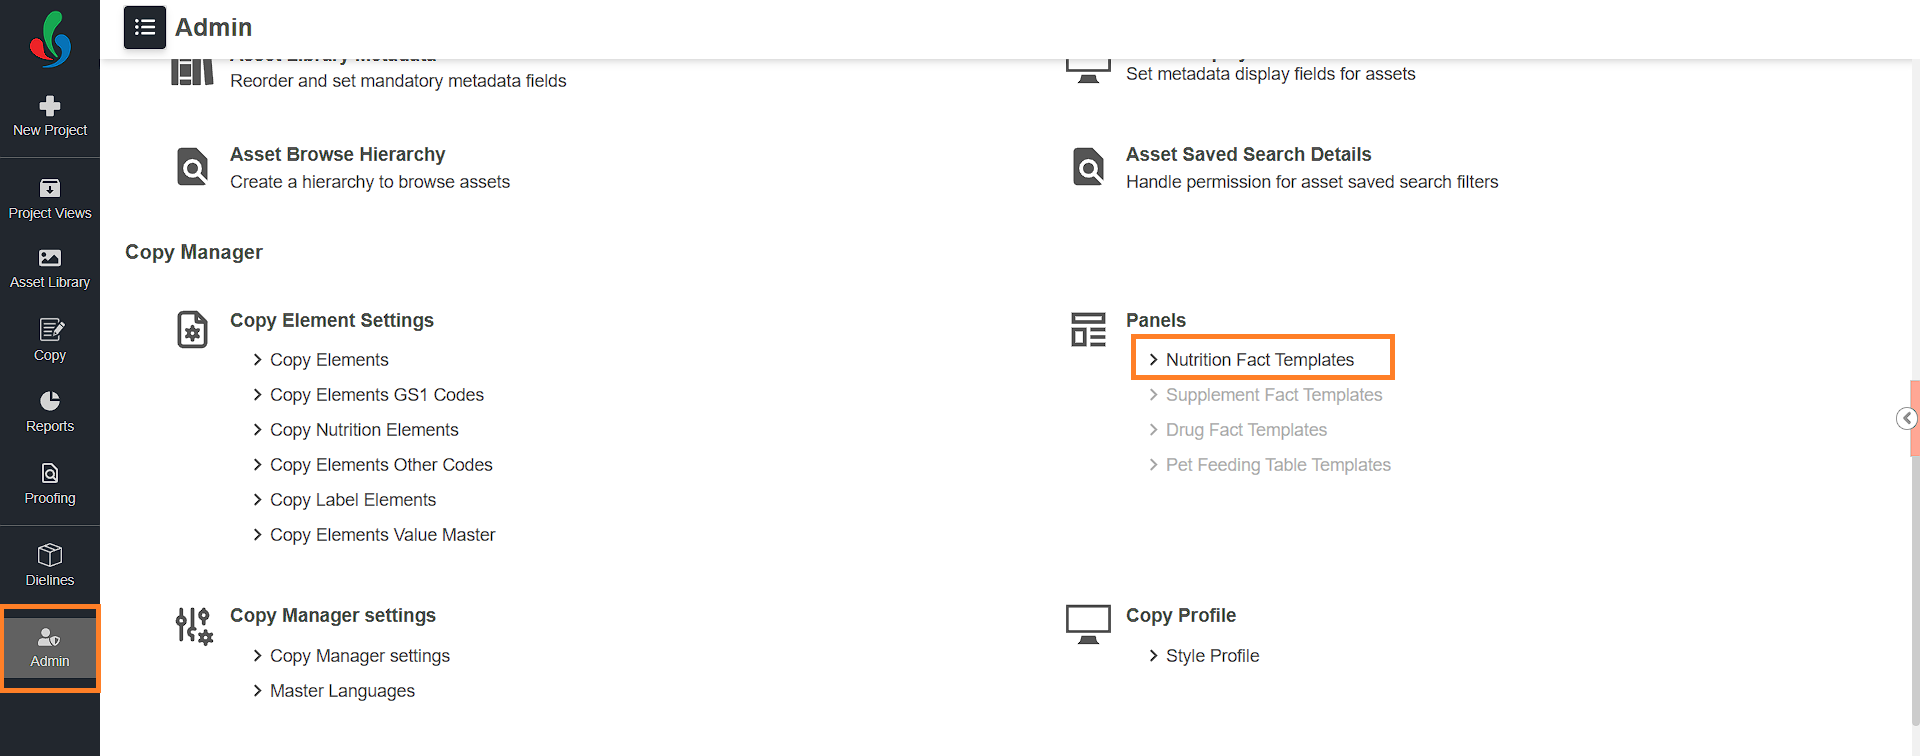
01. Access the Admin Module
- Log in to your ManageArtworks account.
- Navigate to the Admin module.
- Under Panels Settings, select Nutrition Fact Templates.
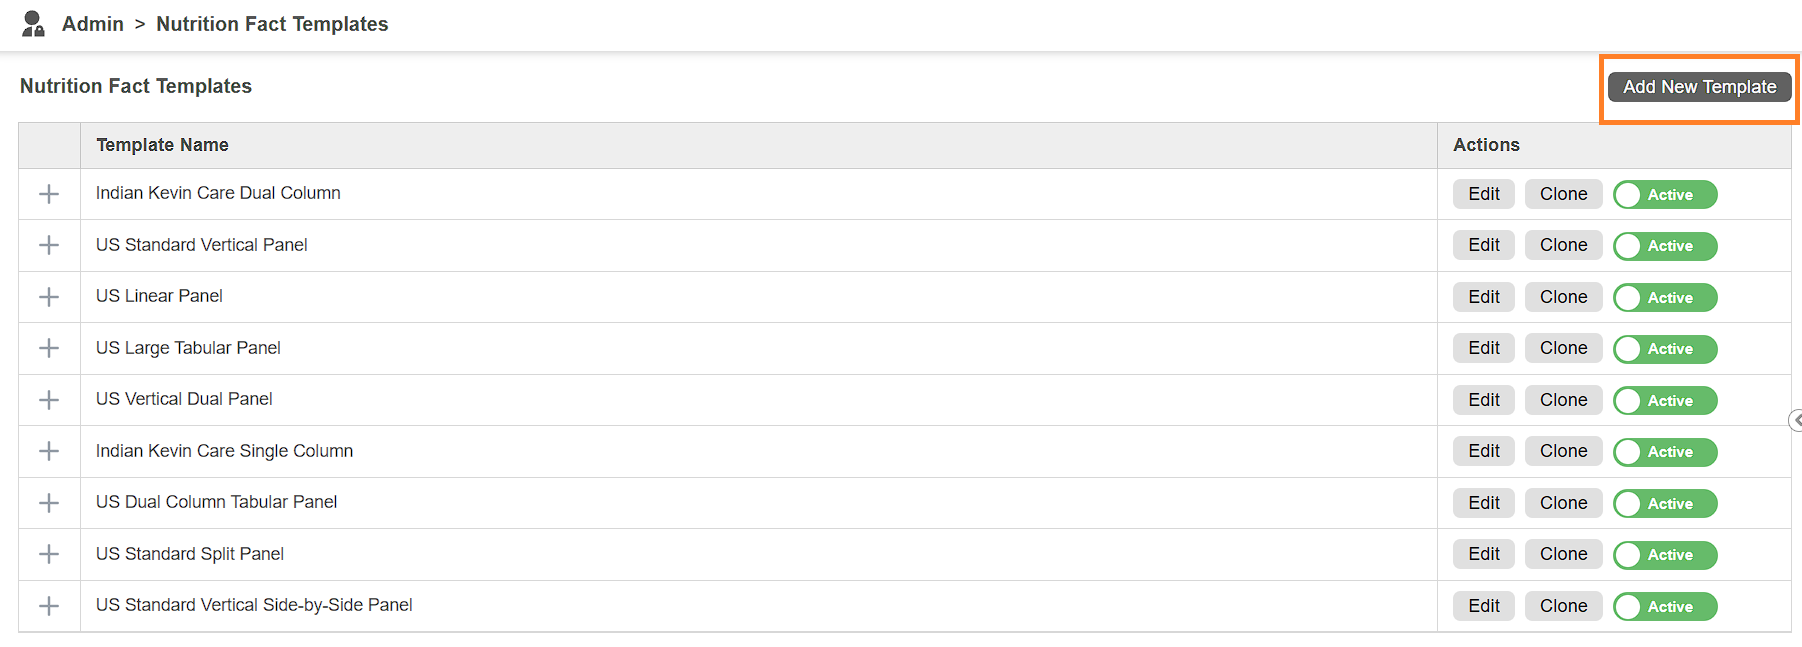
02. Add/Create New Template
- Click the Add New Template button in the upper-right corner of the screen.
- In the Add Template pop-up, configure the template as needed.
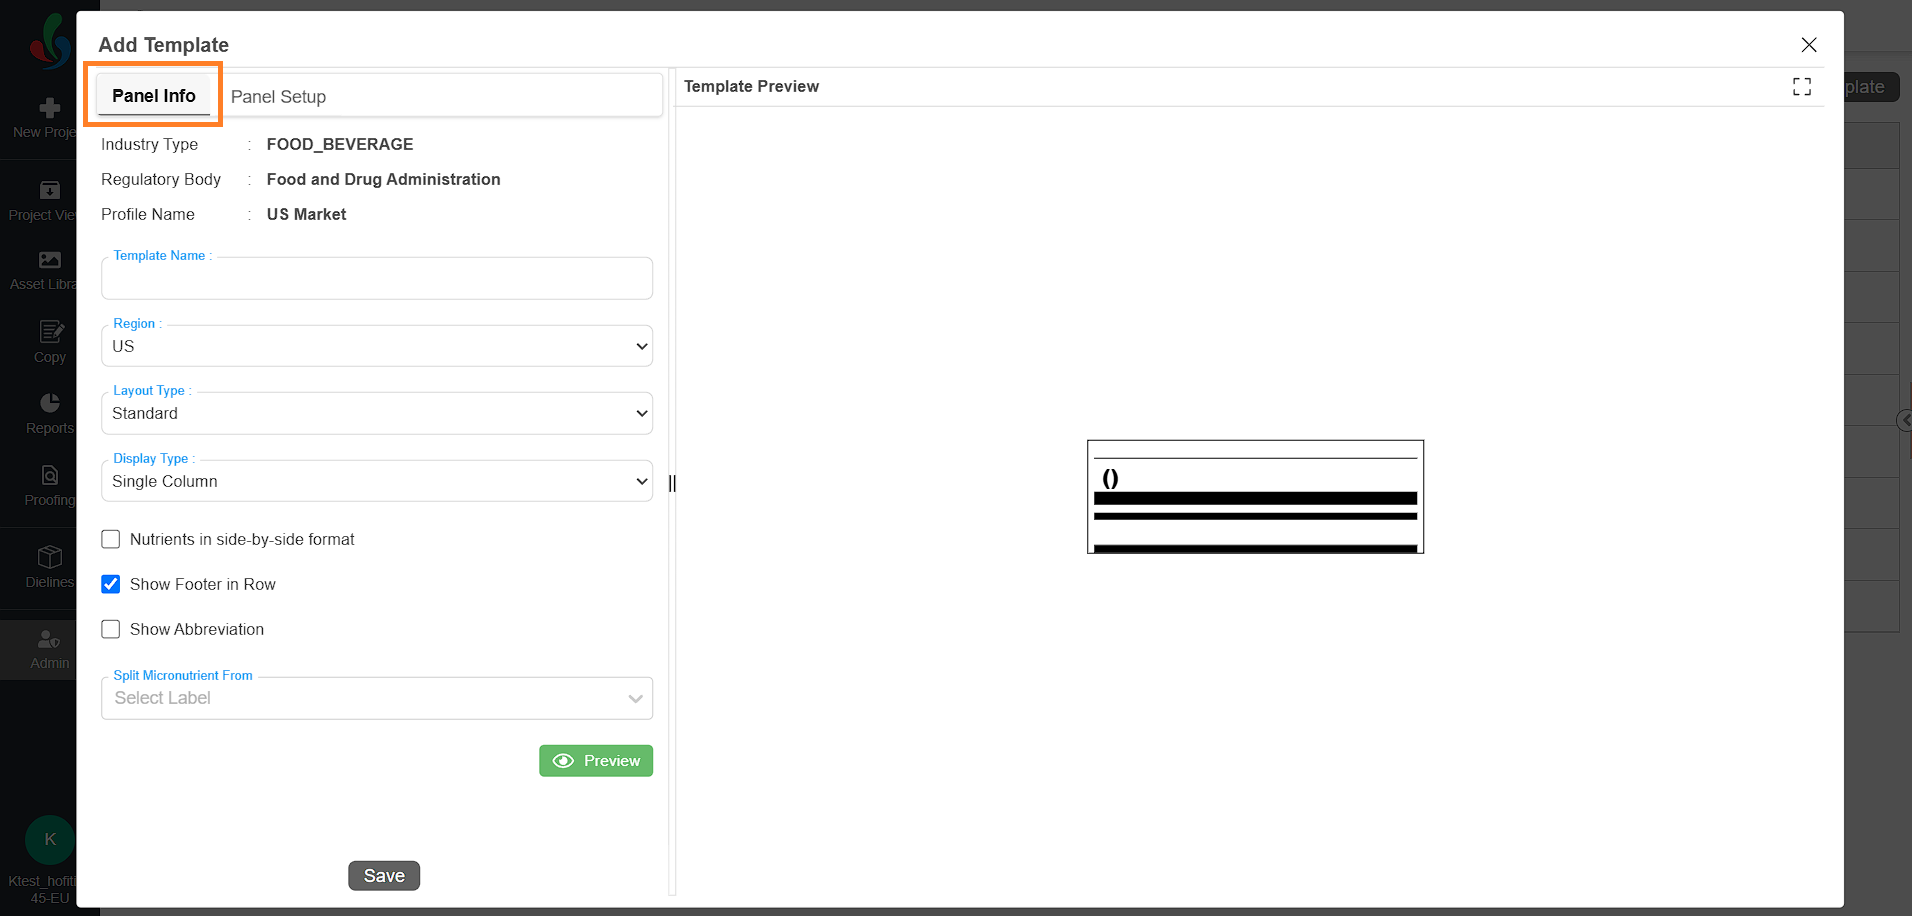
03. Configure Panel Info Tab
Allows you to define the basic information and layout for the template.
- Template Name: Enter a name for the template.
- Region: Select the applicable region from the drop-down menu.
- Layout Type: Select a layout type from the drop-down menu that best suits your template needs.
Note: The available layout options may vary depending on the selected region. - Display Type: Choose how the table should appear:
- Single Column: One-column layout.
- Multi Column: Two-column layout.
- Additional Display Options:
Note: The available additional display options may vary depending on the selected layout.
Select the checkbox next to each option to enable it in the Nutrition Facts template:- Nutrients in Side-by-Side Format: Enable this to align nutrient values horizontally.
- Show Footer in Row: Displays the footer in the Nutrition Facts table.
- Show Abbreviation: Display abbreviations alongside element names.
- Show UOM with Element Name: Displays units of measurement with element names.
04. Configure Panel Setup Tab
Allows you to build the nutrition facts table.
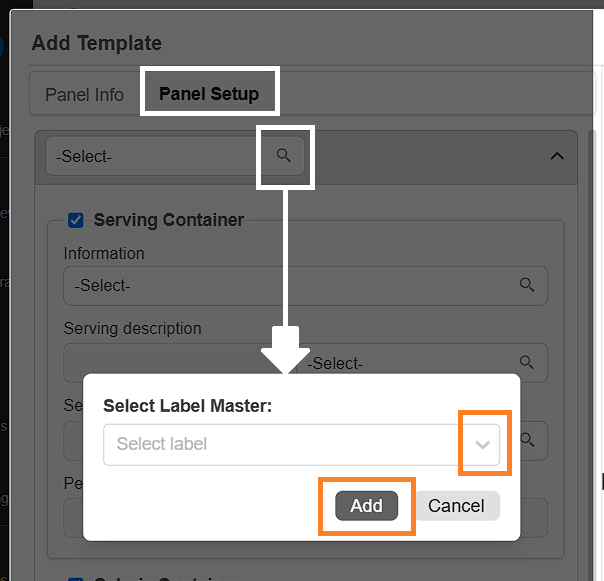
- Add the table title:
- Click the lookup icon at the top of the section.
- Click the drop-down menu and select the desired element as table title.
- Once selected, click the Add button.
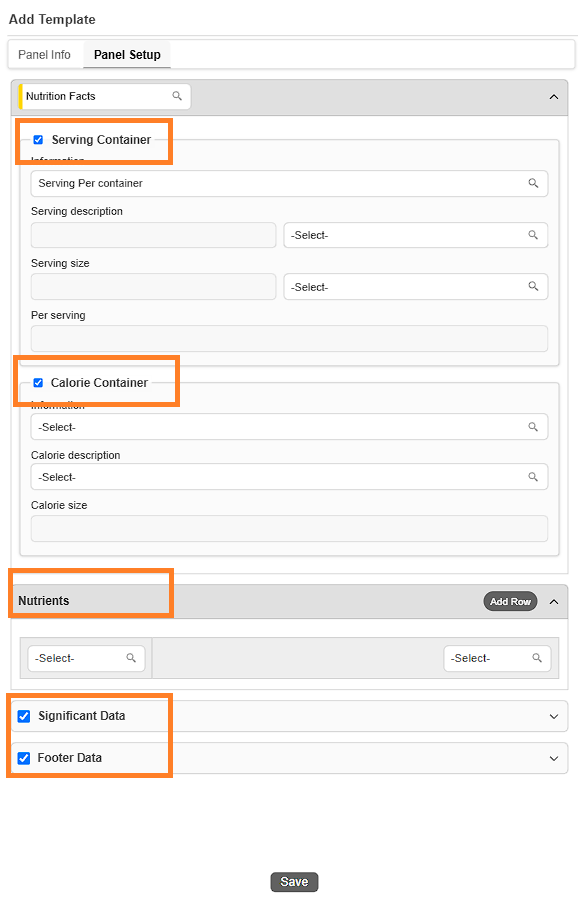
- Add elements to the sections:
All elements added to the template will follow the formatting defined in the system’s Style Profile. To update or customize the appearance of these elements, refer to the Style Profile settings.- The template configuration includes five major sections:
- Serving Container
- Calorie Container
- Nutrients
- Significant Data
- Footer Data
Note: All sections, except Nutrients, can be added to or removed from the template by checking the corresponding checkboxes.
- In each applicable section:
- Click the lookup icon.
- In the pop-up, click the drop-down menu and select the desired element from the list.
- Once selected, click the Add button.
- The selected element will be placed automatically based on its type and section relevance.
- The template configuration includes five major sections:
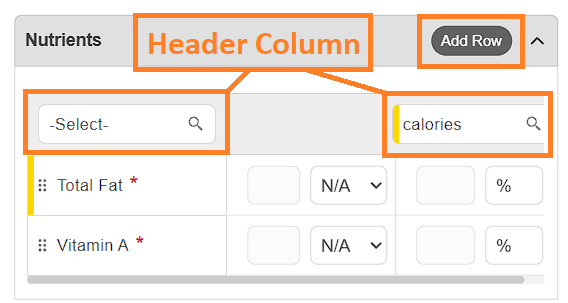
- Add Nutrient Elements:
The Nutrients section typically displays only the elements that require values (e.g., Total Fat, Vitamin A). This section is designed in a two-column format—one for the nutrient name and another for the corresponding value.
In some cases, you may want to display a heading for the value column (e.g., "per 100 ml" or "per serving"). You can configure this by clicking the lookup icon in the column header and selecting the appropriate element.- Click Add Row next to the Nutrients section header.
- In the dialog box, choose the desired nutrient from the drop-down list.
- If required, enable the Is Mandatory checkbox if the element must always be filled during data entry.
- Click Add to insert the element into the template.
Note: The values for these elements will be provided during the content collection stage. Based on the selected Nutrition Type (e.g., macronutrients, vitamins and minerals) defined during element creation, items are automatically grouped under the correct category in the nutrition table.
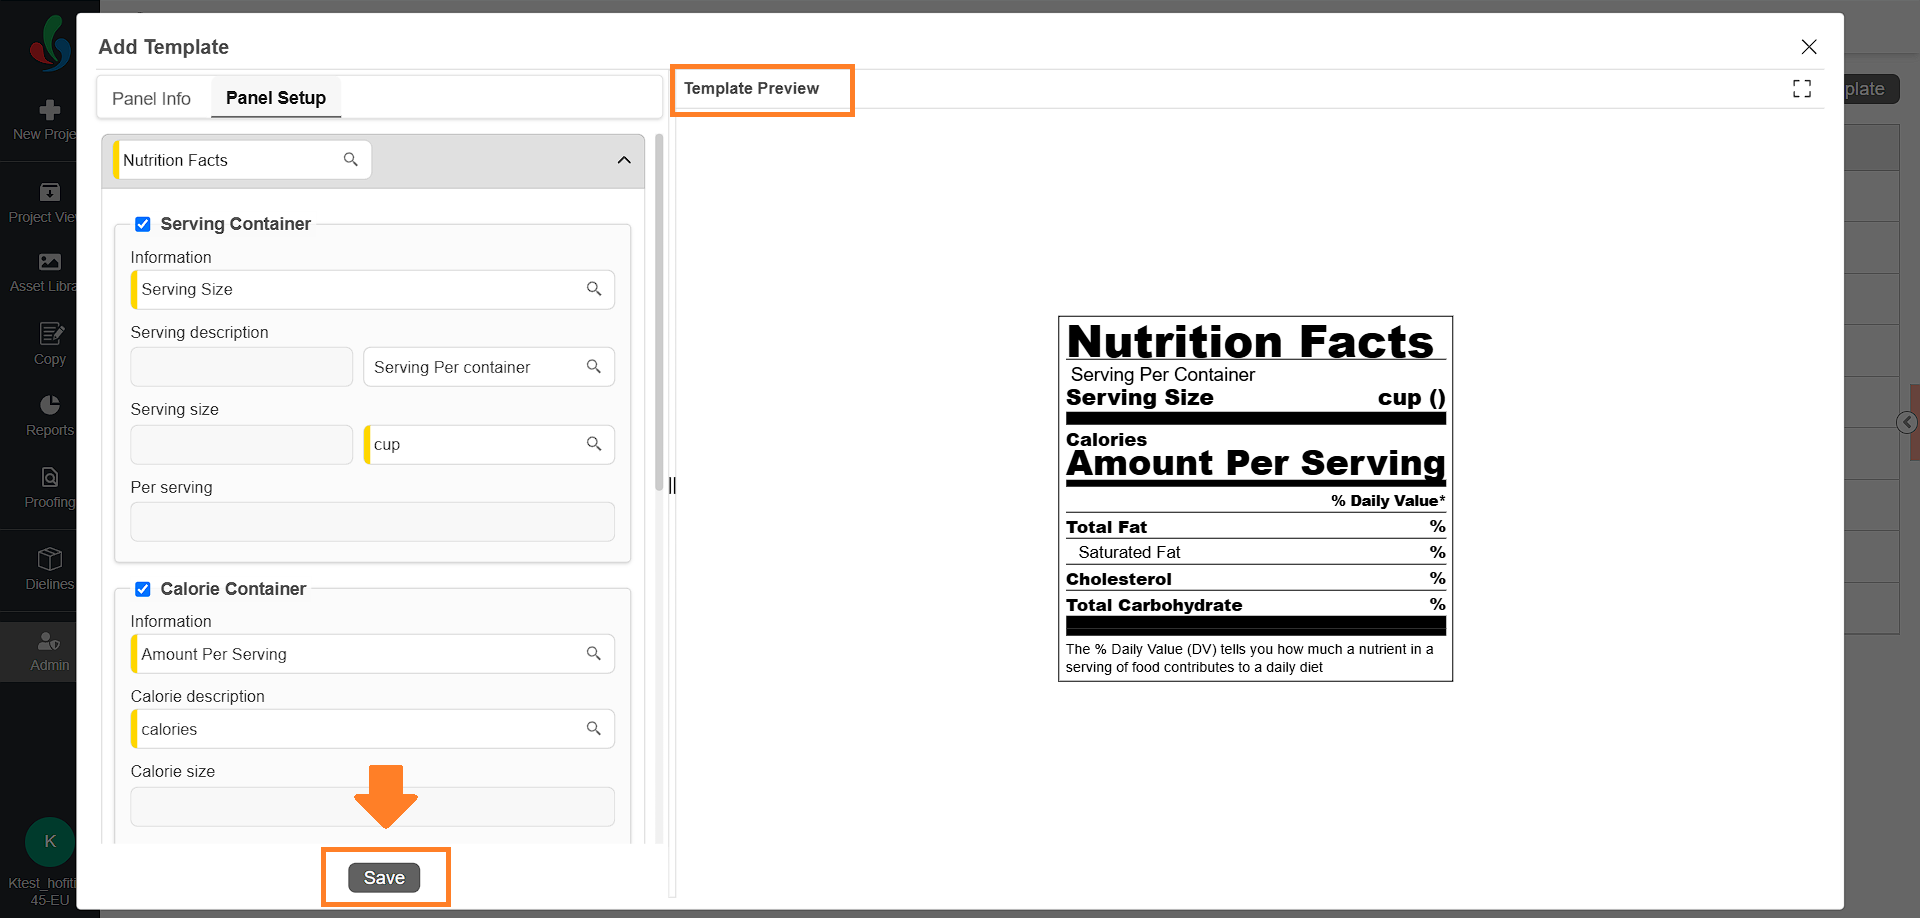
05. Preview and Save
- As you configure the template, a real-time preview appears on the right side of the window.
- Once all settings are complete, click Save to add the new nutrition fact template to the system.
How do I edit the Nutrition Fact Template?
Edit Nutrition Fact Template
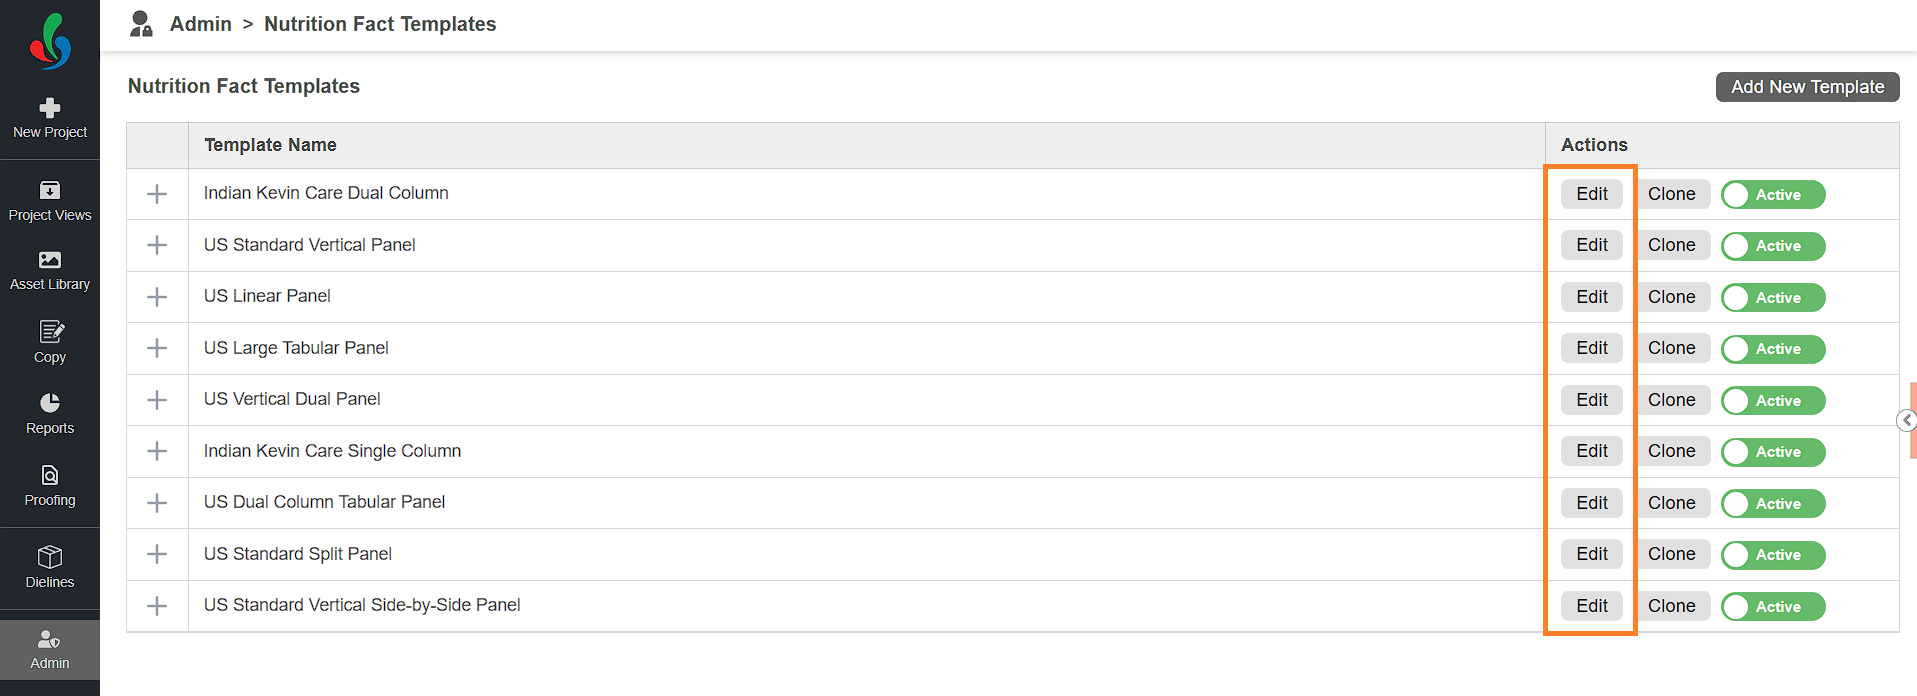
- Log in to your ManageArtworks account.
- Navigate to the Admin module.
- Under Nutrition Fact Settings, select Nutrition Fact Templates.
- Click Edit in the action column next to the template you want to modify.
- Update the template as needed.
Note: Refer to steps 03, 04 and 05 in the Create a New Nutrition Fact Template section for guidance on editing the template.
How do I clone and customize the Nutrition Fact Template?
Clone Nutrition Fact Template
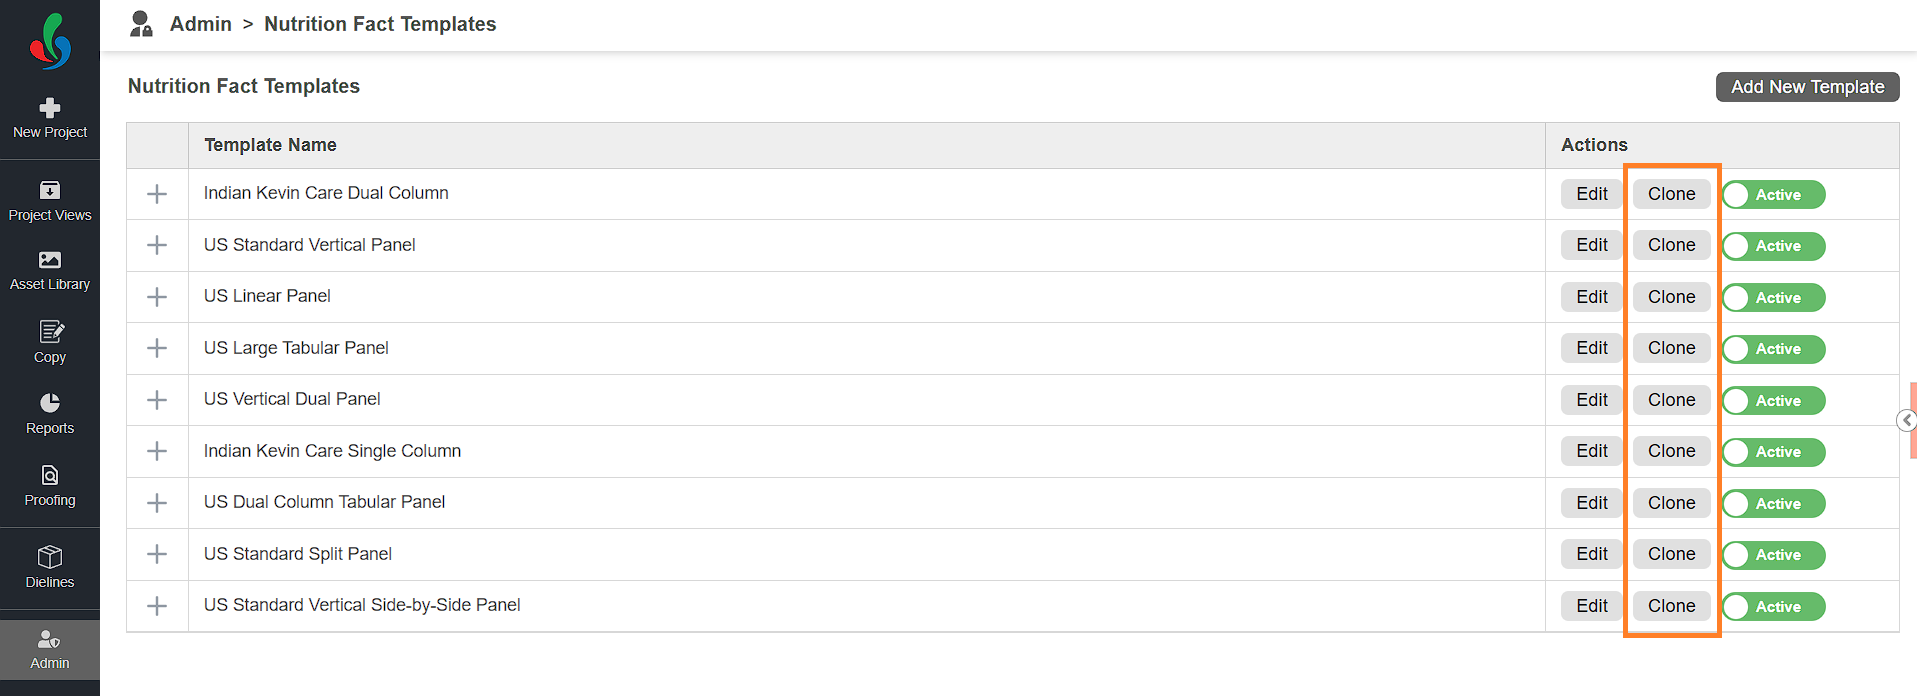
If you need to make minor changes to an existing template without modifying the original or creating a new one from scratch, you can use the Clone option.
To clone the template:
- Log in to your ManageArtworks account.
- Navigate to the Admin module.
- Under Nutrition Fact Settings, select Nutrition Fact Templates.
- Click Clone in the action column next to the template you want to duplicate.
- Edit the template as needed.
Note: Refer to steps 03, 04 and 05 in the Create a New Nutrition Fact Template section for guidance on editing the template.
How do I activate or deactivate a nutrition fact template?
Activate or Deactivate a Nutrition Fact Template
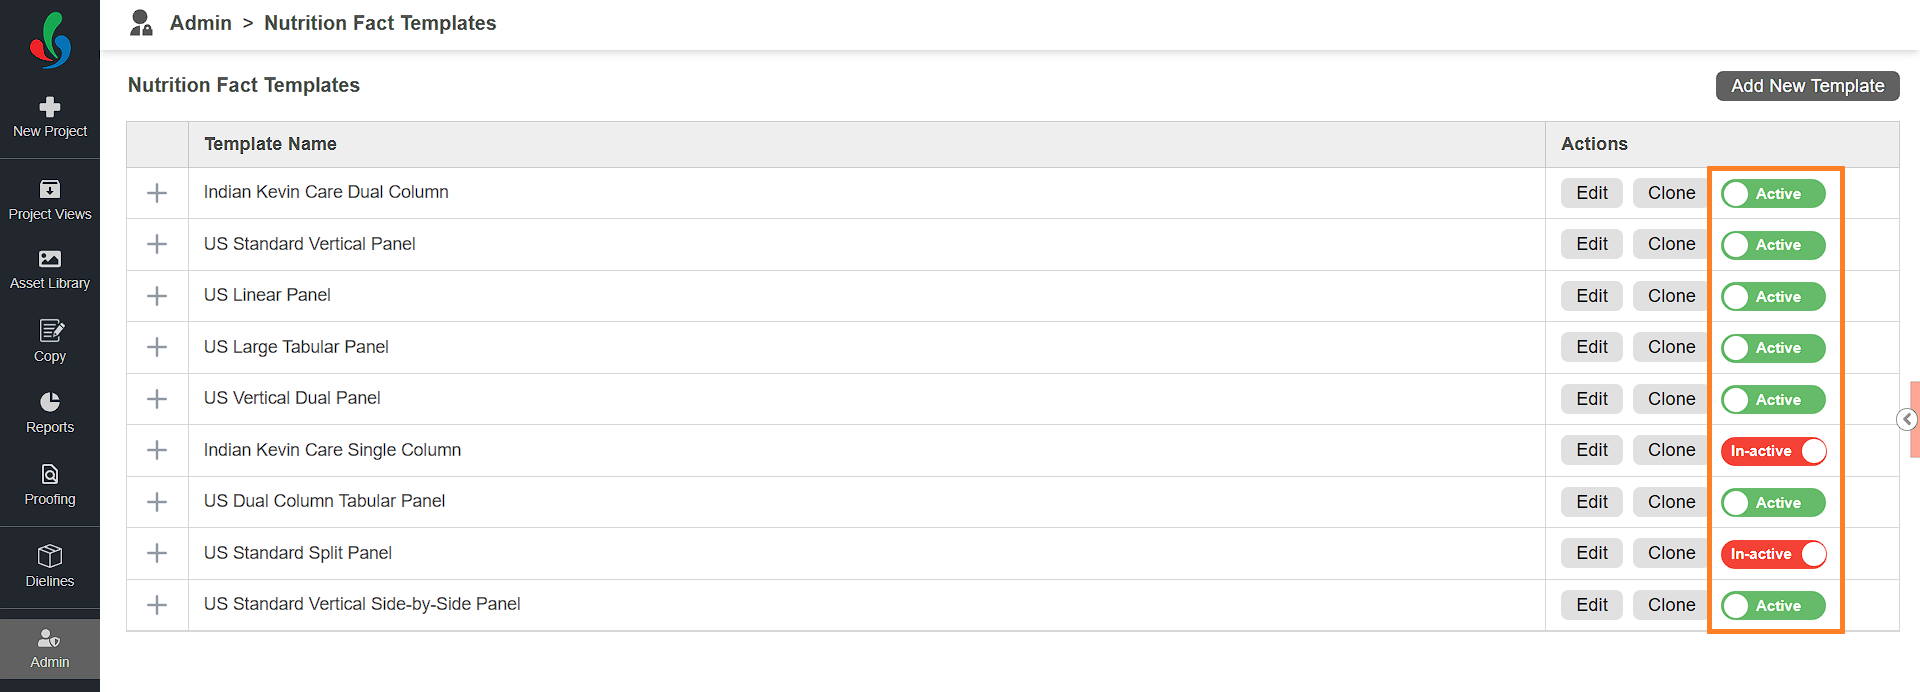
You cannot delete a Nutrition Fact Template—whether it is a system-provided, created, or cloned template. However, you can deactivate a template to prevent users from selecting it.
To activate or deactivate a template:
- Log in to your ManageArtworks account.
- Navigate to the Admin module.
- Under Nutrition Fact Settings, select Nutrition Fact Templates.
- In the Actions column, toggle the Active/In-active switch next to the template you want to activate or deactivate.
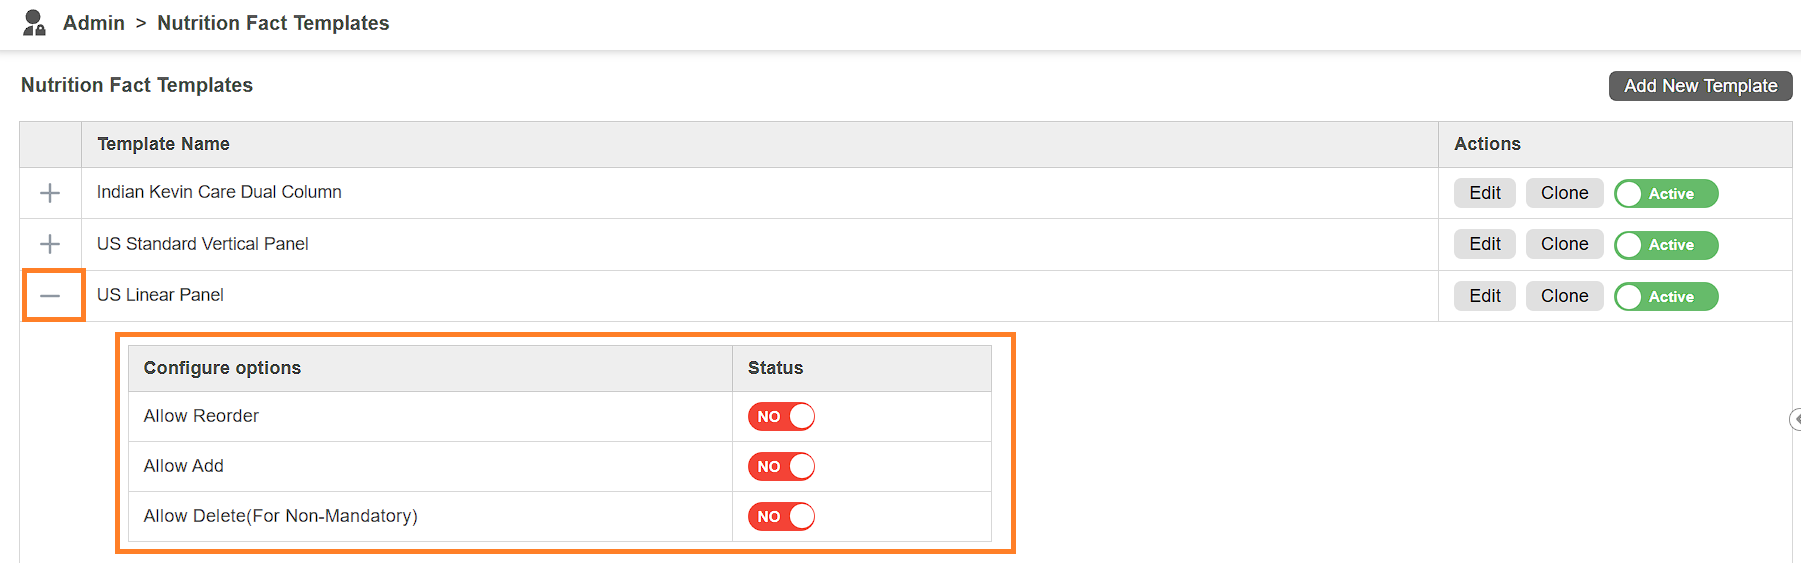
Additional Options
To view and configure additional options:
- Click the Expand (plus) icon next to the template name.
- The following configuration options are available:
- Allow Reorder — Allows users to reorder elements within the template during run time.
- Allow Add — Allows users to add new elements to the template during run time.
- Allow Delete (for Non-Mandatory) — Allows users to delete non-mandatory elements from the template.
- Each option can be enabled or disabled by toggling the corresponding switch.