
Step 1: Create a New Project Template for Content Collection (Parent Template)
 | Note: Copy Manager is an enterprise feature available exclusively to users on the Enterprise plan. For more information on all ManageArtworks plans, click here. |
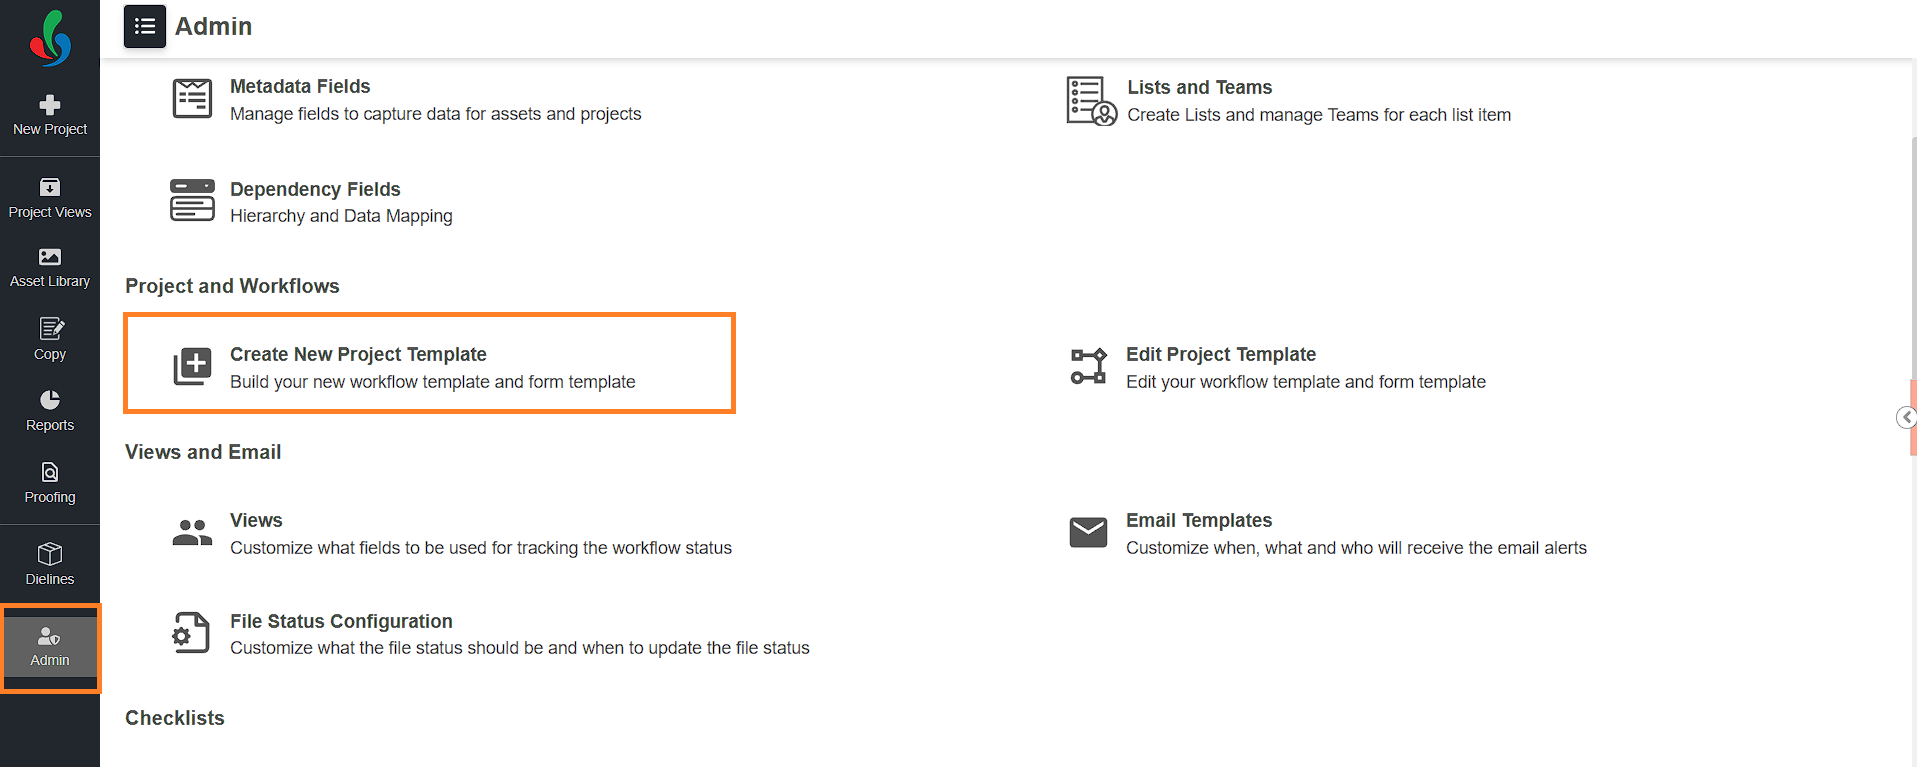
01. Access the Admin Module
- Log in to your ManageArtworks account.
- Navigate to the Admin module.
- Click the Create New Project Template tab.
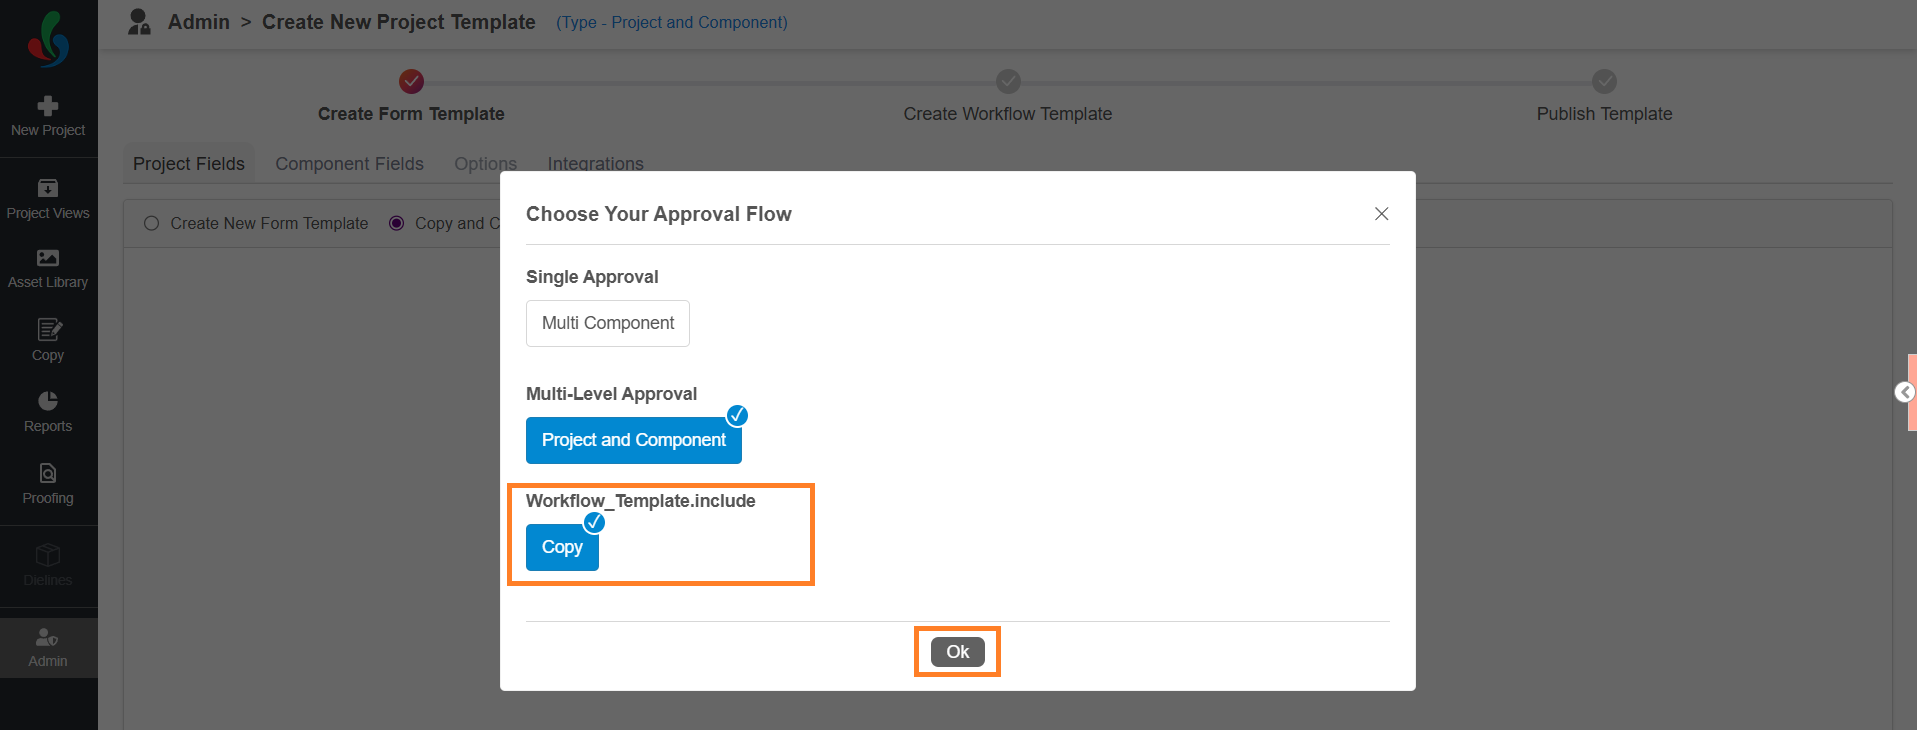
02. Choose Approval Flow
- Select the required approval flow. For more details, refer to Approval Flow Selection.
- Make sure that the Copy option under the Workflow Template Includes section is selected.
Note: Selecting Copy is mandatory to create a workflow template that includes copy. - Click OK to proceed.
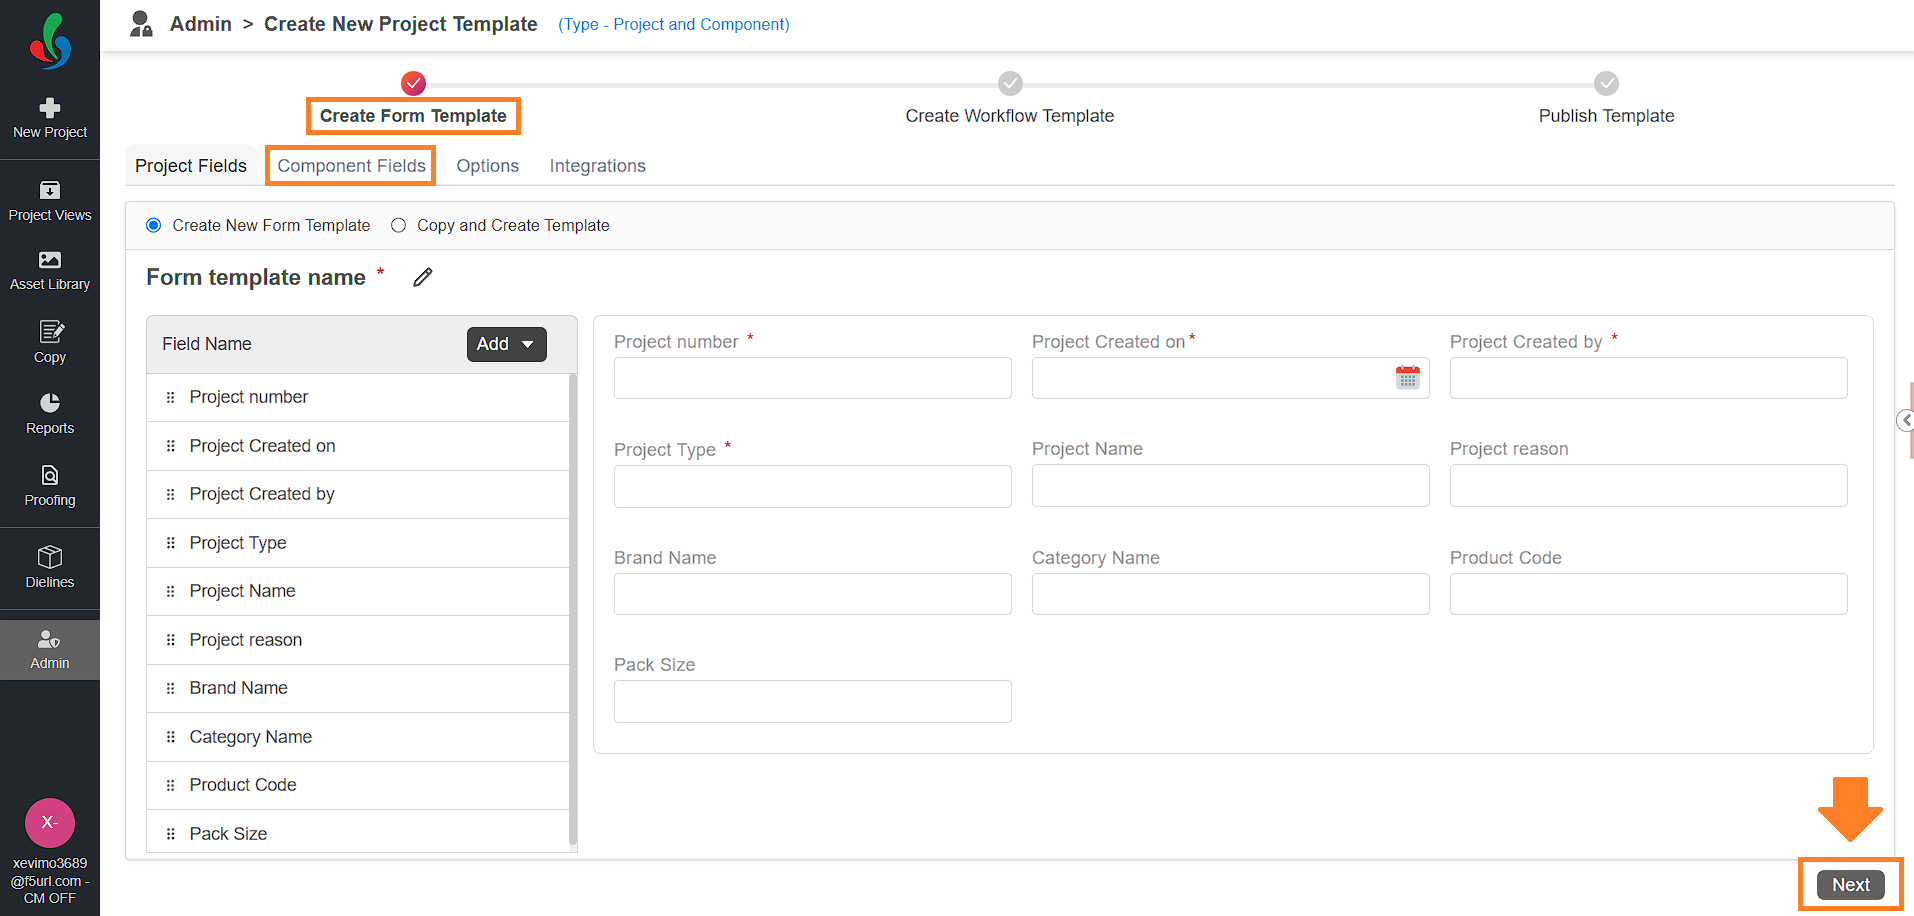
03. Configure Form Template
- Set up the Form Template as needed. For detailed steps, refer to: Step 2: Create Form Template.
Note: It is mandatory to configure components fields for Copy Manager to function correctly. - Once the form template is configured, click Next to proceed to the Workflow Template setup.
04. Configure Workflow Template
When configuring the workflow for Copy Manager, it's important to include Copy Manager-specific tasks. These tasks are different from standard workflow tasks and are designed to manage the copy content life-cycle effectively.
By default, workflow templates support two task types: Normal and Decision. However, when used with Copy Manager, these task types can be customized to behave differently based on the Copy Task Type configured for each task. Each Copy Task Type serves a specific purpose and can be configured depending on how you want users to interact with the content.
Copy Task Types
- Only Set-up (Optional)
Allows users to configure the structure of copy content—such as adding, editing, or removing elements, assigning participants, and selecting translation languages. However, users cannot input actual content at this stage. - Copy Input
Enables assigned users to enter content for each assigned element. - Copy Approval
Facilitates the approval or rejection of content submitted during the Copy Input task. Only assigned users can take approval actions. - Translation Language Input (Optional)
Allows users to input translated content for the assigned elements in the selected languages. - Translation Language Approve (Optional)
Allow users to review and approve or reject the translated content submitted in the previous task. - Only View (Optional)
Grants users view-only access to copy content. This is useful in workflow-related tasks where users need to see content but not modify or act on it. - Artwork Review (Optional)
Acts as a final review checkpoint. Participants in this task have elevated privileges, including the ability to add, edit, or delete elements, and to move the task forward. This is typically used for supervisory or final approval roles.
 | Note: A workflow template can include only one Copy Task per template. For example, you cannot have two Copy Input tasks in the same workflow template. However, you can add multiple tasks with the Only View Copy Task if needed. Although the Artwork Review copy task is optional, it is recommended to include it in a workflow template for better review efficiency. |
Configure the Workflow for Content Collection
To create a workflow template for content collection using Copy Manager:
- Configure the Start Activity
- Begin by setting up the Start activity as usual.
- Add a Copy Set-up Task (Optional)
- The Copy Set-up task provides a dedicated step for organizing copy content—such as add/delete element, participant assignment, and translation settings.
- This task is not mandatory. You can start the workflow directly with the Copy Input task if preferred.
Best Practice: Use a Copy Set-up task to maintain a well-structured and scalable copy content collection process.
- Add Copy Input and Copy Approval Tasks (Mandatory)
- Copy Input — for entering copy content by assigned participants
- Copy Approval — for routing the submitted copy for review and approval.
- These tasks are essential for collecting content and routing it for approval.
- Ensure both tasks are included in every content collection workflow.
- Add Translation Tasks (If applicable)
- If translations are required, include the following tasks:
- Translation Language Input
- Translation Language Approval
- If translations are required, include the following tasks:
- Add Artwork Review Task (Recommended)
- Although optional, including an Artwork Review task is recommended to validate the final output.
- Add Additional Tasks (Optional)
- You may include other tasks in the workflow as needed.
- For single approval project templates, add any additional tasks directly within the same template.
- For multi-level approval project templates, if the tasks relate to workflow processing (rather than content collection), place them in the child template instead.
- Refer to Add Tasks to Your Workflow for detailed instructions.
- Publish the Template
- Once configured, publish the project template.
- For single approval templates — you can start using the template immediately.
- For multi-level approval templates — proceed to Step 2.
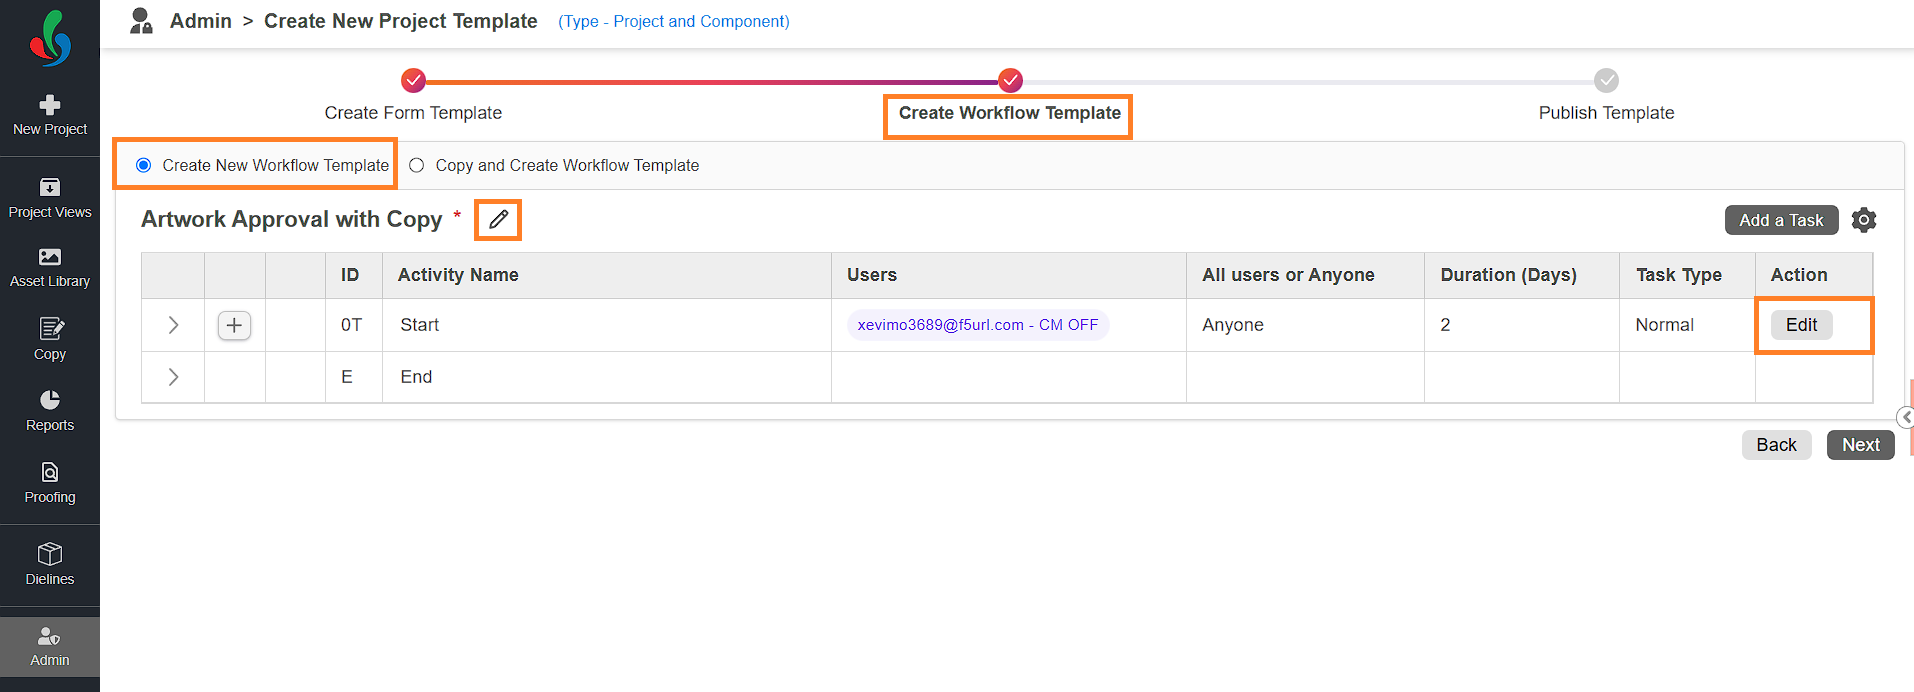
1. Configure the Start Activity
- Make sure that the Create New Workflow Template option is selected.
- Click the edit icon next to the workflow template placeholder name and enter a descriptive name (e.g., Artwork Approval with Copy) for your workflow template.
- Configure the Start activity.
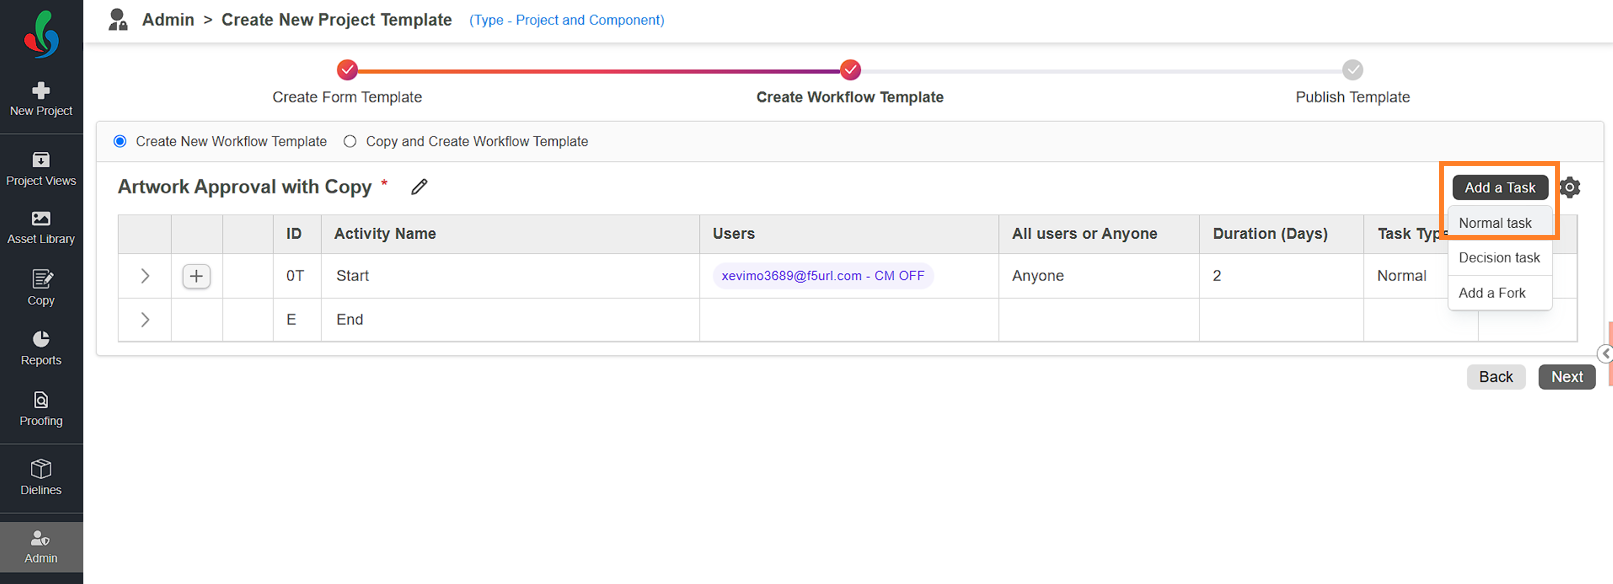
2. Add a Copy Set-up Task (Optional)
- Click the Add a Task button and select Normal Task from the task type options.
Note: Only Normal Tasks can be configured as the Only Set-up copy task type.
- Upon selection, you’ll see four configuration tabs:
- Task Information
- Validation
- Instructions
- Copy.
- Configure the first three tabs as needed using the Configure a Normal Task guide.
- Copy Tab
Allows you to configure the task for Copy Manager- To turn the task into a Copy Manager set-up task:
- Go to the Copy tab.
- Toggle the Copy Task switch to Yes.
- From the Copy Task Type dropdown, select Only Set-up task type.
- The Only Set-up task type is optional and is used when you want to create a dedicated task just for setting up the elements (e.g., defining how many elements are needed, assigning participants, or configuring translation languages). If you want the same task participants to immediately begin entering content, you can skip the "Only Set-up" task and start with a Copy Input task instead. However, using "Only Set-up" allows for a more organized and error-free setup process.
- Additional Configuration Options:
You can fine-tune the task behavior using the following options within the Copy tab.
Note: Depending on the copy task type that you have selected, the below configuration will be limited to select.- Can Edit Assigned Users: Lets task participants to assign/modify the element's participants.
- Allow Admin (Add/Delete/Edit Elements): Allows users in the start activity to make changes to element configuration during the project runtime.
- Allow Task Users to Edit: Lets task participants to make changes to element configuration during the project runtime.
- To turn the task into a Copy Manager set-up task:
- Once all configurations are complete, click the Save button to add the task to the workflow.

3. Add Copy Input and Copy Approval Tasks
- Once the setup task is added (optional), you can proceed to include the Copy Input and Copy Approval tasks in your workflow. These tasks allow participants to provide and review the content that will appear on the pack.
- Add the Copy Input Task:
- Click the Add a Task button and select Normal Task from the available task types.
Note: Only Normal Task can be configured as Copy Input task. - Upon selection, you’ll see four configuration tabs:
- Task Information
- Validation
- Instructions
- Copy.
- Configure the first three tabs as needed, using the Configure a Normal Task for reference.
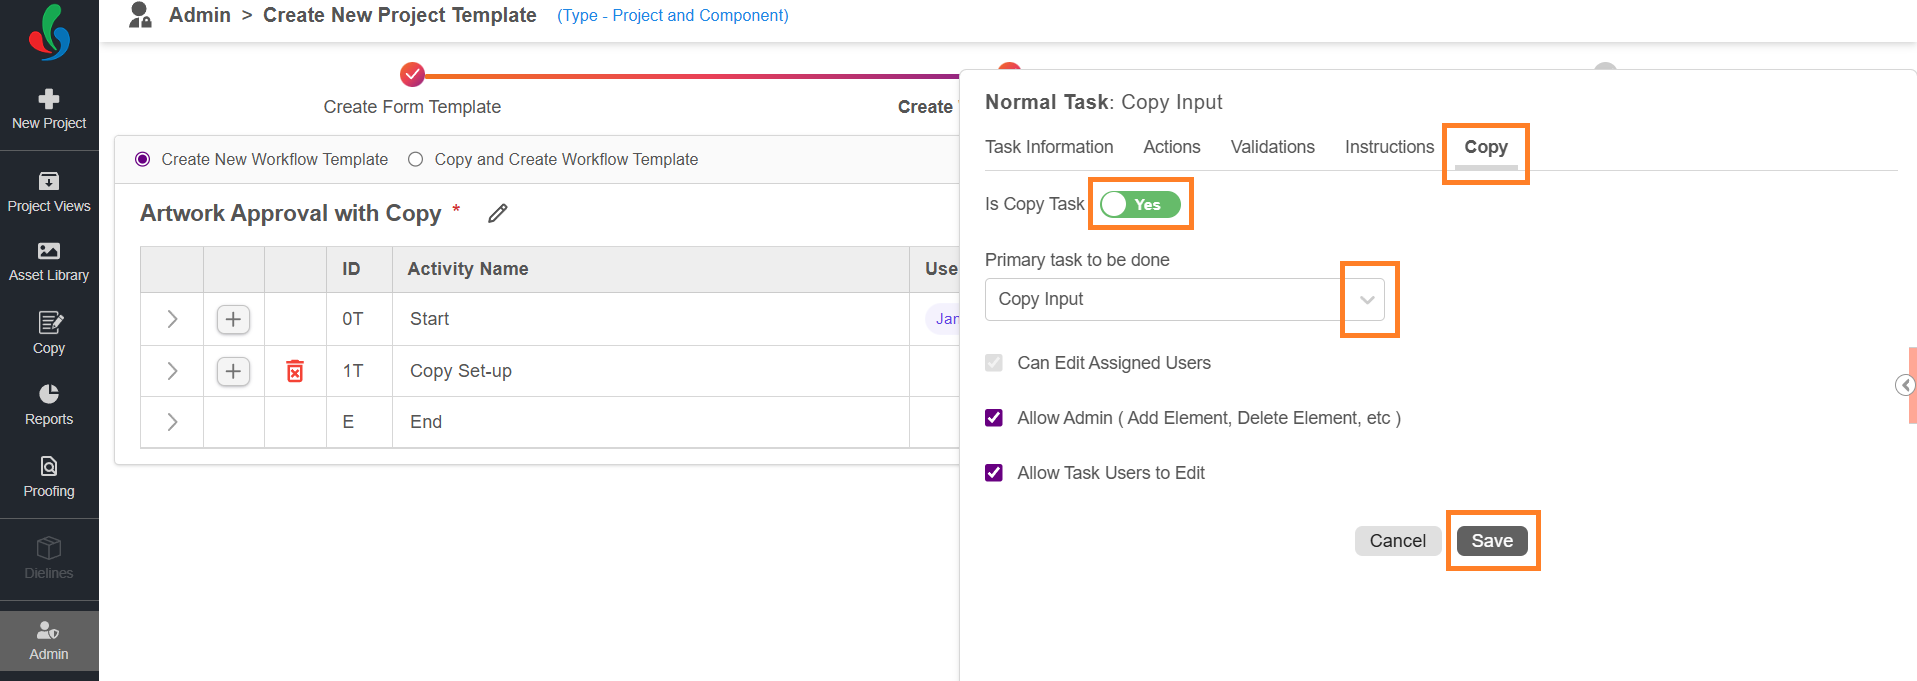
- Copy Tab – Allows you to configure as Copy Input Task
- Go to the Copy tab.
- Toggle the Copy Task switch to Yes.
- From the Copy Task Type drop-down, select Copy Input.
- The Copy Input task allows the assigned users to input content for the elements they are responsible for.
- Additional Configuration Options (within the Copy tab):
Note: Depending on the copy task type that you have selected, the below configuration will be limited to select.- Can Edit Assigned Users: Lets task participants to assign/modify the element's participants.
- Allow Admin (Add/Delete/Edit Elements): Allows users in the start activity to make changes to element configuration during the project runtime.
- Allow Task Users to Edit: Lets task participants to make changes to element configuration during the project runtime.
- Click the Add a Task button and select Normal Task from the available task types.
- Once configured, click the Save button to add the task to the workflow.
- Add the Copy Approval Task:
- Click the Add a Task button and select Decision Task from the available task types.
Note: Only Decision Tasks can be configured as Copy Approval tasks - As before, you’ll see the following four configuration tabs:
- Task Information
- Validation
- Instructions
- Copy.
- Configure the first three tabs using the Configure a Decision Task guide.
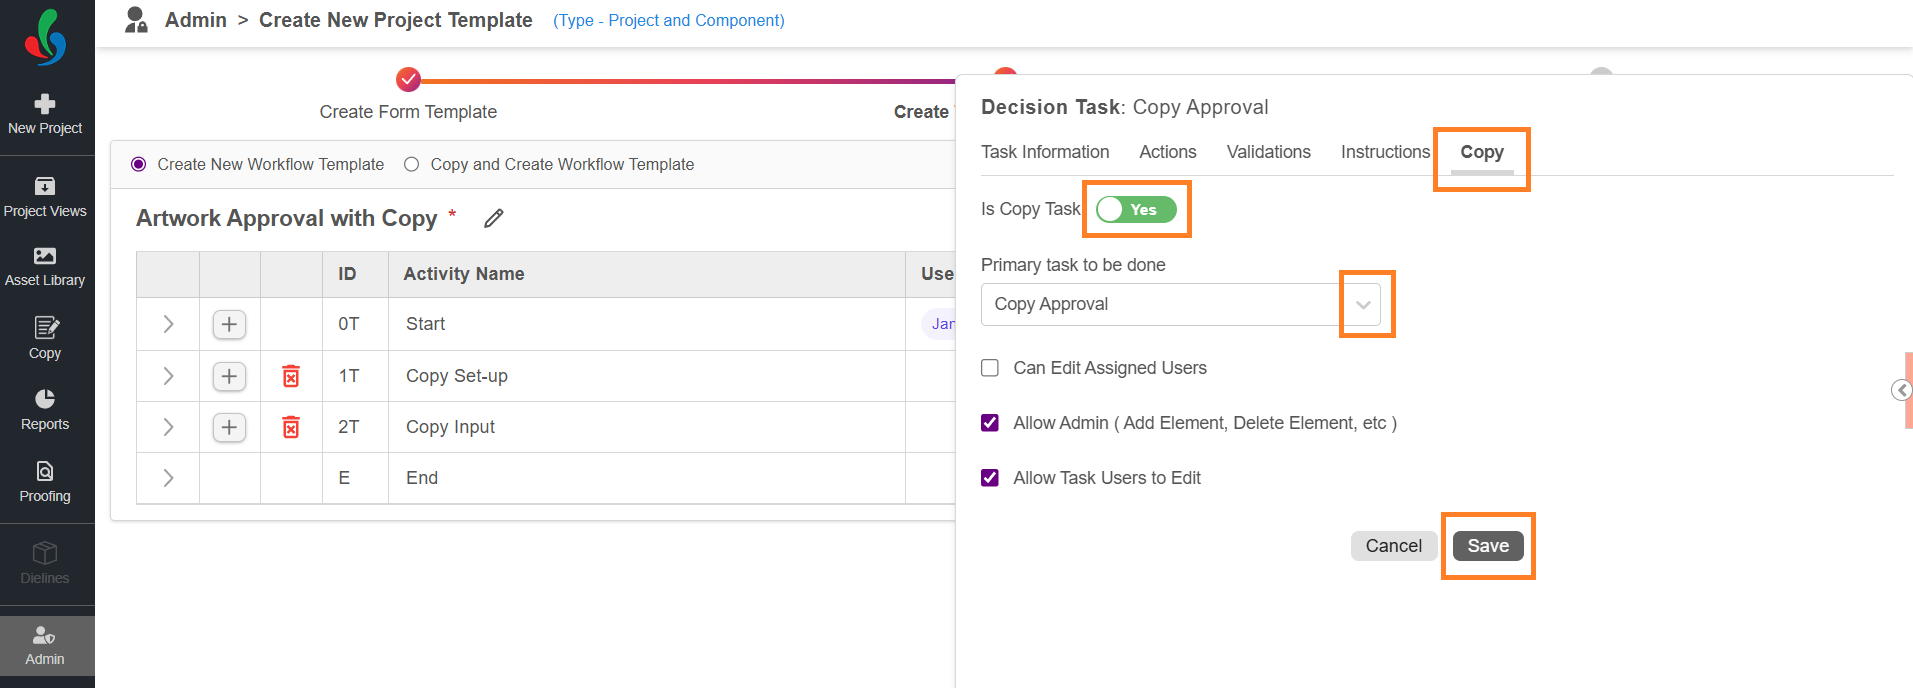
- Copy Tab – Allows you to configure as Copy Approval Task
- Go to the Copy tab.
- Toggle the Copy Task switch to Yes.
- From the Copy Task Type dropdown, select Copy Approval.
- The Copy Approval task enables participants to approve or reject content provided during the Copy Input stage.
- Additional Configuration Options (within the Copy tab):
Note: Depending on the copy task type that you have selected, the below configuration will be limited to select.- Can Edit Assigned Users: Lets task participants to assign/modify the element's participants.
- Allow Admin (Add/Delete/Edit Elements): Allows users in the start activity to make changes to element configuration during the project runtime.
- Allow Task Users to Edit: Lets task participants to make changes to element configuration during the project runtime.
- Click the Add a Task button and select Decision Task from the available task types.
- Once all settings are configured, click the Save button to add the task to the workflow.
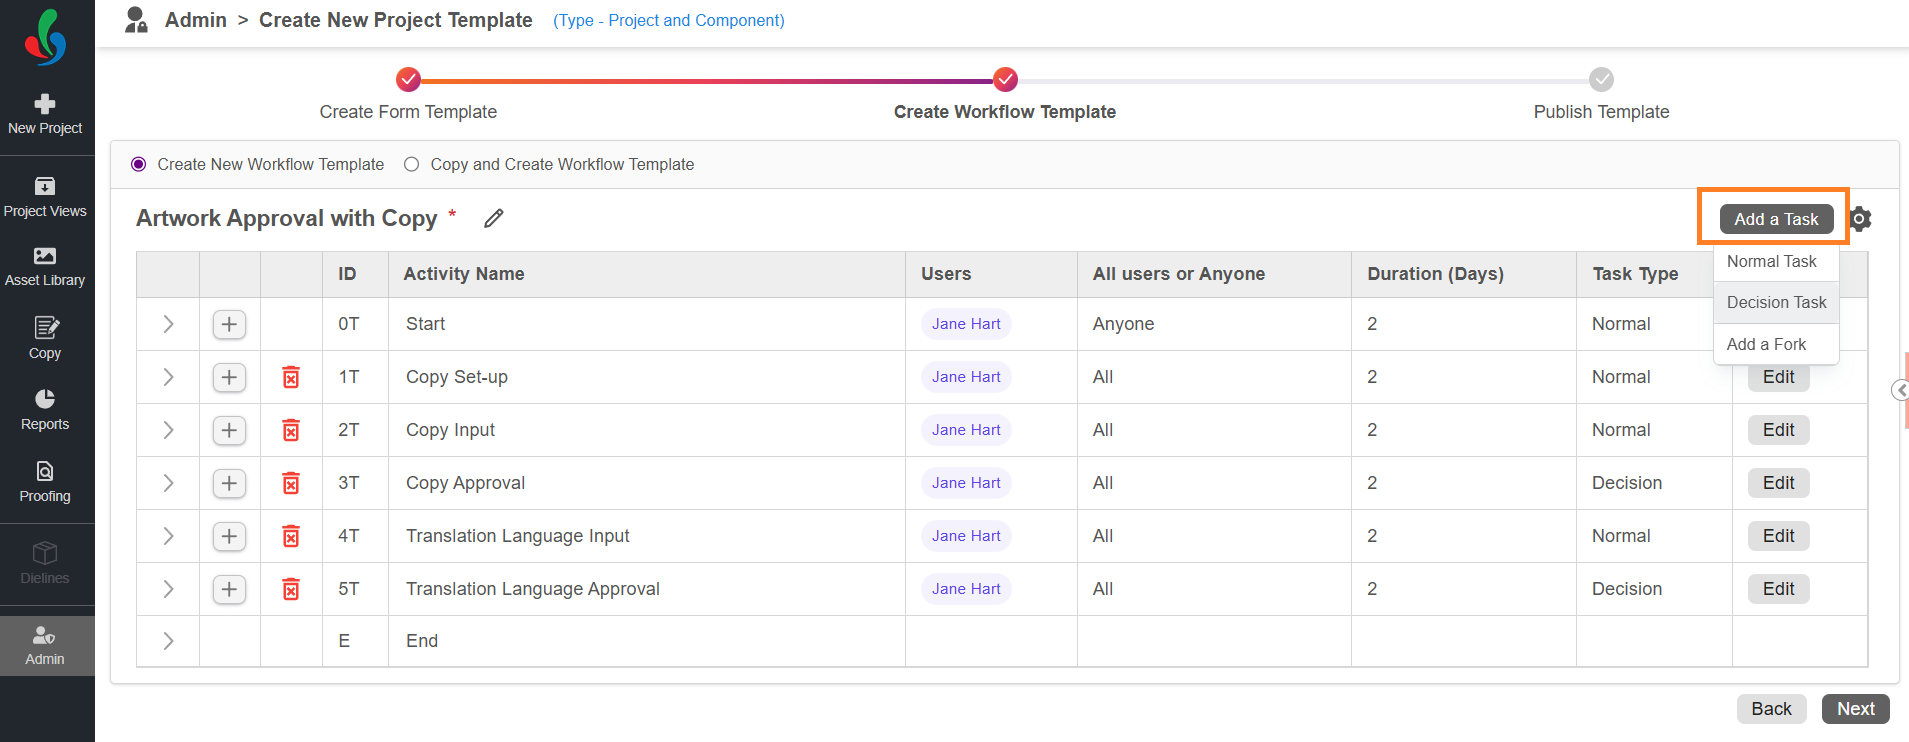
4. Add Copy Translation Tasks (Optional)
If your workflow involves collecting and approving content in multiple languages, you can configure Copy Translation tasks to manage this process efficiently.
- Add the following tasks at the appropriate stages in your workflow:
- Translation Language Input – To collect translated content for the elements.
- Translation Language Approval – To review and approve the translated content.
- These tasks follow a setup process similar to the Copy Input and Copy Approval tasks.
- While configuring these tasks:
- Navigate to the Copy tab.
- Enable the Copy Task toggle.
- From the Copy Task Type drop-down menu:
- Select Translation Language Input for translation input task.
- Select Translation Language Approval for approval task.
- Ensure these tasks are placed in the correct sequence to support a smooth multilingual copy collection and approval process.
- While configuring these tasks:
5. Add Artwork Review Task (Recommended)
The Artwork Review task serves as a final review checkpoint, allowing last-minute changes to approved copy content before project completion. Participants in this task have elevated privileges, such as adding, editing, or deleting elements, and advancing the task. This step is typically used for supervisory or final approval roles.
| Note
|
- Click the Add a Task button and select Normal Task or Decision Task from the task type options.
- Upon selection, you’ll see four configuration tabs:
- Task Information
- Validation
- Instructions
- Copy.
- Configure the first three tabs:
- If using a Normal Task, follow the Configure a Normal Task guide.
- If using a Decision Task, follow the Configure a Decision Task guide.
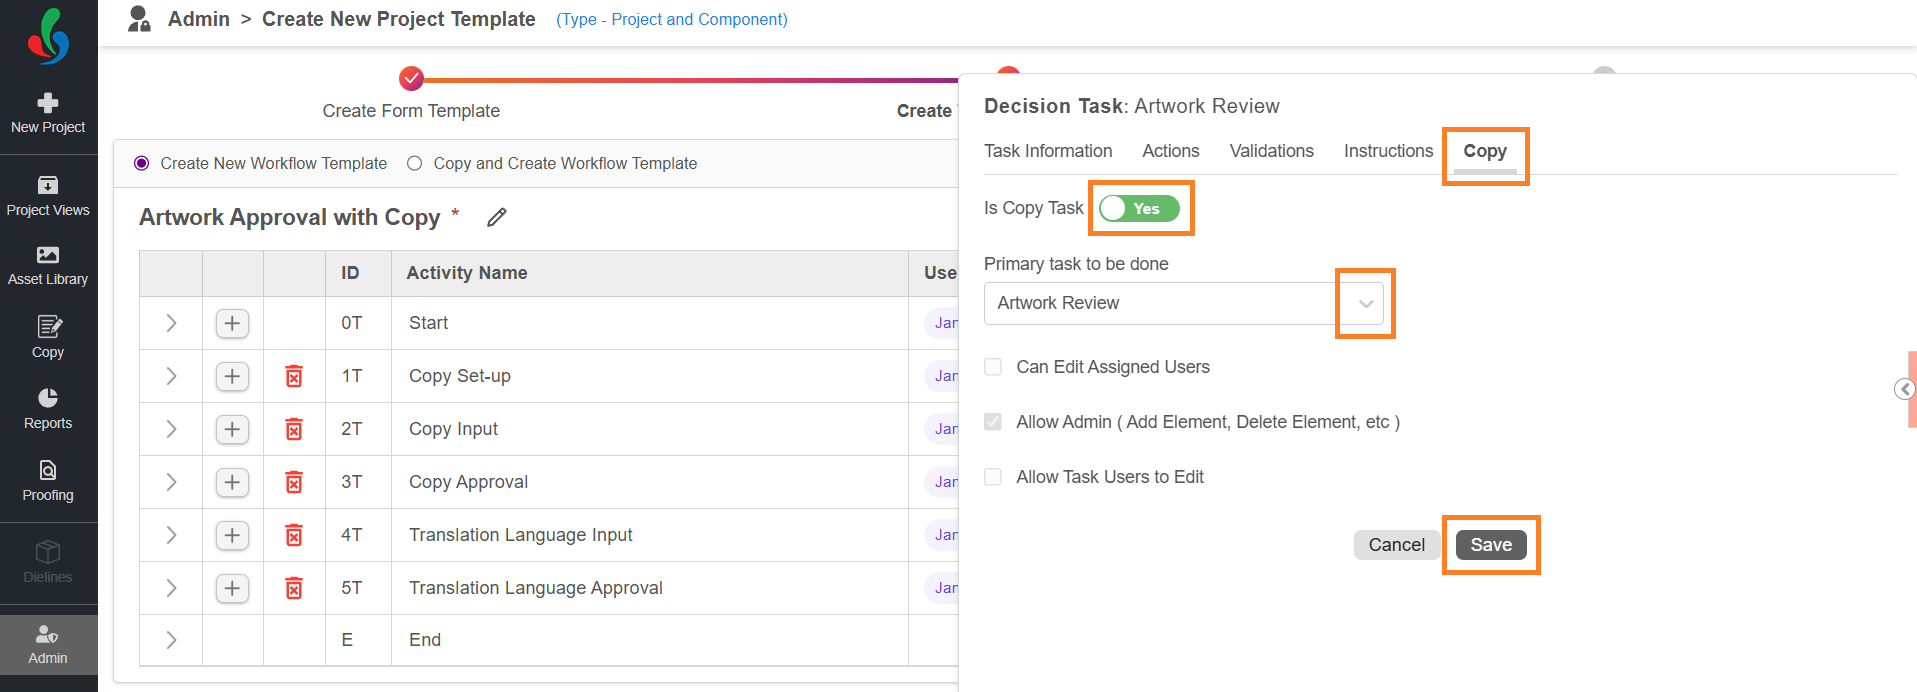
- Copy Tab
Allows you to configure the task for Copy Manager- To turn the task into a copy manager Artwork Review task:
- Go to the Copy tab.
- Toggle the Copy Task switch to Yes.
- From the Copy Task Type drop-down menu, select Artwork Review task type.
- To turn the task into a copy manager Artwork Review task:
- Click the Save button to add the task to the workflow.
6. Add Additional Tasks (Optional)
- Now that we’ve configured the workflow template for content collection. You can include other tasks in the workflow as needed.
- If these tasks are related to workflow processing rather than content collection, consider placing them in a child template.
- For details on adding tasks, refer to Add Tasks to Your Workflow.
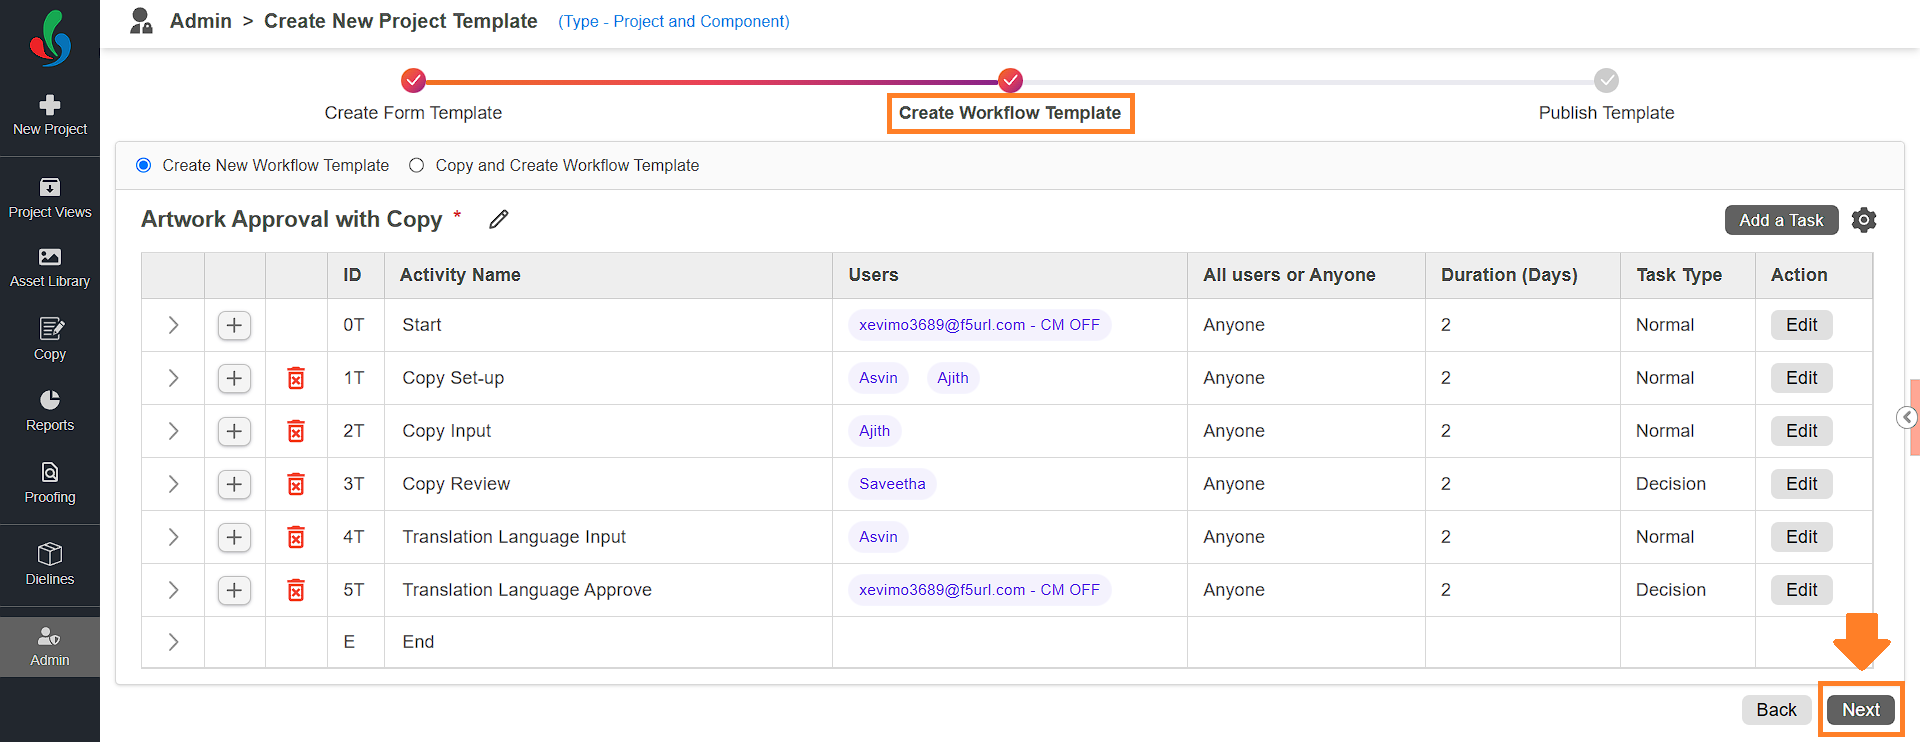
7. Proceed to Publish the Template
- Once the workflow template is configured, click Next to proceed to publish the template.
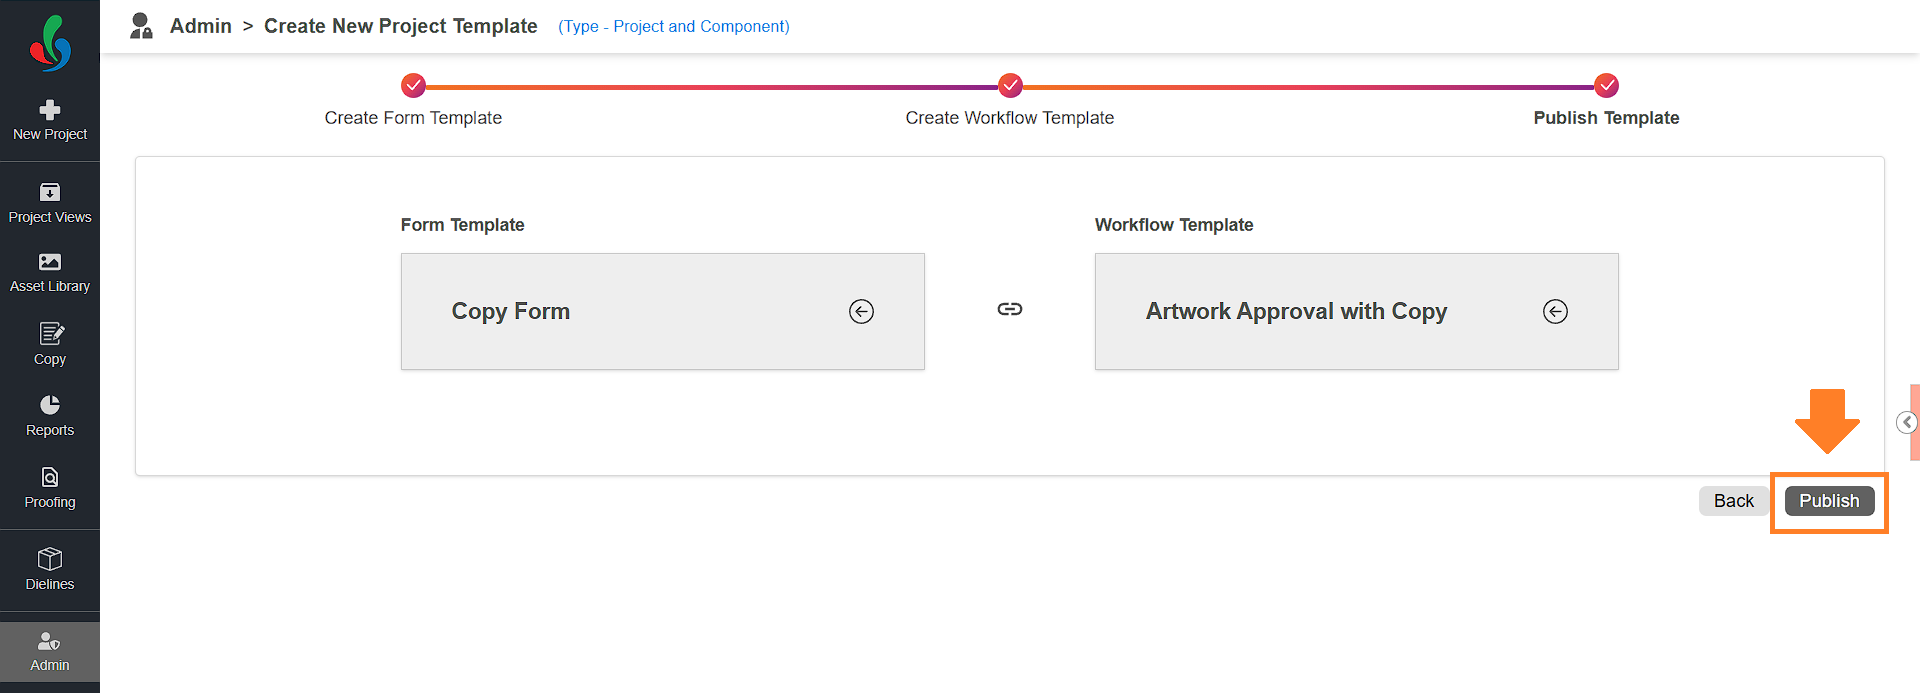
05. Publish the Template
- Review and Finalize:
- Once you've built and configured your workflow and form template, double-check everything before publishing. If needed, use the Back button to make further adjustments to the workflow or form fields.
- Click "Publish" to make your template available for creating new projects.
- For single approval templates — you can start using the template immediately.
- For multi-level approval templates — proceed to Step 2: Create a New Project Template for Workflow Process (Child Template).
Next, go to Step 2