Manage Files with Enhanced Features
How to Bulk Download Files from the Asset Library?
Bulk Download
To bulk download files from the Asset Library:
- Navigate to Asset Library > Search.
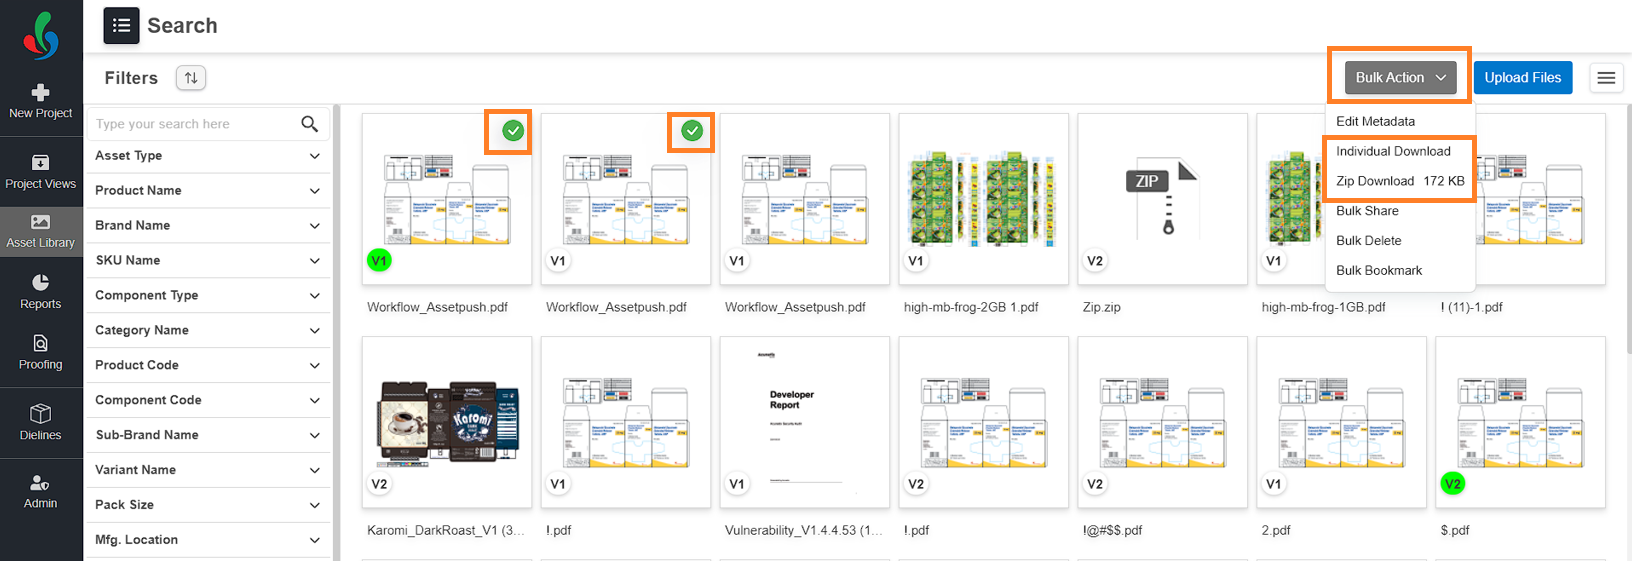
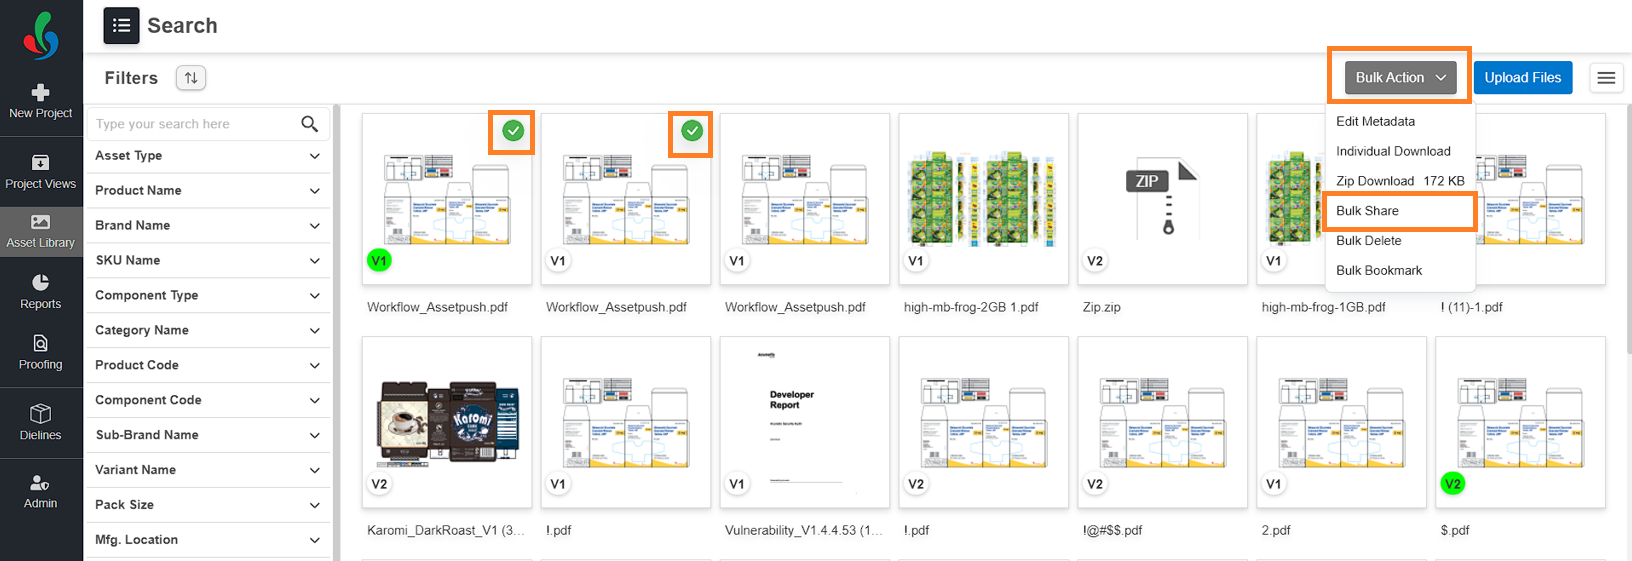
- Select the files you want to download in bulk:
- Hover over a file and click the checkmark icon.
- Note: Bulk actions are enabled only when two or more files are selected.
- Hover over a file and click the checkmark icon.
- Click the "Bulk Action" drop-down menu in the upper-right of the screen.
- You can choose to download files as individual files or as a zip file:
- To download as individual files: Select Individual Download. Your selected files will be downloaded one by one.
- To download as a zip file: Select Zip Download. Your files will be packaged into a single zip file for download.
How to View the Download History in Asset Library
Download History
To view your download history in the Asset Library:
- Navigate to Asset Library > Search.
- Click the hamburger icon located in the upper-right corner of the screen.
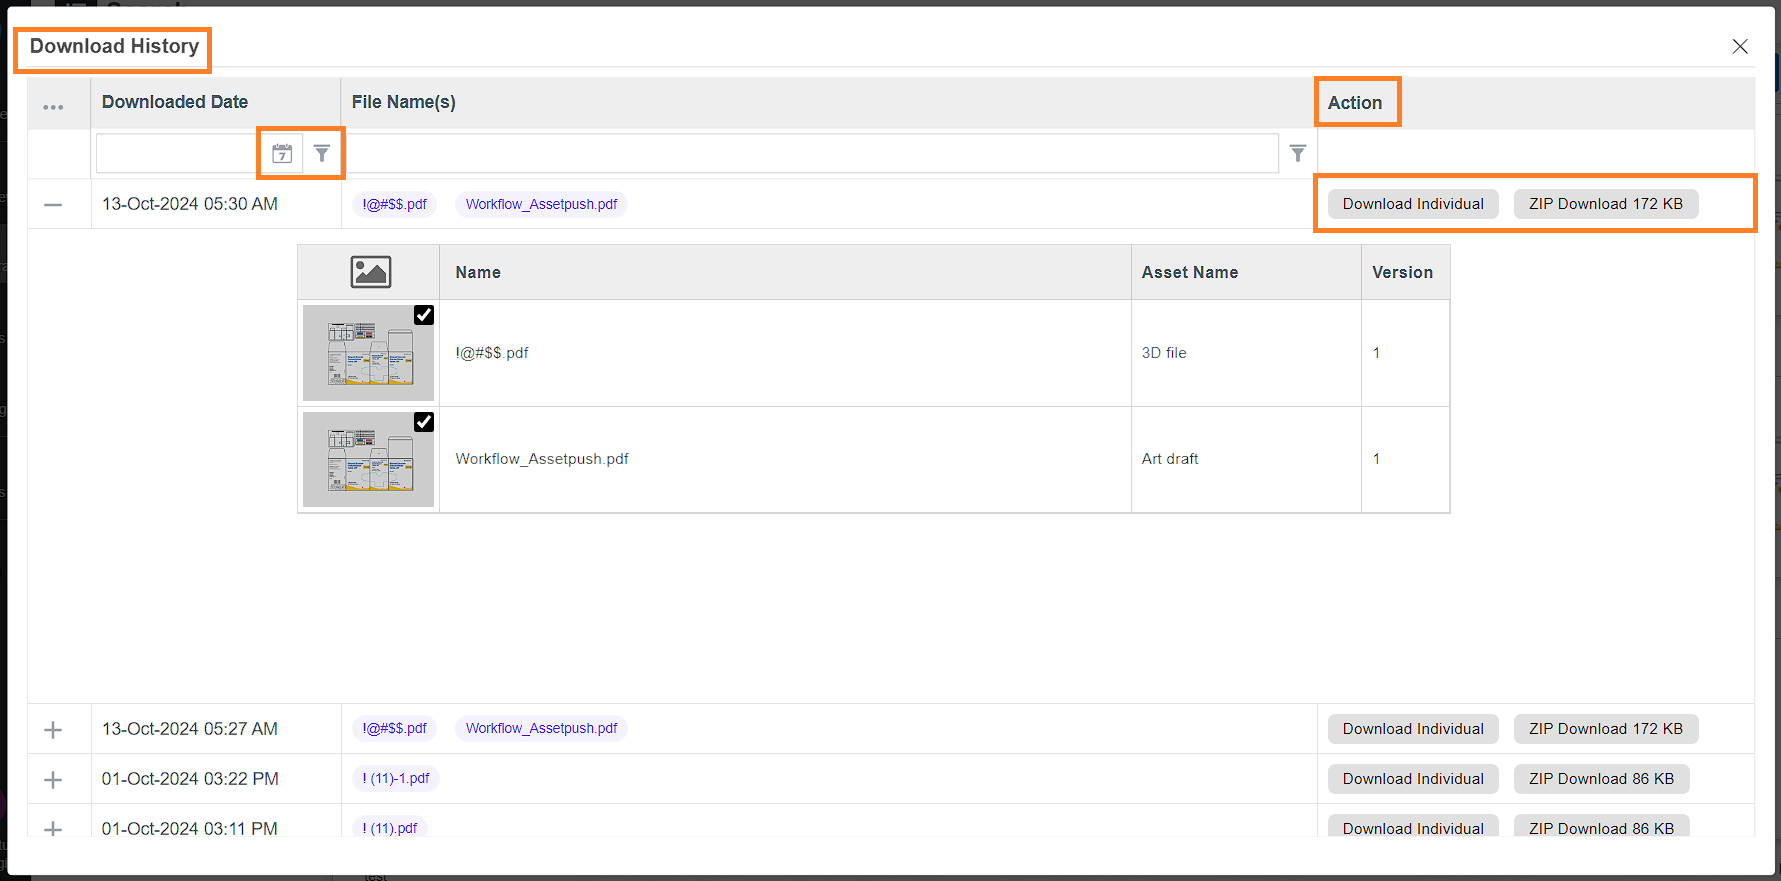
- Select Download History. A "Download History" pop-up window will appear.
- You can browse through your download history or use filters to narrow it down by date and other criteria.
- To re-download files, you have two options:
- Download as individual files: Click the Download Individual button in the Action column associated with the file name. The files will be downloaded one by one.
- Download as a ZIP file: Click the ZIP Download button in the Action column associated with the file name. The files will be packaged into a single ZIP file for download.
How to Bulk Share Files in Asset Library?
Bulk Share
To bulk share files from the Asset Library:
- Navigate to Asset Library > Search.
- Select the files you want to share:
- Hover over a file and click the checkmark icon.
- Note: Bulk actions are enabled only when two or more files are selected.
- Hover over a file and click the checkmark icon.
- Click the "Bulk Action" drop-down menu in the upper-right of the screen.
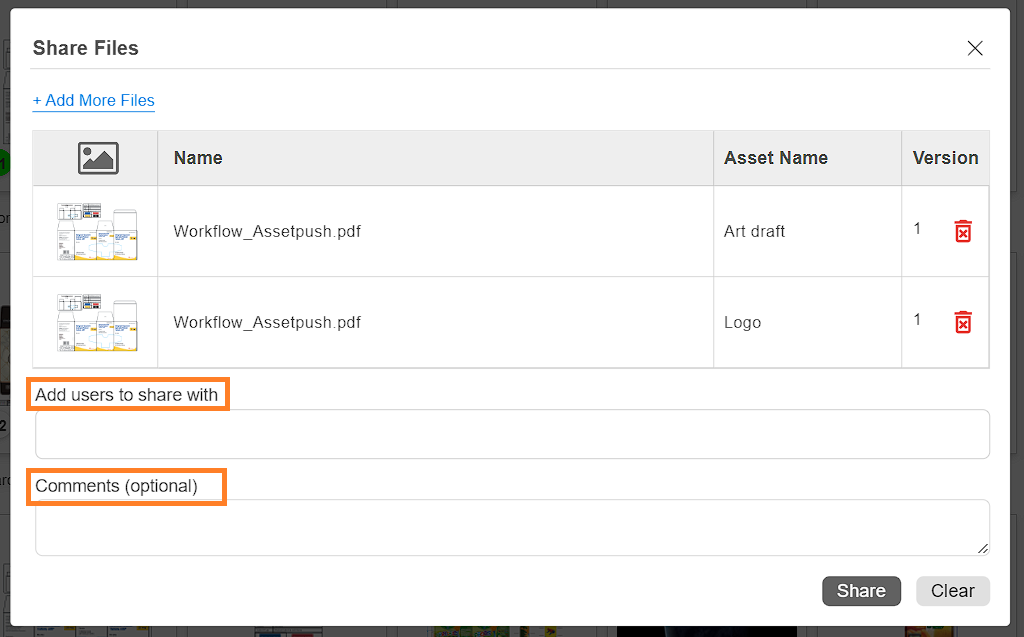
- Select the Bulk Share option. A "Share File" pop-up will appear.
- In the Add users to share with field, enter the email addresses of the users you want to share the files with.
- If needed, add comments in the "Comments" field to provide additional context for the shared files.
- To add more files to the share:
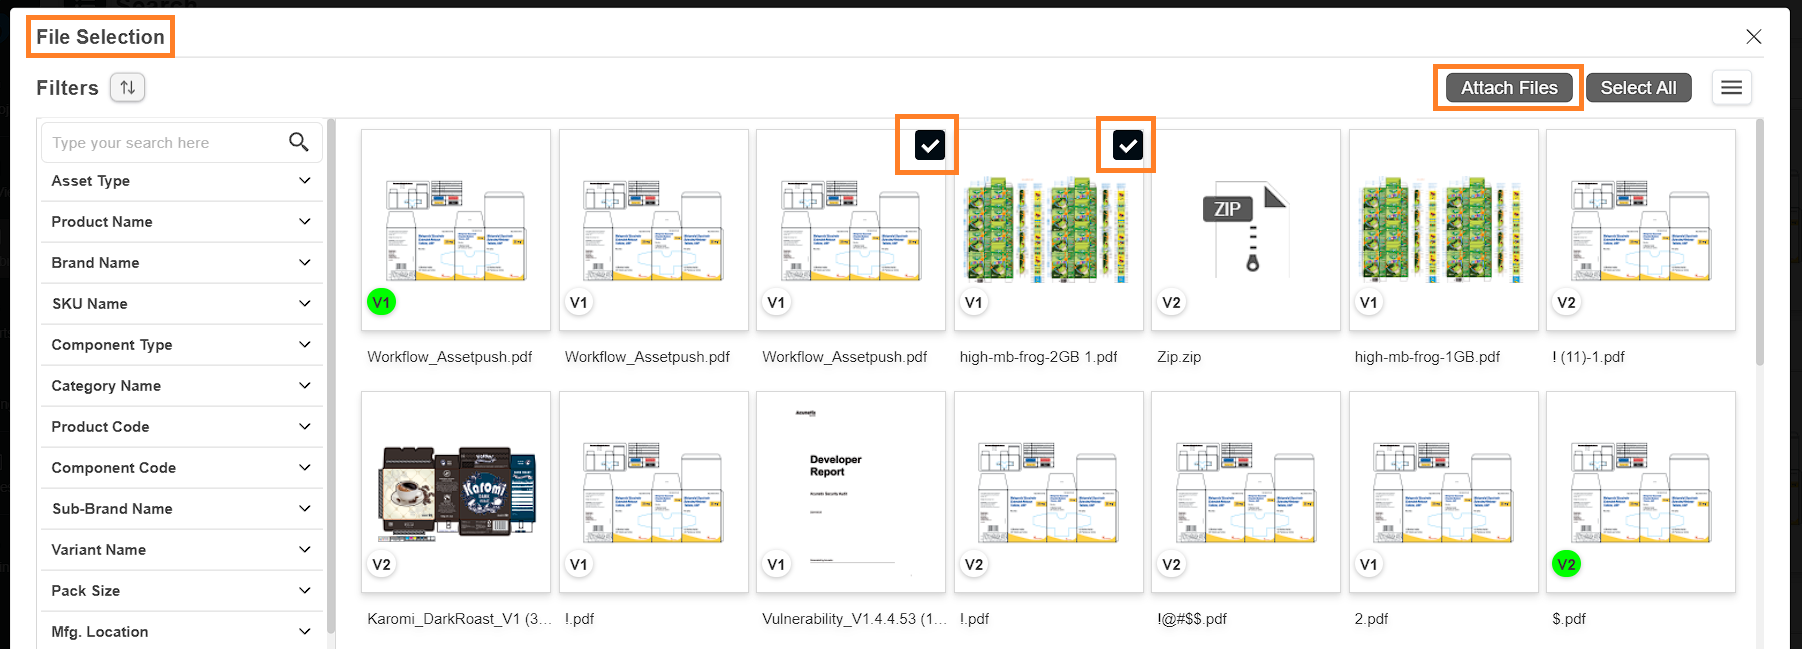
- Click "Add More Files."
- Select the files from the pop-up screen by clicking on the desired files.
- Click "Attach Files" in the top-right corner to finalize your selection.
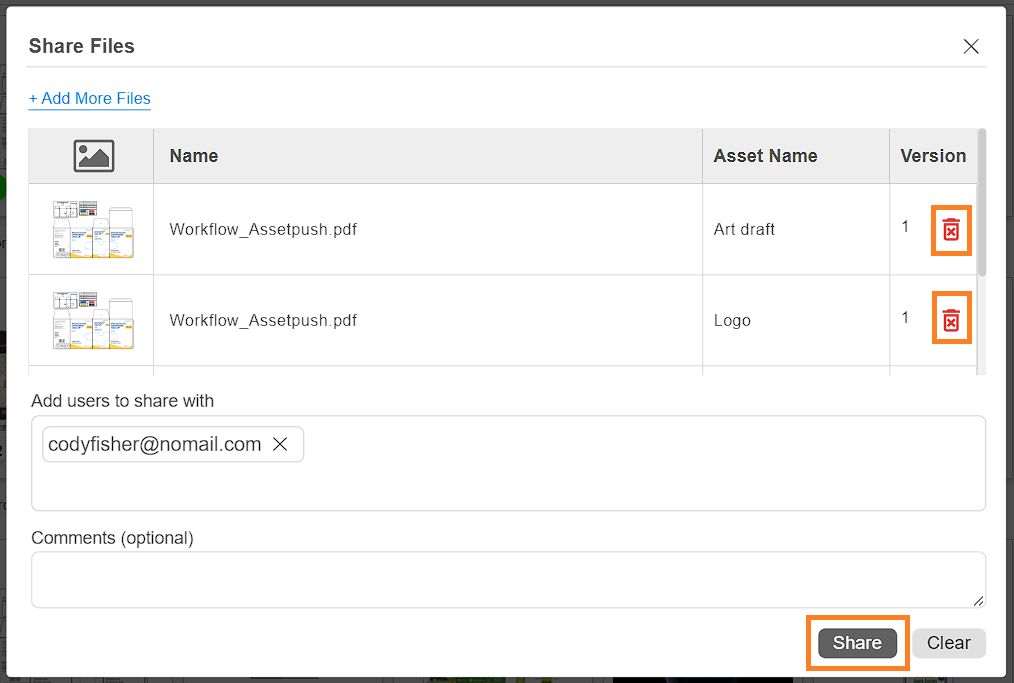
- To remove any files from the share:
- Click the delete icon next to the file you wish to remove.
- Once everything is set, click Share to send the files. Recipients will receive an email with downloadable links, and they can download the files directly from the provided links.
How to View the Share History in Asset Library
Share History
To view your share history in the Asset Library:
- Navigate to Asset Library > Search.
- Click the hamburger icon located in the upper-right corner of the screen.
- Select Share History. A "Share History" pop-up window will appear.
- Browse through your share history or apply filters to narrow down the results by date or other criteria.
- To re-share files:
- Click the Reshare button in the Action column associated with the file name. A "Share File" pop-up will appear.
- In the Add users to share with field, add or modify the email addresses of the users you want to reshare the files with.
- If needed, add comments in the "Comments" field to provide additional context for the shared files.
- To add more files to the reshare:
- Click "Add More Files."
- Select the files from the pop-up screen by clicking on the desired files.
- Click "Attach Files" in the top-right corner to finalize your selection.
- To remove any files from the reshare:
- Click the delete icon next to the file you wish to remove.
- Click the Reshare button in the Action column associated with the file name. A "Share File" pop-up will appear.
- Once all changes are made, click Share to complete the reshare process.
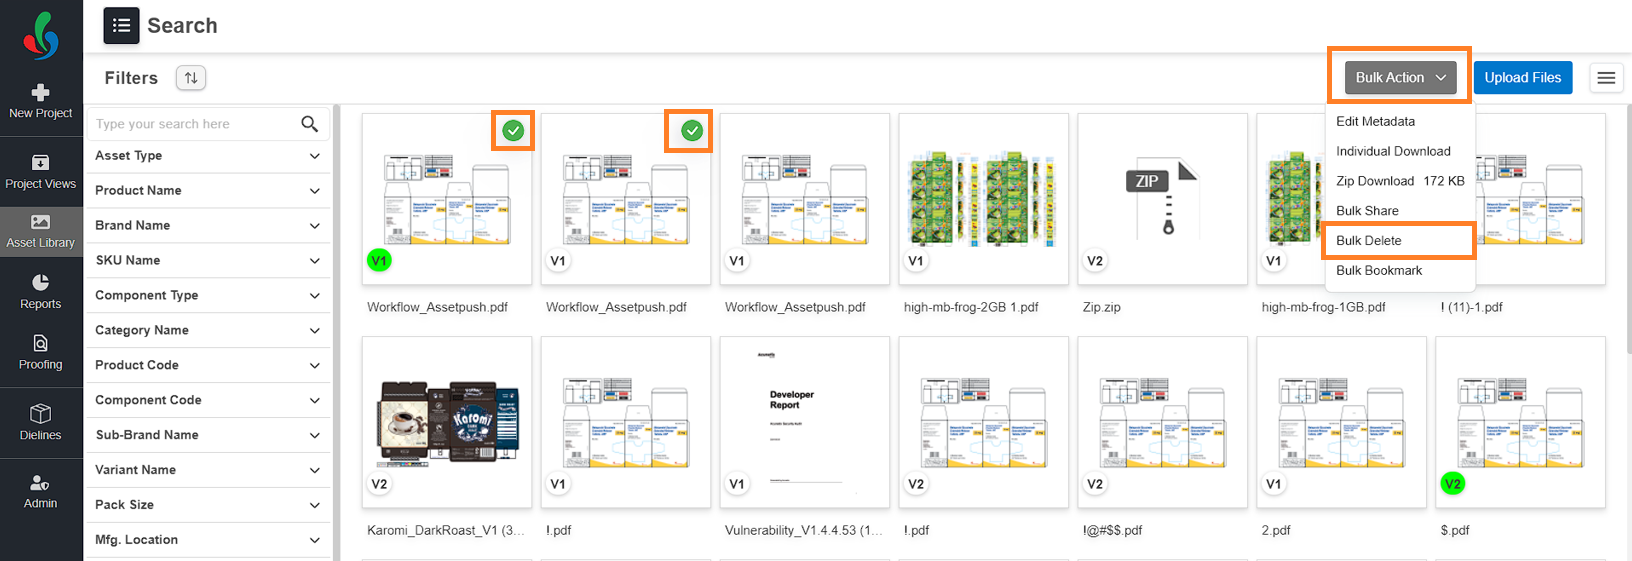
How to Bulk Delete Files in Asset Library?
Bulk Delete
To bulk delete files from the Asset Library:
- Navigate to Asset Library > Search.
- Select the files you want to delete:
- Hover over a file and click the checkmark icon.
Note: Bulk actions are enabled only when two or more files are selected.
- Hover over a file and click the checkmark icon.
- Click the Bulk Action drop-down menu in the upper-right of the screen.
- Select Bulk Delete.
- The selected files will be deleted from the Asset Library. A confirmation toast message will appear upon successful deletion.
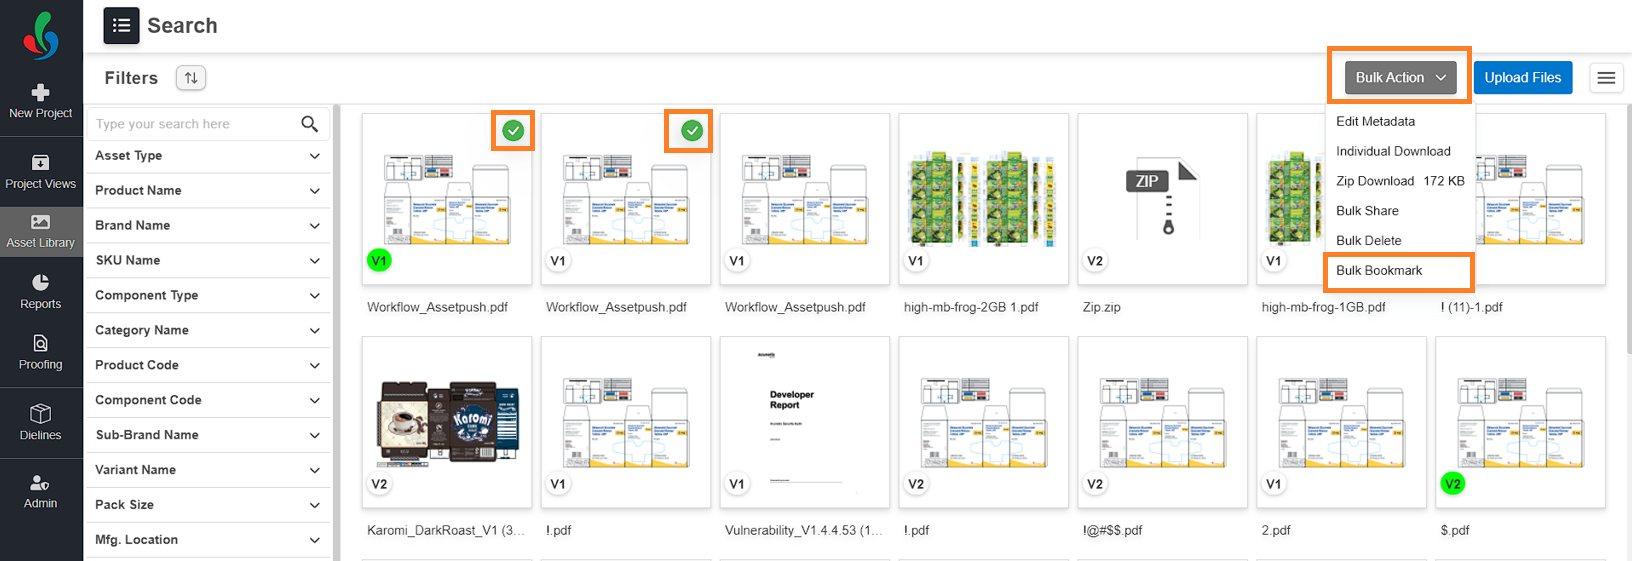
How to Bulk Bookmark Files in Asset Library
Bulk Bookmark
To bulk bookmark files in the Asset Library:
- Navigate to Asset Library > Search.
- Select the files you want to bookmark:
- Hover over a file and click the checkmark icon.
- Note: Bulk actions are enabled only when two or more files are selected.
- Hover over a file and click the checkmark icon.
- Click the Bulk Action drop-down menu in the upper-right corner of the screen.
- Select Bulk Bookmark.
- The selected files will be bookmarked. A toast message will appear once the files are successfully bookmarked.
- To view your bookmarked files:
- Click the hamburger menu.
- Select Bookmarked Files.
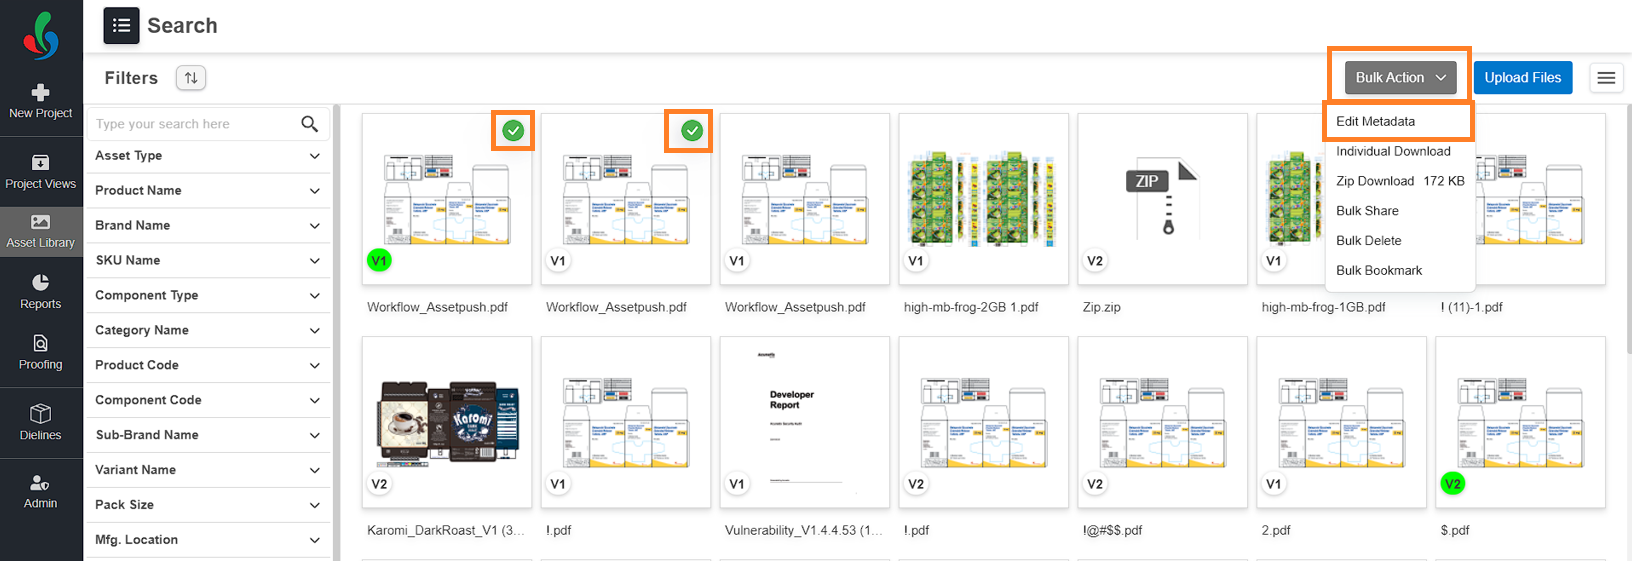
How to Bulk Edit Metadata for Files in Asset Library
Bulk Edit Metadata
To bulk edit metadata for files in the Asset Library:
- Navigate to Asset Library > Search.
- Select the files you want to edit:
- Hover over a file and click the checkmark icon.
- Note: Bulk actions are enabled only when two or more files are selected.
- Hover over a file and click the checkmark icon.
- Click the Bulk Action drop-down menu in the upper-right of the screen.
- Select Edit Metadata. A Bulk Metadata Edit pop-up will appear.
- Make the necessary changes to the metadata.
- Once done, click Save to apply the changes.
- A toast message will confirm the successful update of the metadata.
How do I Save Search Details in Asset Library?
Save Search Details
With the Asset Library enhanced feature, you can save your search details so you don’t need to perform the same search every time you want to find specific files.
To save search details in the Asset Library:
- Navigate to Asset Library > Search.
- Perform a search for the desired files.
- For example, if you're looking for artworks related to the "Karomi" brand, "Toned Milk" product, and "500 ml" size, simply enter each criterion in the search bar to narrow down the results.
- After completing your search, save it to avoid reapplying the same filters in the future.
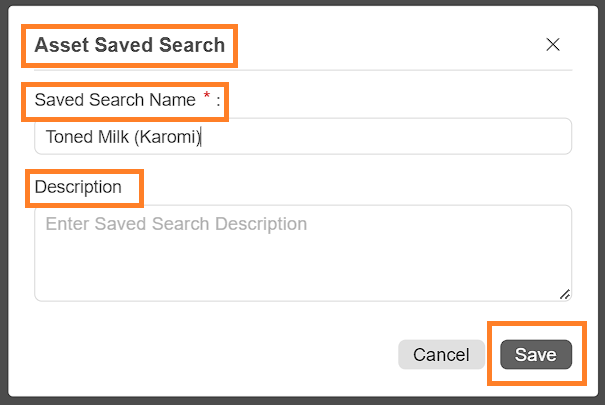
- To save the search, hover over the Save Filter icon and select Save Filter. An Asset Saved Search pop-up will appear.
- Give your search a descriptive name, and if necessary, provide a description to help others understand the context of the saved search.
- Click Save.
- Now, this search will be saved to your system. Whenever you want to perform the same search, you can simply click the Hamburger menu and select your saved search by name.
For managing saved searches, refer to Manage Asset Saved Search Details.
View Options
To adjust how files are displayed in the Asset Library:
- Navigate to Asset Library > Search.
- To switch views:
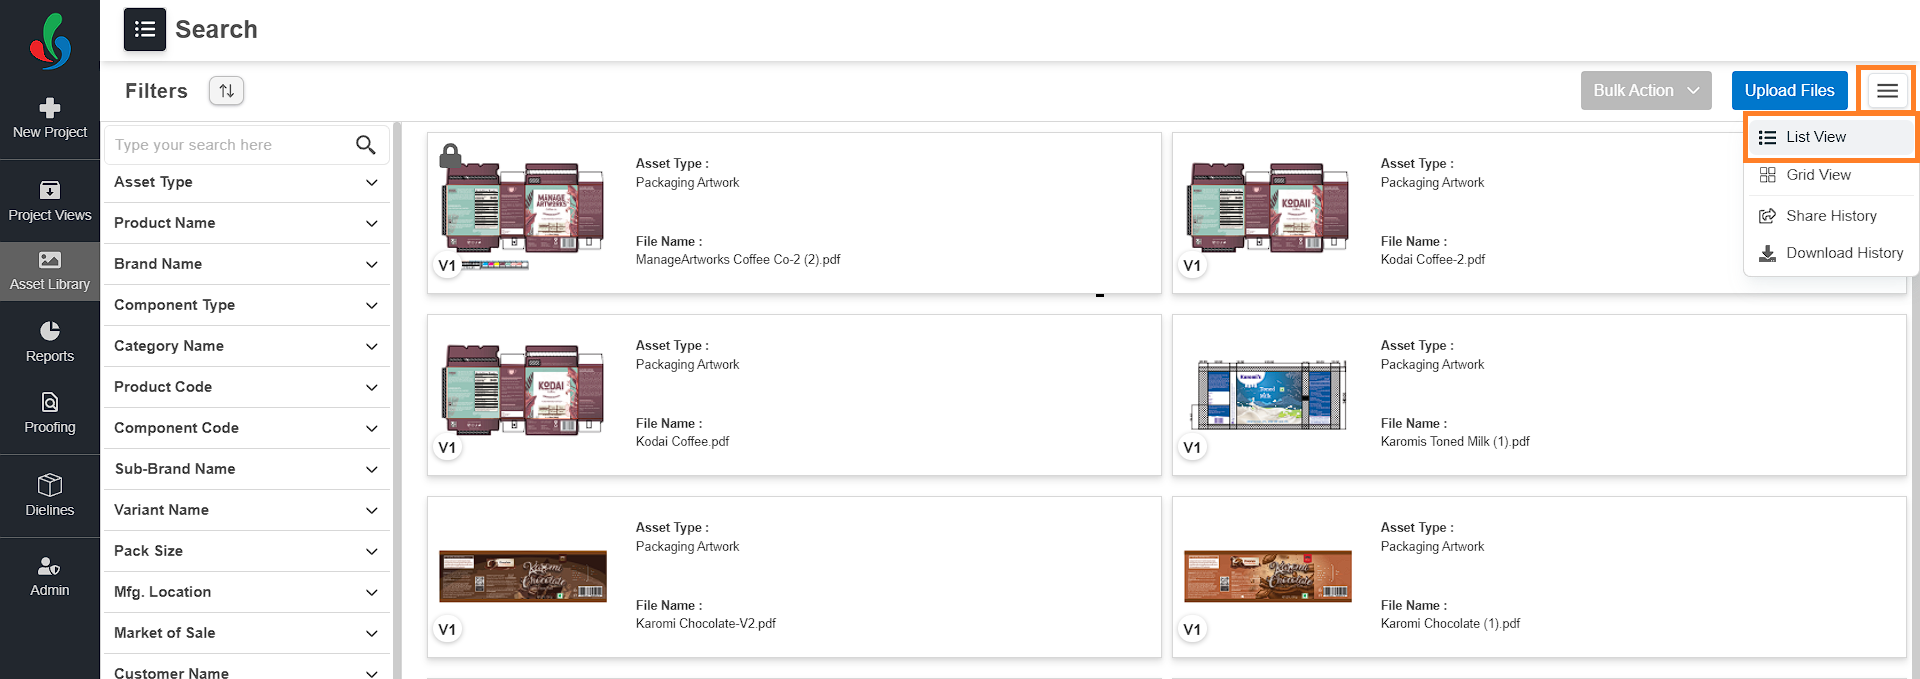
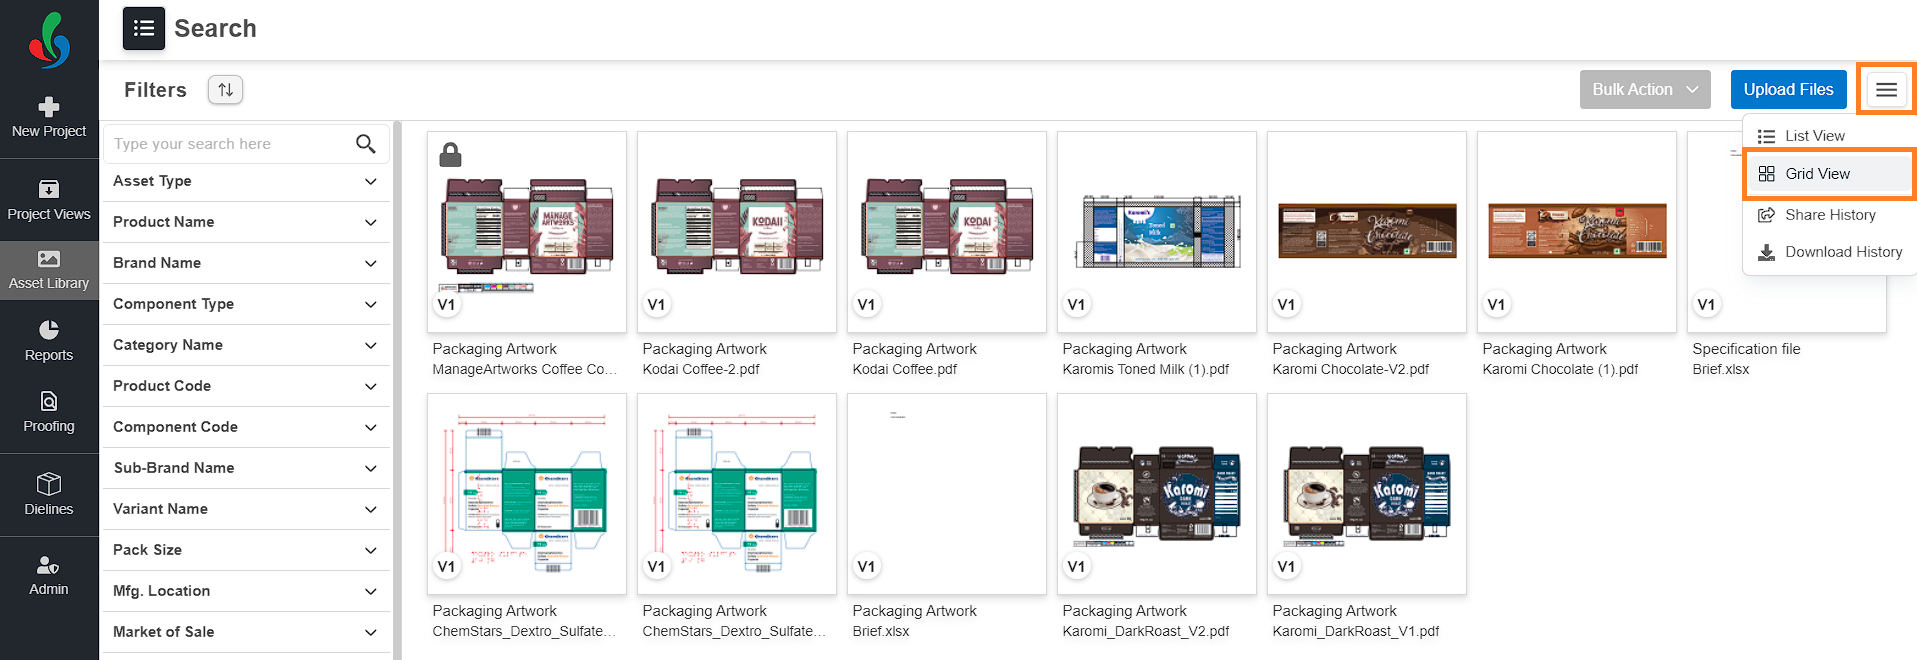
- Click the hamburger icon located in the upper-right corner of the screen.
- Select either List View or Grid View as per your preference.
- Choose a View:
- List View: Displays files in a list format for a detailed view.
- Grid View: Displays files in a grid format for a visual overview.
- List View: Displays files in a list format for a detailed view.
- Choose a View:
Sort Files
To organize files based on specific criteria:
- Navigate to Asset Library > Search.
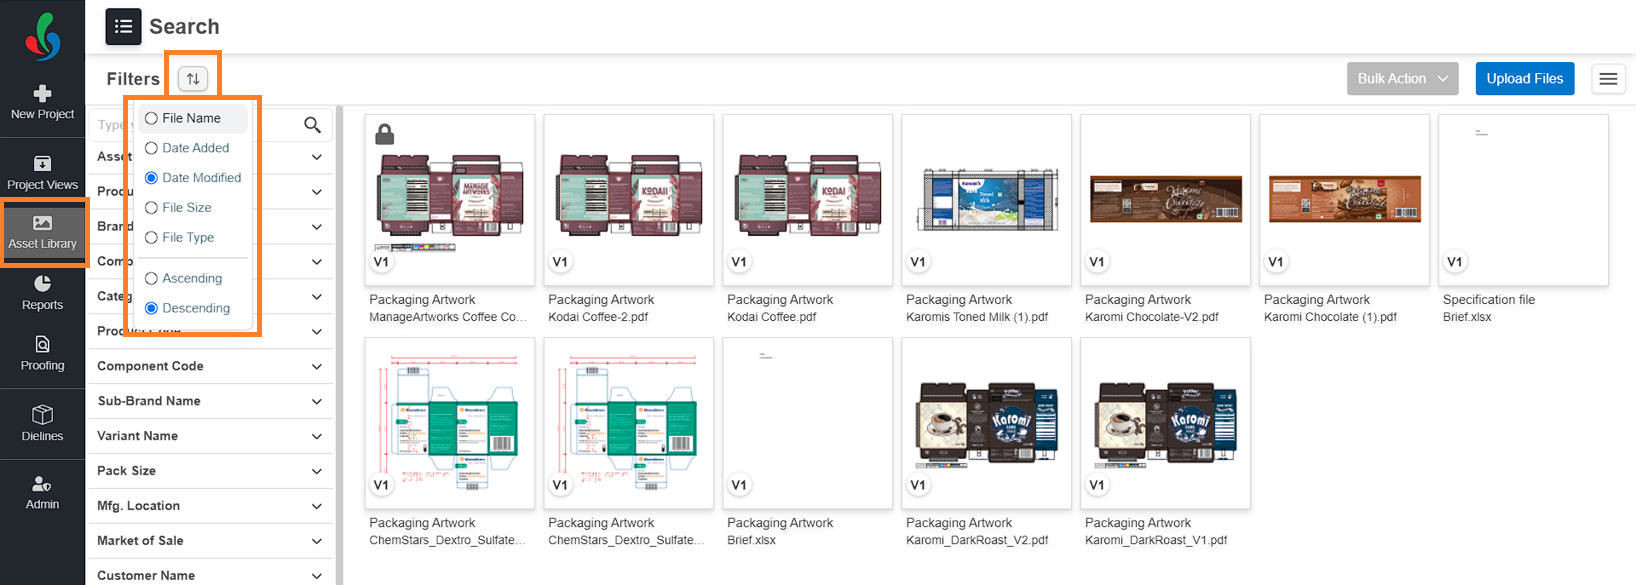
- Click the Sort icon.
- Choose a Sort Criteria:
- File Name: Sort files alphabetically by their name.
- Date Added: Sort files by the date they were added to the library.
- Date Modified: Sort by the last date the files were modified.
- File Size: Sort files by size (ascending or descending).
- File Type: Sort files by type (e.g., packaging artwork, dieline).
- Ascending/Descending: Choose to sort files in ascending or descending order.
