Manage Copy Through Project Workflows
The Copy Manager workflow is tightly integrated with the overall project workflow in ManageArtworks. When a project is initiated using a workflow template configured with Copy Manager, a Copy tab becomes available within the project. This tab acts as the central workspace for performing all copy-related activities throughout the project lifecycle.
 | To learn how to configure a new project template with Copy Manager, refer to Configure Project Template. |
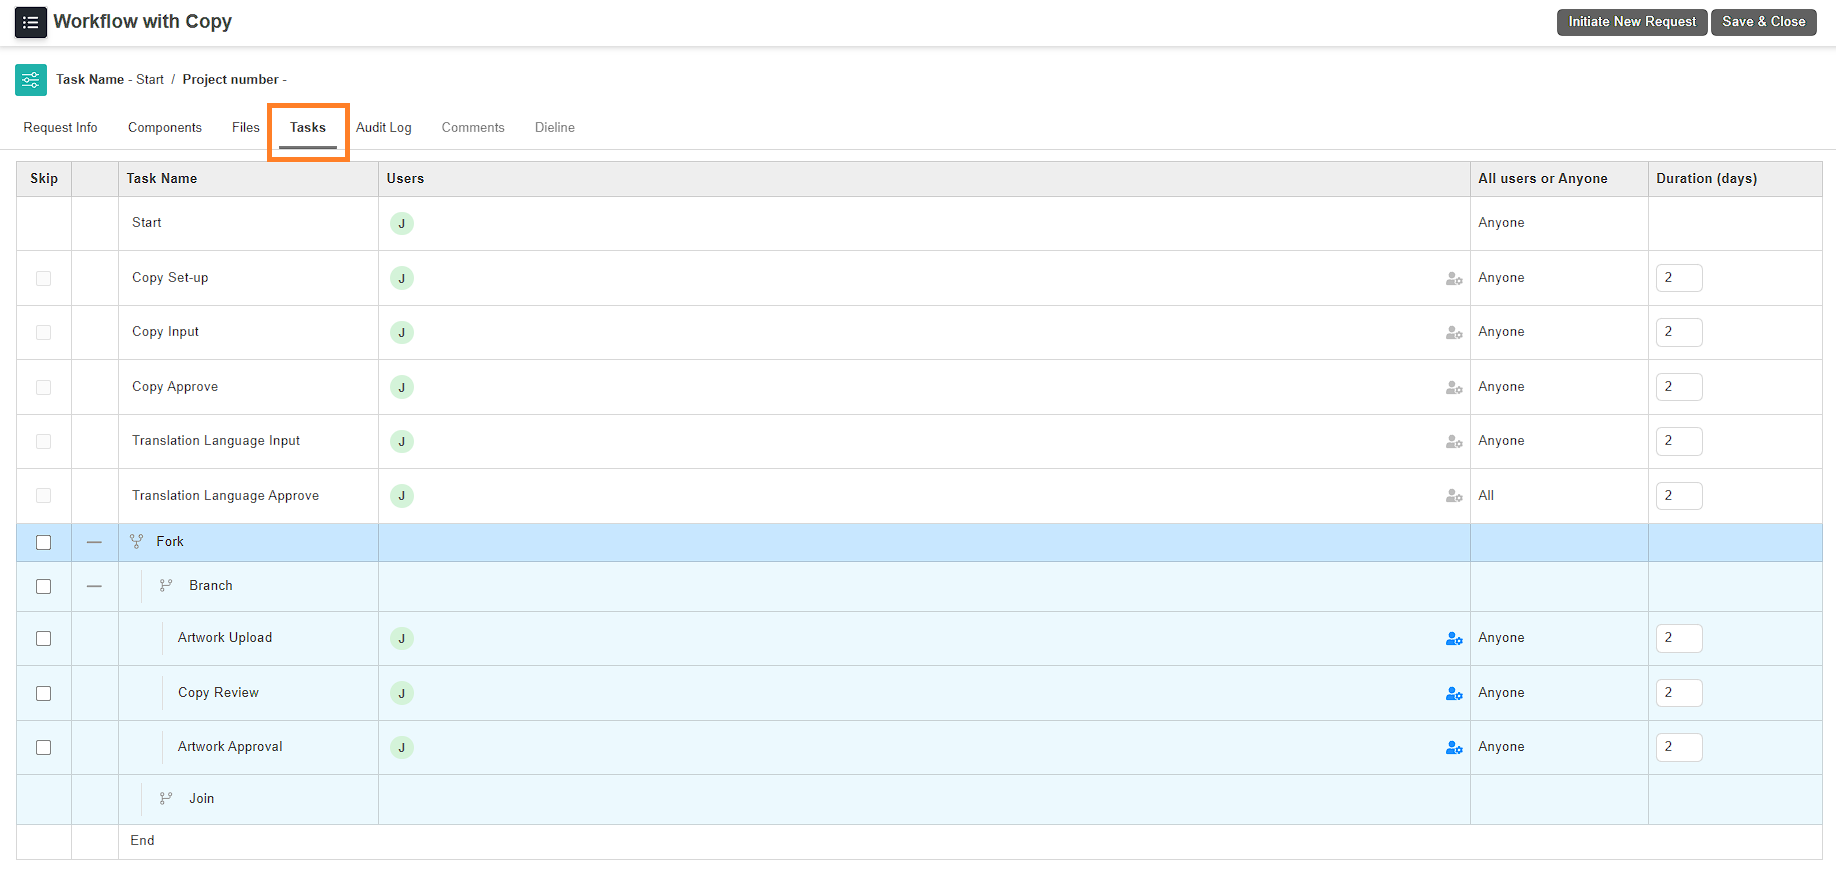
A Copy Manager workflow follows the same structure and sequence as the project workflow, with the addition of copy-specific tasks. These tasks enable users to create, manage, review, approve, and translate copy content as part of the overall approval process.
Copy Manager workflows can be configured in multiple ways based on business requirements. Depending on the template design, a workflow may include different combinations of copy tasks, branching logic, and component-based execution. Because of this flexibility, it is not feasible to document every possible Copy Manager workflow configuration.
Instead, this article focuses on:
- The different types of Copy tasks
- How users interact with Copy tasks during a project
- How to complete copy-related activities using a representative end-to-end Copy Manager workflow
To illustrate this, the article walks through a typical Copy Manager project that includes the following copy tasks:
- Copy Setup
- Copy Input and Approval
- Copy Translation Input and Approval
After the Copy Translation Approval task is completed, the workflow branches based on the configured components. In this example, two components—100 ml and 200 ml—are defined.
The workflow then continues with tasks such as:
Once all tasks are completed, the final artwork files are published to the Asset Library, along with their corresponding approved copy content.
Initiate a Project
To begin working with Copy Manager, initiate a project using a workflow template configured with Copy Manager. For instructions, refer to Start a New Project.
 | Note: In this example, two components—100 ml and 200 ml—are added during project creation. Adding components at the start of the project is optional. However, all copy elements must be assigned to components during the Copy Input task. If required, components can also be added after the project is initiated. Regardless of when components are added, ensure that every copy element is mapped to a component during the Copy Input task. |
Copy Setup
Once the project is initiated, the workflow begins with the first configured task—in this example, the Copy Setup task.
The Copy Setup task is optional and is used to prepare the copy structure for the project. This includes defining the required copy elements, assigning participants, and configuring translation languages. Using a Copy Setup task helps maintain a structured, scalable, and reusable copy content framework, especially for projects with multiple components or languages.
During this task, users set up copy elements only. Actual copy content is not entered at this stage. Content input, review, approval, and translation are handled in subsequent Copy tasks.
01. Access the Copy Tab
To begin the Copy Setup task:
- Sign in to your ManageArtworks account.
- Navigate to the Project Views module.
- Open the required project that is configured with Copy Manager.
- Select the Copy tab.
 | The Copy tab appears automatically when the project is initiated using a workflow template configured with Copy Manager. This tab serves as the workspace for completing all copy-related tasks in the workflow. At this stage:
|
| Auto Template Load (If Enabled) If Auto Template Load is enabled in Copy Manager Settings, the system automatically loads a matching Copy Template when you open the Copy tab. A matching template is identified based on the metadata configured in the copy template and the project.
Even when copy elements are loaded automatically, you can modify the elements and their configurations as required during the Copy Setup task. |
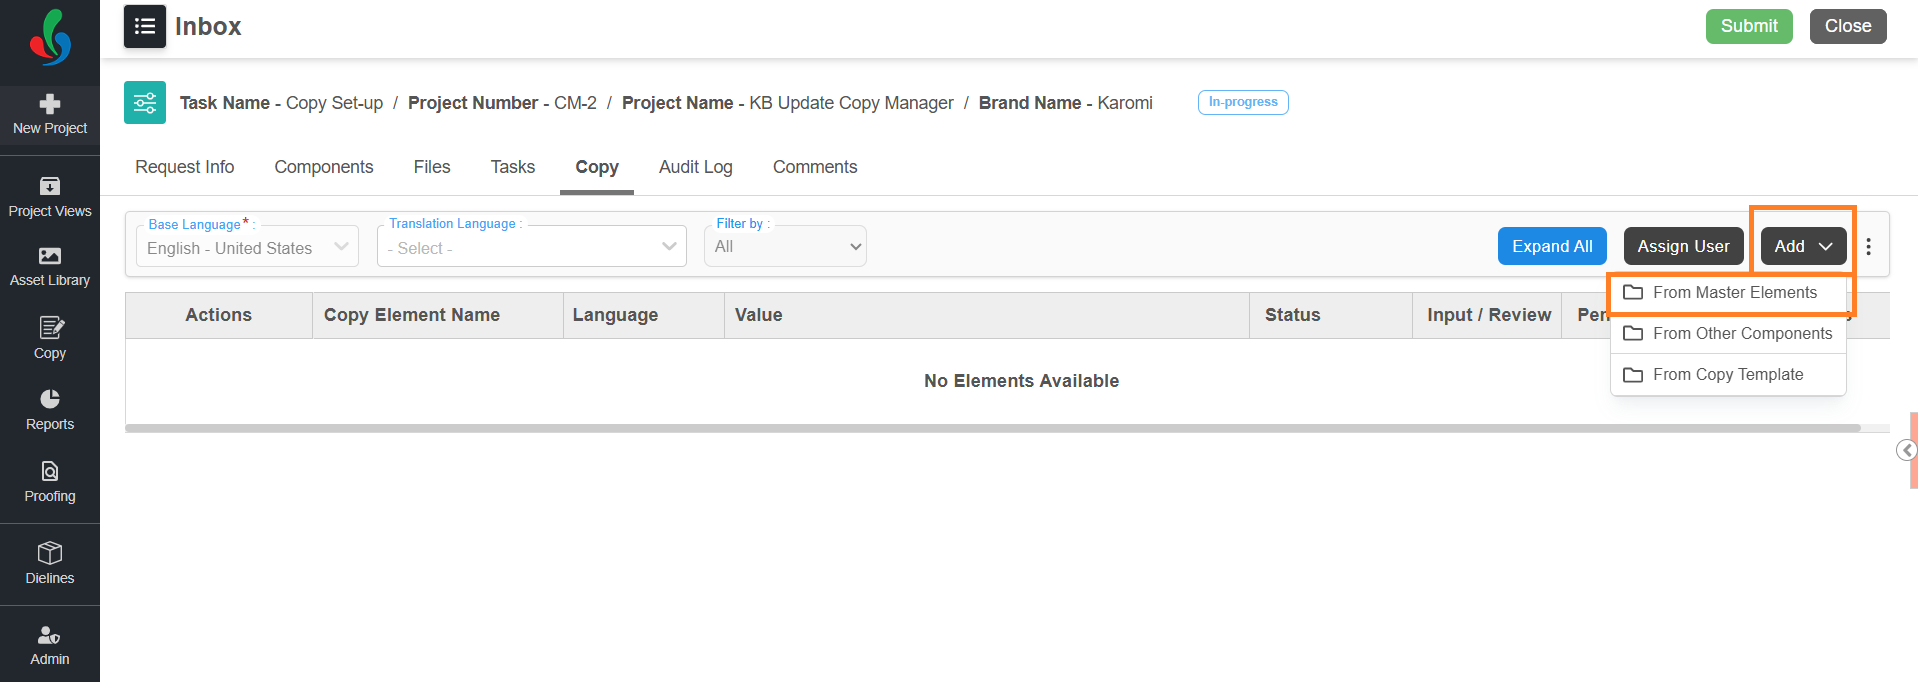
02. Add Copy Elements
In the Copy Setup task, you define the copy elements required for the project. Copy elements represent individual pieces of content such as product name, ingredients, usage instructions, warnings, brand logo, barcode or regulatory text.
To support different business scenarios and reduce manual effort, ManageArtworks provides three ways to add copy elements. You can choose the method that best fits your project requirements.
The available methods are:
- From Master Elements
- From Other Components
- From Copy Template
You can use one or more of these methods within the same project.
Add Elements from Master
Use this option to add copy elements directly from the master list. This method is suitable when you need to add a limited number of elements or when working on smaller projects.
To add elements from Master Elements:
- In the Copy tab, select the Add drop-down menu
- Select From Master Elements.
- A list of copy elements defined in Master Data appears.
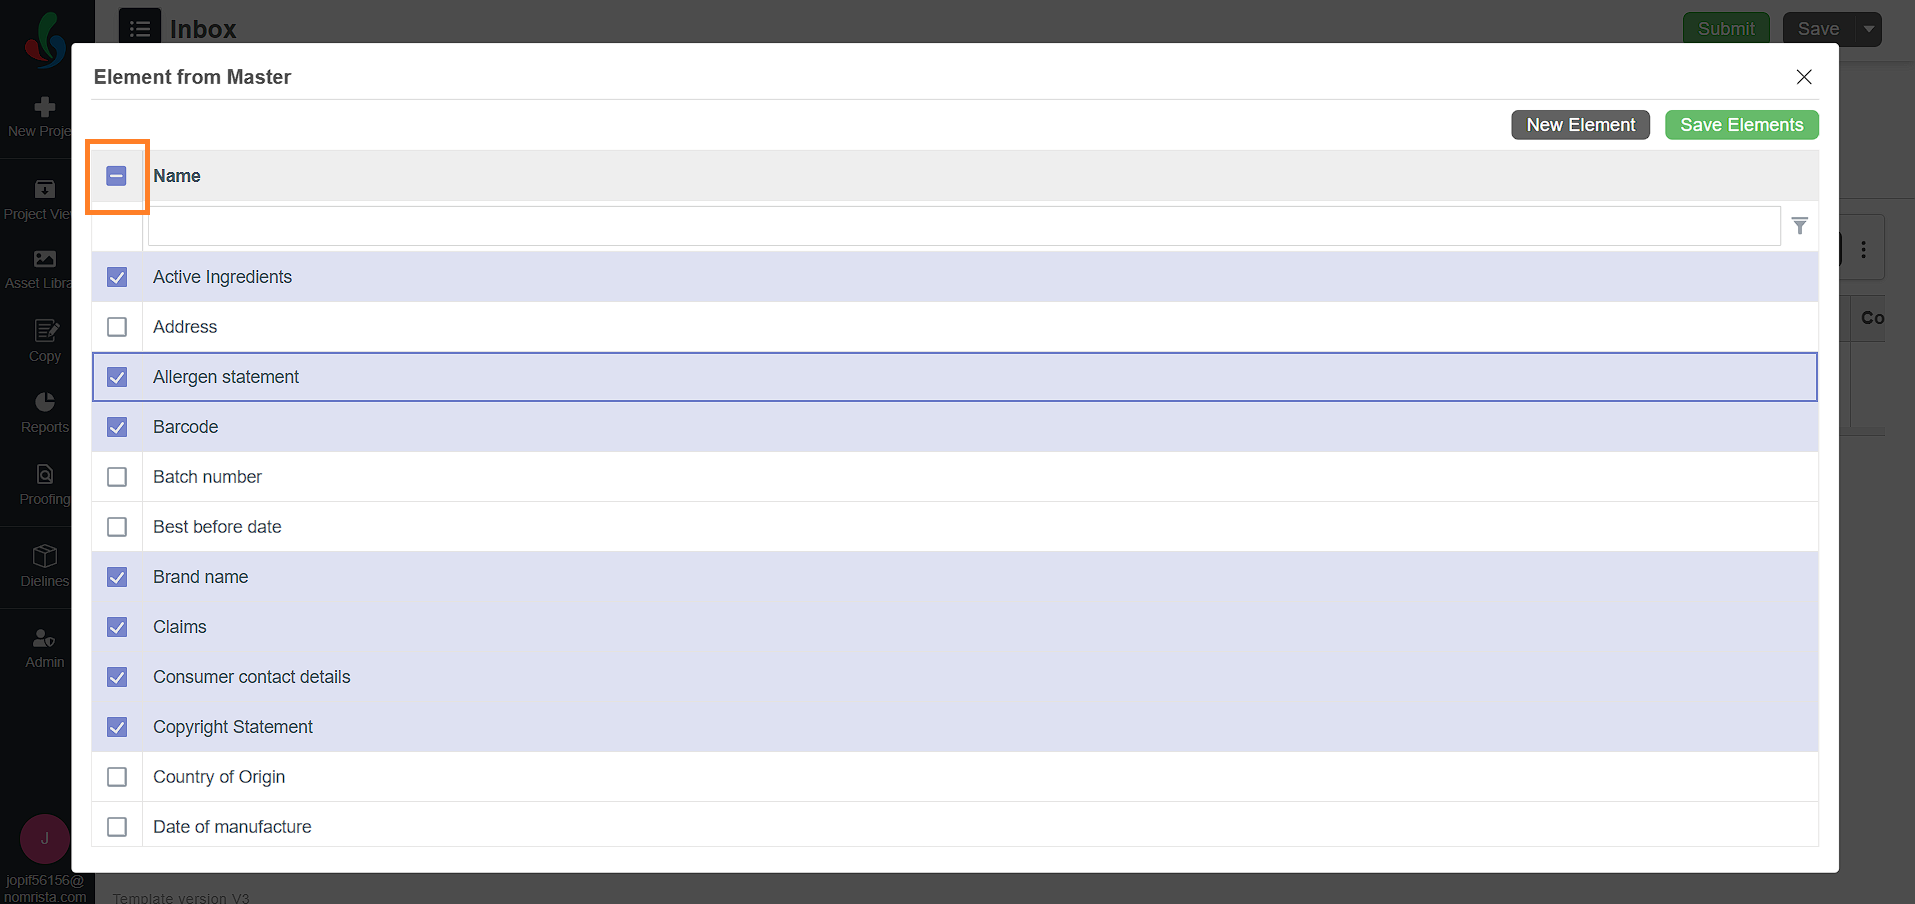
Note: To manage Master Data elements, refer to the Copy Elements section. - Select the elements you want to include in the project.
- If a required element is not available in the list, select New Element to create one.
- In the New Element popup, provide the following details:
Note: Fields such as GS1 Code, Other Code, and Priority are displayed only if they are enabled in Copy Manager Settings.- Element Name: Enter the name of the copy element. To add the name in another language, click the globe icon and enter the translated name in the appropriate language box.
- Element Data Type: Choose a suitable data type from the dropdown:
- Text Box1: For alphanumeric text entries.
- Nutrition Panel: For elements related to nutrition facts.
- Image: Use this if the element value should be an image (e.g., Barcode).
- Text Box1 + Text Box2: If you require two text inputs for the element (e.g., size with unit).
- GS1 Equivalent (optional): If applicable, select a corresponding GS1 code from the dropdown.
Note: Ensure the relevant GS1 code is already defined in the GS1 Master Data, or it won't appear in the dropdown. - Other Code (optional): If applicable, select a corresponding other code from the dropdown.
Note: Ensure the relevant Other Code is already defined in the Other Code Master Data, or it won't appear in the dropdown. - Give Value Through: Select a suitable option from the dropdown:
- User Input: Allows users to manually enter values.
- Value Master: Restricts users to select predefined values.
Note: The corresponding values must be configured under Copy Elements Value Master.
- Priority (optional): Set a numeric priority for the element.
- Element Description: Provide a brief description explaining the purpose or usage of the element. This helps users understand the element and supports copy extraction, compliance-related automated validations, and AI training. The description does not need to be exact; a brief or sample description is sufficient.
- Element Example: Provide a sample value for the element. This helps users understand the expected format and supports automated validation and AI training. The example does not need to be exact.
- Element Industry: Select the industry relevant to the element. This helps users contextualize the element and allows the system to apply industry-specific compliance checks, and AI training.
- Select Save to add the element to the system.
- In the New Element popup, provide the following details:
- Once all desired elements are selected, select Save Elements to finalize and add them to the project’s Copy tab.
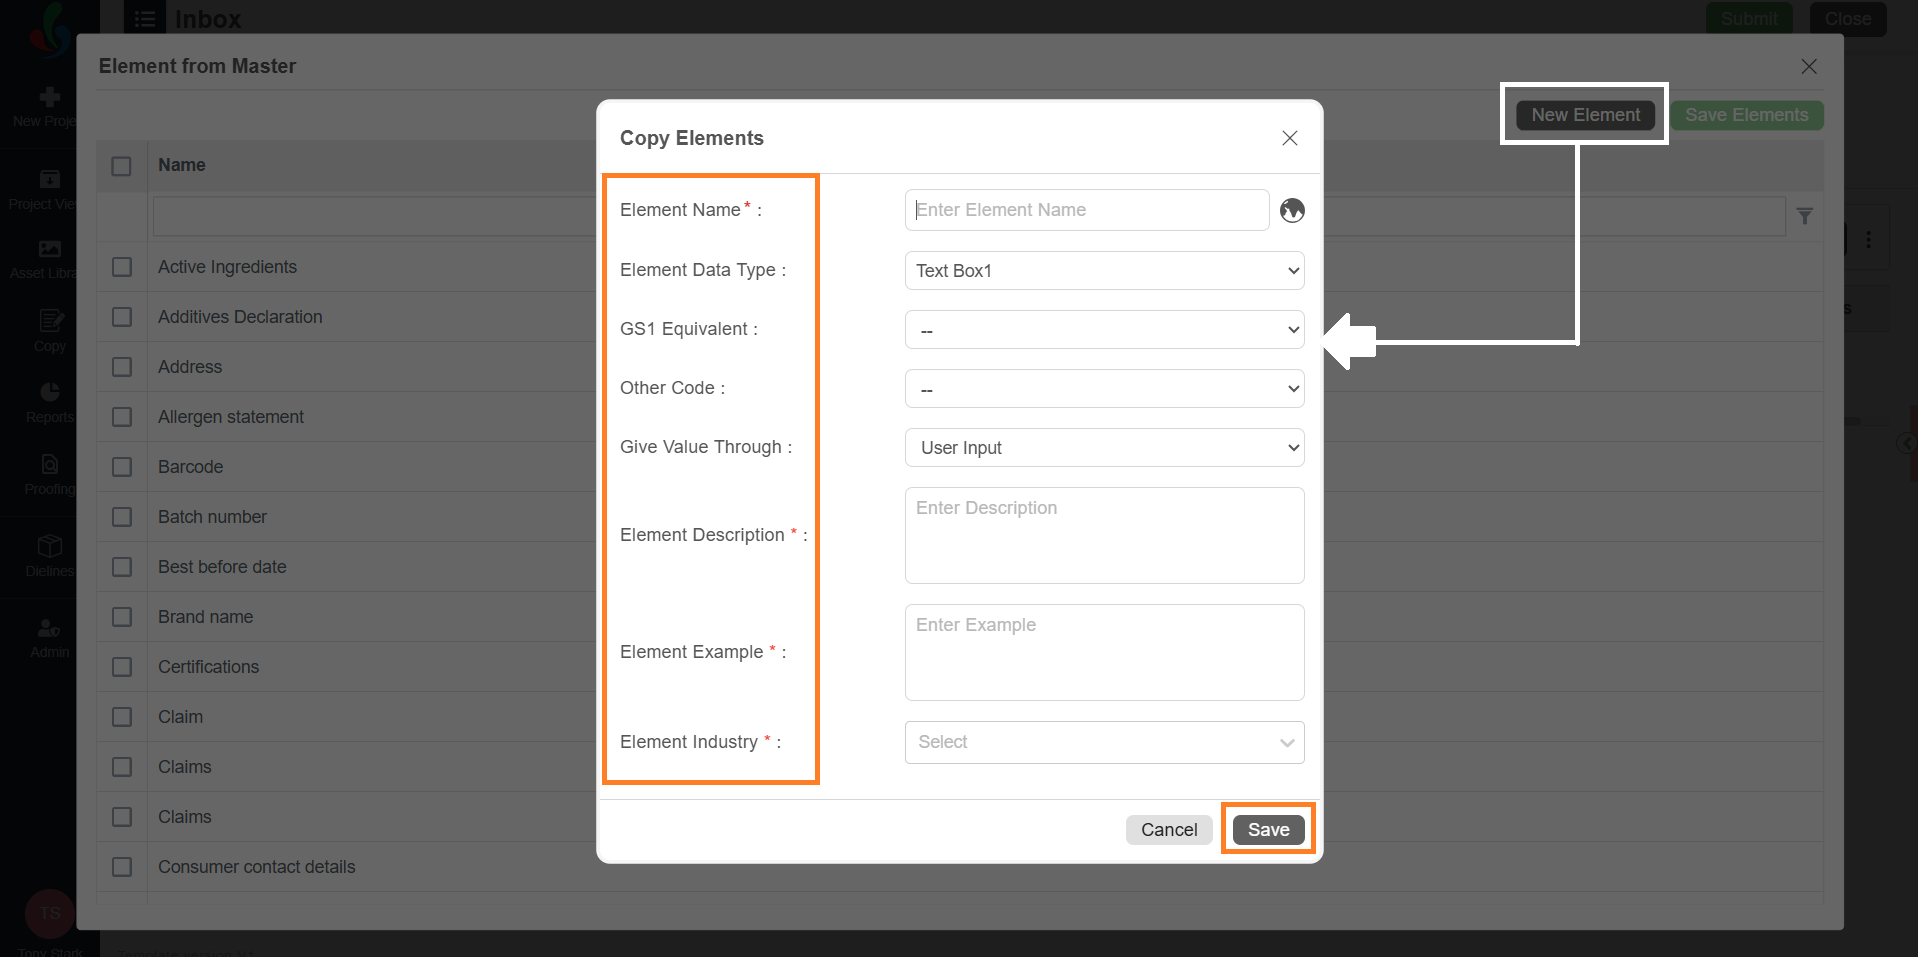

Add Elements from Other Component
Use this option to reuse copy elements from existing components available in the system. This helps reduce rework and ensures consistency by leveraging previously created or approved copy content.
To add elements from other components:
- In the Copy tab, select the Add drop-down menu.
- Select From Other Components.
- A pop-up window appears listing all available components in the system with the following statuses:
- In Progress
- Completed
- Terminated
- Select the plus (+) icon to expand the required component.
- Select the required copy elements.
- Once all desired elements are selected, select Add Selected Elements to add them to the project.
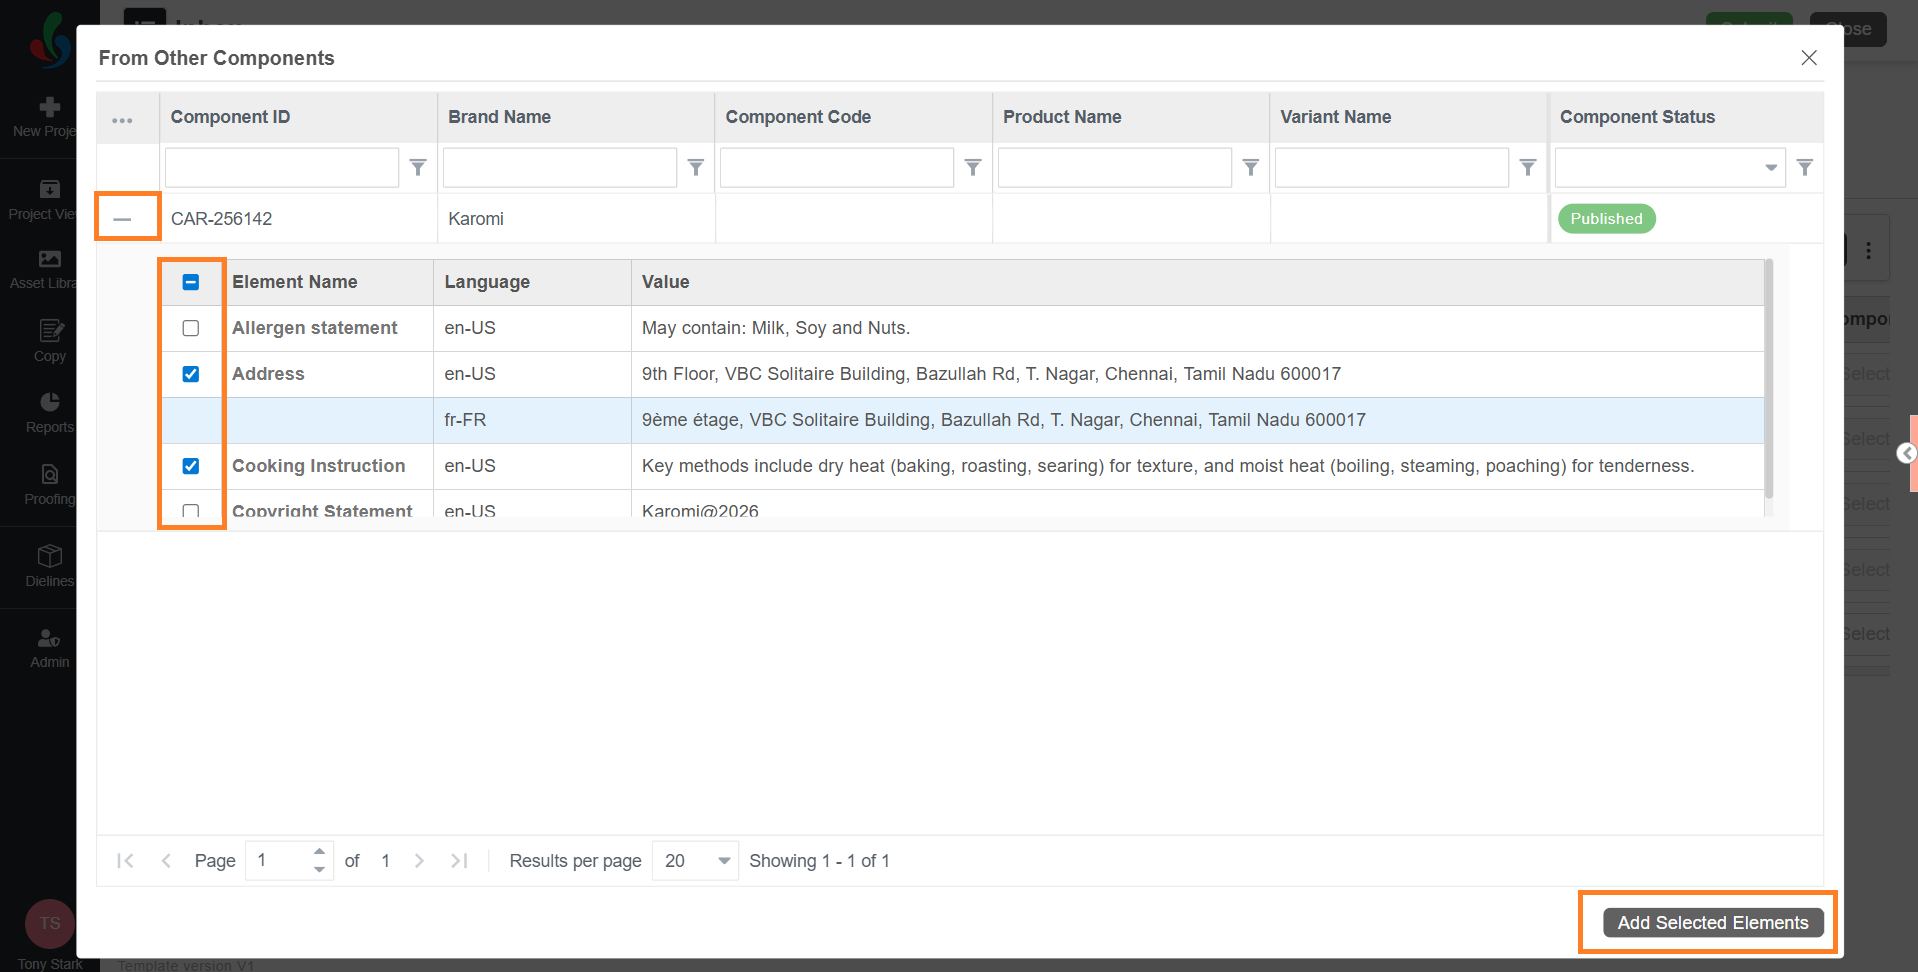
| Element Status After Adding from Other Components The status of the added copy elements depends on the status of the source component:
Revising Approved Elements Even if an element is imported with the status Copy Input Approved, you can revise it if changes are required.
For more information, refer to Copy Input. |
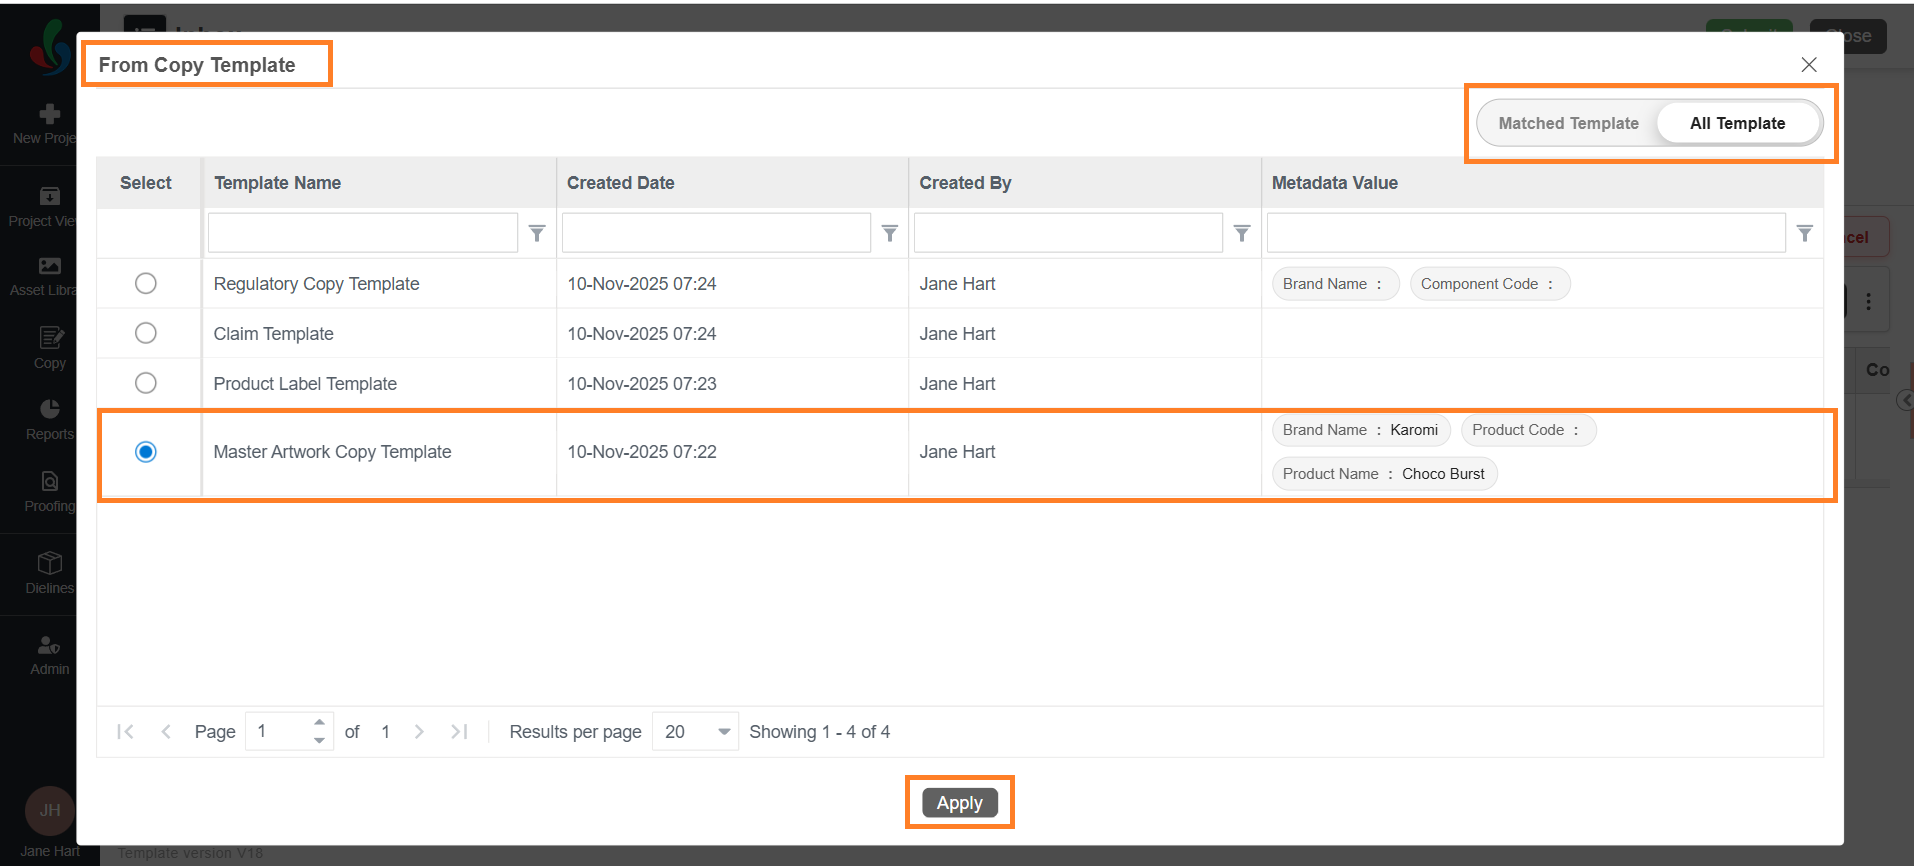
Add Elements From Copy Template
Use this option to quickly populate copy elements using predefined Copy Templates. This method is ideal for standardized projects and ensures consistency across multiple workflows.
| Note: To create or manage Copy Templates, refer to Copy Template. |
To add elements from a Copy Template:
- Select the Add drop-down menu.
- Select From Copy Template.
- In the From Copy Template window, all copy templates available in the system are listed.
- To view only templates whose configured metadata matches the project, select Matched Templates.
- Select the required template and select Apply.
- All elements configured in the selected template, along with their associated settings, are imported into the project.
- Depending on the template configuration:
- Elements may be preassigned with users.
- Elements may include predefined values.
- Elements may already be in an approved state.
- This significantly reduces setup time for repetitive or standardized projects.
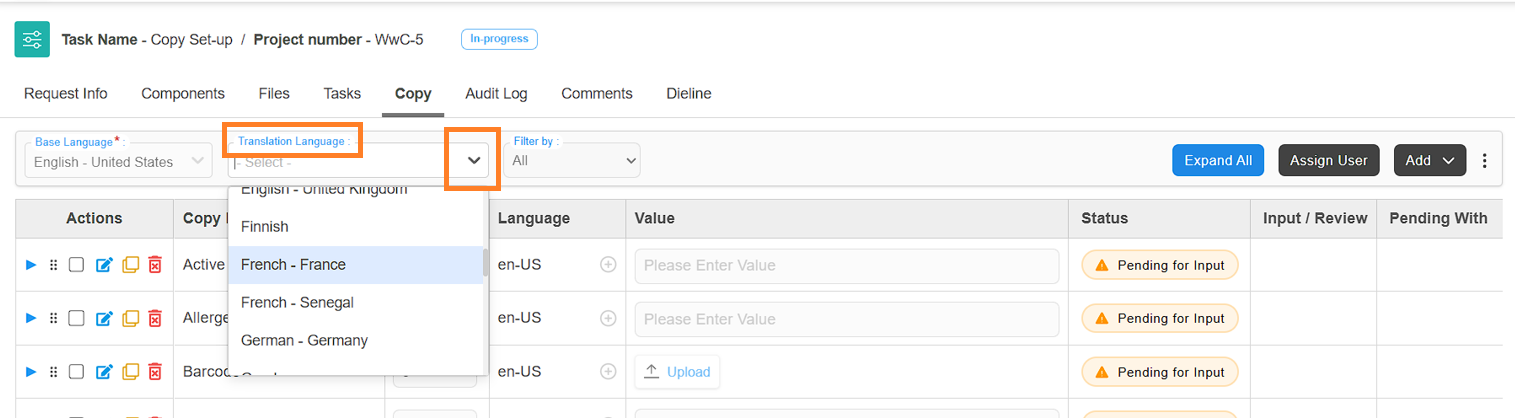
03. Add Translation to Copy Elements (Optional)
If your project requires copy content in multiple languages, you can configure translations for copy elements during the Copy Setup task.
Translations can be added element-wise, allowing you to control which elements require translation and which languages apply to each element.
| Note: If copy elements are added using a Copy Template and the selected template already includes translation configuration, those settings are automatically imported. You can modify the translation configuration if required. |
| How Translation Configuration Works
Auto Translation Behavior (If Enabled) If Auto Translation is enabled in Copy Manager Settings, the system behaves as follows:
|
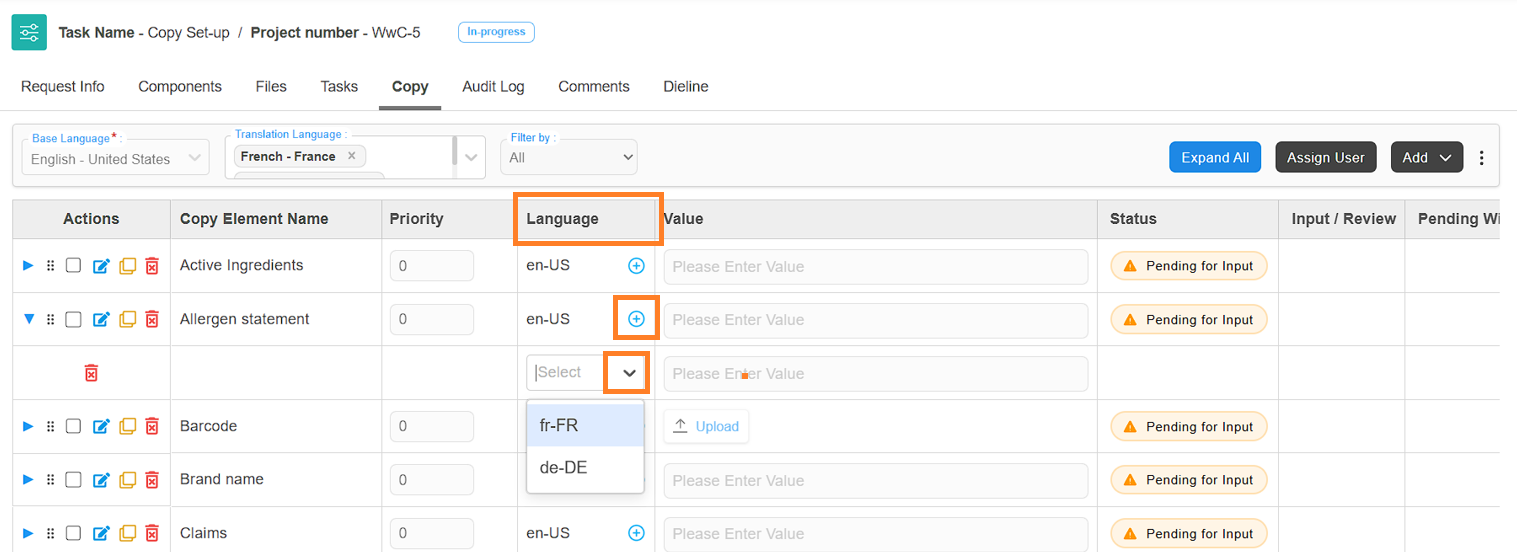
To add translation languages:
- In the Copy tab, select the Translation Language drop-down menu.
- Select the required language.
Example: Select French – France if you want to provide French translations.
Note: You can add multiple translation languages by selecting them one by one from the dropdown.
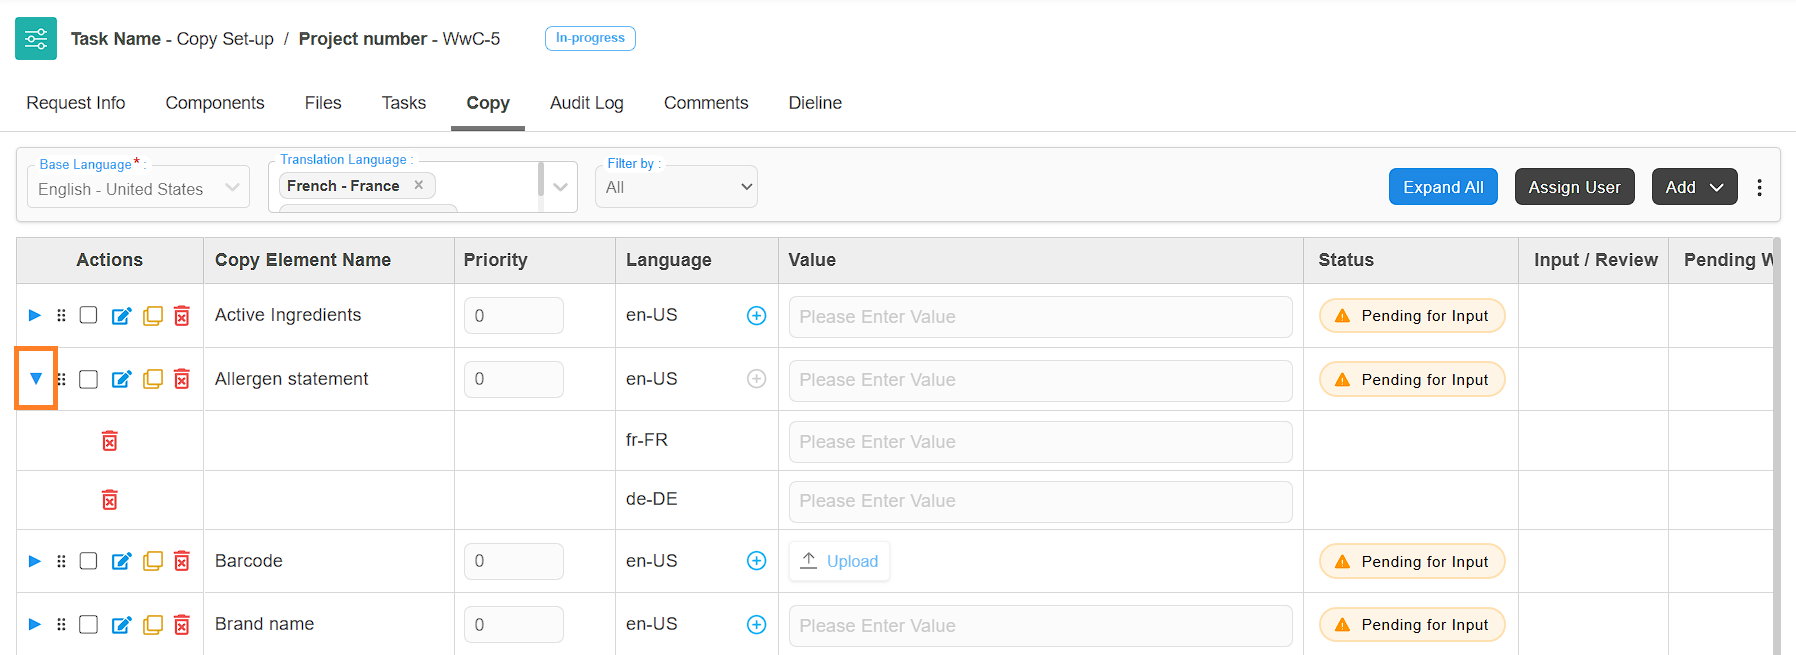
- After selecting a translation language, locate the copy element to which you want to apply translation.
- Select the plus (+) icon in the Language column for that element.
- Select the drop-down menu and select the required translation language from the list. (e.g., French - France).
- The selected language is now associated with the copy element.
- Repeat Steps 3 and 4 for any other elements that need translation.
- You can assign different translation languages to different elements, or use the same one across all.
- You can expand each element using the ▶ expand icon to view and manage translation assignments.
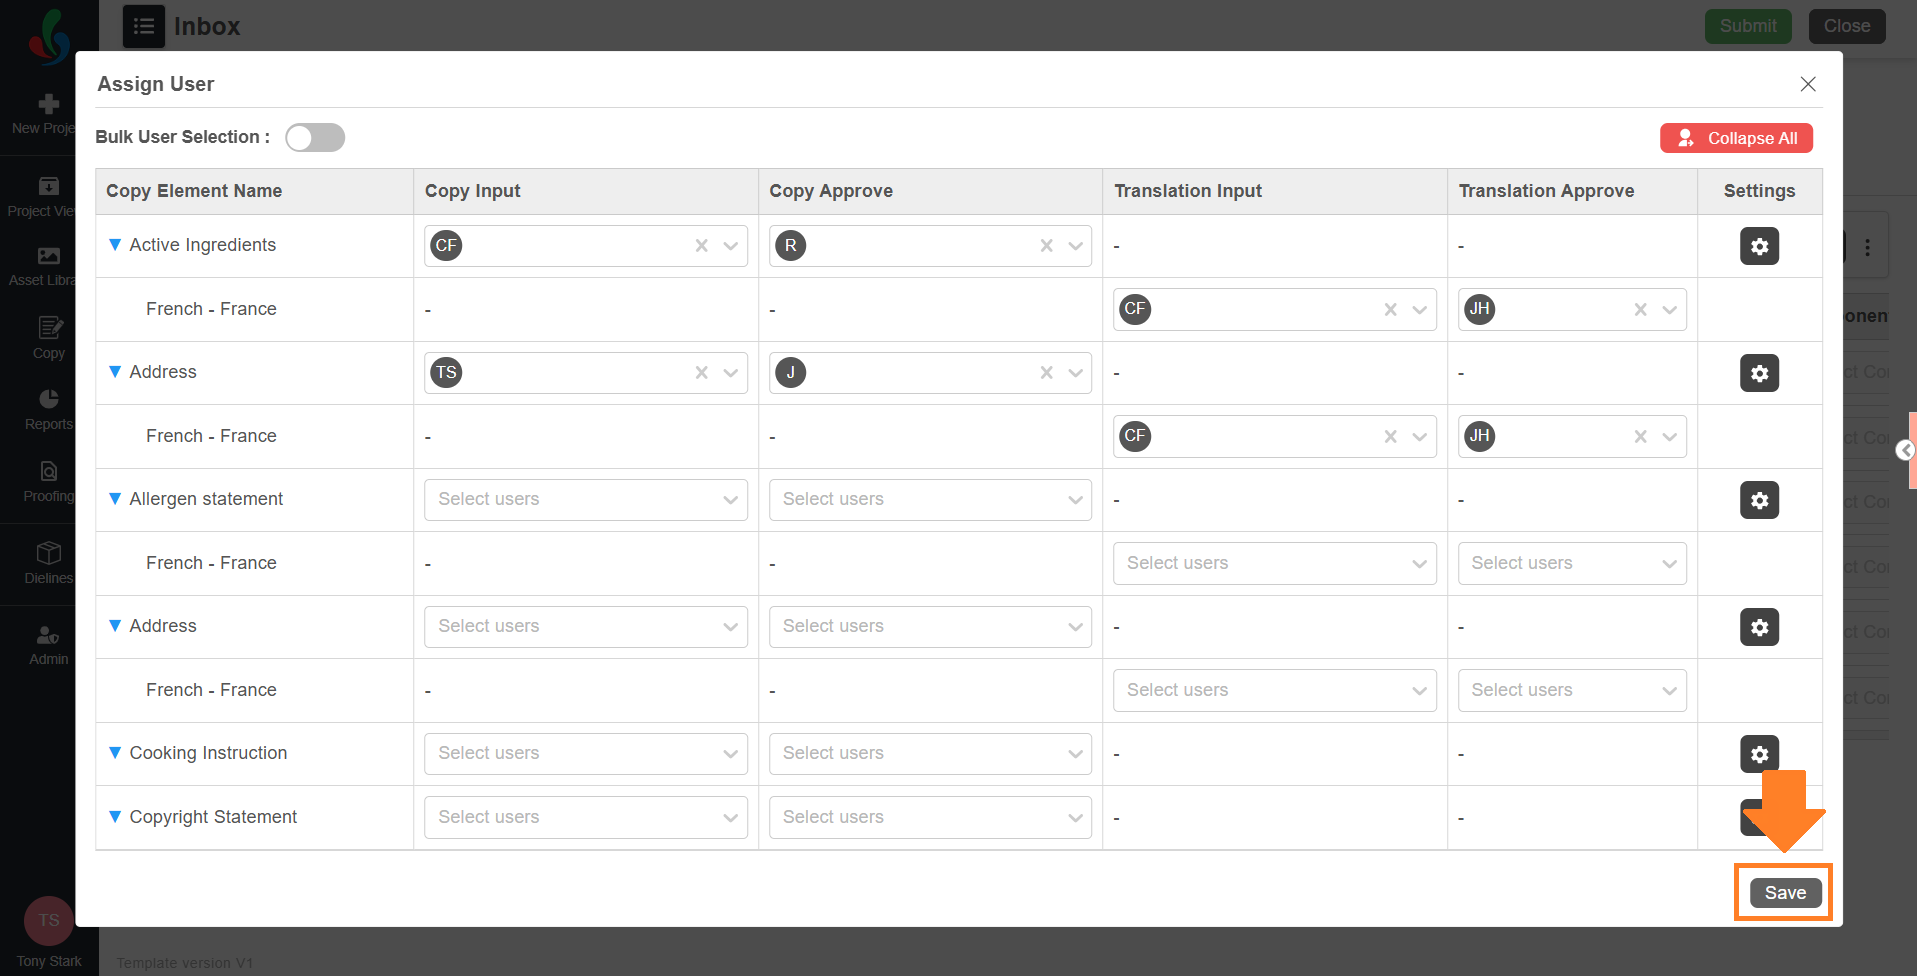
04. Assign User to Copy Elements
After adding copy elements and configuring translations (if required), assign users who are responsible for inputting and approving copy content.
User assignment is done at the element level, giving you granular control over who works on each copy element.
| User Assignment Rules Keep the following rules in mind when assigning users to copy elements:
|
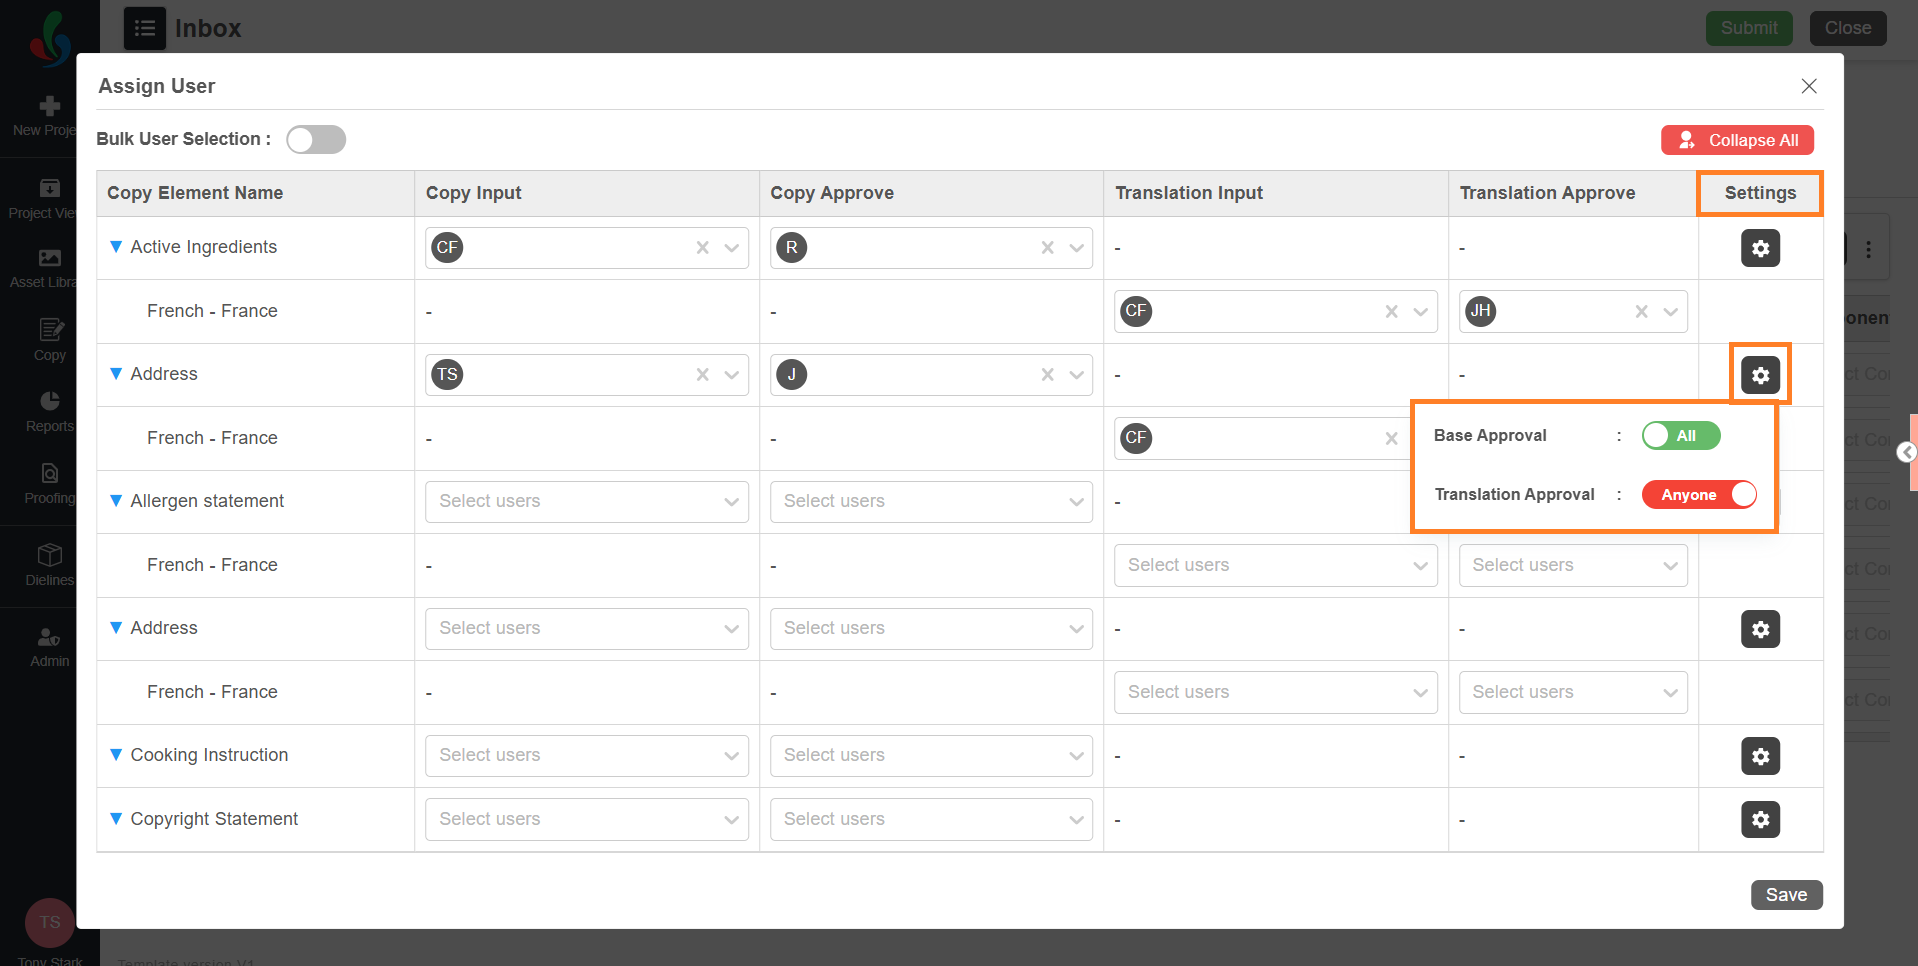
To assign users to the elements:
- In the Copy tab, select Assign Users.
- In the popup window, you’ll see all the added copy elements along with user selection fields for each task type.
- For each element, select the dropdown in the Copy Input and Copy Approve columns and select the appropriate users.
- Copy Input – the person who will fill in the content.
- Copy Approve – the person who will review and approve the content.
Note: You can select multiple user only for Copy Approval.
- Assign users for translation (if applicable):
- If a copy element includes translation, select the expand (▶) icon next to the element.
- Assign users to Translation Input and Translation Approve from the respective dropdowns.
Note: You can select multiple user only for Translation Approval.
- Configure Approval Settings (All or Anyone):
If you’ve assigned multiple users for approving an element, you can control how approvals are handled by setting it to "All" or "Anyone"- Select the Settings icon associated with the element where multiple users are assigned.
- Use the toggles associated with Base Approval or Translation Approval to select your preferred setting.
- Anyone: Approval from any one of the assigned users is enough to proceed.
- All: Every assigned user must approve the element for it to move forward.
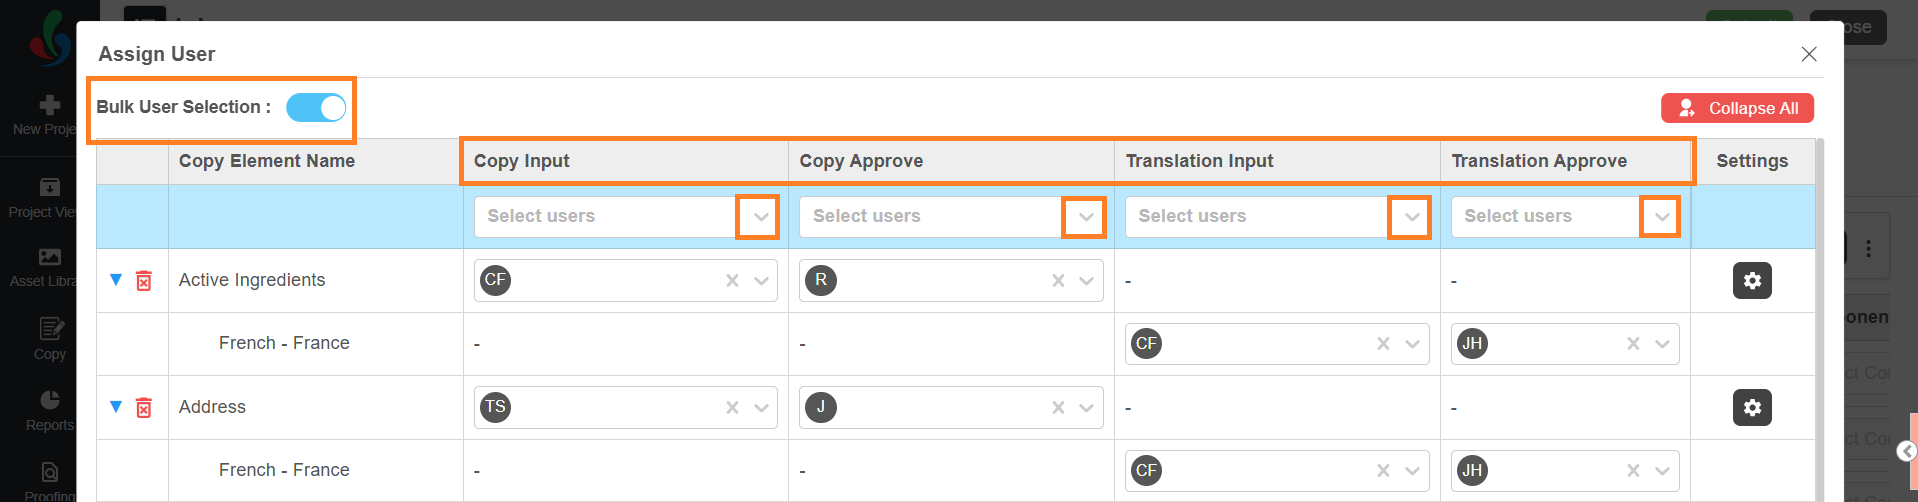
- Use Bulk User Assignment (If needed):
If you want to assign the same user to multiple elements quickly:- Toggle Bulk User Selection to On.
- Use the dropdown in the first row to assign a user to any of the following columns:
- Copy Input
- Copy Approval
- Translation Input (if applicable)
- Translation Approval (if applicable)
- The selected user will be automatically applied to all corresponding elements in the list.
- After completing the user assignments, select Save to apply your changes.


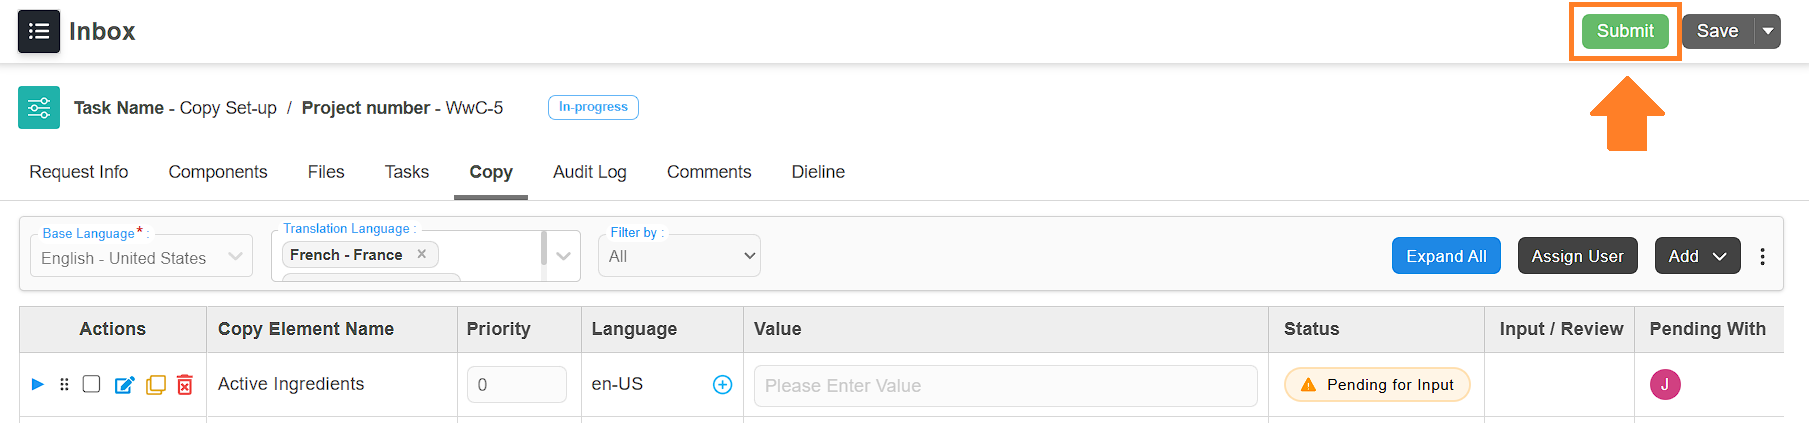
05. Submit
After you have configured or set up the copy elements, select Submit to move the project to the next task in the workflow.
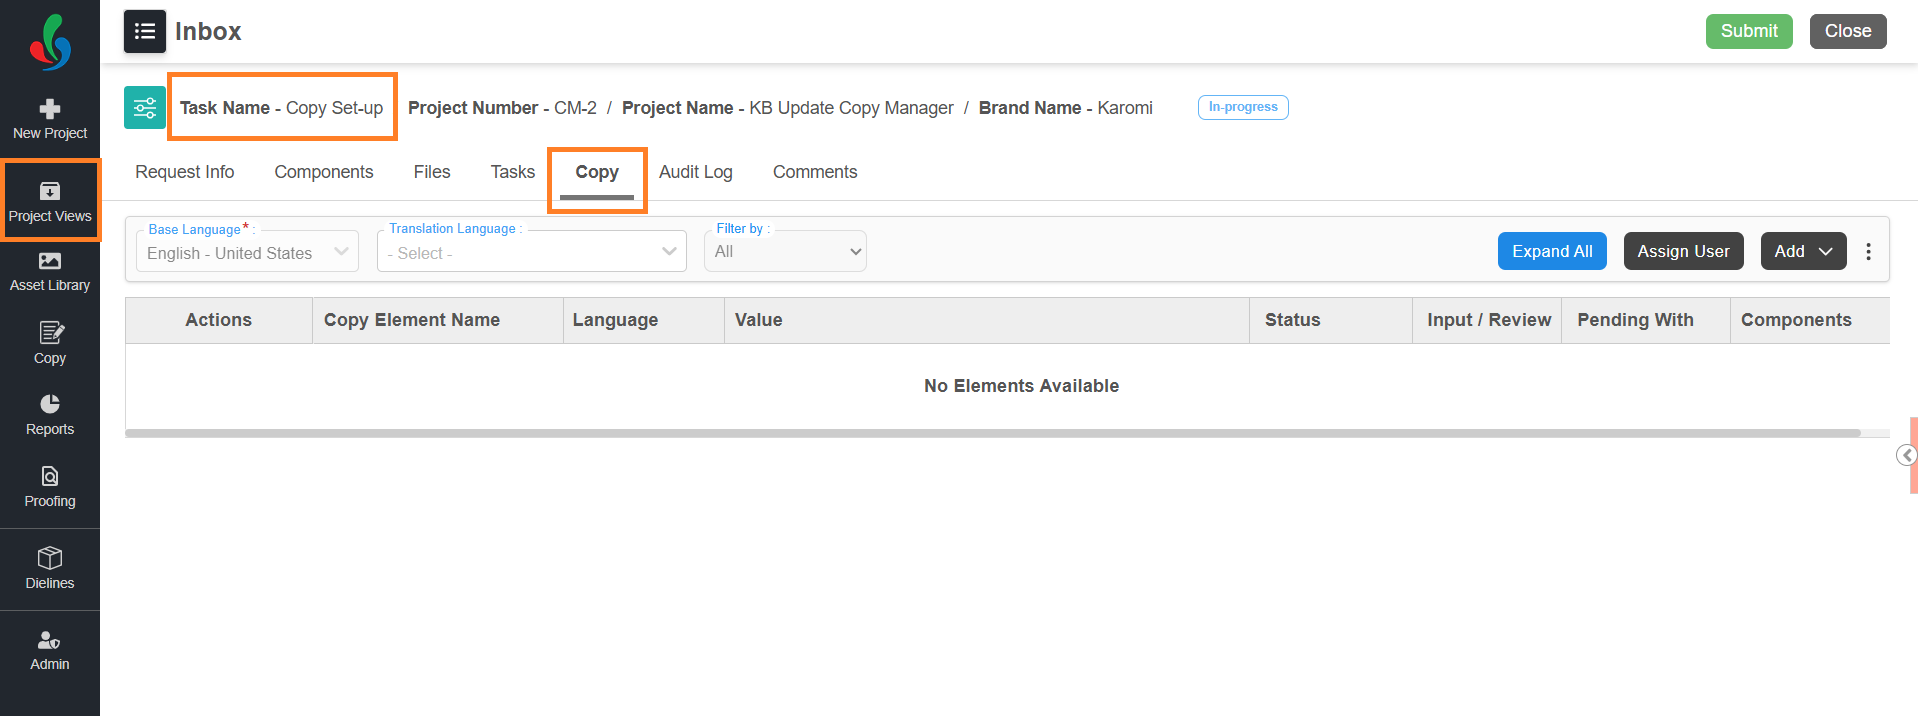
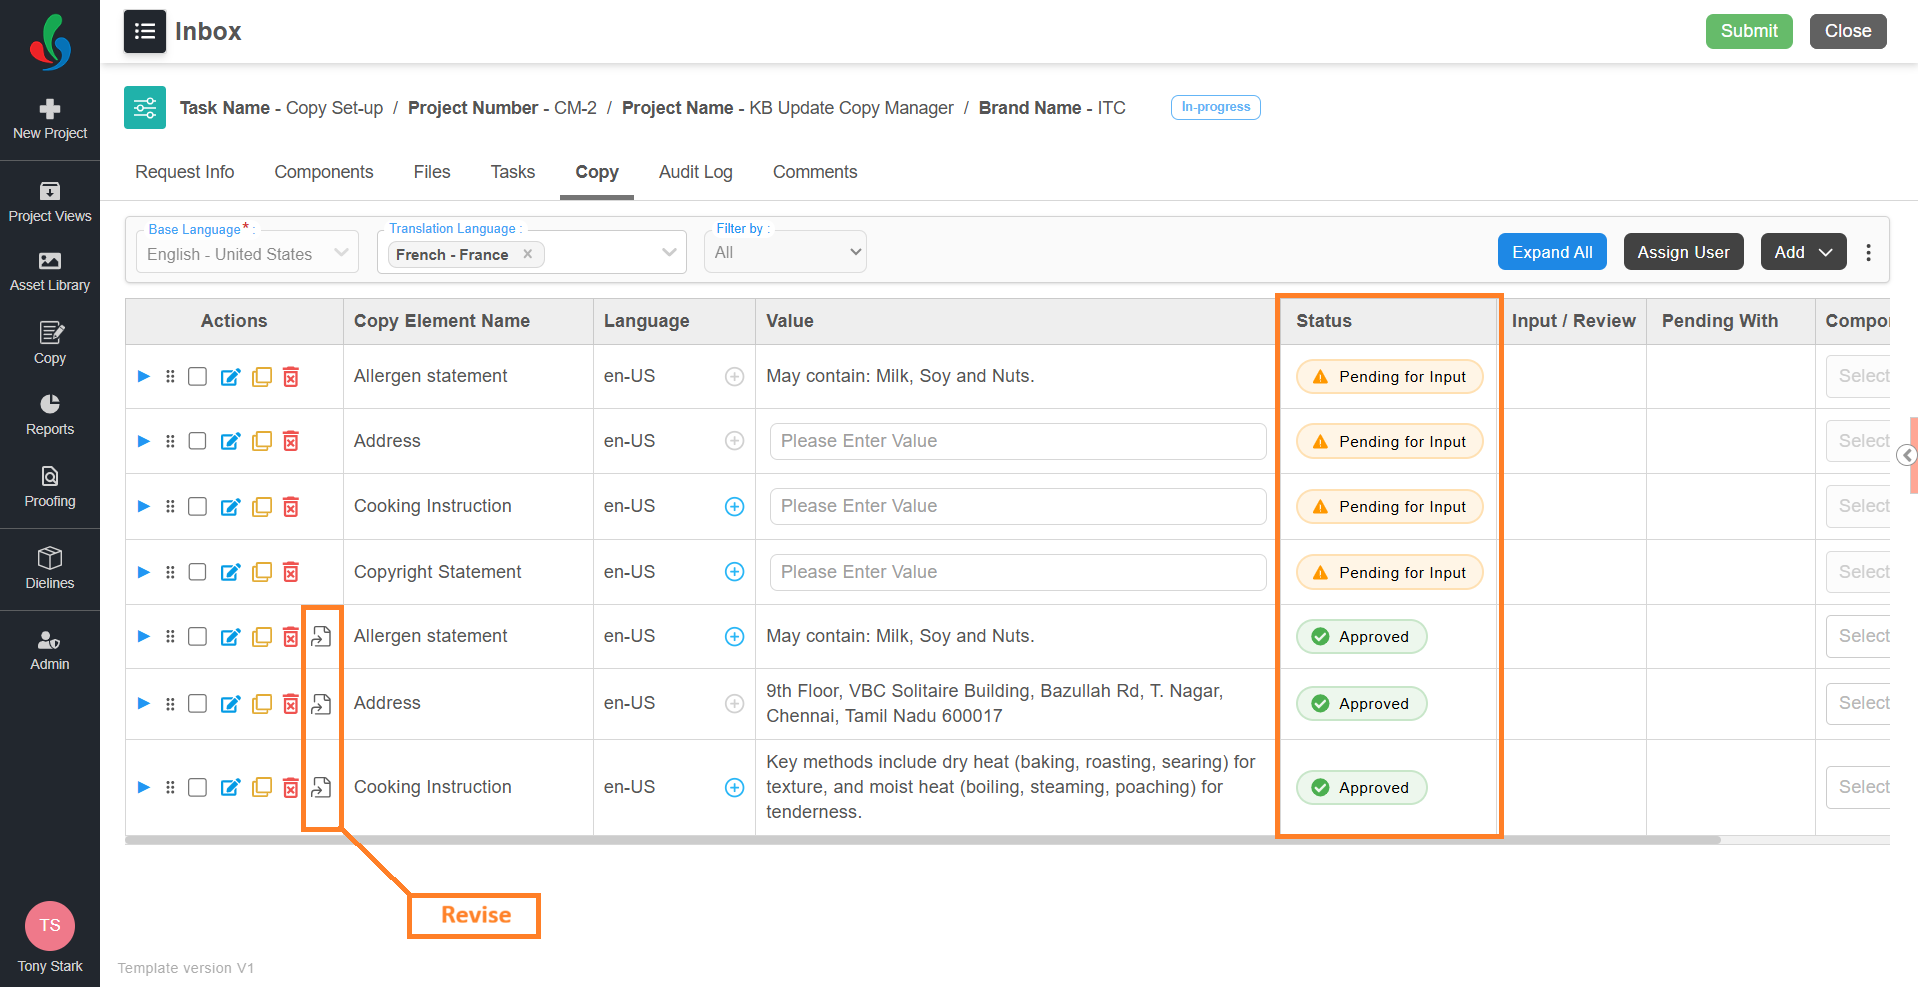
Copy Input
The Copy Input task is where you enter content (also called “values”) for each copy element that has been assigned to you. These values might be product information, ingredient names, statements, images or other regulatory texts.
What You Can Do in This Task
- Enter values for the copy elements assigned to you.
- Edit the values until you submit them.
- Submit individual elements once values are finalized.
| Note: By default, you cannot add or remove elements or assign users in this task. However, if these permissions were enabled for this task when the workflow template was configured, you will have access to those options. |
If the Copy Setup task was skipped earlier:
- Add copy elements.
- Assign users to those elements.
- If required, add translations.
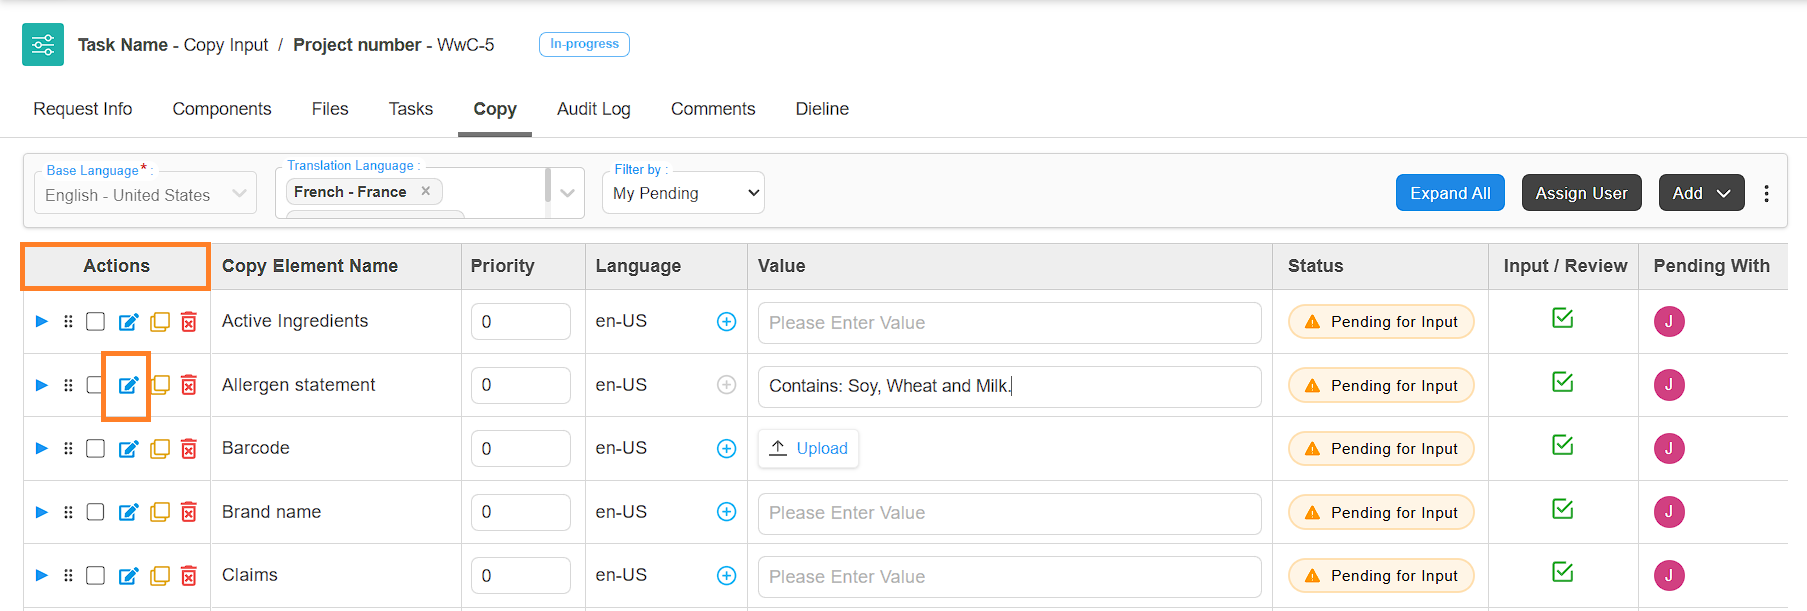
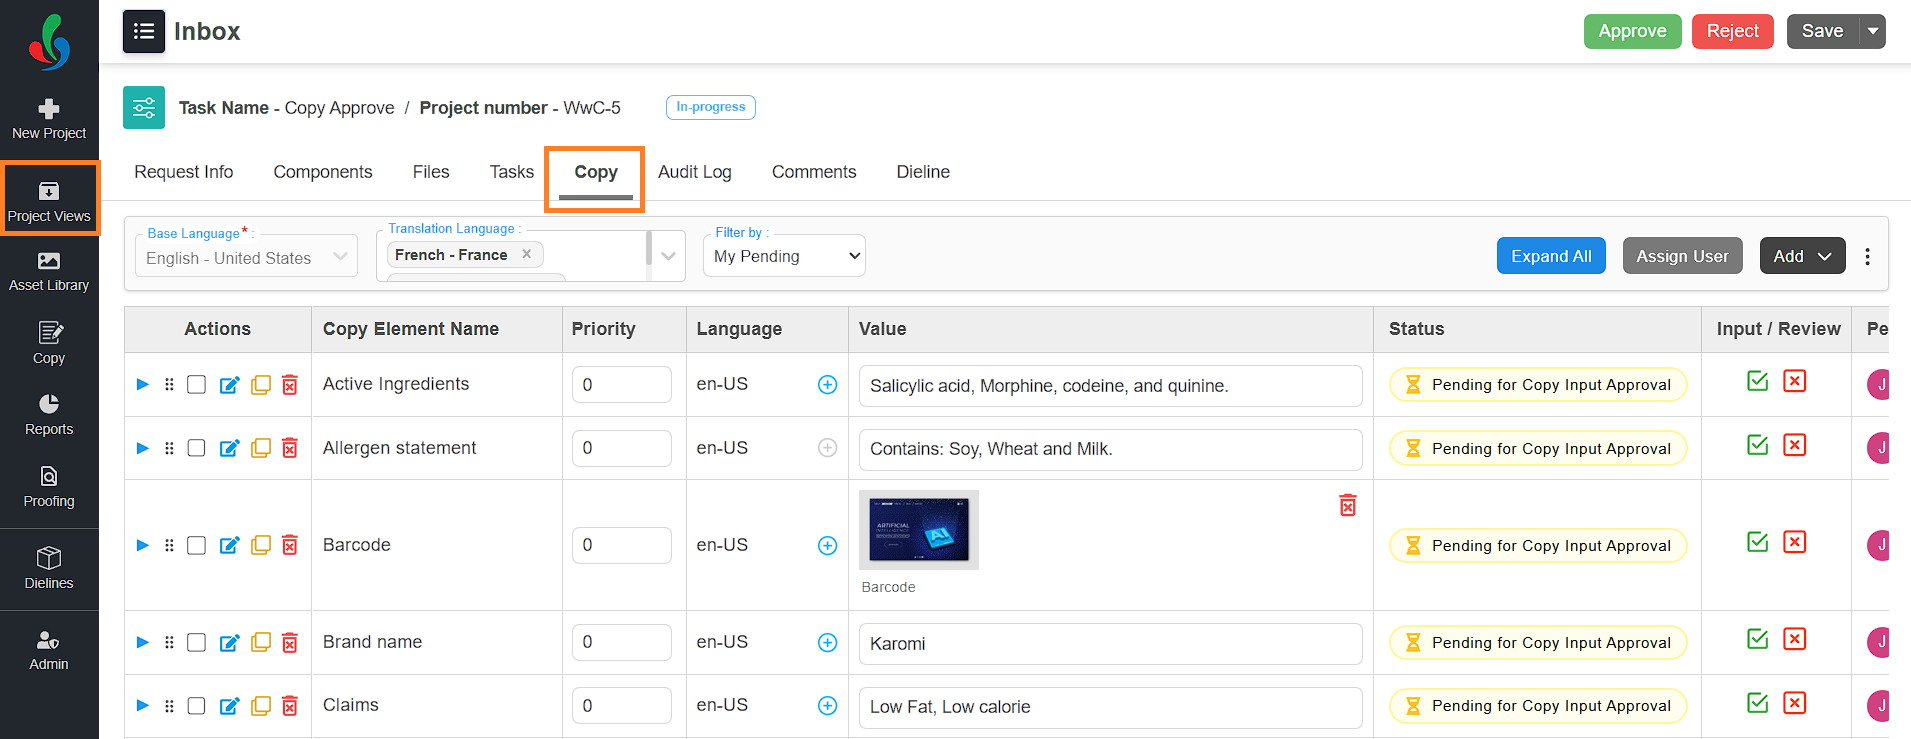
01. Access the Copy Tab
- Sign in to your ManageArtworks account.
- Navigate to the Project Views module.
- Open the Copy Input task.
- Go to Copy tab.
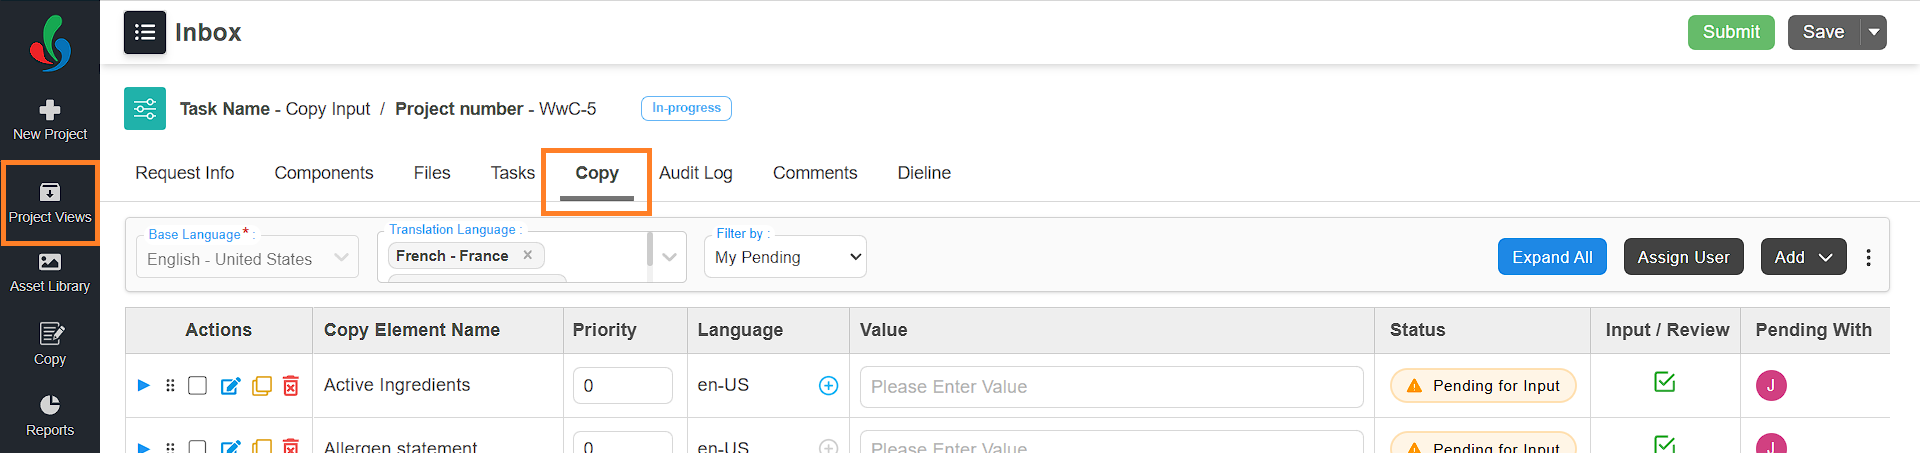
02. View Your Assigned Elements
- By default, you will see only the elements that have been assigned to you.
- To view all elements in the project (not just your own), click the Filter by dropdown and select All.

| Note: You can only enter values for the elements that are assigned to you. |
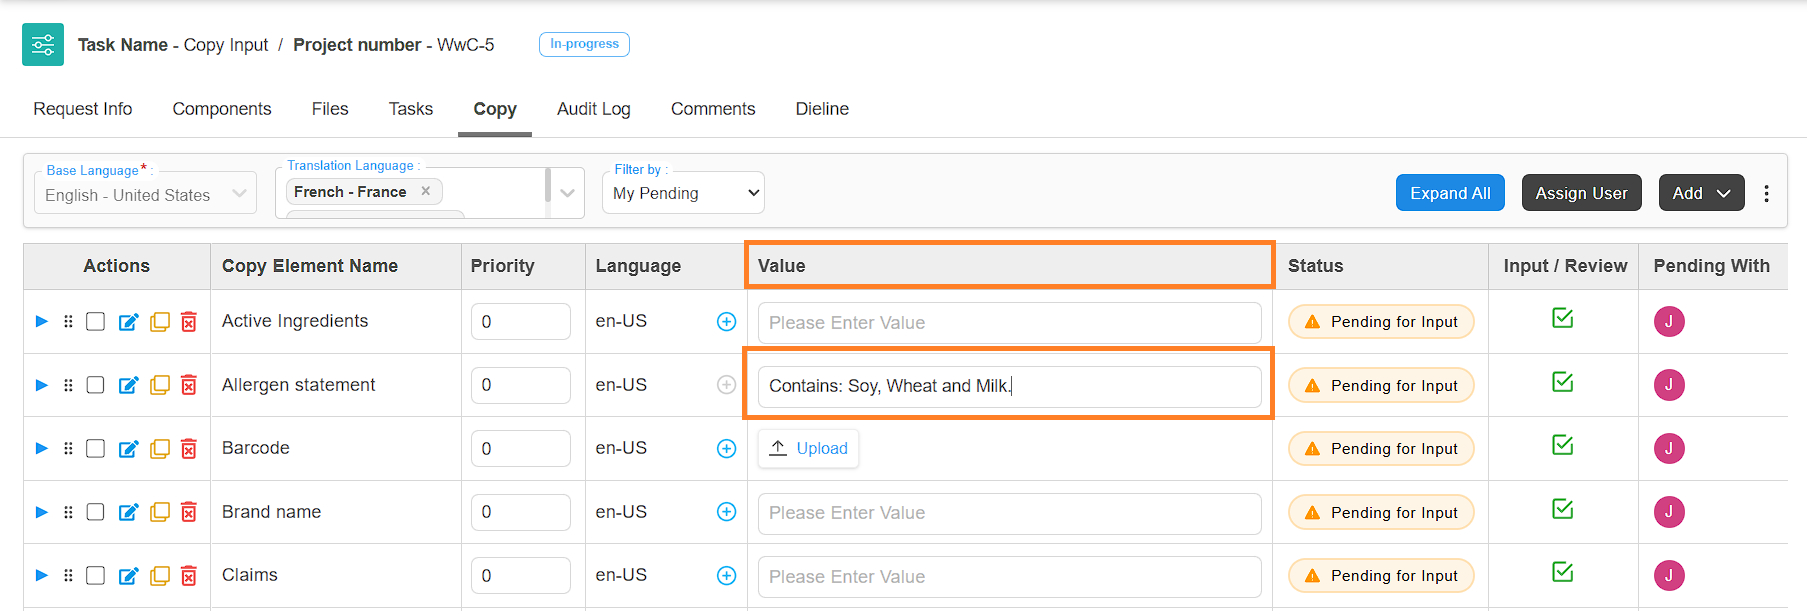
03. Enter Values for Elements
- You can enter values for your copy elements by any of the following method:
- Quick Edit in the Value Column
- In the Value column, click the input box next to the element you want to update.
- Type your content or value for the element.
- Your input will be saved automatically.
- You can edit the value anytime until you submit it.
- Edit Element Option
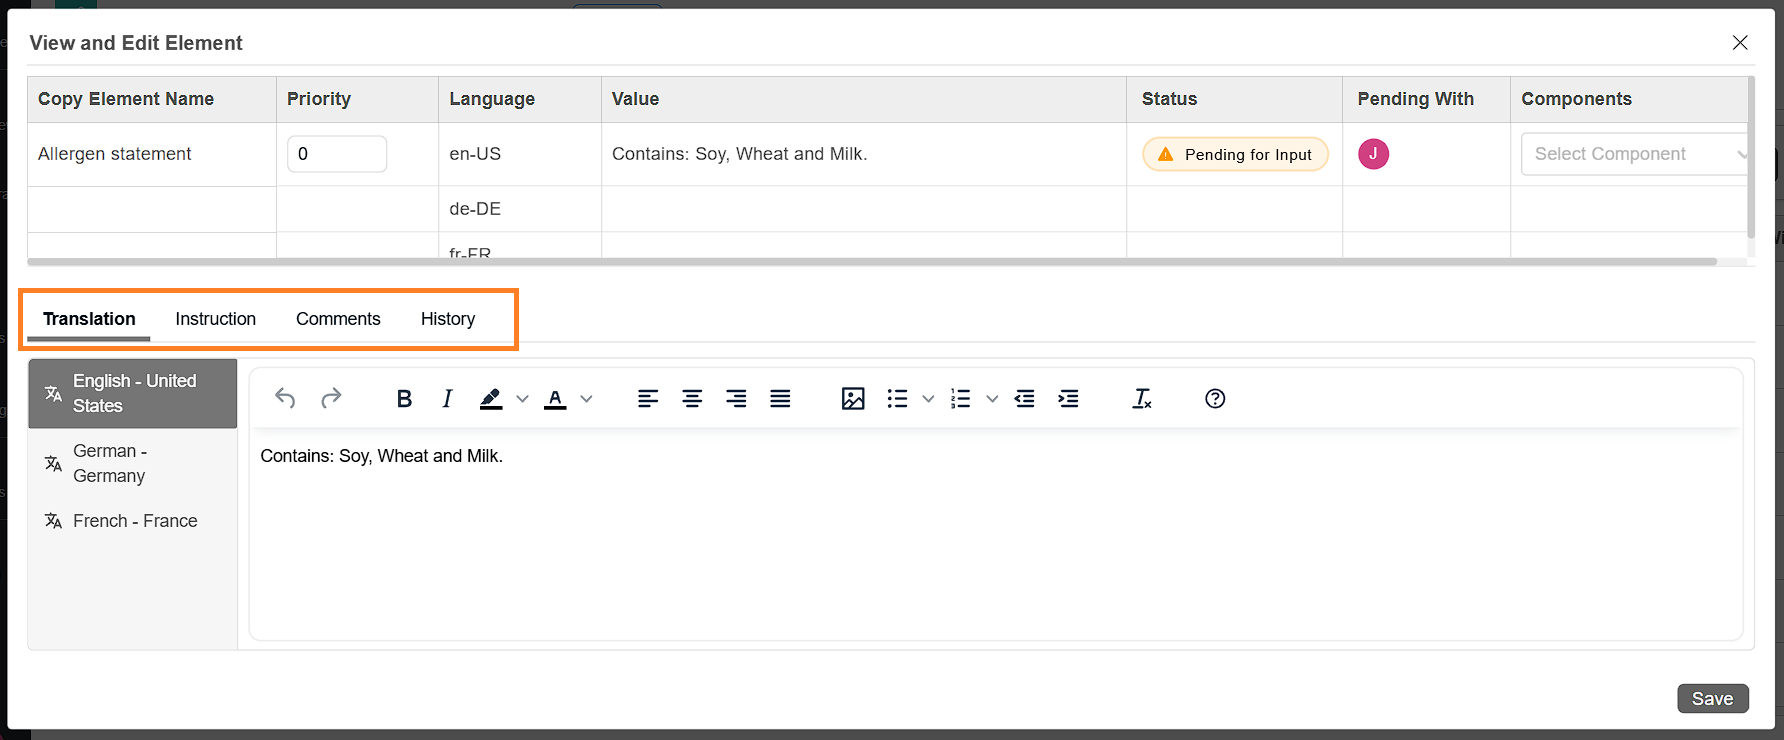
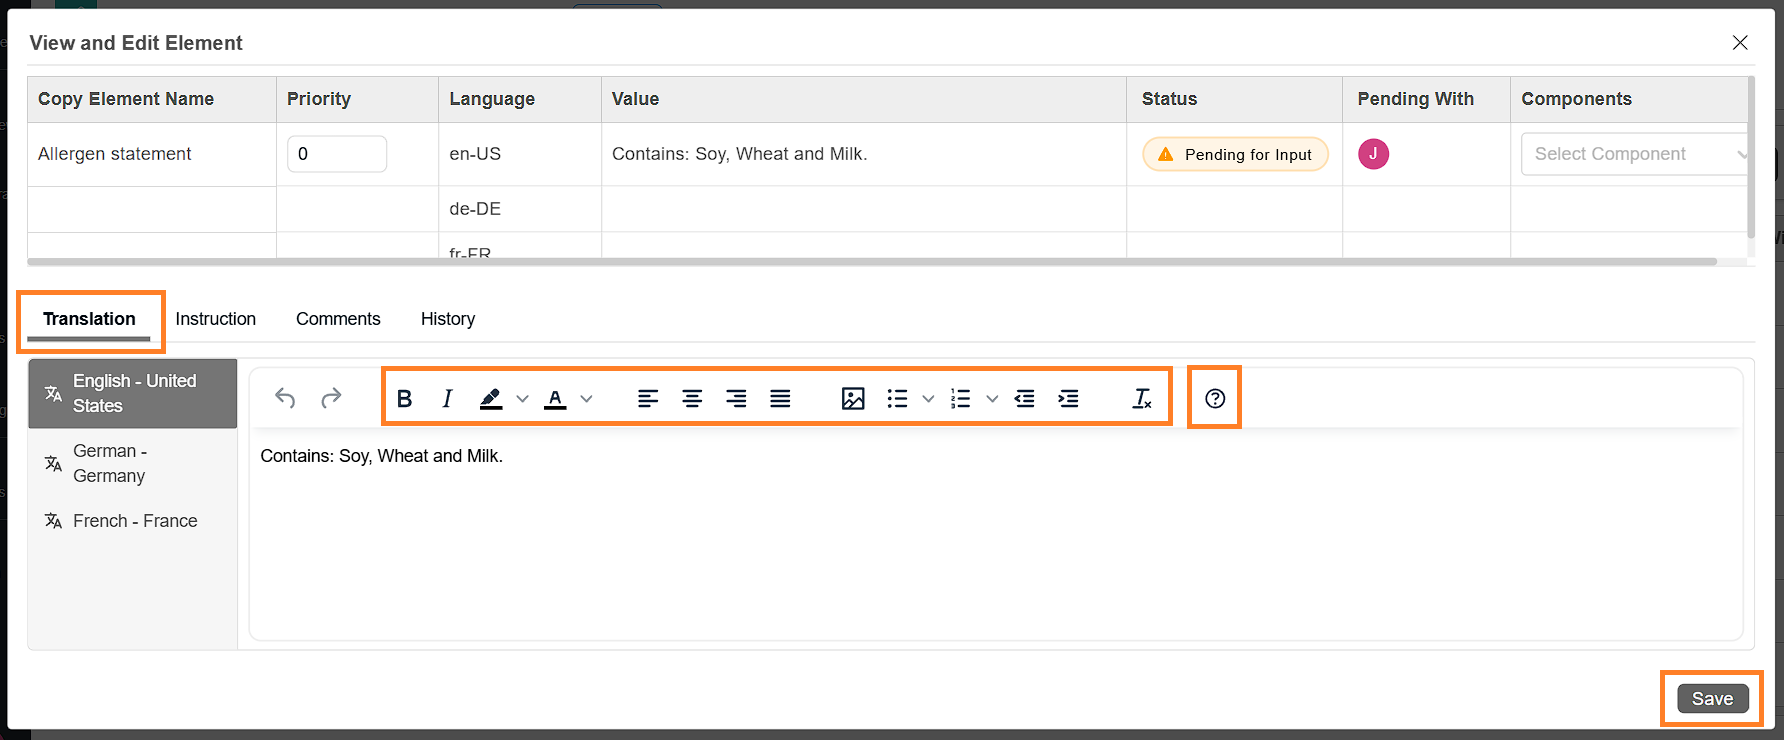
- In the Actions column, select the Edit Element icon associated with the desired element you want to update.
- The View and Edit Element popup will appear. It contains four tabs:
- Translation - Enter or update content for the element.
- Instruction - Provide additional guidance or notes about the element.
- Comments -Add feedback or suggestions.
- History - View a log of changes and updates made to the element.
- Enter Values:
- Go to the Translation tab (selected by default).
- Click the input box and type the content or value for the element.
- Use the text formatting tools (bold, italics, bullet points, etc.) as needed.
Note: Select the Help icon in the toolbar to learn how to use the formatting options. - Select the Save button at the bottom of the popup to apply your changes.
- In the Actions column, select the Edit Element icon associated with the desired element you want to update.
- Quick Edit in the Value Column
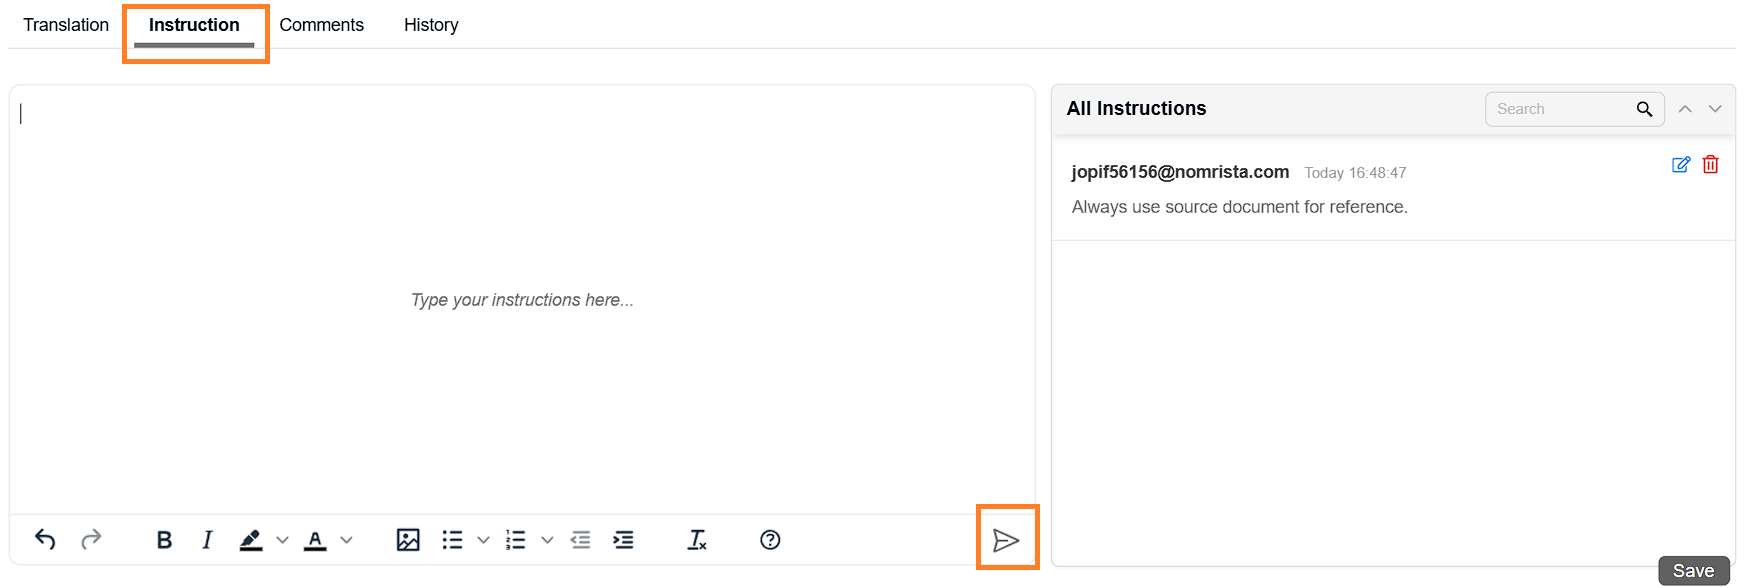
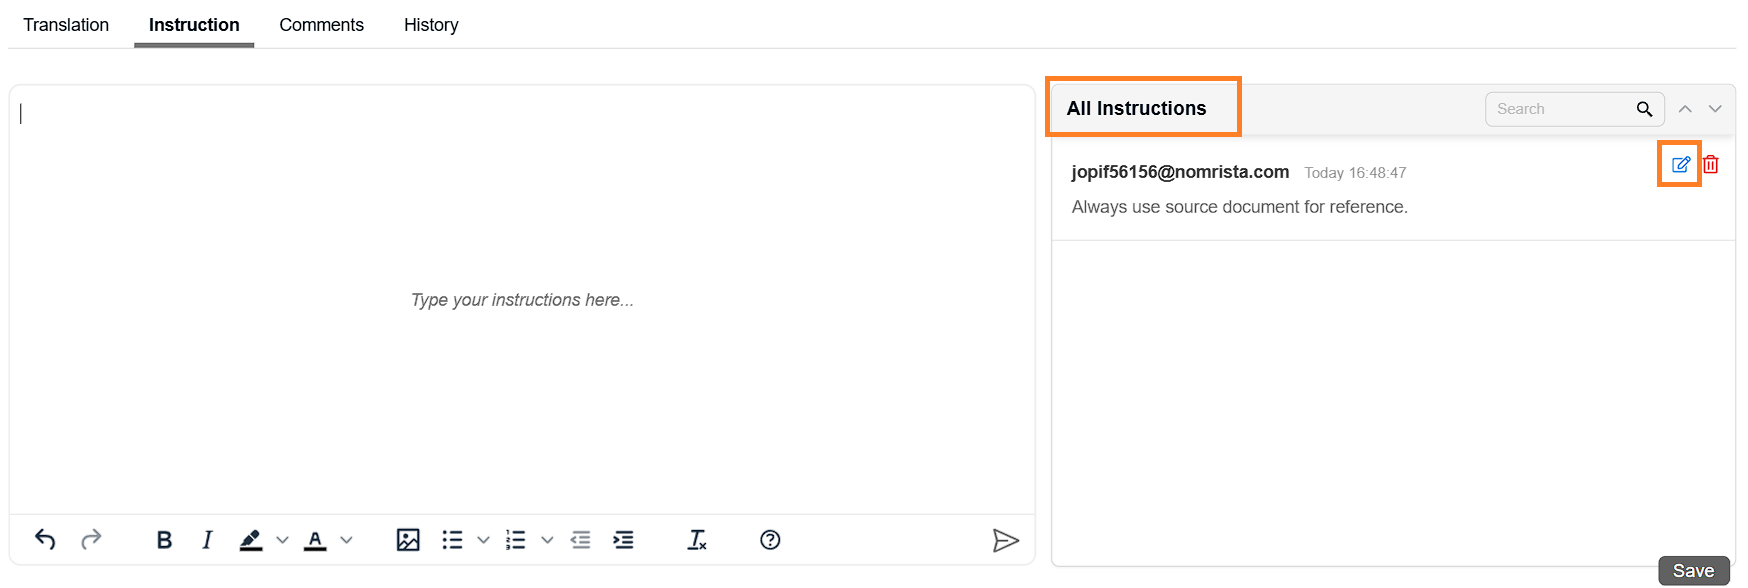
- Add Instructions (Optional):
- In the View and Edit Element popup, select the Instruction tab.
- Click the input box and type any instructions or notes related to the element.
- Format the text using the editor tools, if needed.
Note: Select the Help icon in the toolbar to learn how to use the formatting options. - Select the Send button (paper plane icon) to add instruction to the elements.
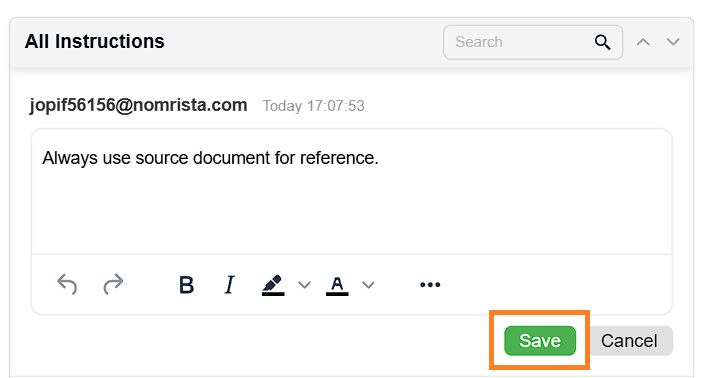
- Manage Instruction:
Once an instruction is added, it will appear under the All Instructions section. You can edit or delete any instruction you have added.- To Edit an Instruction:
- Select the edit icon associated with the instruction.
- Update the text as needed.
- Select Save to apply your changes.
- Select the edit icon associated with the instruction.
- To Delete an Instruction:
- Select the delete icon associated with the instruction.
- In the confirmation pop-up, select Yes to proceed.
- The instruction will be permanently removed.
- To Edit an Instruction:
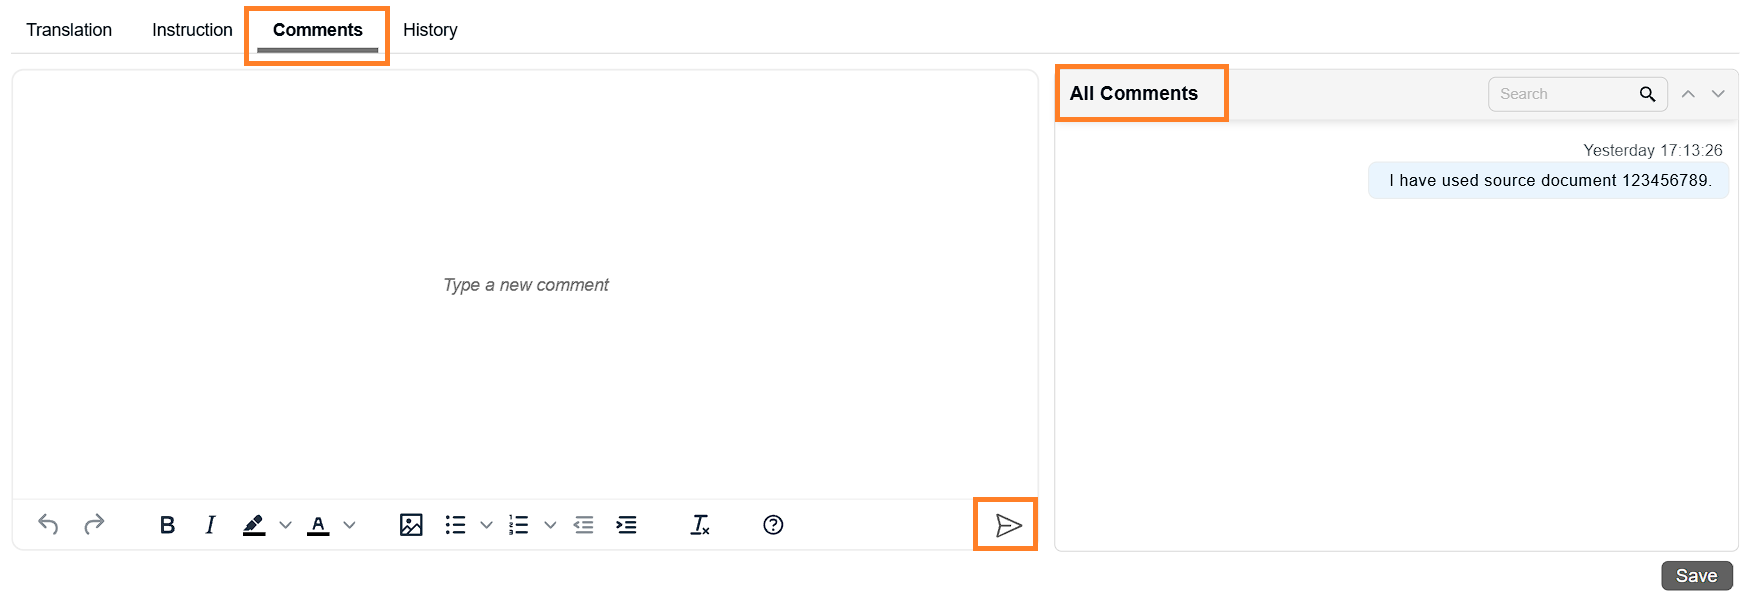
- Add Comments (Optional):
- In the View and Edit Element popup, select the Comments tab.
- Click the input box and type your comment or feedback.
- Style the text using the formatting toolbar as needed.
Note: Select the Help icon in the toolbar to learn how to use the formatting options. - Select the Send button (paper plane icon) to add your comment.
- All added comments will appear under the All Comments section.
Note: Comments cannot be edited or deleted once added.
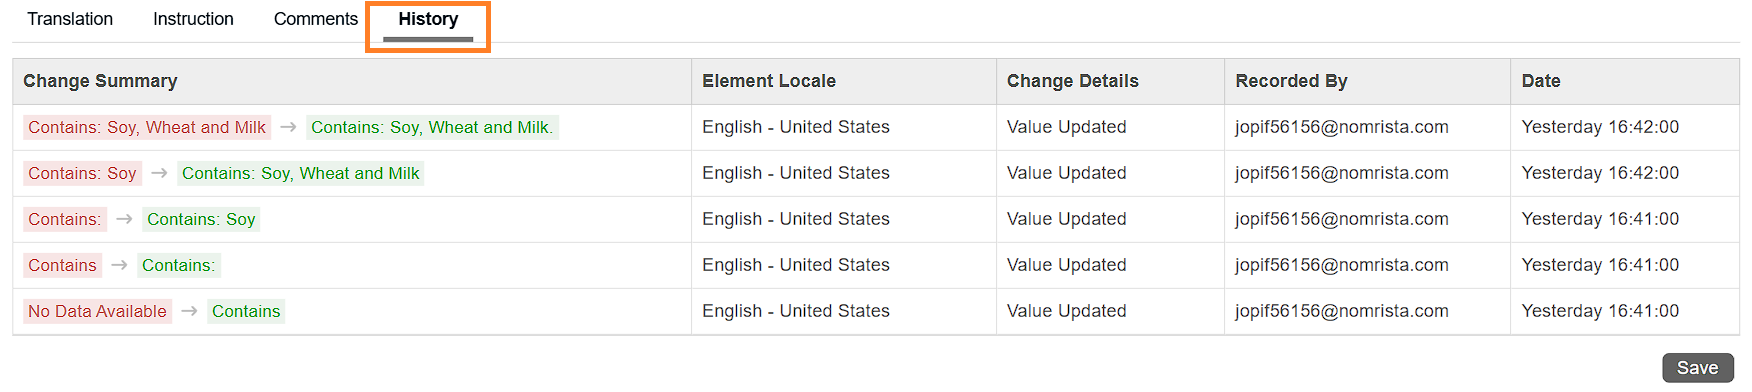
- View History:
- In the View and Edit Element popup, select the History tab to see:
- Who updated the element
- What changes were made
- Time and date of the actions.
- In the View and Edit Element popup, select the History tab to see:

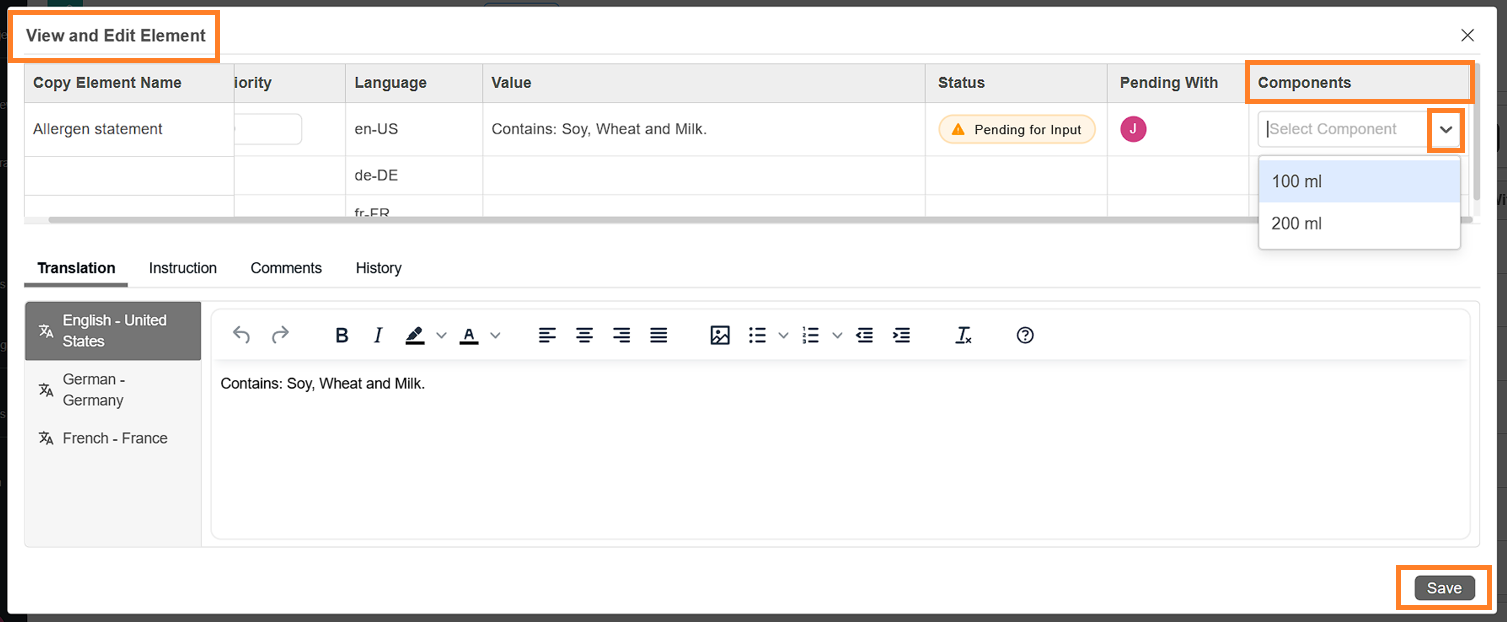
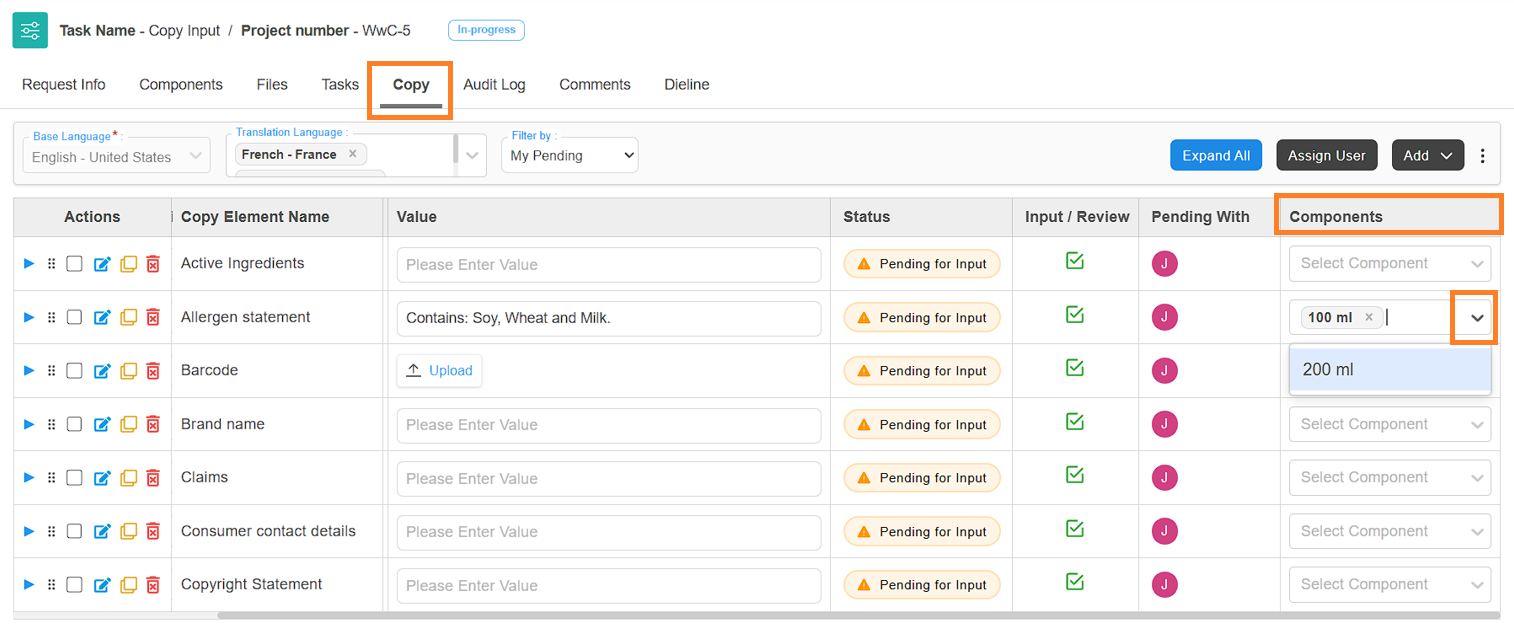
04. Assign Components (Mandatory Step)
Each copy element must be linked to at least one component. You can assign components using either of the following methods:
- From the View and Edit Element Popup:
- In the Actions column, select the Edit Element icon associated with the desired element you want to update
- In the Components column, select the dropdown menu.
- Select the component(s) you want to associate with the element.
Note: Only components added through the Components tab will be available in this list. Make sure components are added before assigning them. - Select the Save button at the bottom of the popup to apply your changes.
- Directly from the Copy Tab:
- In the Components column, select the dropdown menu associated with the desired element.
- Select the component(s) you want to associate with the element.
Note: Only components added through the Components tab will be available in this list. Make sure components are added before assigning them. - Your selection will be saved automatically.
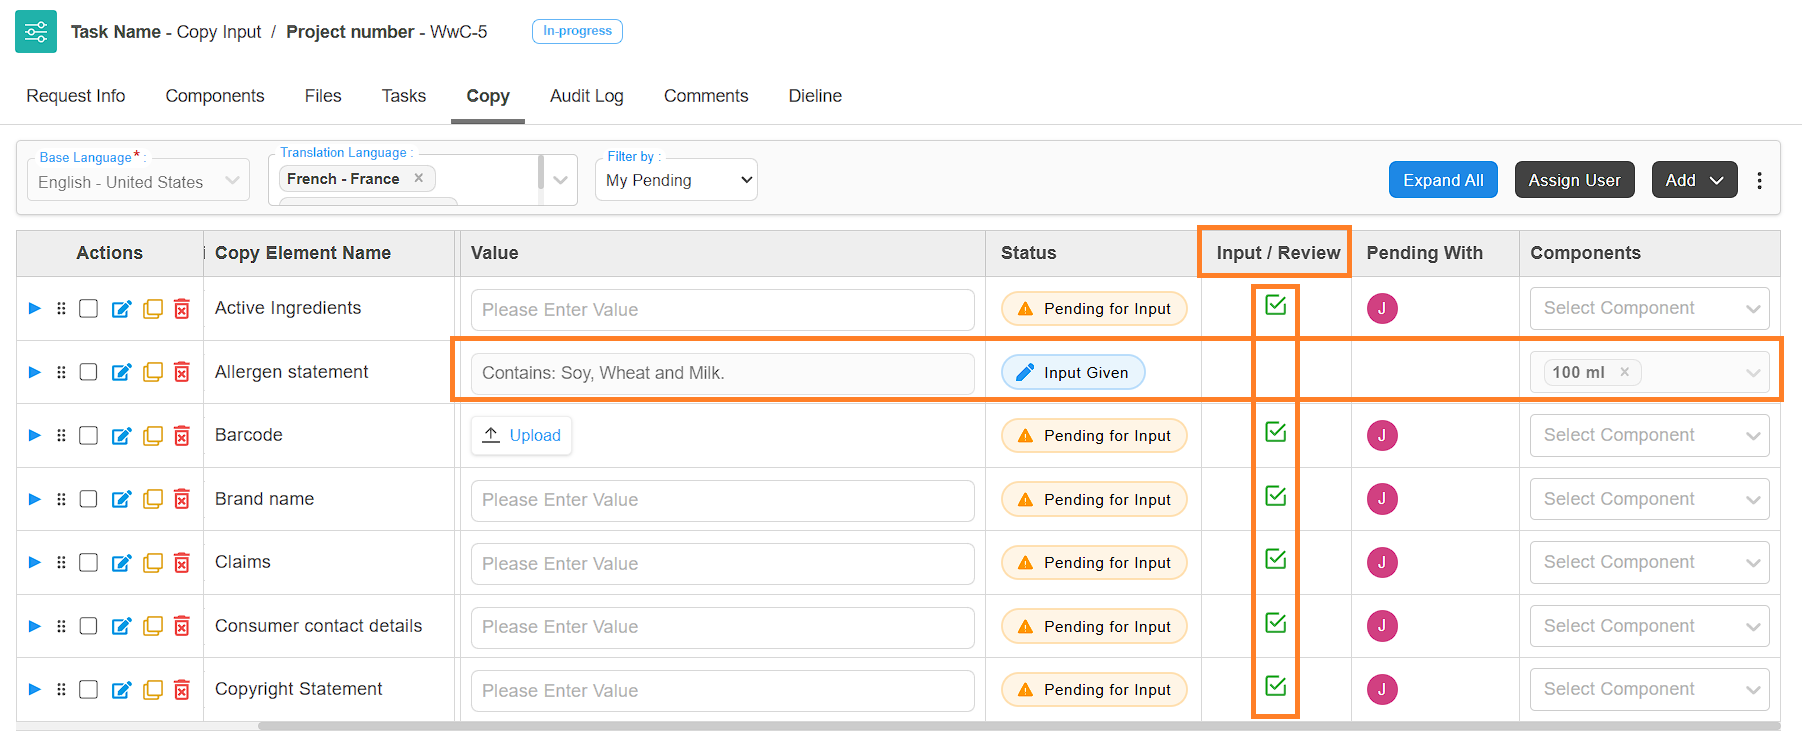
05. Submit Each Element
Once you're satisfied with a value:
- Select the Submit icon in the Input/Review column associated with the element.
- After submitting, the value becomes locked and cannot be changed.
- The element status will update to Input Given.
| Note: If you are unable to click the Submit icon, ensure that translation users have been assigned for that element (if translation is enabled). For elements with translation, make sure users are assigned to both Translation Input and Translation Approve. |
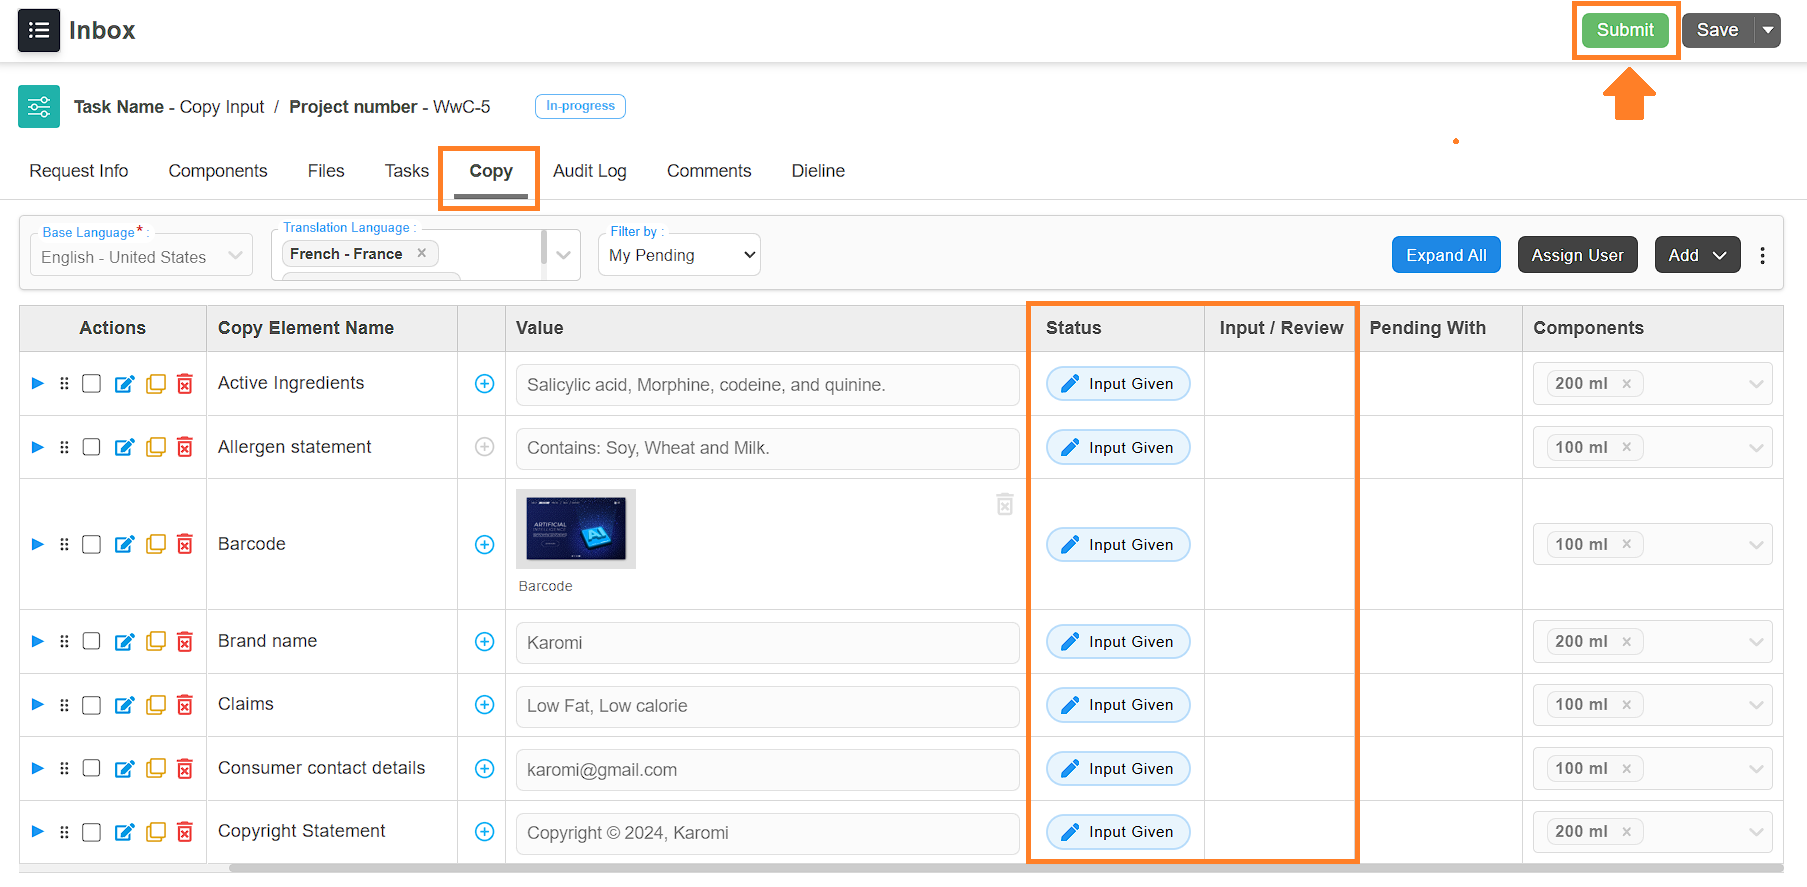
06. Submit the Task
After all your assigned elements have been submitted:
- Select the Submit button (top-right corner of the screen).
- The task will move to the next stage in the workflow.
| Note: You can only submit the task once all elements assigned to you are submitted. |
Copy Approval
The Copy Approval task allows you to review and approve or reject the values submitted in the Copy Input task. Depending on how the workflow template was configured, you may also have permissions to:
- Add copy elements.
- Assign users to those elements.
- If required, add translations.
- Edit element values.
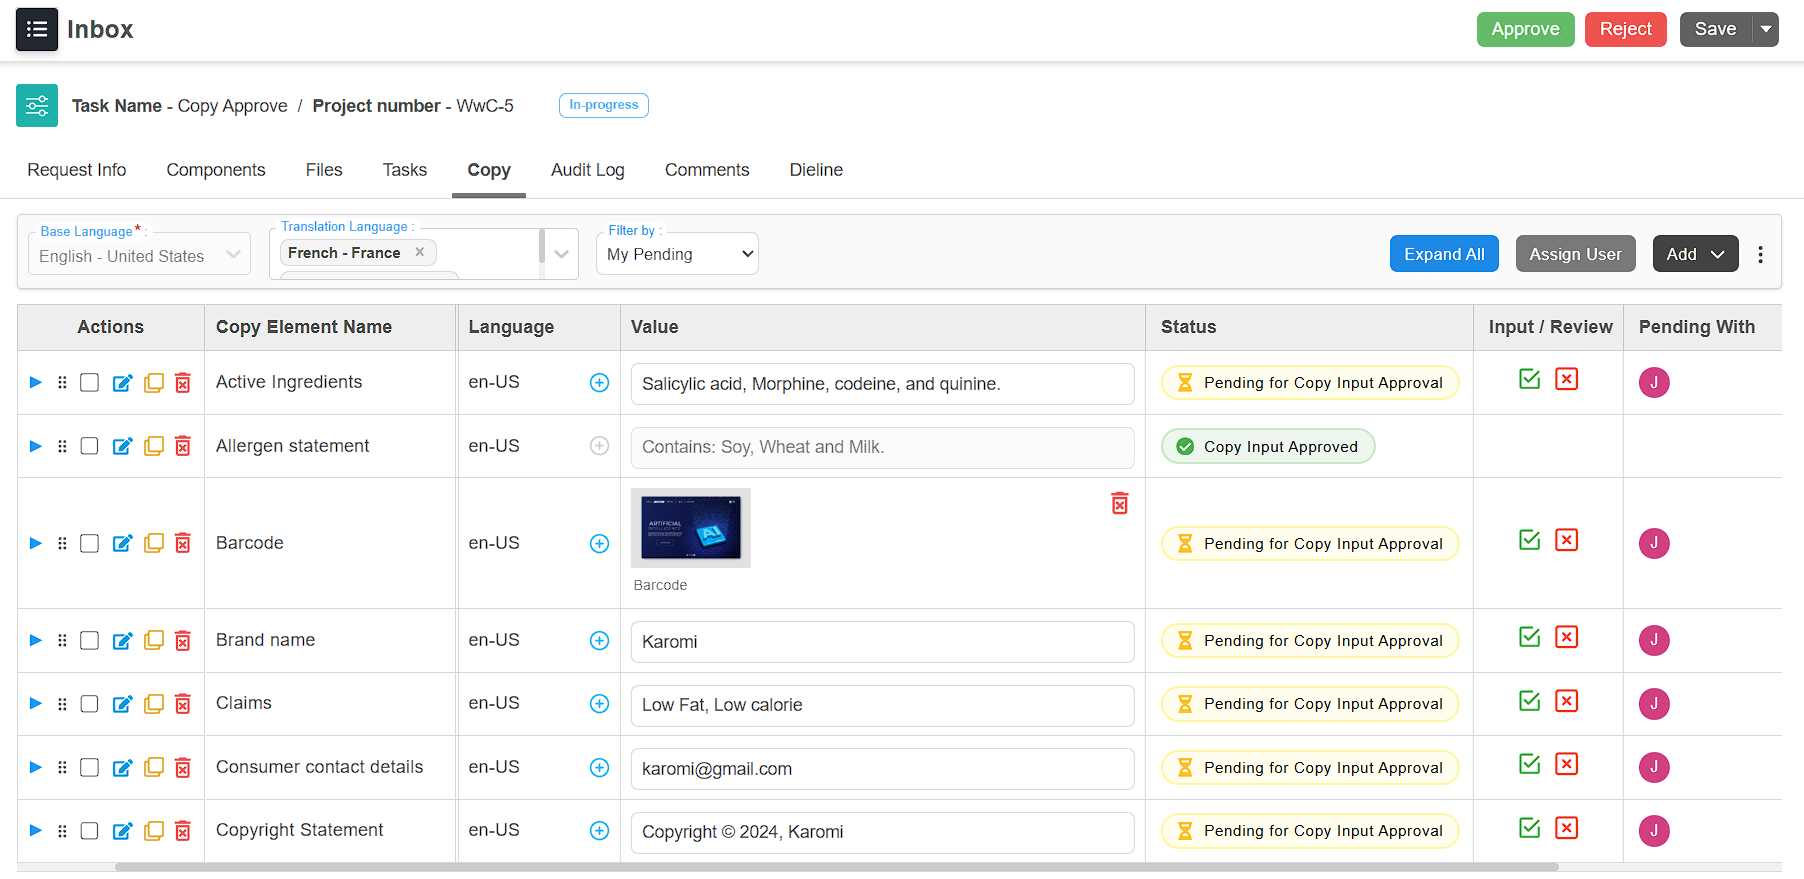
01. Access the Copy Tab
- Sign in to your ManageArtworks account.
- Navigate to the Project Views module.
- Open the Copy Approval task.
- Go to Copy tab.
02. View Your Assigned Elements
- By default, you will see only the elements that have been assigned to you.
- To view all elements in the project (not just your own), select the Filter by dropdown and select All.
| Note: You can only approve the elements that are assigned to you. |

03. Edit Values (Optional)
- If required, you can edit the copy values as needed before approving it.
Note: Refer to the Enter Values section in the Copy Input paragraph for detailed instructions on entering values.
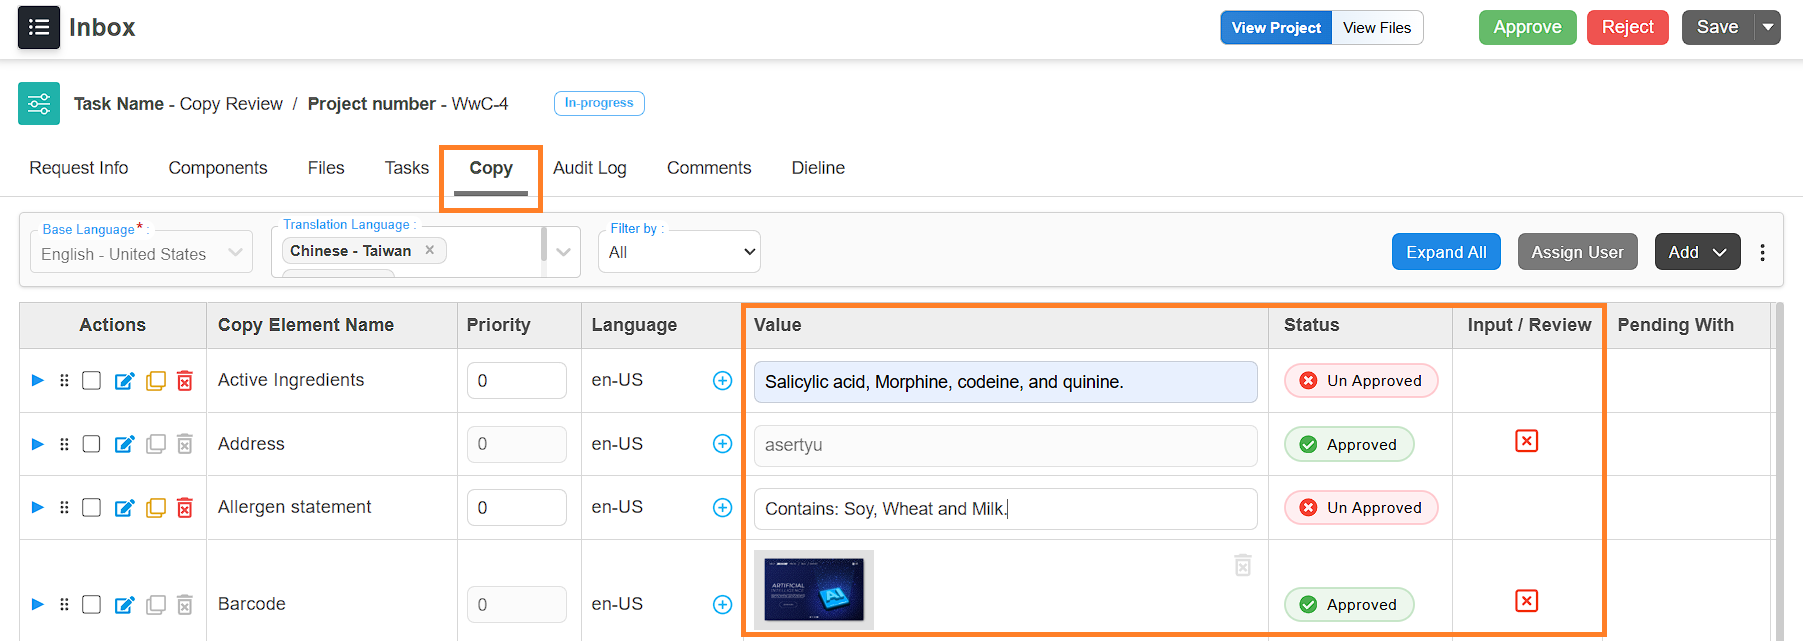
04. Approve or Reject Each Elements
- To approve an Element:
- Review the value/content provided for the element.
- If everything is correct, select the Approve icon in the Input/Review column.
Note: This action is final and cannot be undone. - The value will be locked and the element status will update to Copy Input Approved.
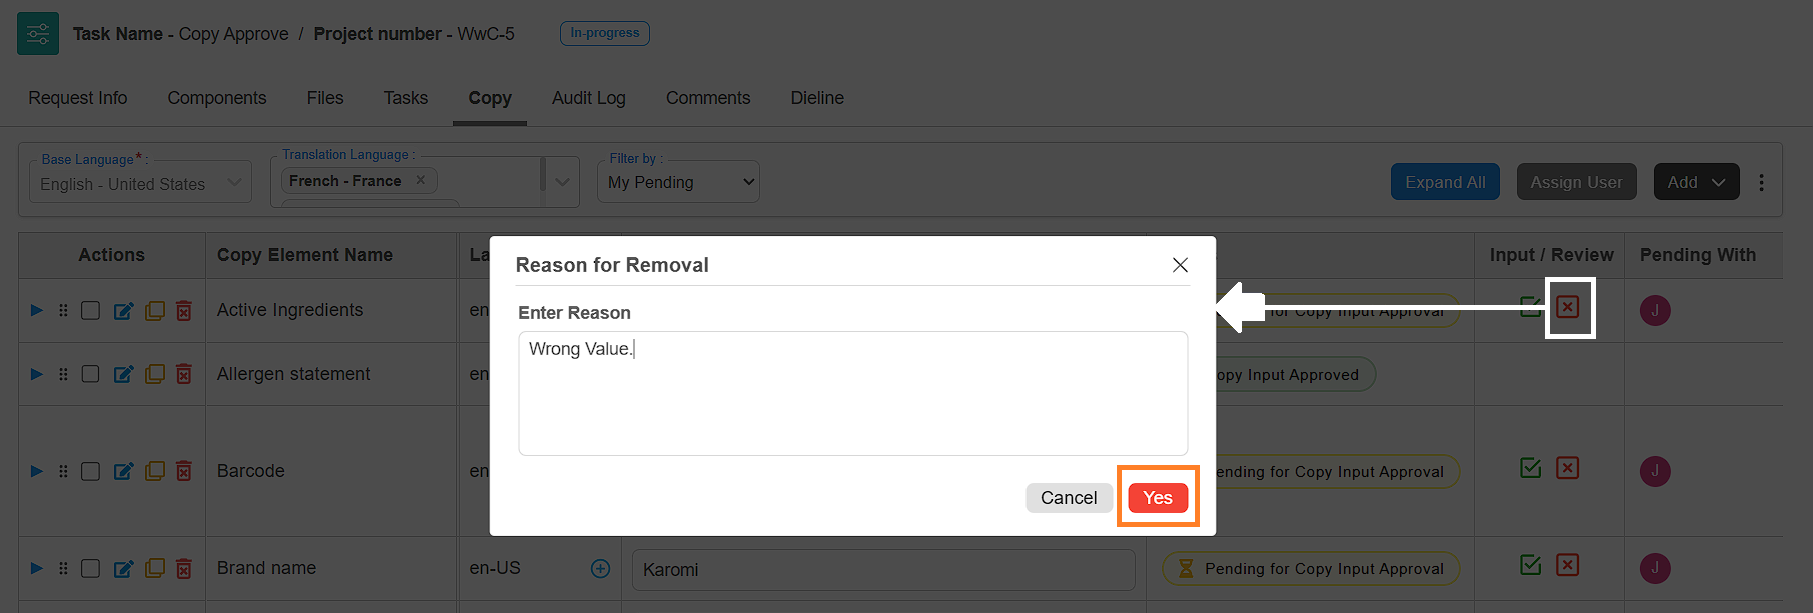
- To Reject an Element:
- Select the Reject icon in the Input/Review column.
- In the pop-up window, enter the reason for rejection.
- Select Yes to confirm.
- The element status will update to Copy Input Rejected.
| Note: If even a single element is rejected, the task cannot be moved to the next stage. All elements must be approved before moving forward. |
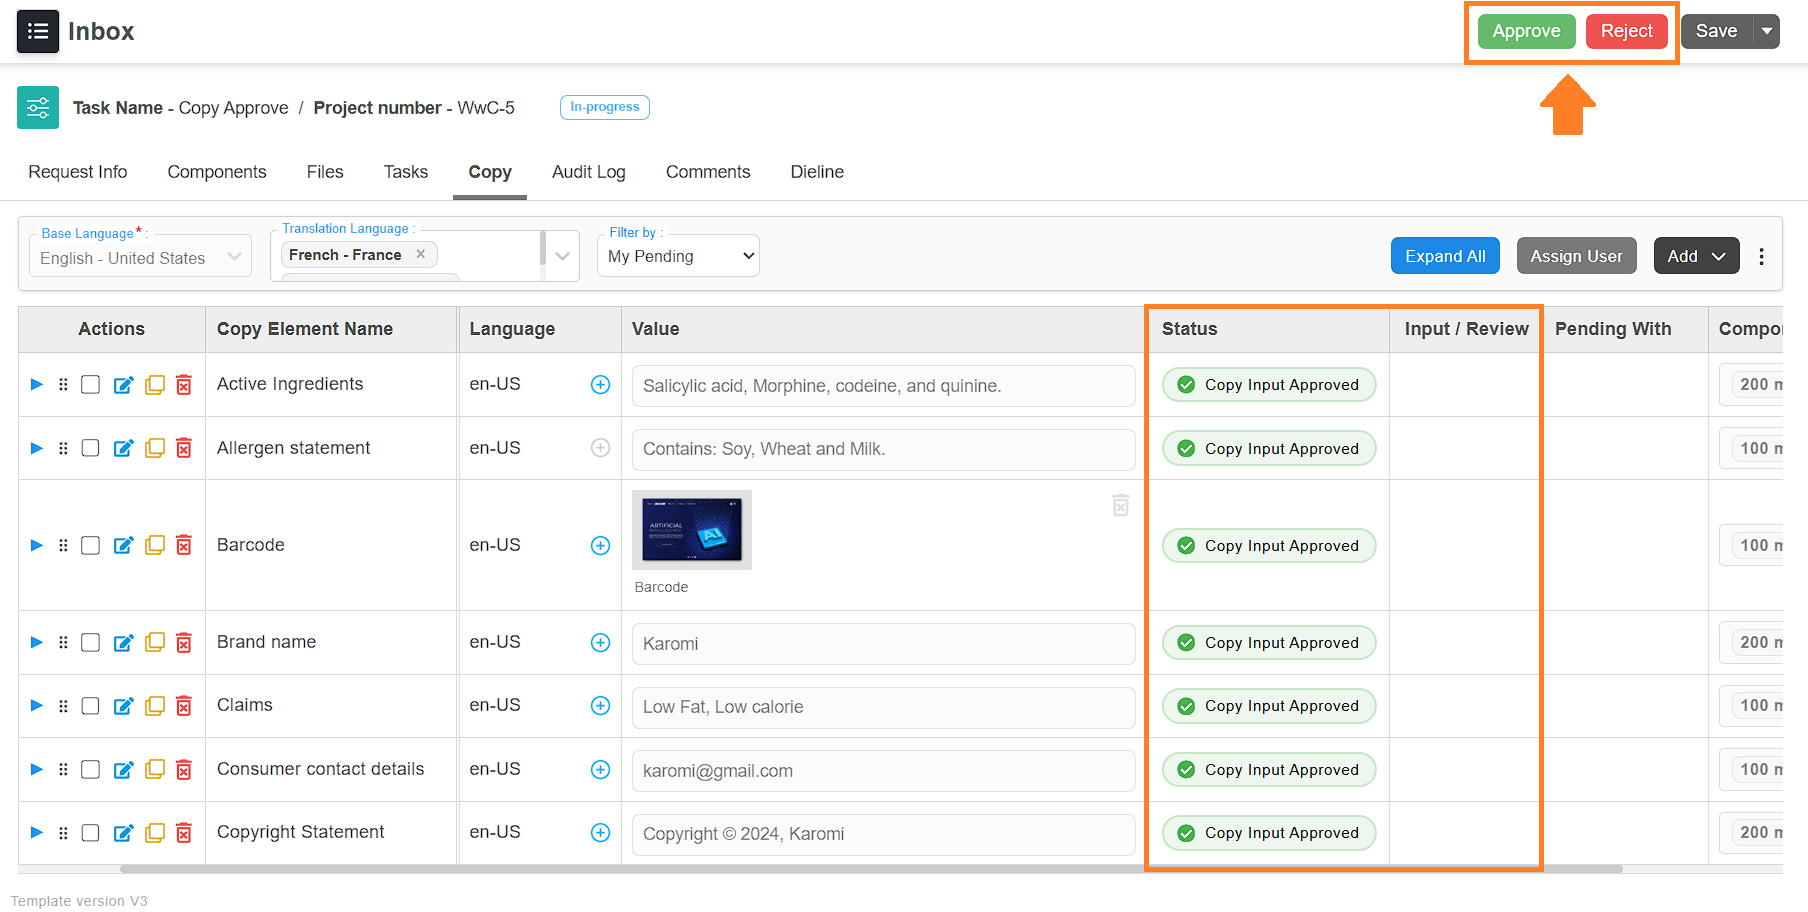
05. Approve or Reject the Task
- To Approve the Task:
- After all assigned elements are approved, select the Approve button in the top-right corner of the screen.
- The task will move to the next stage in the workflow.
- To Reject the Task:
- If any element is rejected, you must reject the entire task.
- Select the Reject button.
- The task will return to the previous stage, allowing the responsible user to update the rejected elements and resubmit them.
| Notes
|
Translation Language Input
The Translation Language Input task allows you to provide translated content for the copy elements. This task works just like the Copy Input task, but it's specifically for entering values in the translation language(s).
01. Access the Copy Tab
- Sign in to your ManageArtworks account.
- Navigate to the Project Views module.
- Open the Translation Language Input task.
- Go to Copy tab.
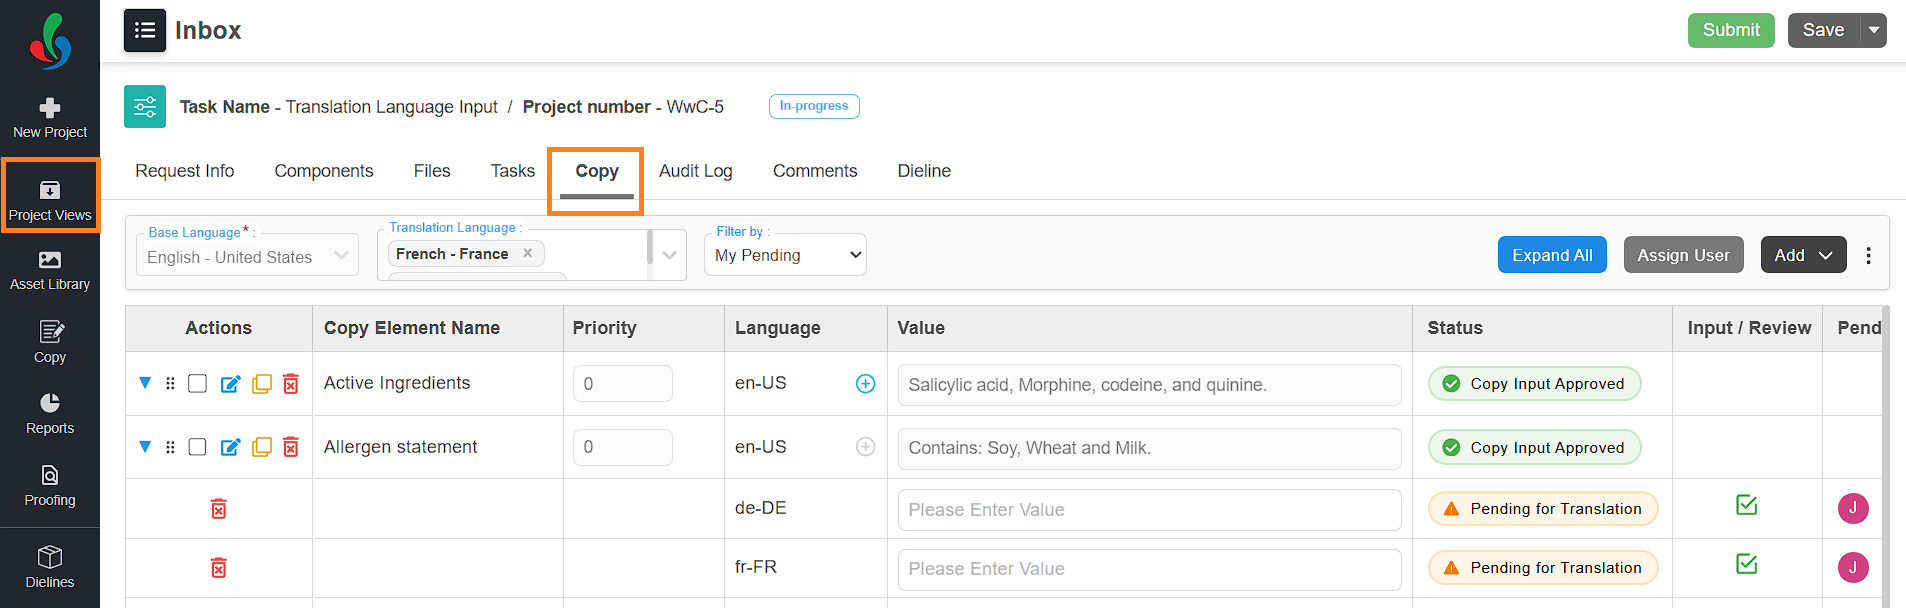
02. View Your Assigned Elements
- You will see only the translation elements assigned to you.
- To view all translation elements in the project (not just your own), select the Filter by dropdown and select All.
| Note: You can only enter values for the translation elements that are assigned to you. |
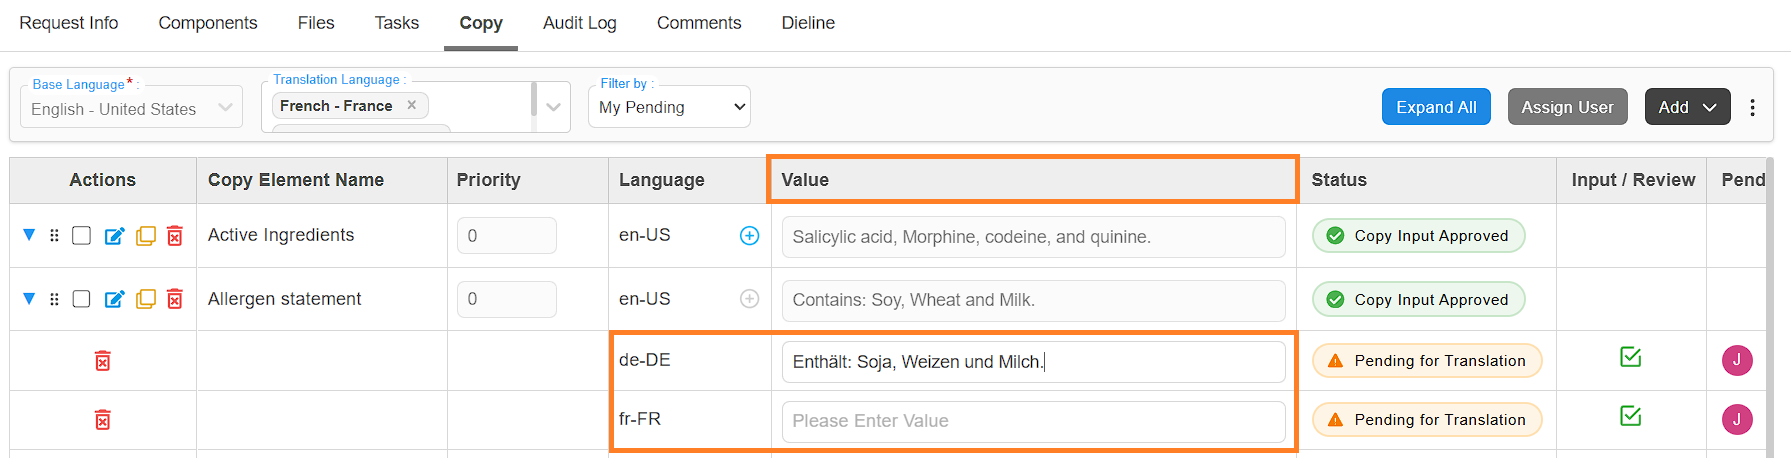
03. Enter Values for Translation Elements
- You can enter translated values for your copy elements by any of the following method:
- Quick Edit in the Value Column
- In the Value column, click the translation input box associated with the element you want to update.
- Type the translated content.
- Your input will be saved automatically.
- You can edit the value anytime until you submit it.
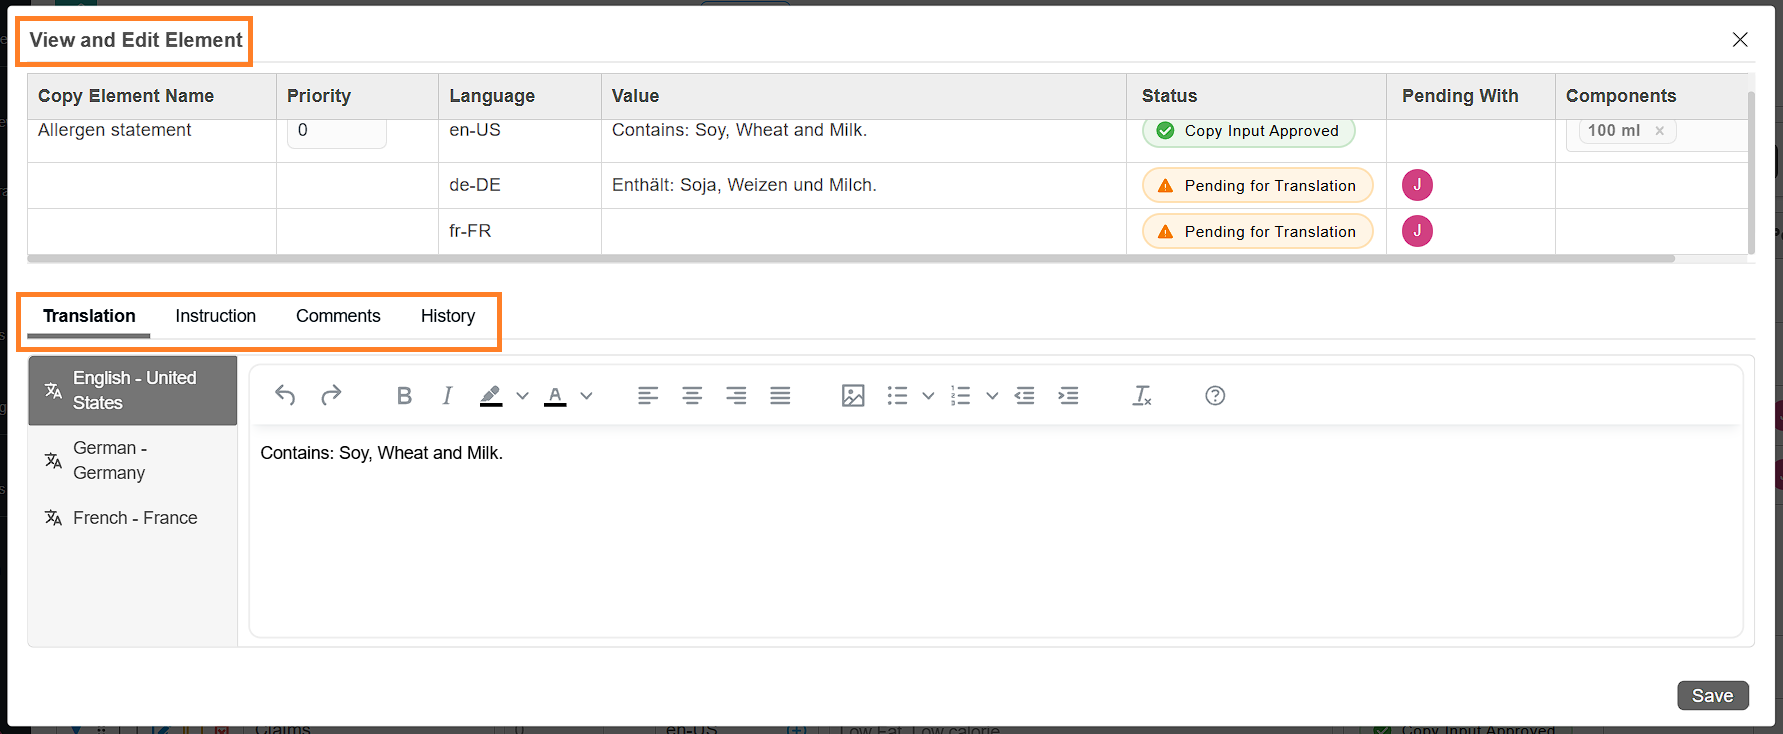
- Edit Element Option
- In the Actions column, select the Edit Element icon associated with the desired element you want to update.
- The View and Edit Element popup will appear. It contains four tabs:
- Translation - Enter or update translated content for the element.
- Instruction - Provide additional guidance or notes about the element.
- Comments -Add feedback or suggestions.
- History - View a log of changes and updates made to the element.
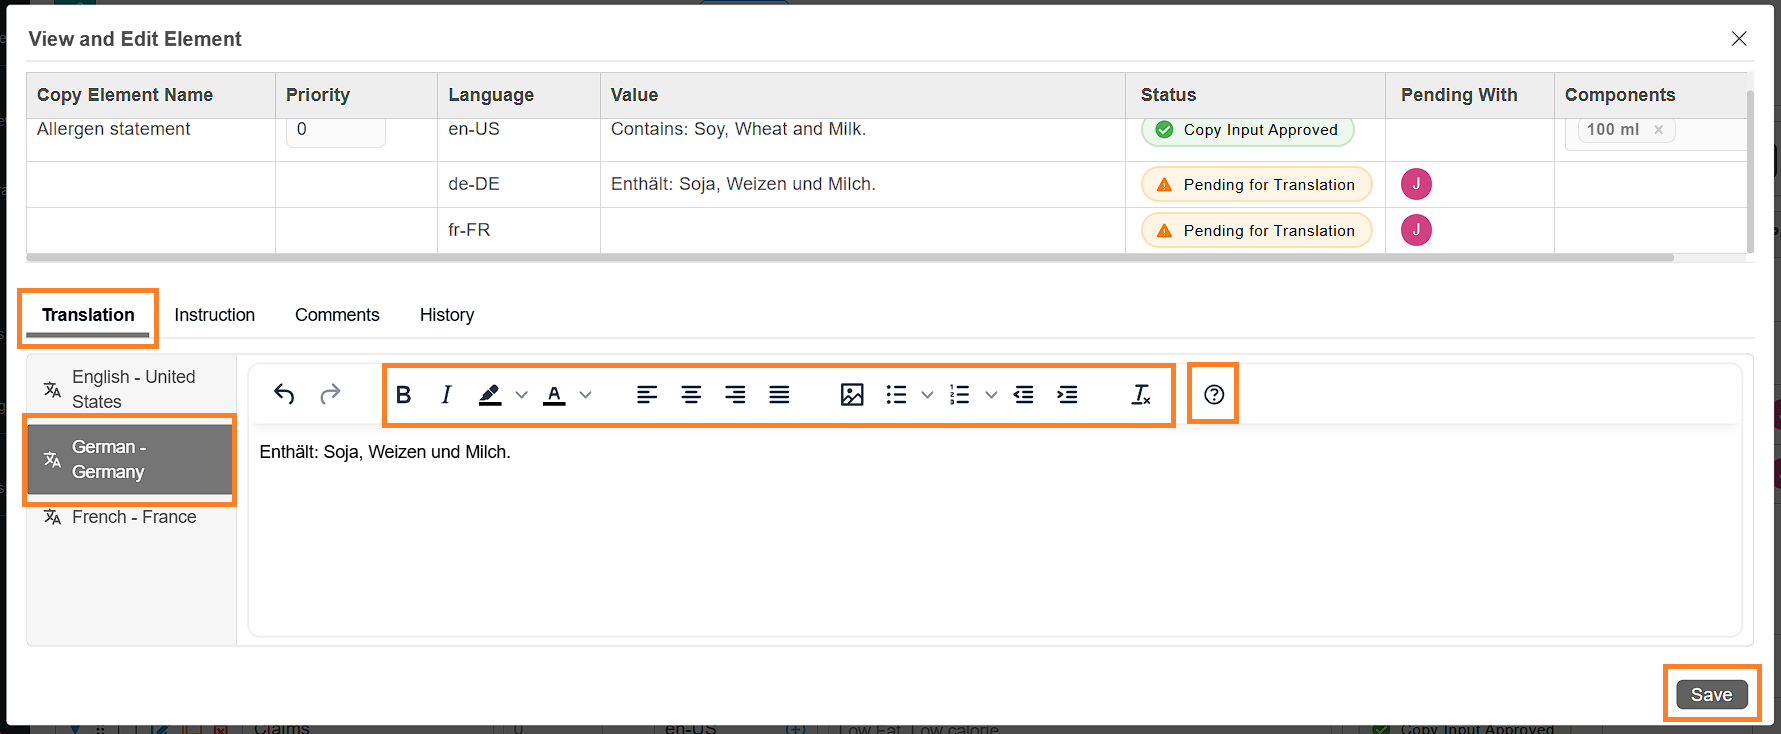
- Enter Values:
- Go to the Translation tab (selected by default).
- Select the translation language.
- Click the input box and type your translated content.
- Use the text formatting tools (bold, italics, bullet points, etc.) as needed.
Note: Select the Help icon in the toolbar to learn how to use the formatting options. - Select the Save button at the bottom of the popup to save the translated value.
- For more information on the Instruction, Comments, and History tabs, refer to the Copy Input section.
- Quick Edit in the Value Column
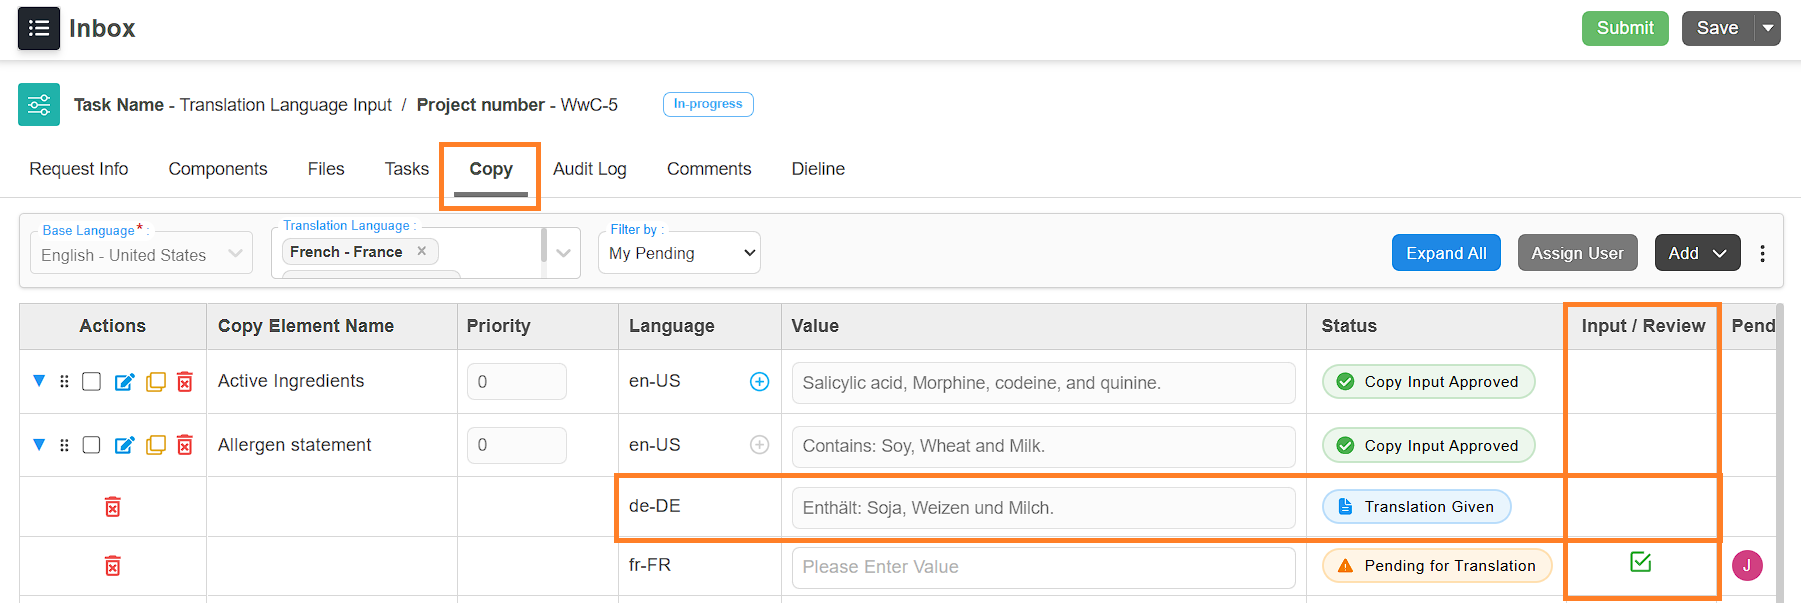
04. Submit Each Element
Once you're satisfied with a translated value:
- Select the Submit icon in the Input/Review column for that element.
- After submitting, the value becomes locked and cannot be changed.
- The element status will update to Translation Given.
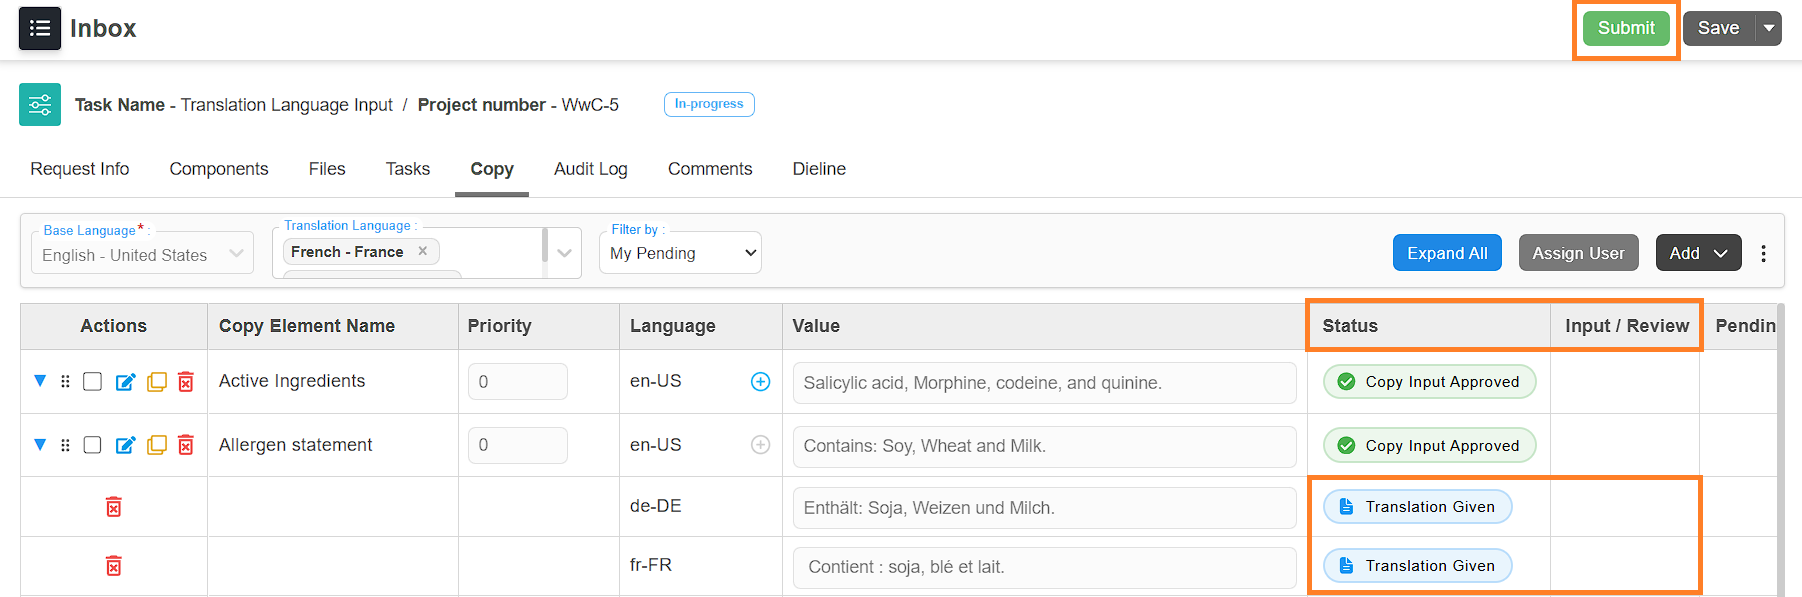
05. Submit the Task
After all your assigned translation elements have been submitted:
- Select the Submit button (top-right corner of the screen).
- The task will move to the next stage in the workflow.
| Note: You can only submit the task once all translation elements assigned to you are submitted. |
Translation Language Approval
The Translation Language Approval task allows you to review and approve or reject the translated values submitted in the Translation Language Input task. This task works just like the Copy Approval task, but it's specifically for approving translated values.
01. Access the Copy Tab
- Sign in to your ManageArtworks account.
- Navigate to the Project Views module.
- Open the Translation Language Approval task.
- Go to Copy tab.
02. View Your Assigned Elements
- You will see only the translation elements assigned to you.
- To view all translation elements in the project (not just your own), select the Filter by dropdown and select All.
| Note: You can only approve the translation elements that are assigned to you. |
03. Edit Values (Optional)
- If required, you can edit the translated copy values as needed before approving it.
Note: Refer to the Enter Values section in the Translation Language Input paragraph for detailed instructions on entering values.
04. Approve or Reject Each Translation Elements
- To Approve a Translation Element:
- Review the value/content provided for the translation element.
- If everything is correct, select the Approve icon in the Input/Review column.
Note: This action is final and cannot be undone. - The value will be locked and the element status will update to Translation Approved.
- To Reject a Translation Element:
- Select the Reject icon in the Input/Review column.
- In the pop-up window, enter the reason for rejection.
- Select Yes to confirm.
- The element status will update to Translation Rejected.
| Note: If even a single translation element is rejected, the task cannot be moved to the next stage. All translation elements must be approved before proceeding. |
05. Approve or Reject the Task
- To Approve the Task:
- After all assigned translation elements are approved, select the Approve button in the top-right corner of the screen.
- The task will move to the next stage in the workflow.
- To Reject the Task:
- If any translation element is rejected, you must reject the entire task.
- Select the Reject button.
- The task will return to the previous stage, allowing the responsible user to update the rejected translation elements and resubmit them.
| Notes
|
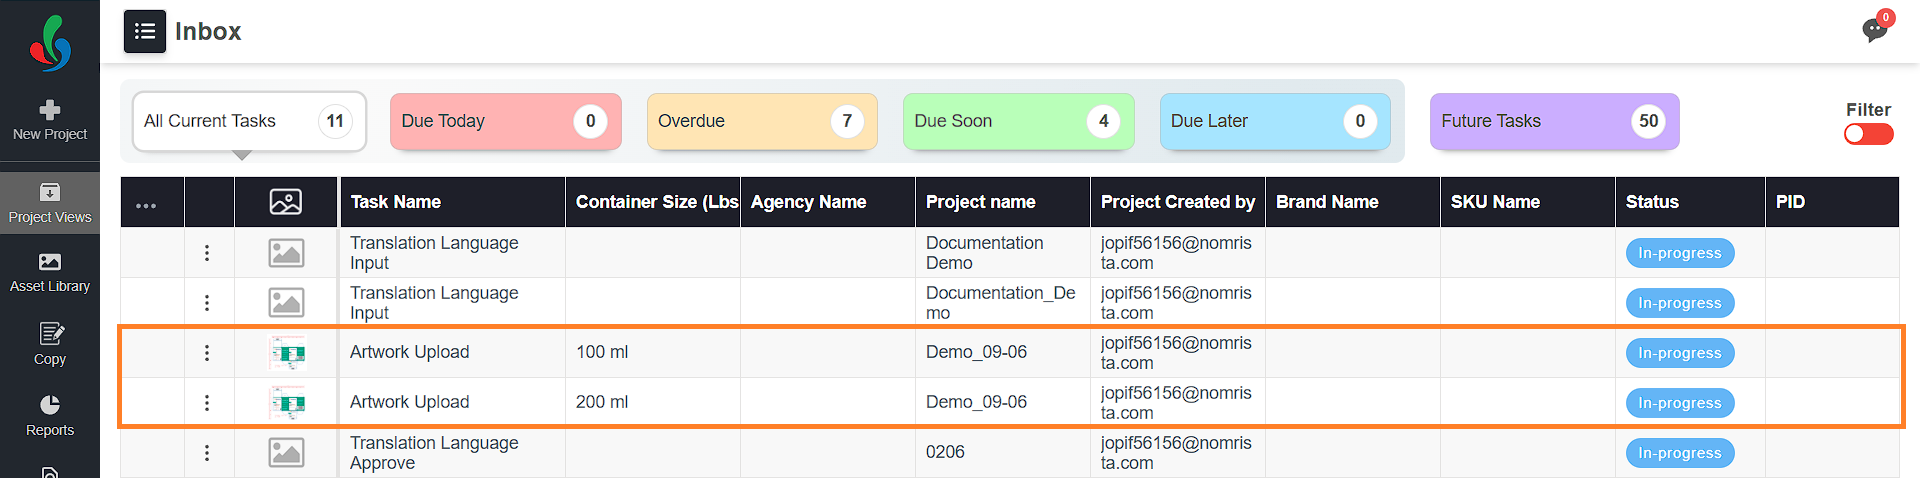
Project Split
In the sample workflow we’re discussing, once the Translation Approval task is completed, the project will automatically split based on the components assigned.
For example, if the project has two components — 100 ml and 200 ml — it will split into two separate workflow paths, one for each component. From this point forward, the following tasks will be carried out independently for each split:
- Artwork Upload
- Final Copy Review
- Artwork Approval.
Artwork Upload
This task allows the user to upload artwork files that are based on the approved copy content collected via the Copy Manager.
In this task, the user needs access to the copy content for reference but should not be able to make any edits. That’s why the task is configured using the Only View copy task type.
Only View Copy Task
A task configured with the Only View copy task type provides read-only access to the copy tab.
Users can:
- View the copy content
- But cannot add, edit, delete elements or change any configurations.
Use this type when users only need to refer to the copy content, such as during artwork design or approval.
Submit the Task
After uploading the files:
- Select the Submit button (top-right corner of the screen).
- The task will move to the next stage in the workflow.

Final Copy Review
Sometimes, after the copy has been collected and approved, changes may still be required during the later stages of the workflow. The Final Copy Review task is designed to review and approve any final changes to the copy content.
This is where the Artwork Review copy task type comes into play.
Artwork Review Copy Task
The Artwork Review task type allows users to:
- Edit approved copy values
- Add or delete elements
- Reconfigure element assignments.
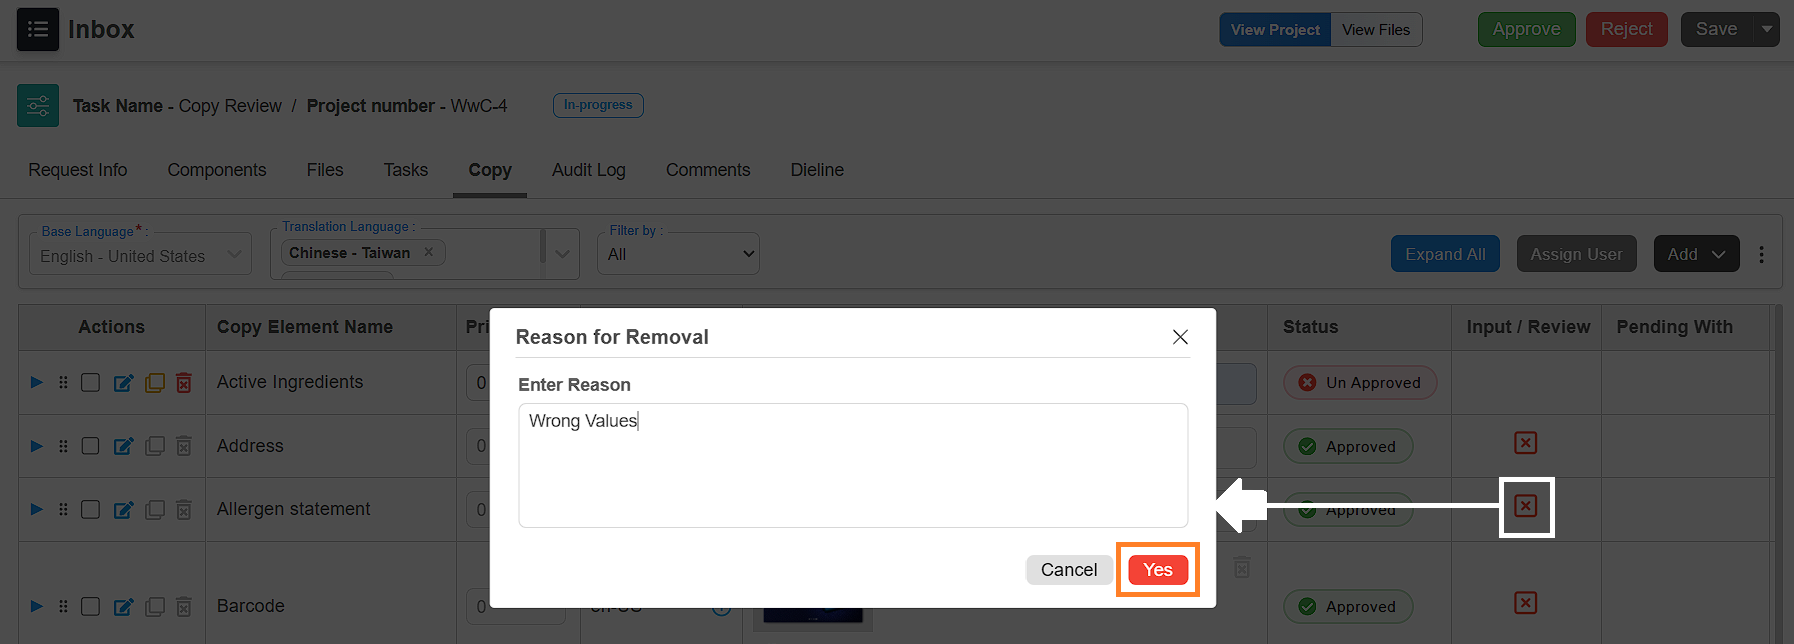
To edit approved copy values:
- Select the Reject icon in the Input/Review column corresponding to the copy value you want to edit.
- In the pop-up window, enter the reason for rejection.
- Select Yes to confirm.
- The element status will update to Un Approved.
- You can now edit the copy values as needed.
Note: Refer to the Enter Values section in the Copy Input paragraph for detailed instructions on entering values. - Once you edited the values as desired, submit the task.
Key points:
- Can be configured as either a Normal Task or a Decision Task
- If configured as a decision task, users can also reject the task if further changes are needed
- Once all changes are complete and approved, you can move the task forward to the next stage.
Submit the Task
Once satisfied with the copy data:
- Select the Submit/Approve button (top-right corner of the screen).
- The task will move to the next stage in the workflow.
Artwork Approval
This is the final task in the sample workflow.
Here, the user:
- Reviews the final artwork and associated copy content.
- Approves the task to complete the workflow.
Submit the Task
Once satisfied with the artwork:
- Select the Approve button (top-right corner of the screen).
- The task will move to the next stage in the workflow.
Upon approval:
- The final artwork files are published to the Asset Library based on the publish configuration.
- If you wish to customize when and which file types should be published—such as after the completion of a specific task or upon workflow completion—please contact the ManageArtworks Support Team for assistance in setting up the appropriate configuration.
- The associated copy data is stored along with the artwork.
- Since the user only needs to view the copy content and not modify it, this task is configured using the Only View copy task type.
Access the Published Copy Sheet
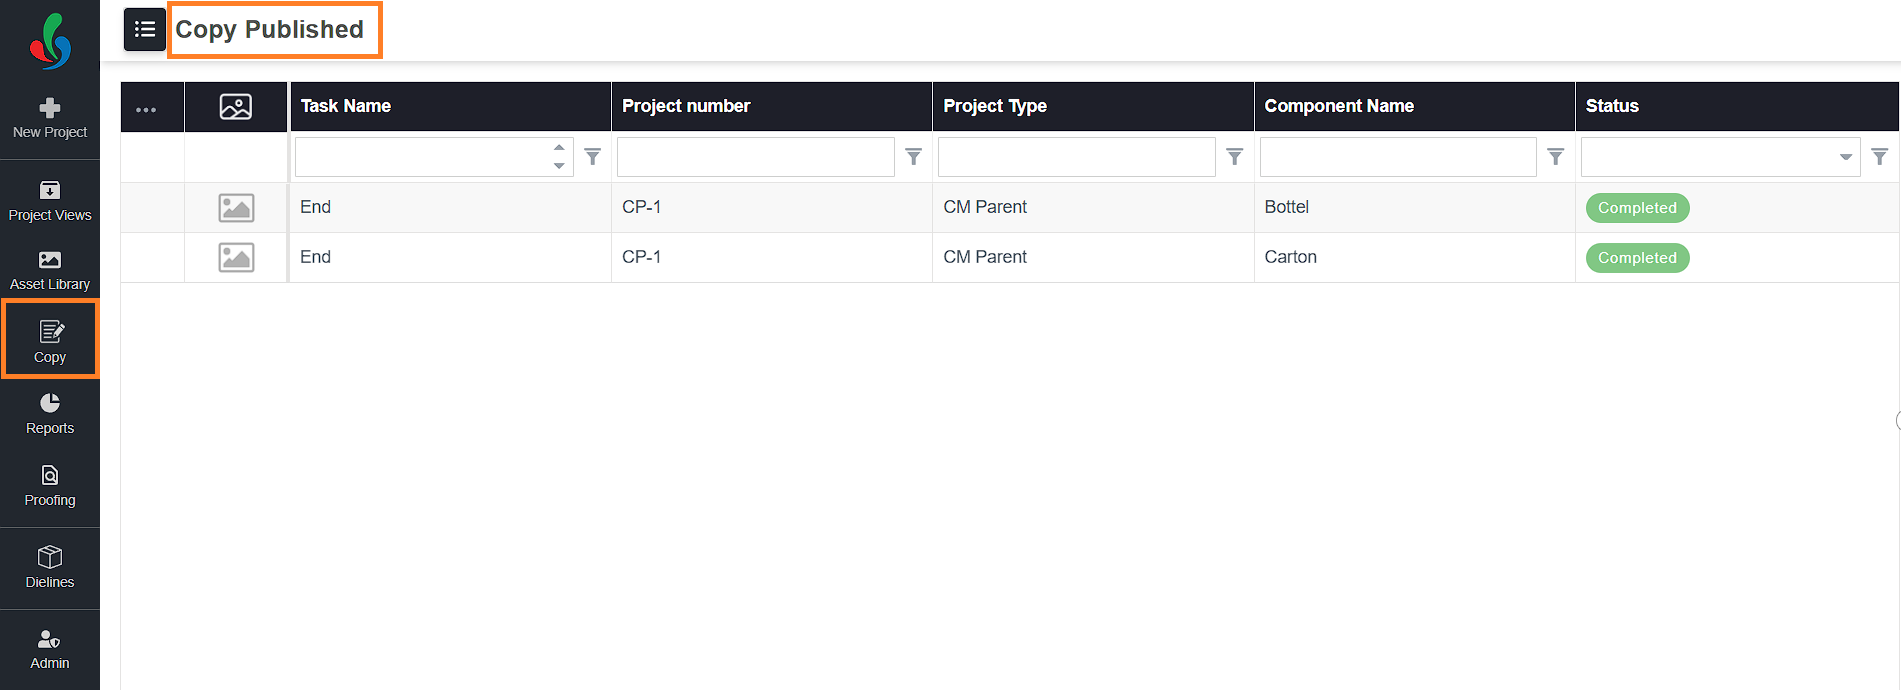
Once a project is completed, the associated copy content is compiled and published as a Copy Sheet. These published copy sheets can be accessed from a dedicated module called Copy.
To view a published copy sheet
- Sign in to your ManageArtworks account.
- Navigate to the Copy module.
- A list of all published components (copy sheets) in the system will be displayed.
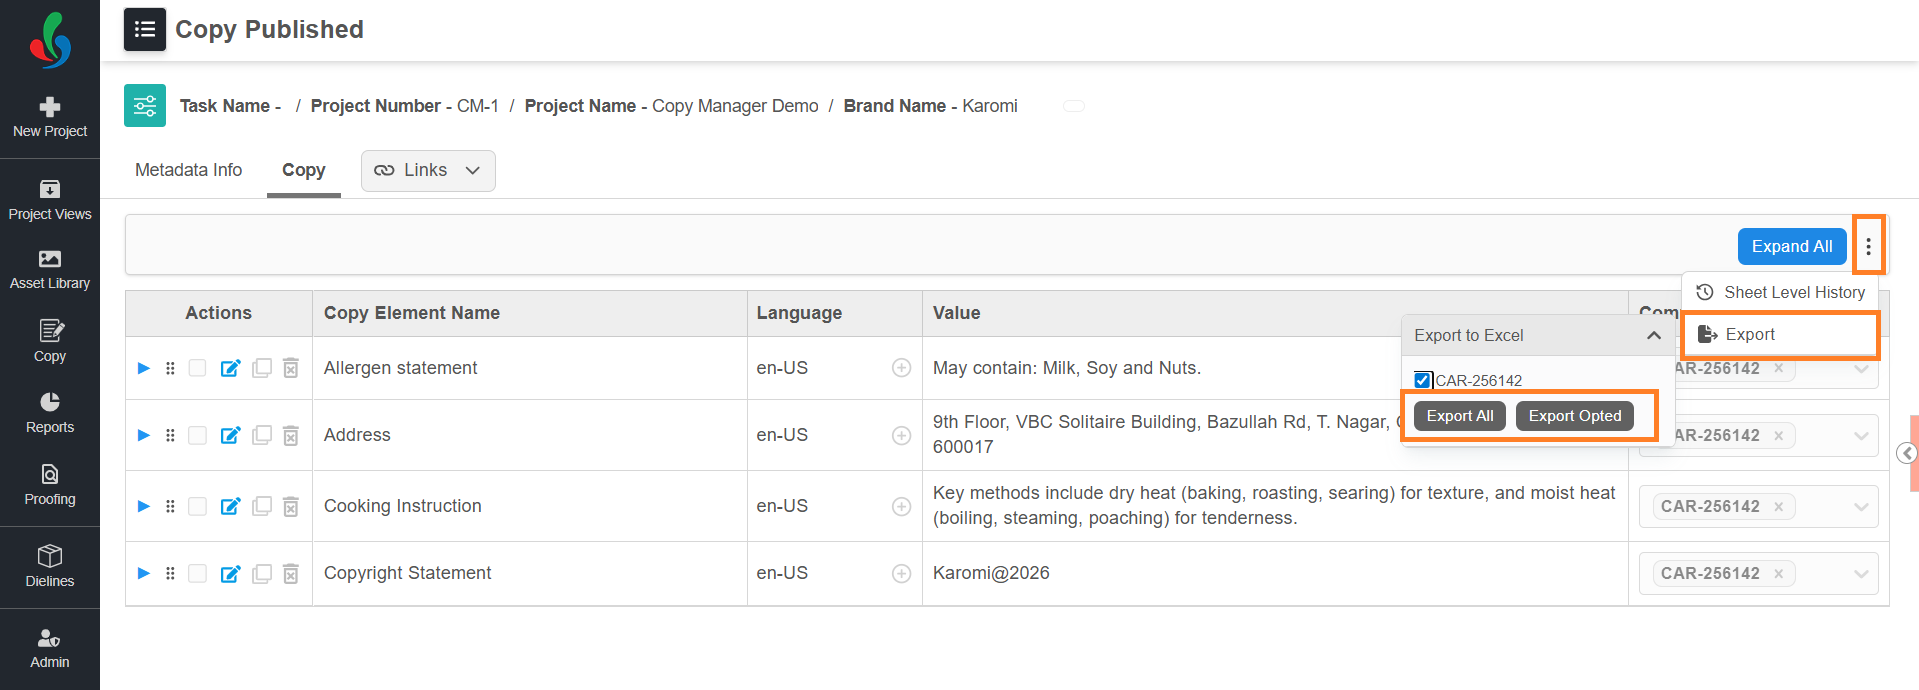
- Select the desired components (copy sheet) to open and view its details.
- To export a copy sheet:
- Select the three-dot icon (options menu).
- Select the Export option.
- Choose the components you want to export:
- Export All – to download the all components associated with the project.
- Export Selected – to download only the components you’ve selected.
- An Excel file containing the selected copy data will be downloaded to your system.