Step 3: Create Workflow Template (Enterprise Plan)
 | Note: The process for creating a workflow template varies depending on the user’s plan. This article focuses on creating a workflow template in the Enterprise Plan. For details on creating a workflow template in the Growth Plan, refer to [Step 2: Create Workflow Template (Growth Plan)]. If you're creating a new project template with Copy Manager, refer to the guide: Configure Project Template with Copy Manager. This article covers the steps to create a project template without Copy Manager. |
01. Workflow Template Selection - Choose Your Template Creation Method
ManageArtworks offers two convenient ways to build your workflow template:
- Create New Workflow Template: Select this option to design a workflow from scratch for unique project workflows, tailoring it specifically to your process.
- Copy and Create Workflow Template: Select this option to save time by modifying an existing workflow template. This is ideal for leveraging familiar structures for similar workflows.

02. Build Your Workflow (Create New Workflow Template Method)
1. Create a New Workflow Template
- Select Create New Workflow Template.
- Click the edit icon next to the workflow template placeholder name and enter a descriptive name (e.g., Artwork Approval) for your workflow template.

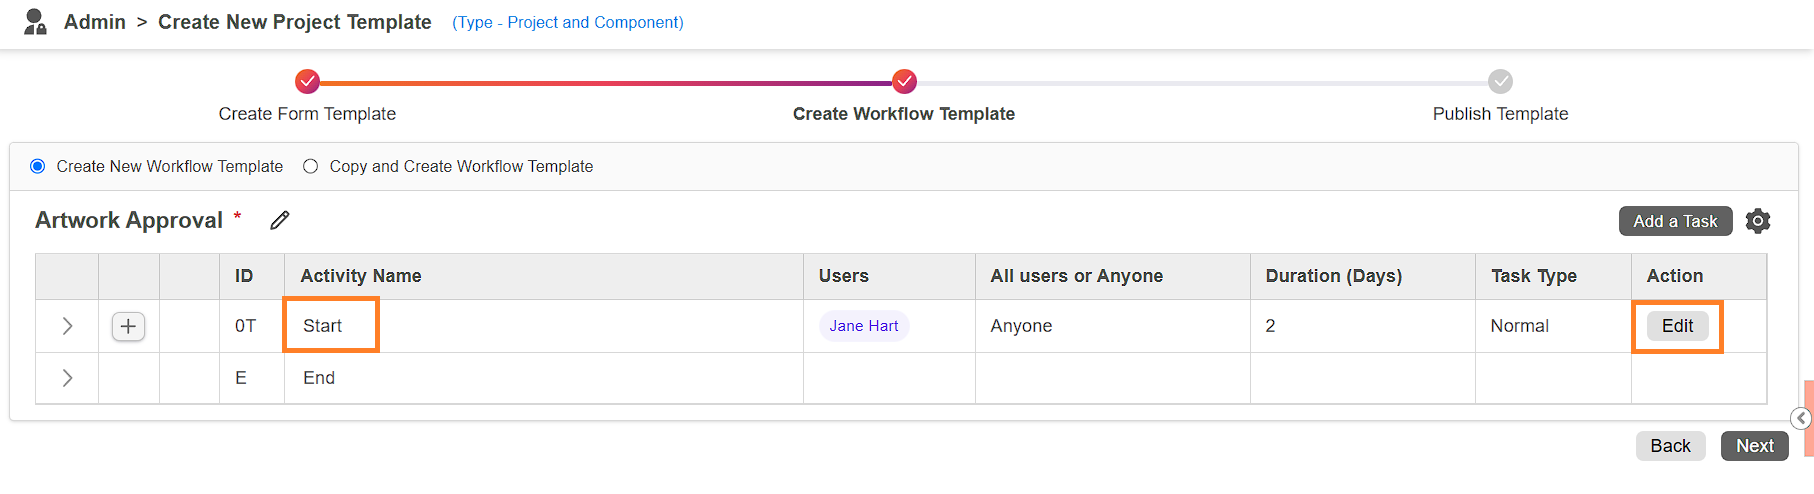
2. Configure the Start Activity
- Click the Edit button in the action column associated with the Start activity. This is where you define who can initiate the project using this template. The Start activity contains four tabs for customization:
- Task Information
- Actions
- Validation
- Instructions.
 | Note: Configuring the Start activity is mandatory. Only users assigned to this activity will have access to the template and be able to initiate the project. |
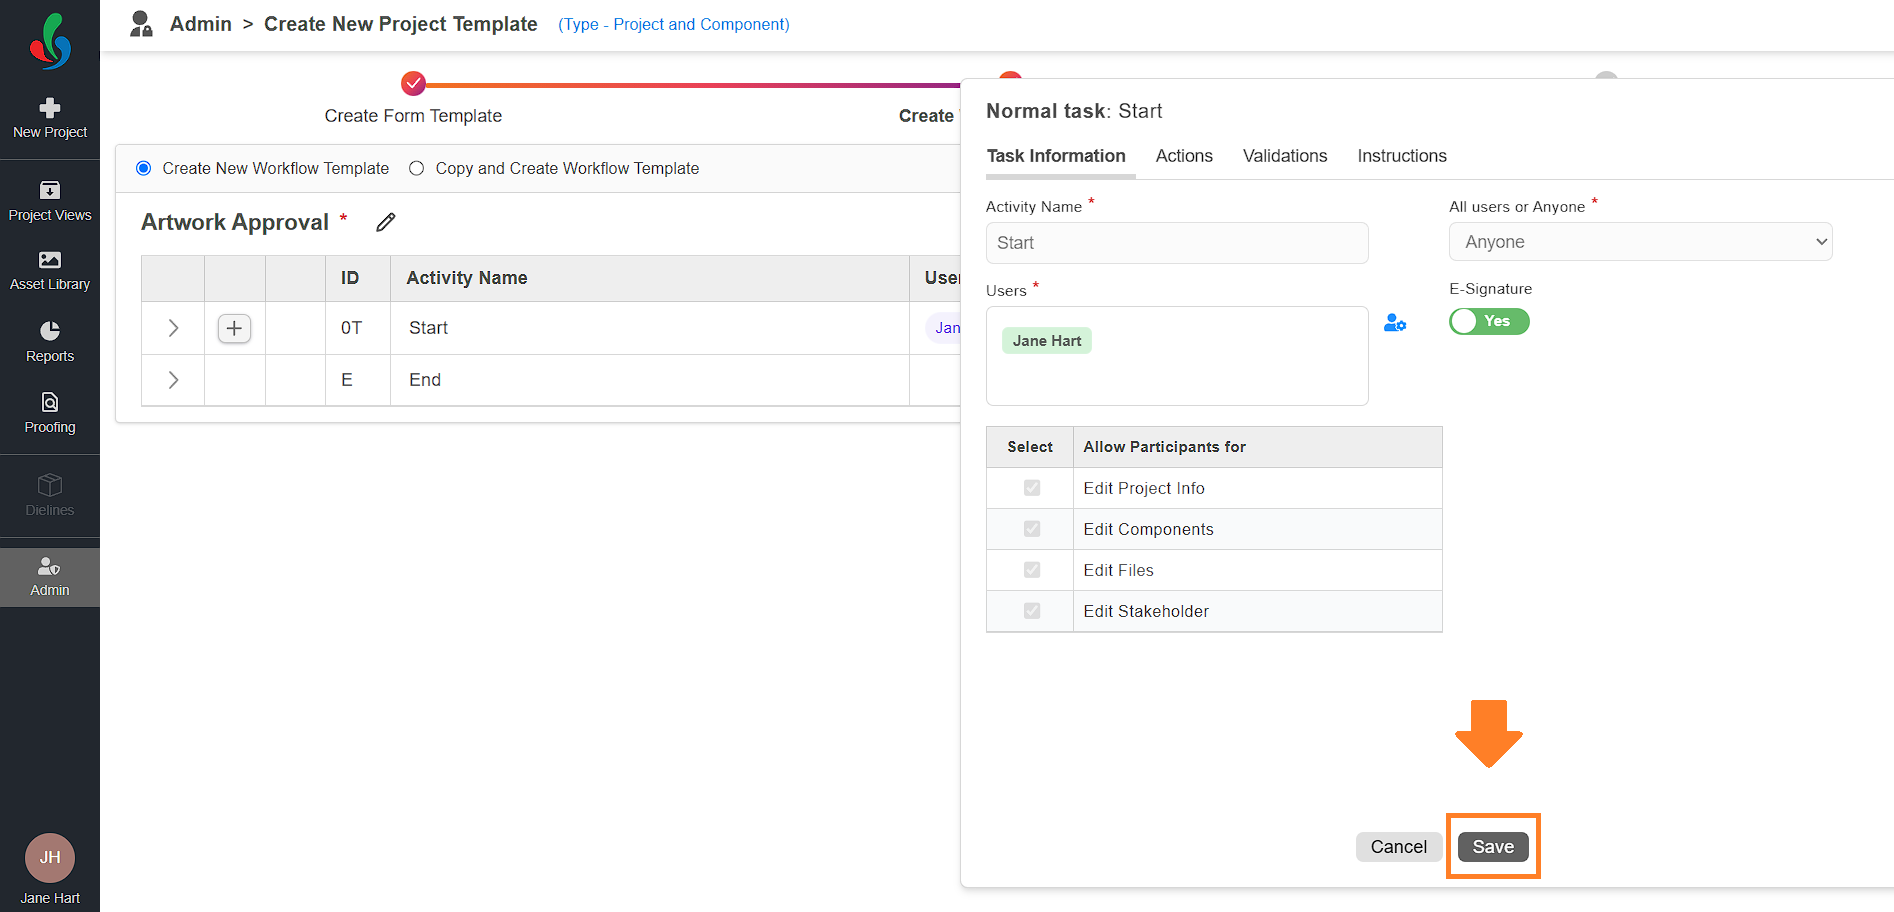
Task Information Tab
In this tab, assign users and configure optional security settings.
- Users: Assign the task to specific users, teams, form fields, or users from previous tasks. Refer to the "Task Assignment Options" section for detailed instructions on assigning users.
- E-Signature (Optional): Enable an additional layer of security requiring users to enter their password to confirm their identity before initiating the project.

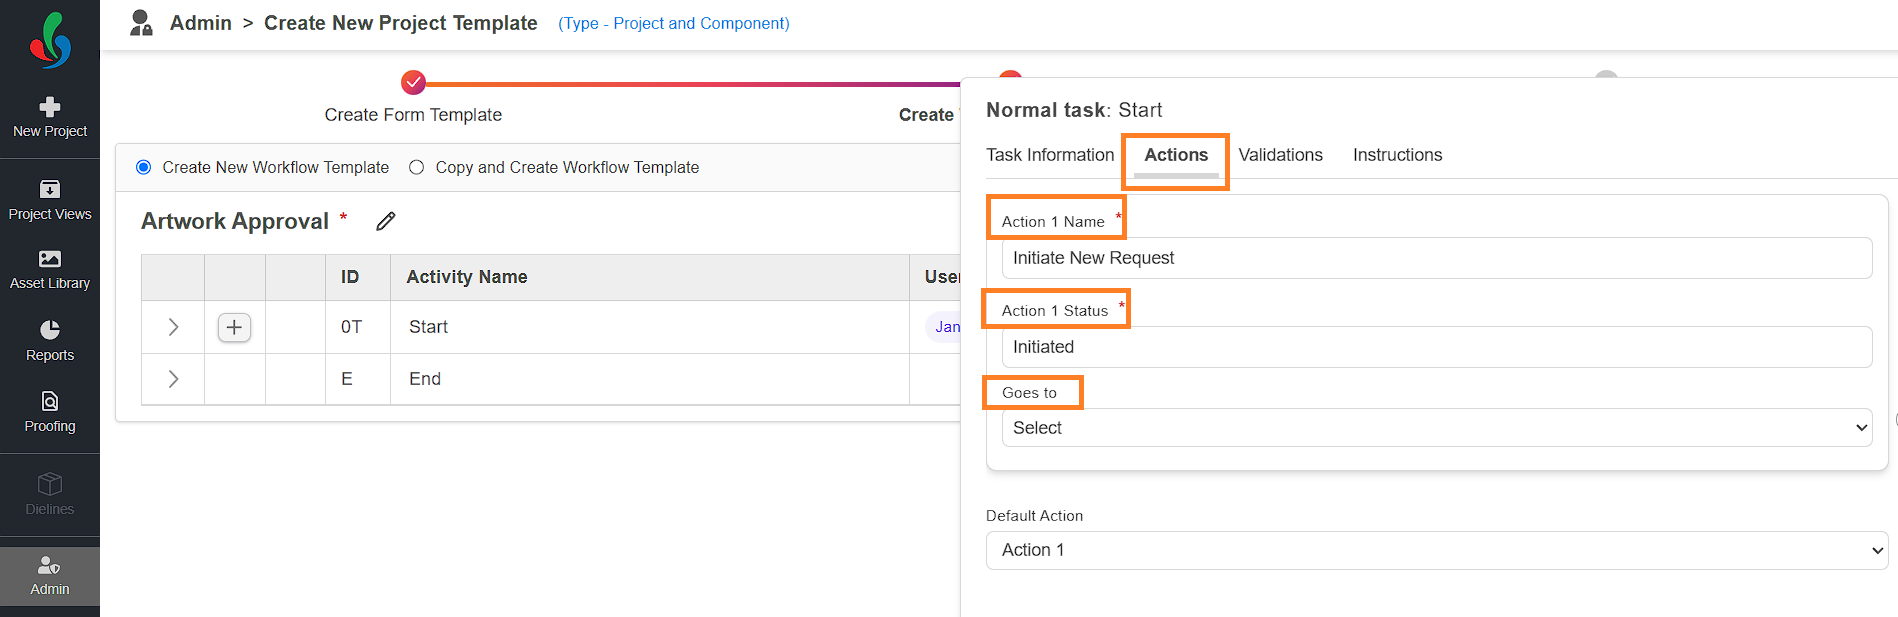
Actions Tab
Use this tab to configure how users initiate the project and define what happens afterward.
- Action 1 Name: Enter the desired label for the button users will click to initiate the project (e.g., "Initiate New Request")
- Action 1 Status: Specify the outcome or status displayed in the audit log after the project is initiated (e.g., "Initiated").
- Goes to: Choose the next workflow step after the Start activity is completed. By default, the system will move to the initial task in your sequence. If no other task types have been added, this field will be blank, and you can leave it as is. Upon adding tasks to the workflow, the initial task in your sequence will be automatically populated here.
Validation Tab (Optional)
- This tab allows you to set restrictions similar to normal and decision tasks. Refer to step 5. Validation Tab section to know more this tab.
Instructions Tab (Optional)
- Add clear instructions to guide users on initiating the project.
3. Save Start Activity
- Once the Start activity has been configured as desired, click Save to apply the configurations.
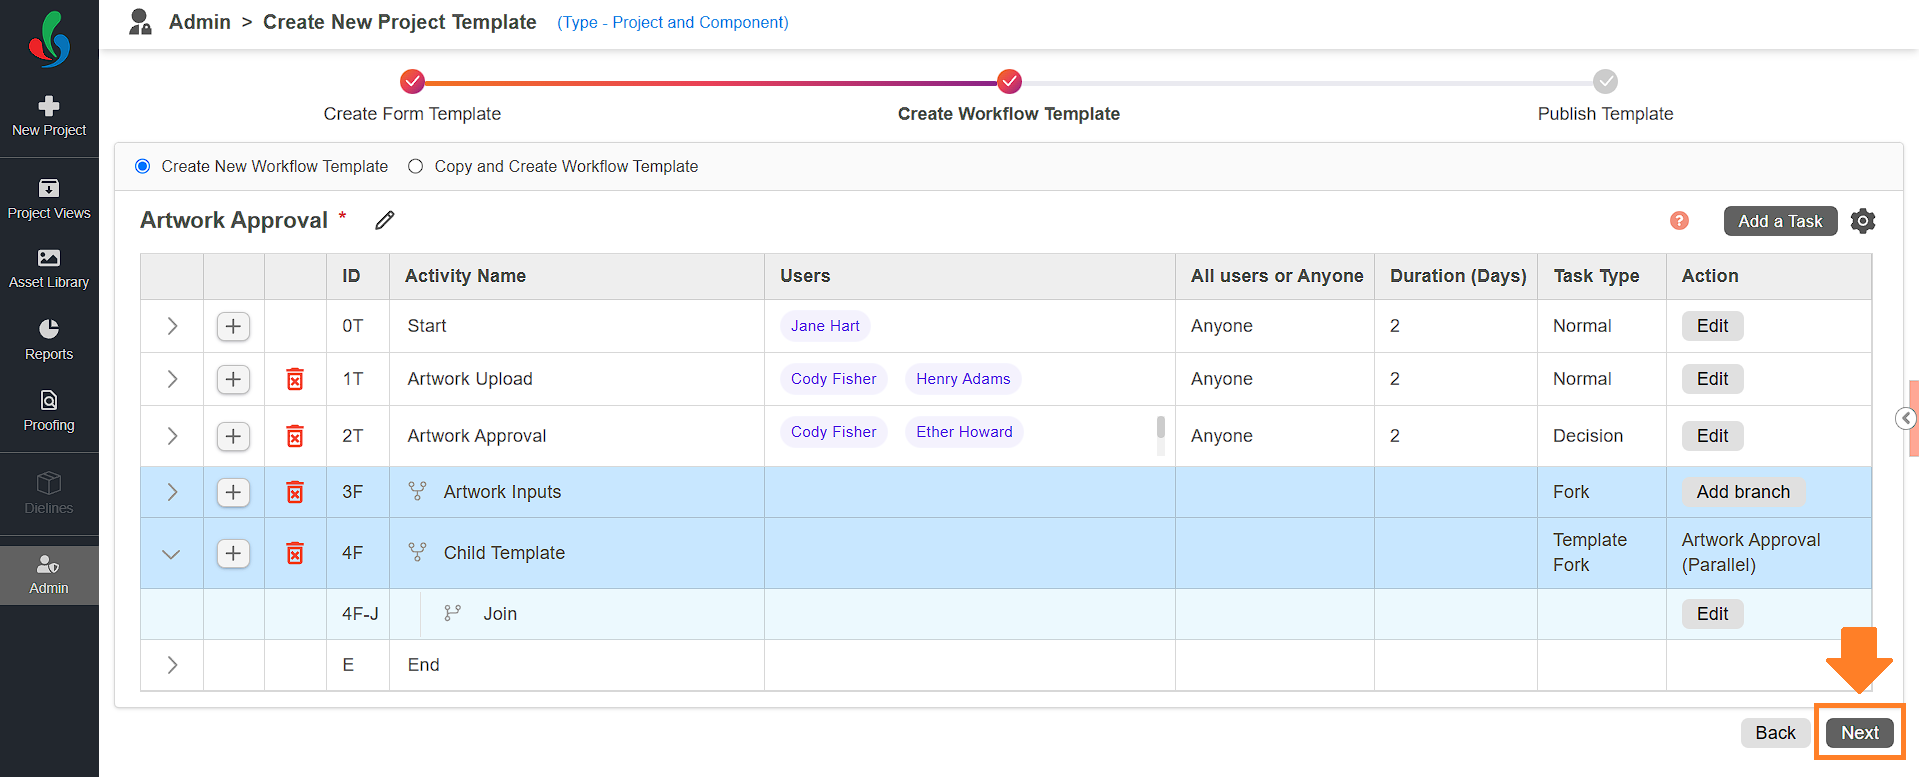
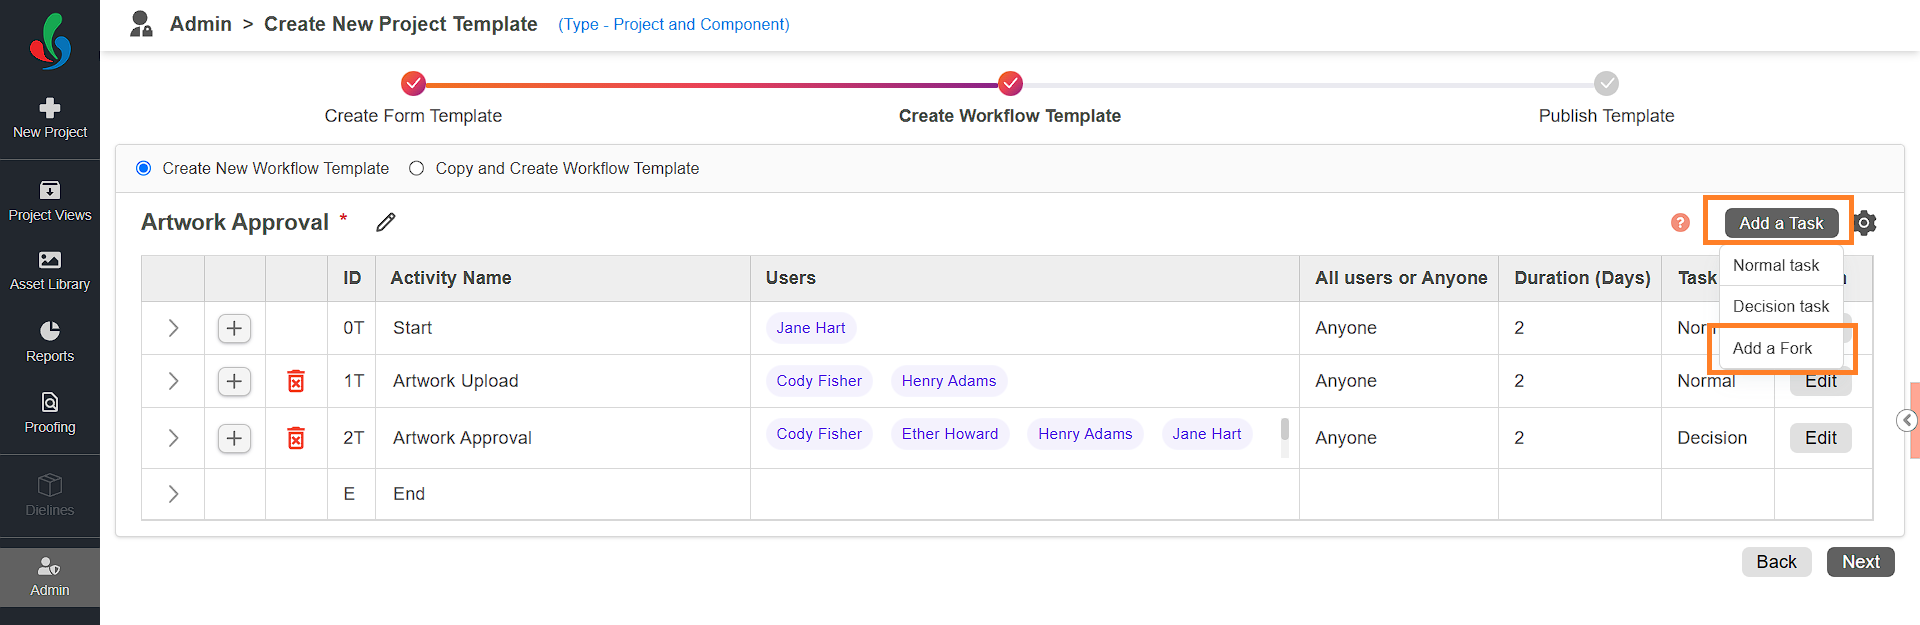
4. Add Tasks to Your Workflow
- You can add tasks to your workflow in two ways:
- Using the Plus Icon: Click the + icon next to an existing task and choose the desired task type. The selected task will be inserted immediately after the task where you clicked the icon.
- Using the Add a Task Button: Click Add a Task at the top right and select the task type you want to add.
- Using the Plus Icon: Click the + icon next to an existing task and choose the desired task type. The selected task will be inserted immediately after the task where you clicked the icon.
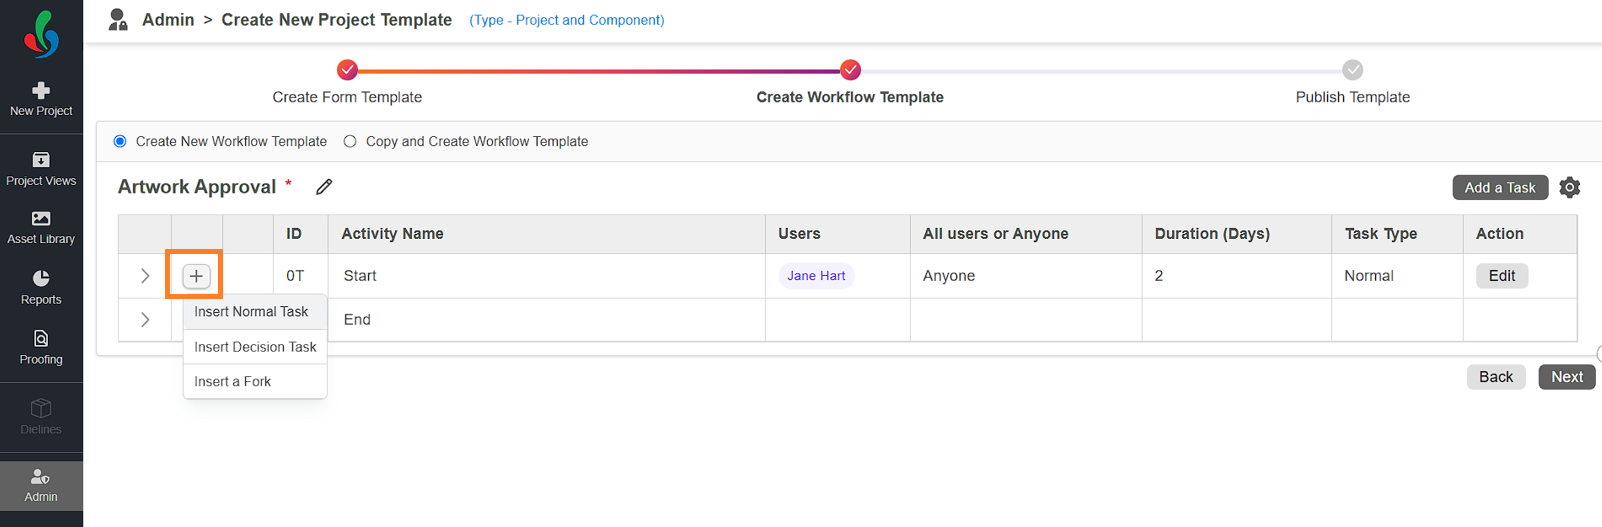

Task Types
- Normal Task: Use this for standard activities such as uploading deliverables or completing specific steps in the workflow.
- Decision Task: Use this when the task involves approvals, rejections, or choices that lead to different workflow paths.
- Add a Fork: For assigning parallel tasks that split into multiple simultaneous activities. Each parallel task can be a normal or decision task, allowing for efficient and concurrent progression, like the branches of a fork splitting from one point. Additionally, you can use forks to add child templates, which split the project into multiple sub-projects based on the number of components added.
Note: The Multi-Project Configuration option within the Fork menu becomes available only when the Multi-Level Approval Flow (Project and Component) setting is selected during the creation of the project template.
| Note: It is mandatory to add at least one Normal Task before adding any other task types, such as a decision task or fork. |
5. Configure a Normal Task
- Once you select Normal Task type from the menu, you will be presented with four tabs for customization:
- Task Information
- Actions
- Validation
- Instructions.
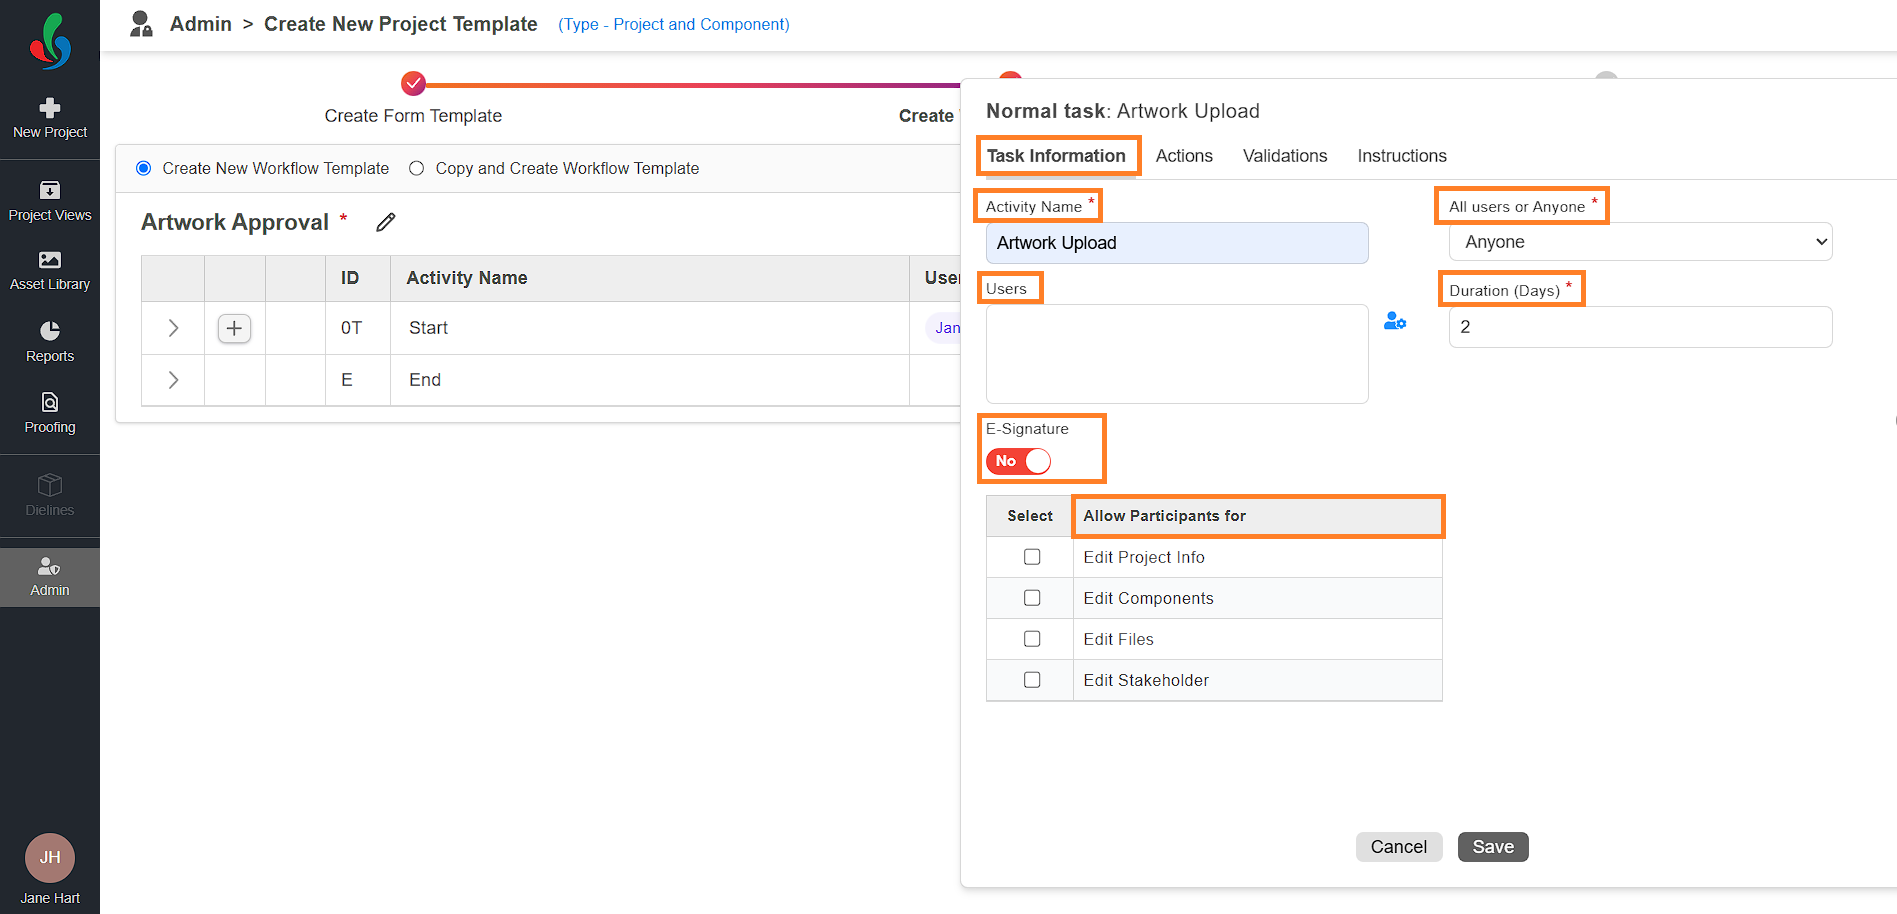
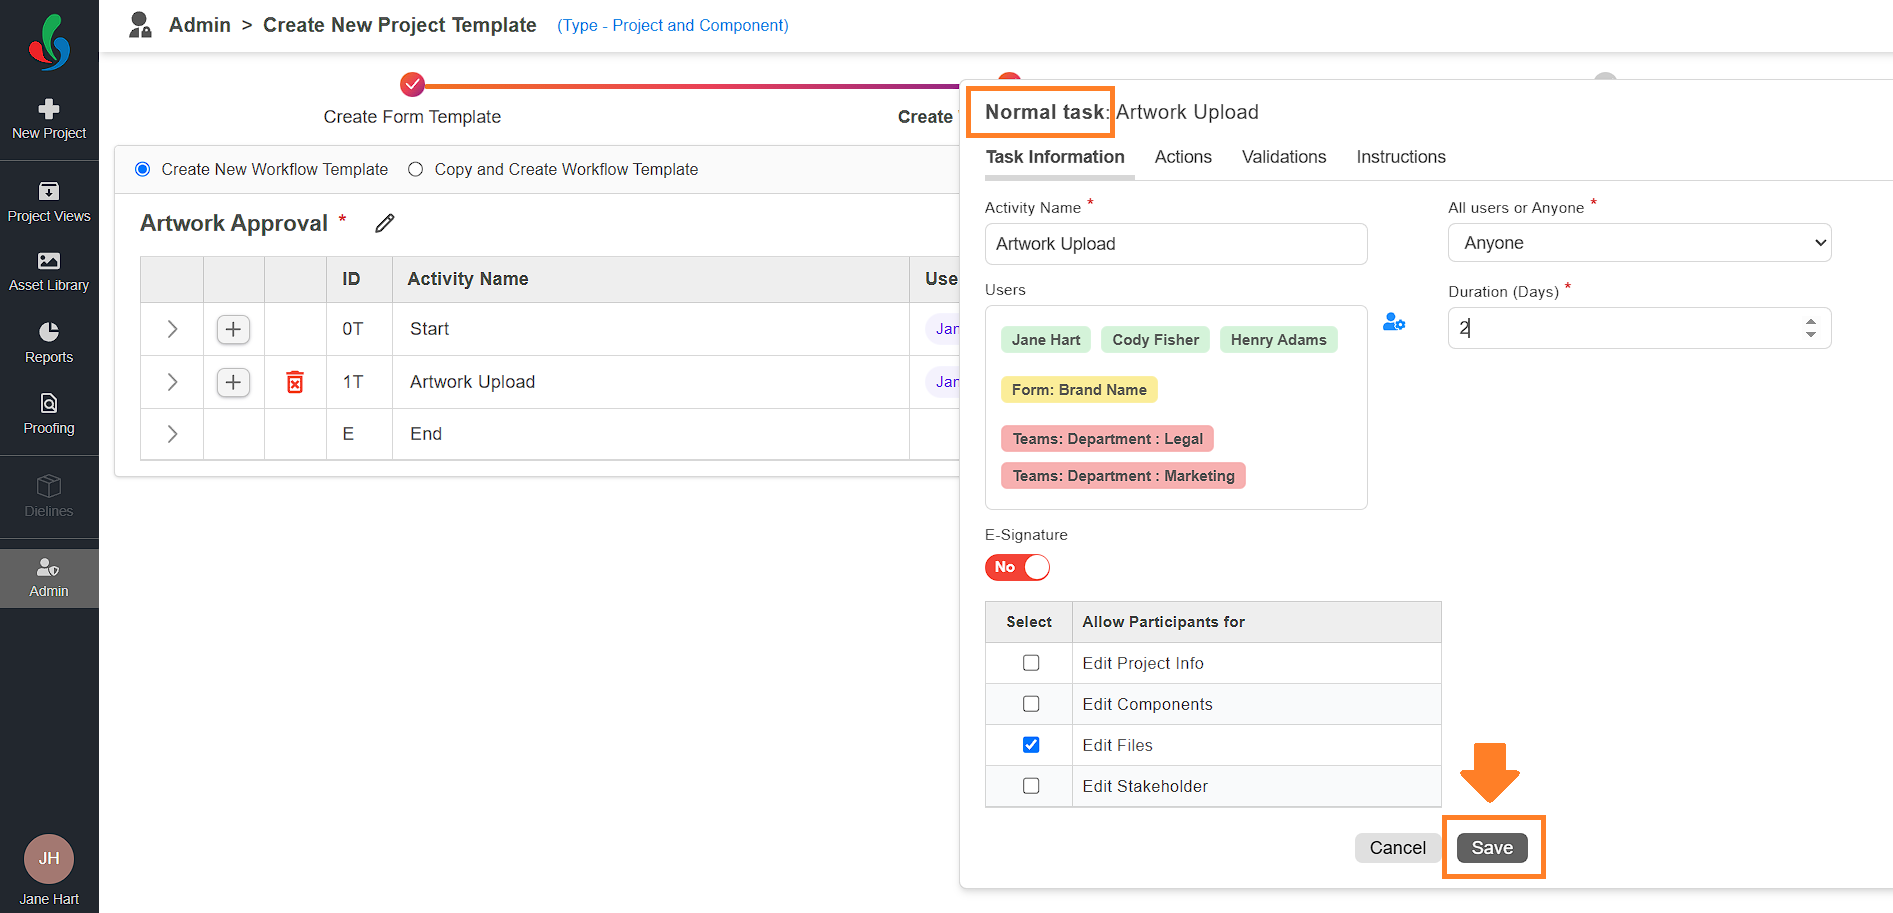
Task Information Tab
- Complete the following fields to configure the task:
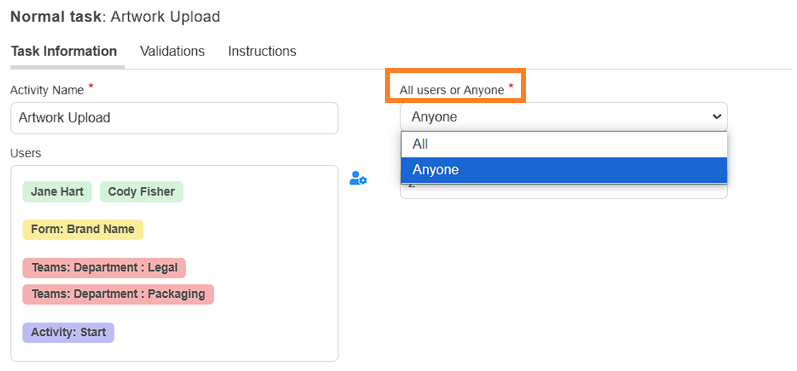
- Activity Name: Enter a descriptive name for the task (e.g., Artwork Upload).
- All or Anyone: Specify if all assigned users must complete the task or if any one of the assigned users can complete it.
- User: Assign the task to specific users, teams, form fields, or users from previous tasks. For more details, refer to the "Task Assignment Options" section.
- Duration (Days): Set a deadline for task completion.
- E-Signature (Optional): If enabled, users will need to reconfirm their identity by entering their password to complete the task.
- Allow Participants for: Specify what participants can edit during the task's runtime. Permissions are only applicable during the active task and will not extend before or after its completion. You can enable the following options:
- Edit Project Info: Allows participants to modify project details.
- Edit Components: Grants permission to update component information.
- Edit Files: Enables participants to upload or modify associated files.
- Edit Stakeholder: Allows participants to edit stakeholder details
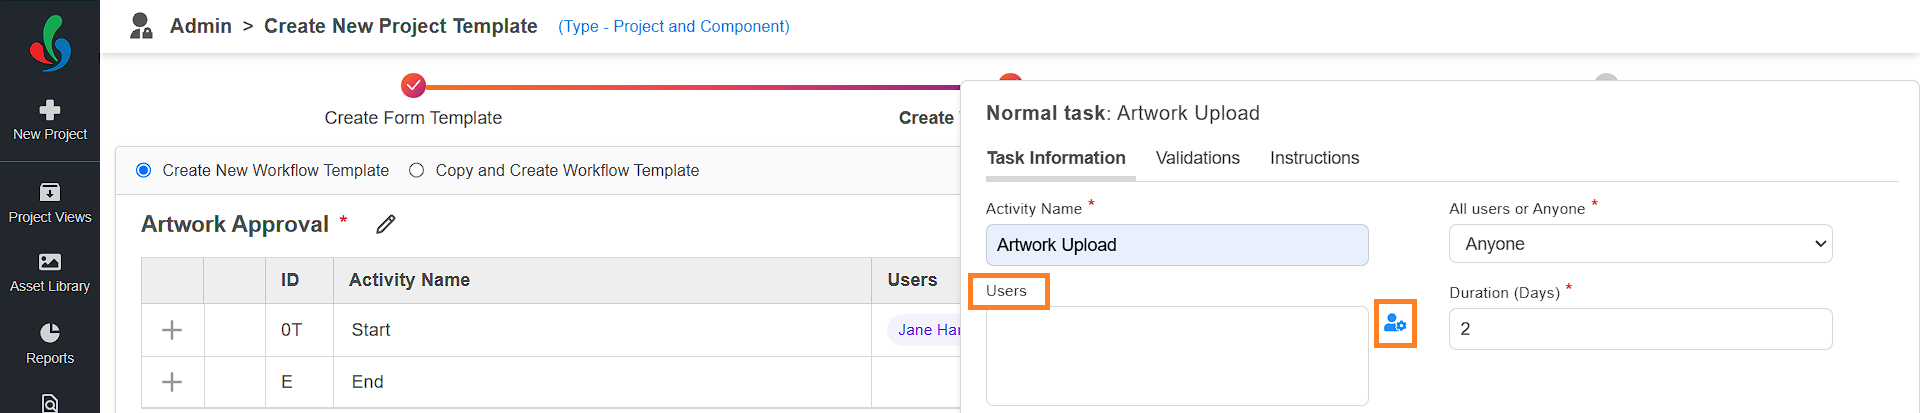
Task Assignment Options
You can assign tasks to specific Users, Teams, Form Fields, or Users assigned to previous tasks. Task assignment options for Start Activity is limited to Users and Teams only.
To configure task assignment:
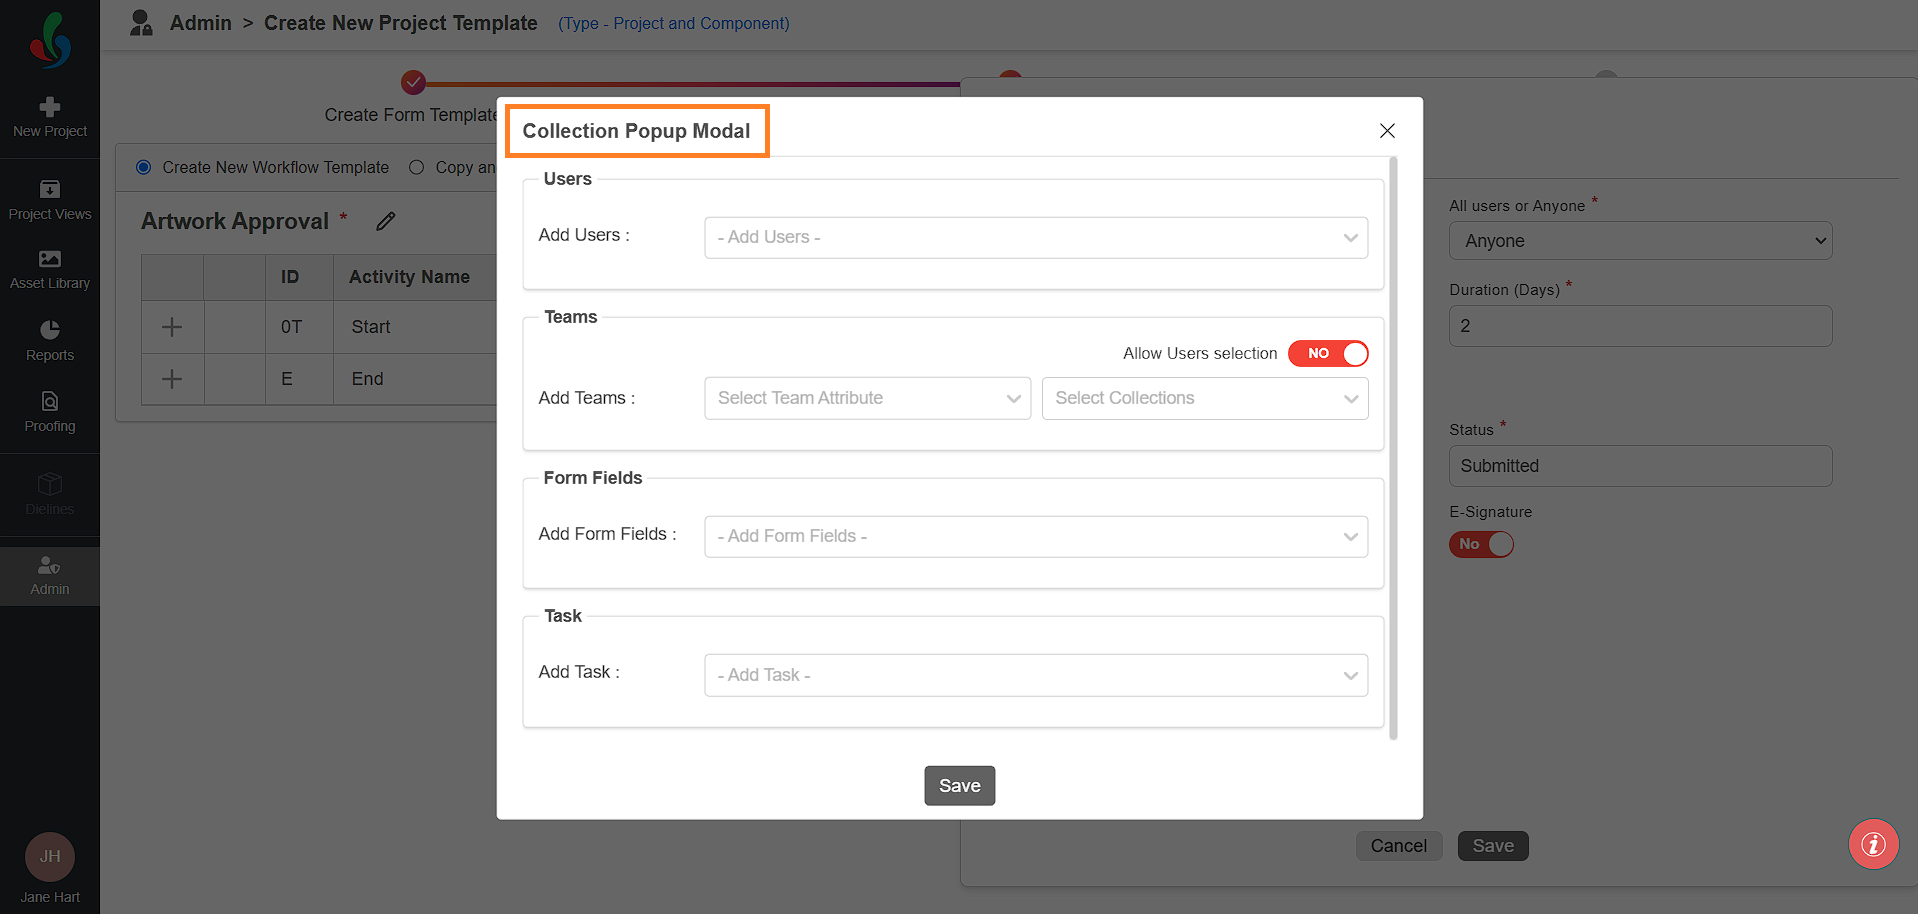
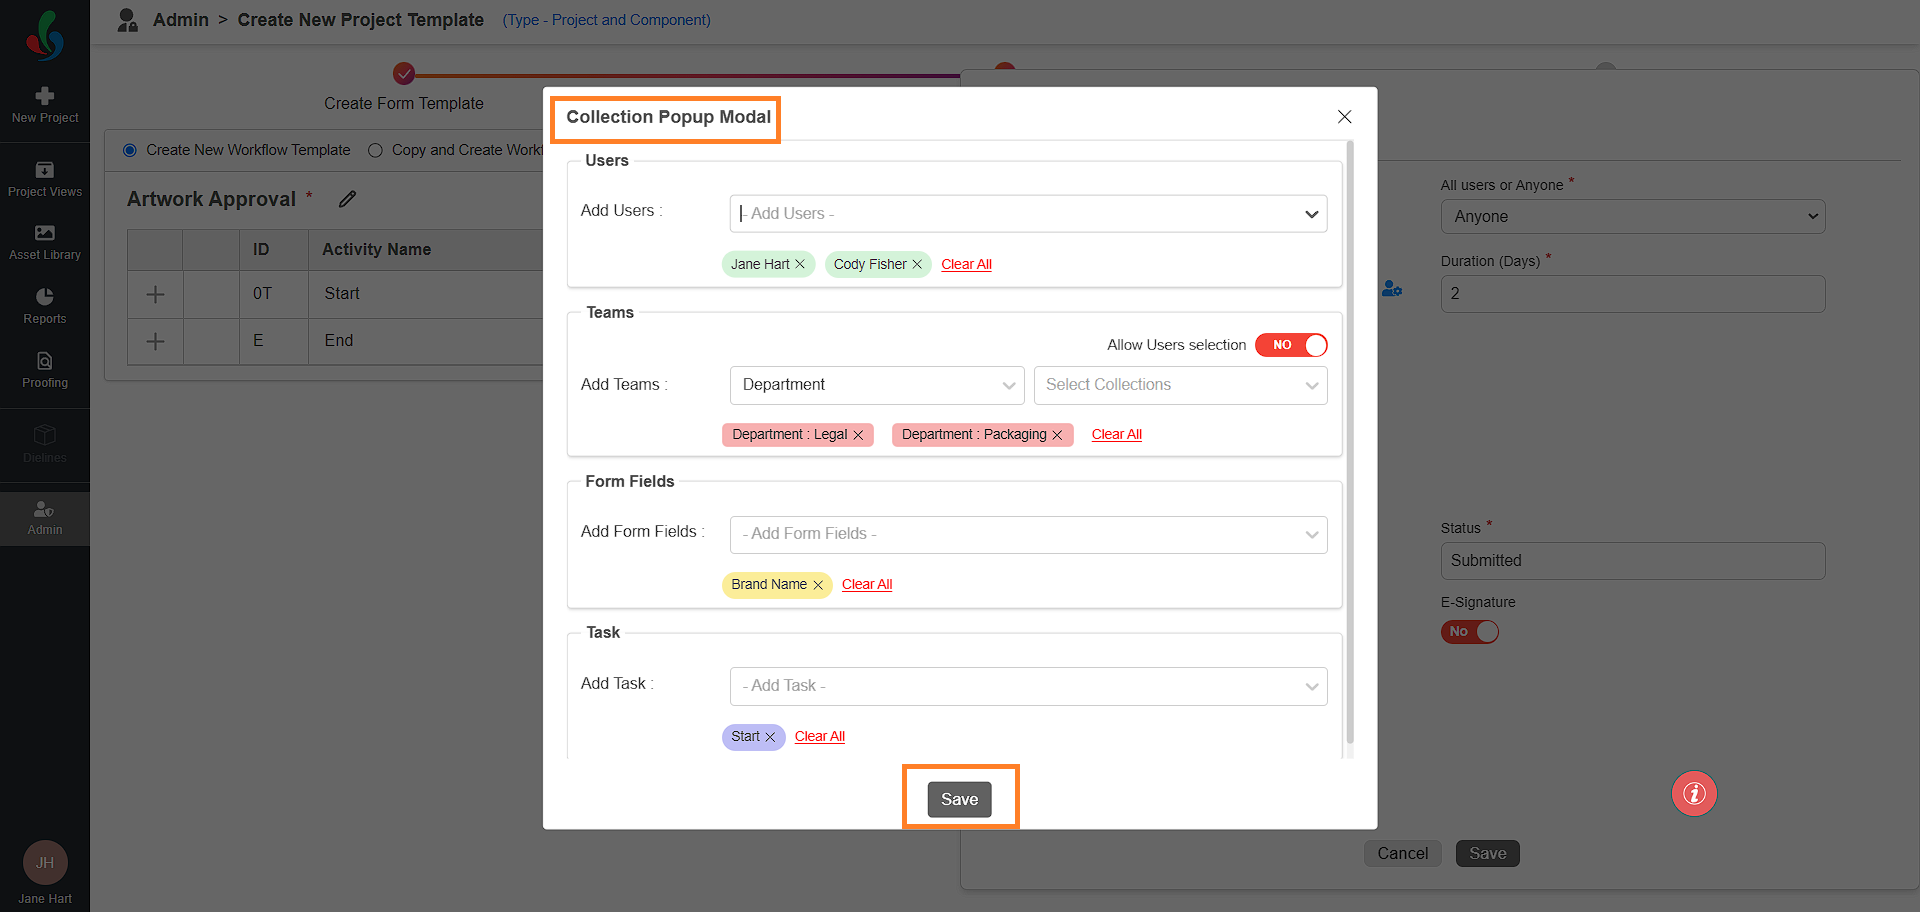
- Click the User Settings icon. A Collection Popup Modal will appear.
- Add Users:
Assign tasks to specific users:- Click the drop-down icon next to the "Add Users" option.
- Select the desired users from the list.
- To remove a selected user, click the close icon next to the added user's name.
- Add Teams:
Assign tasks to entire teams (e.g., marketing, legal):- Click the attribute drop-down icon and select the desired attribute (e.g., Department).
- Click the collection drop-down icon and choose the relevant team (e.g., Marketing).
- To remove a selected team, click the close icon next to the added team's name.
- Allow User Selection (Optional):
- When enabled, users must select specific users from the selected team(s) before initiating the project.
- When disabled, the task will be assigned to all available team members associated with the selected team(s) once project initiated.
- Add Form Fields:
Assign tasks based on form field inputs:- Click the drop-down icon next to "Add Form Fields."
- Select the relevant form field (e.g., Brand Name).
Note: Only form fields included in the form template will appear in the list. - For example, if "Brand A" is selected during project initiation, the task will automatically be assigned to users linked with "Brand A."
- To remove a selected form field, click the close icon next to the added form field name.
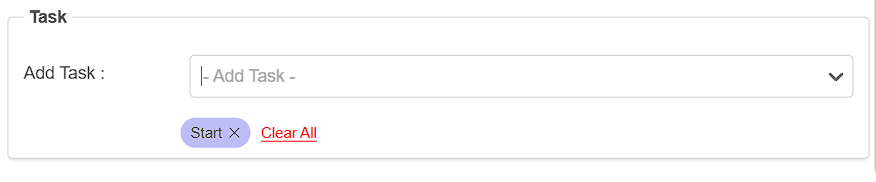
- Add Task:
Assign tasks to users based on previous task assignments:- Click the drop-down icon next to "Add Task."
- Select the desired previous task from the list.
Note: Task assignments using this option are restricted to previously defined tasks. - The task will be assigned to all users associated with the selected task.
- To remove a selected task, click the close icon next to the added task.
- You can configure any combination of these assignment options. If you choose all four options (Users, Form Fields, Teams, and Task), the task will be assigned to all users in the selected options.
Note: If the "Anyone" setting is selected under All or Anyone, the task will move to the next stage once any one user from the selected options approves the task. To fully utilize the task assignment feature and ensure thorough review, select All under the All or Anyone option. This ensures that all assigned users must approve the task before it moves forward.
- After configuring the task assignment, click Save to finalize the user assignment settings.


Actions Tab
Use this tab to configure how users complete the task and define what happens afterward.
- Action 1 Name: Define the label for the button users click to complete the task (e.g., "Submit").
- Action 1 Status: Specify the task's outcome after completion (e.g., "Submitted"). This status will appear in the audit log.
- Goes to: Choose the next step in the workflow after this task is completed. If no other task are available yet, the field will remain empty—leave it as is. Once additional tasks are added to the workflow, the next task following the current one will be automatically selected by default.

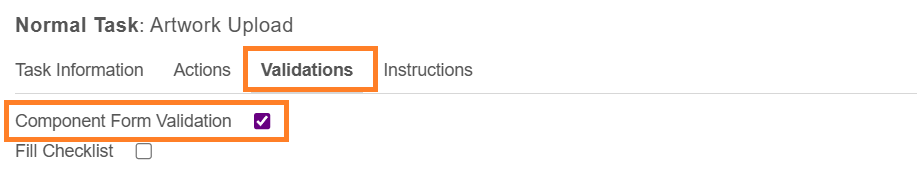
Validation Tab
The Validation tab allows you to define task-specific requirements to control task completion behavior.
| Note: If you have selected Multi Components in the Approval Selection, an additional option called Component Form Validation will be visible. However, if your approval flow is set to Projects and Components, this option will not appear. |
- Component Form Validation
This setting ensures that the task cannot be completed unless at least one component is added in the Components tab.- When enabled, the user must add at least one component to proceed with completing the task.
- This validation can be applied even to the Start Activity.
- To enable this validation, simply check the Component Form Validation checkbox.
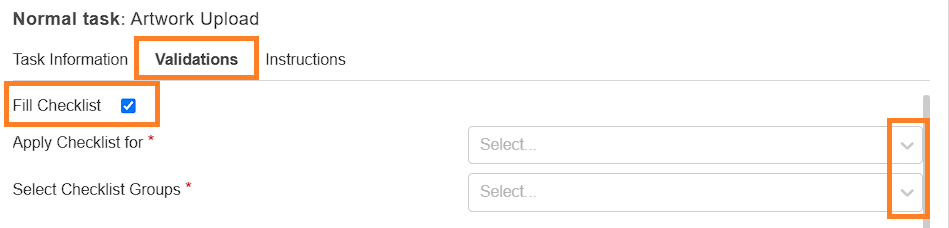
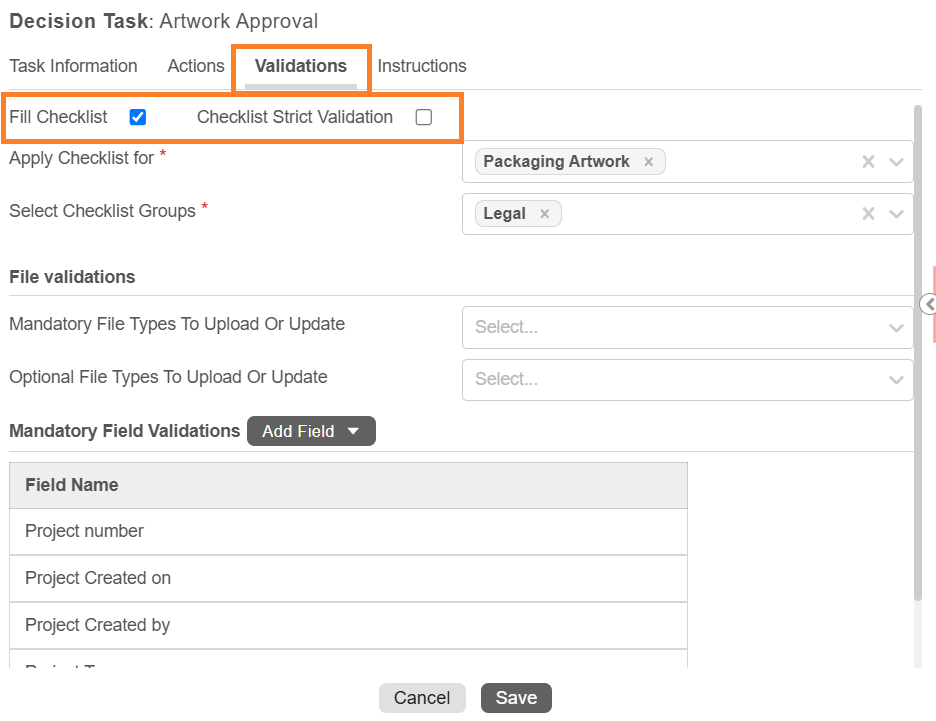
- Fill checklist:
Enable or disable checklists for the task as needed.- To activate the checklist feature, check the box next to Fill Checklist.
Once enabled, you’ll need to configure the following options:- Apply Checklist For:
Select the asset type to which the checklist applies. For instance, if you select the "Packaging Artwork" asset type, checklist items will only appear for that specific asset type when the user opens it in the Web Viewer.- Click the drop-down menu and choose the desired asset type.
- Select Checklist Group:
A checklist group contains a set of related checklist items. When users open the selected asset type in the Web Viewer, only the checklist items from the chosen group(s) will be displayed for the current task.- To assign a checklist group, click the drop-down menu and select the desired group(s).
- To learn how to create a checklist group, refer to the Create Checklist Group.
- Apply Checklist For:
- To activate the checklist feature, check the box next to Fill Checklist.
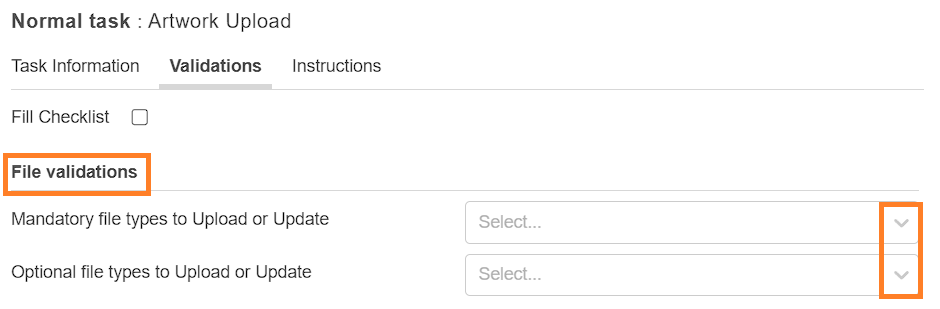
- File Validation:
Restrict the file types users can upload or update for the task.
Note: Make sure that participants have been granted permission to edit files in the Task Information tab.- Mandatory file types to Upload or Update:
Specify the file types that must be uploaded to complete the task. For example, if a task requires "Packaging Artwork" and "Dieline" files, you could choose these as mandatory file types.- Use the drop-down menu to select the required file types (e.g., "Packaging Artwork" and "Dieline").
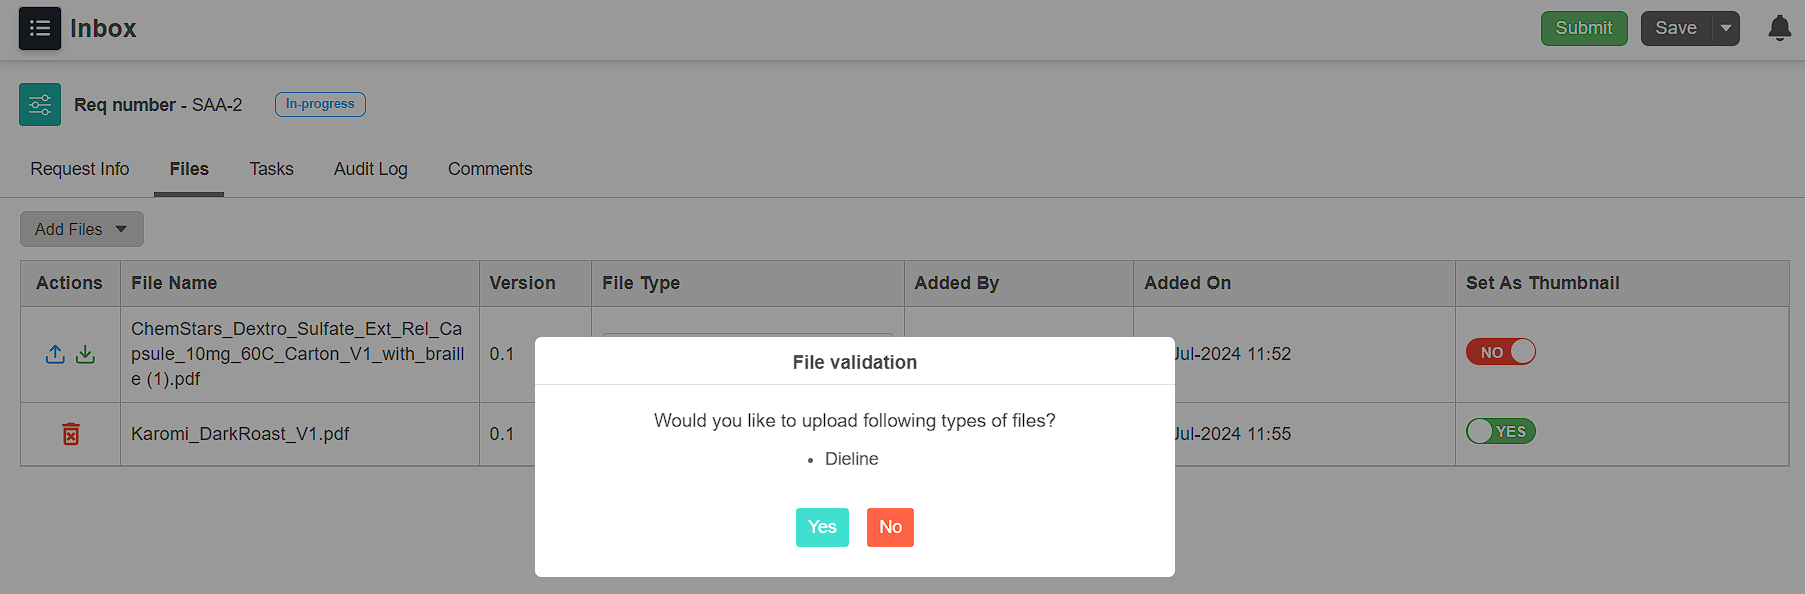
- Users will receive a warning message if they attempt to submit the task without uploading these mandatory file types.
- Submission will be blocked until the required files are uploaded.
- Optional file types to Upload or Update:
Allow users to upload additional, non-essential file types to provide additional information for the task. These files are not essential for completion.- Use the drop-down menu to select optional file types (e.g., "3D Model" or "KLD").
- Uploading any of the selected optional file types will not trigger a warning. If the user attempts to submit the task without uploading any selected optional files, a warning message will appear. However, users can still proceed with submission by dismissing the warning.
- Mandatory field validations:
Set mandatory fields users must complete before moving to the next activity.
Note: Make sure that participants have been granted permission to edit project info in the Task Information tab.
To set Mandatory form fields to move to the next activity:- Click "Add Field" next to "Mandatory field validations."
- Choose the desired form fields from the list. These will appear under "Mandatory field validations."
Note: Only fields included in the form template will be available for selection. - To remove the added form fields from mandatory list, simply click the delete icon available next to the field name.
Note: Pre-existing Mandatory Fields: Any fields set as mandatory in the Start activity or previous activity automatically carry over and cannot be removed in current activity.
- Mandatory file types to Upload or Update:


Instructions Tab (Optional)
- Add clear instructions to guide users on completing the task.
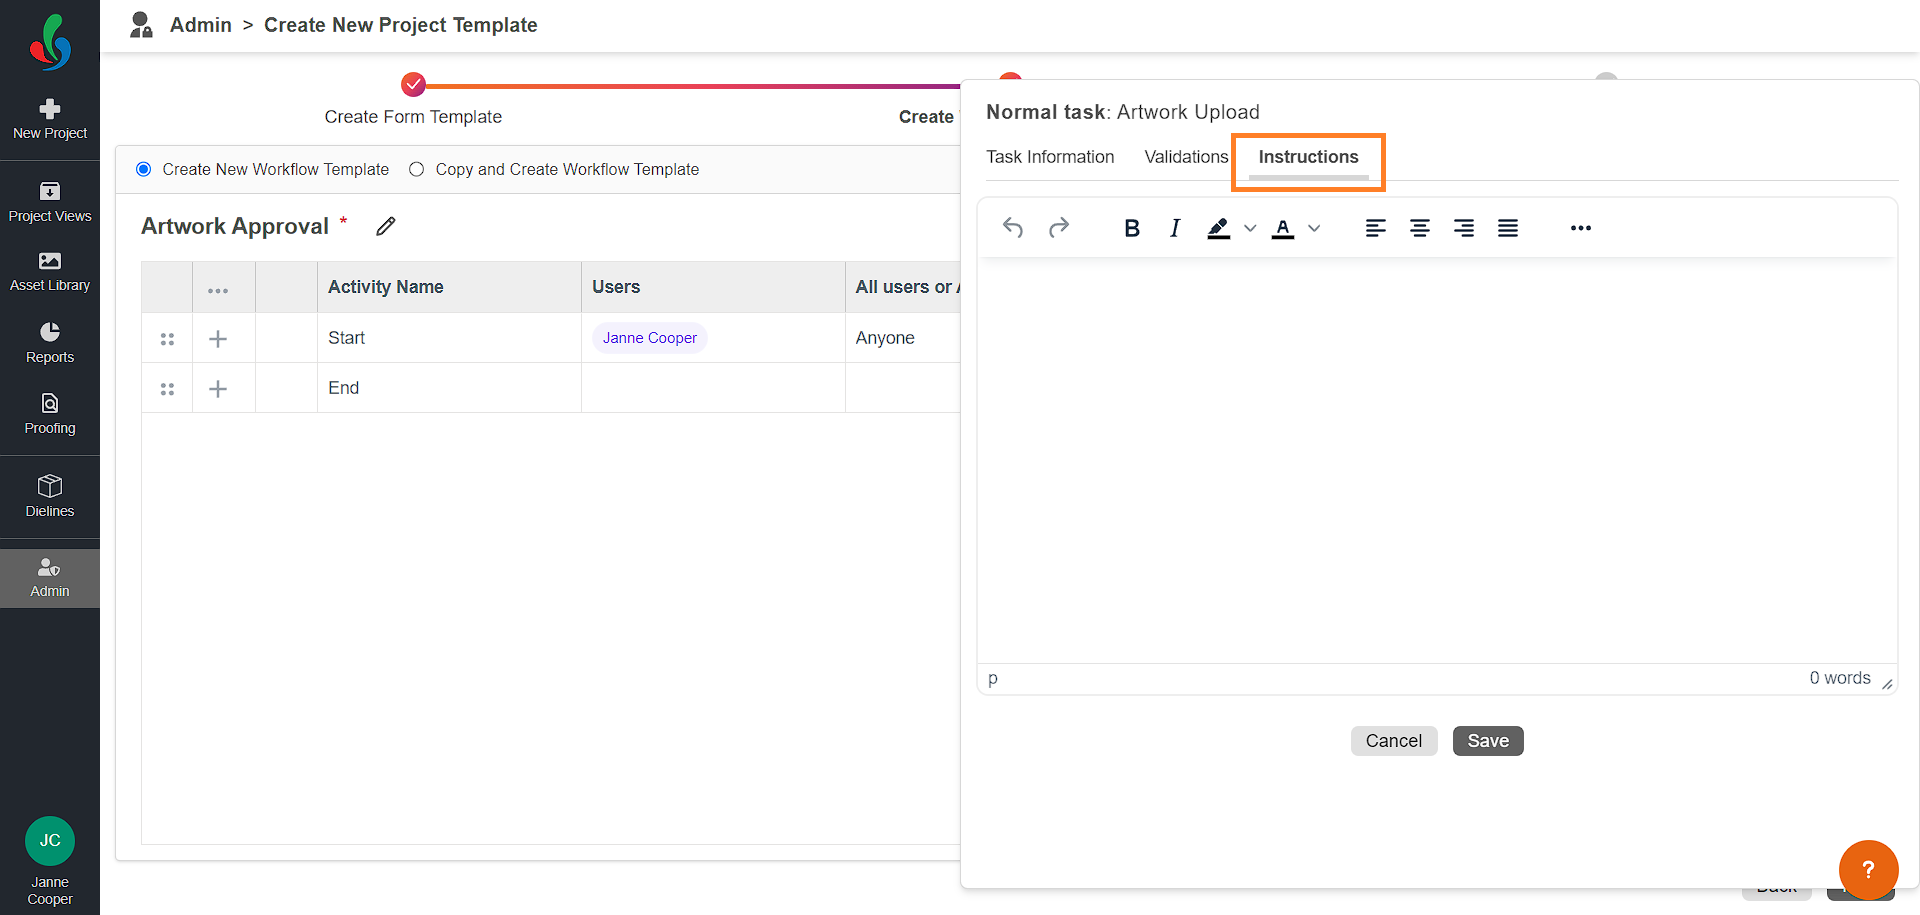
6. Save the Task
- Click the Save button to add the task.
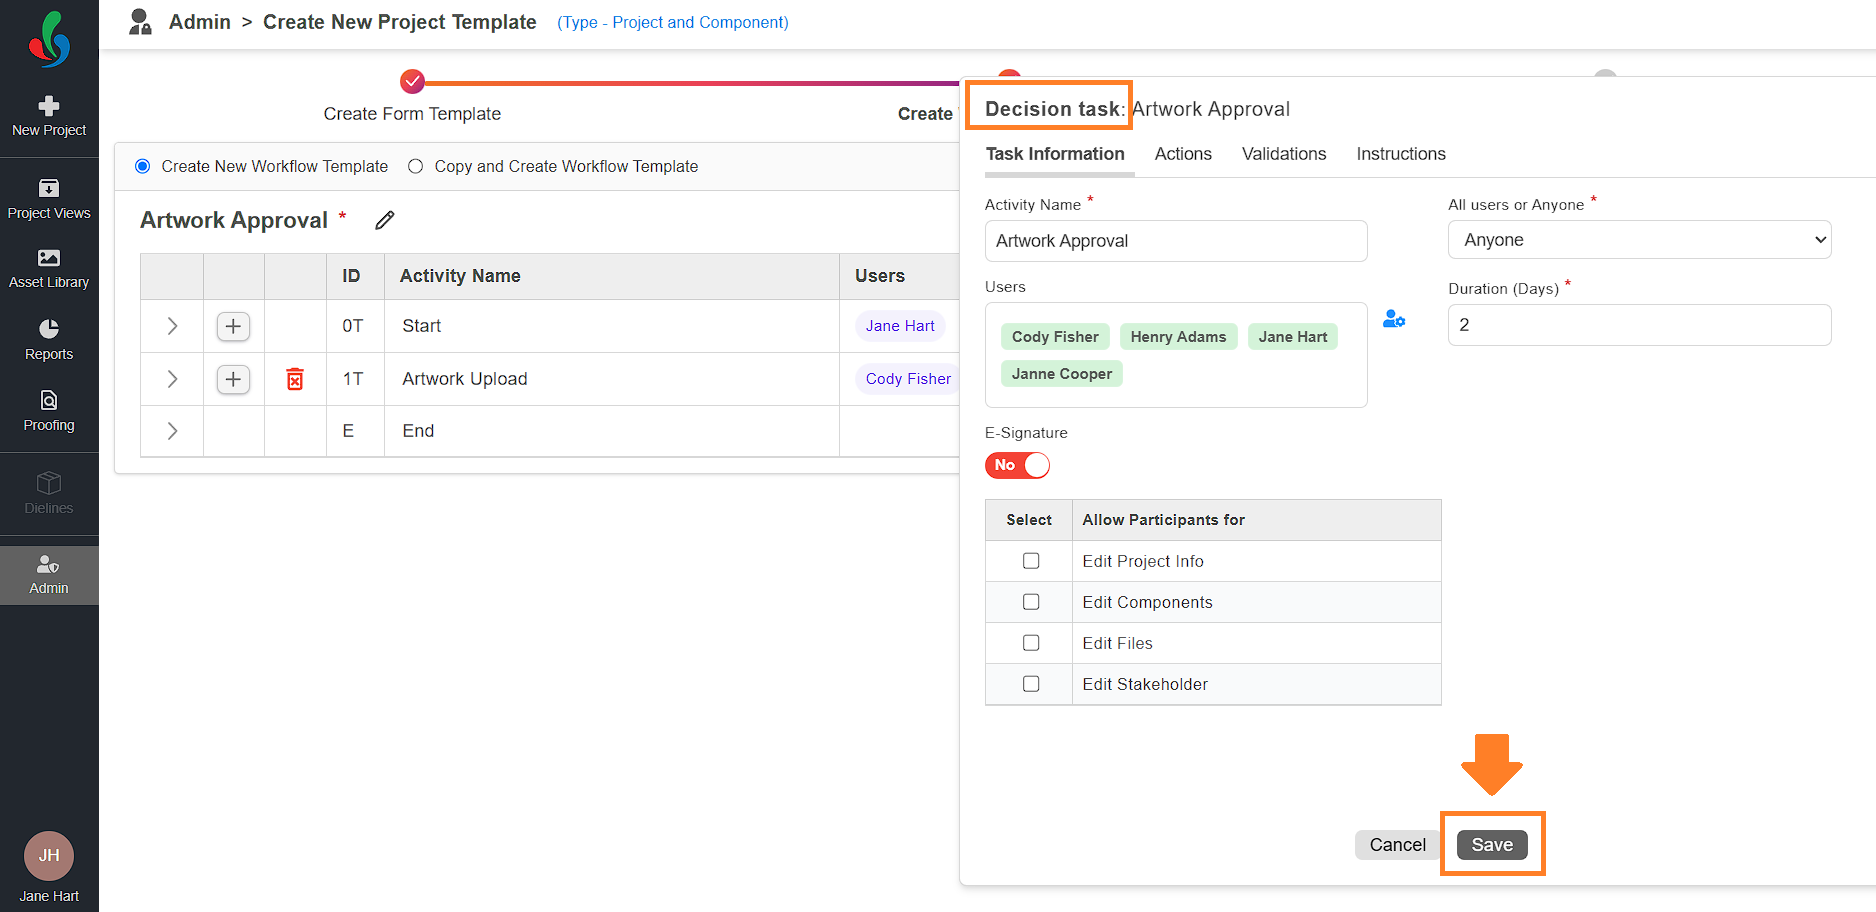
7. Configure a Decision Task
- Once you select Decision Task type from the menu, you will be presented with four tabs for customization:
- Task Information
- Actions
- Validation
- Instructions.
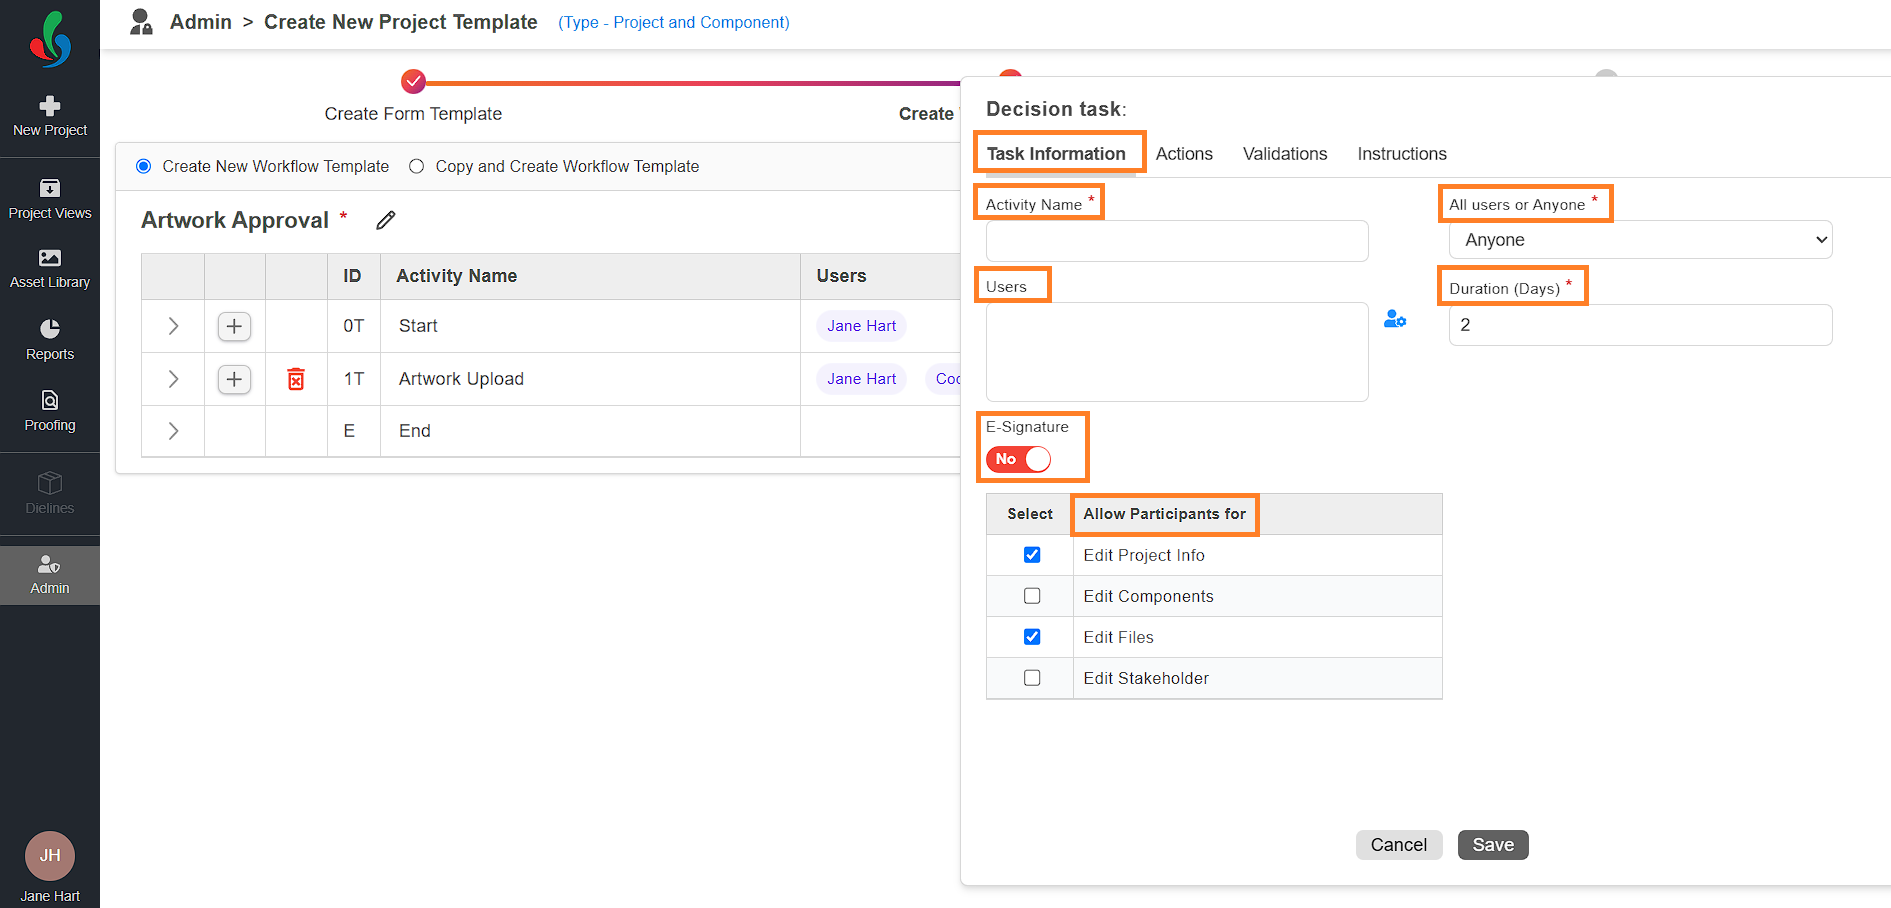
Task Information Tab
- Fill in the Task Information tab:
- Activity Name: Enter a descriptive name for the task (e.g., Artwork Approval).
- All or Anyone: Specify if all assigned users must complete the task or if any one of the assigned users can complete it.
- Users: Assign the task to specific users, teams, form fields, or users from previous tasks. For more details, refer to Task Assignment Options.
- Duration (Days): Set a deadline for task completion.
- E-Signature (Add-on): When E-signature is enabled, an additional verification step is triggered for the user approving or rejecting the project. Users will need to reconfirm their identity by entering their password to complete the task.
- Allow Participants for: Specify what participants can edit during the task's runtime. Permissions are only applicable during the active task and will not extend before or after its completion. You can enable the following options:
- Edit Project Info: Allows participants to modify project details.
- Edit Components: Grants permission to update component information.
- Edit Files: Enables participants to upload or modify associated files.
- Edit Stakeholder: Allows participants to edit stakeholder details.
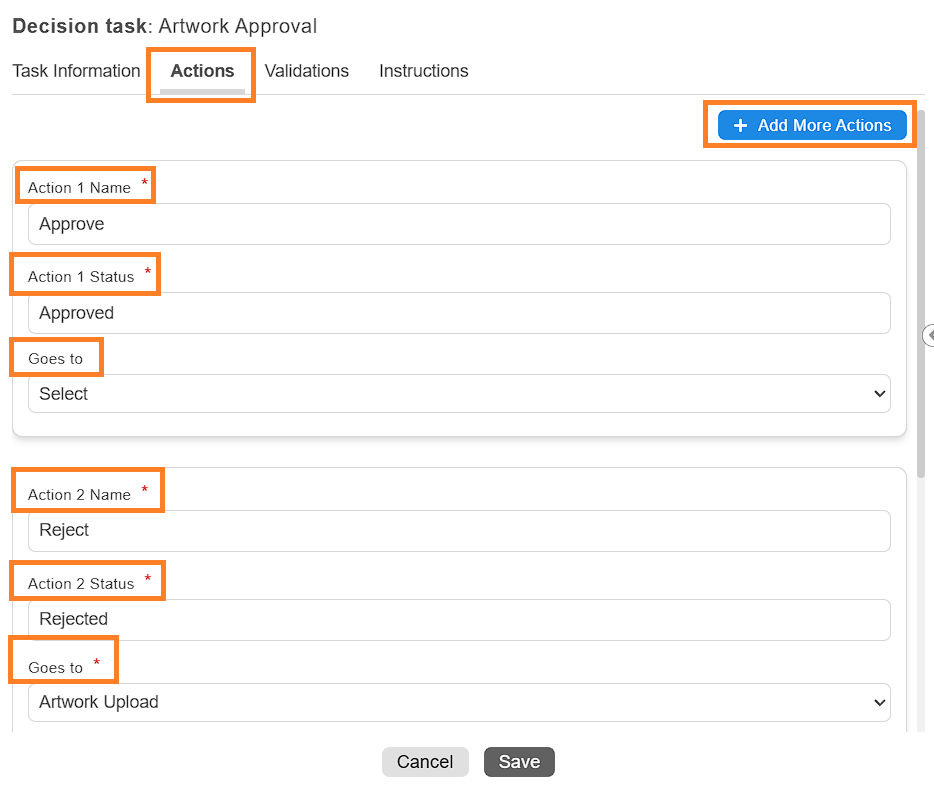
Action Tab
Use this tab to configure how users complete the task and define what happens afterward. Since this is a decision task, users will typically have two options—such as Approve and Reject. You can configure two default actions and also if needed you can add up to two additional custom actions if needed.
- Action 1 Name: Enter the label for the first decision button users click to complete the task (e.g., "Approve").
- Action 1 Status: Define the outcome that will be recorded when Action 1 is selected (e.g., "Approved"). This status will appear in the audit log.
- Goes to: Choose the next step in the workflow that should follow when Action 1 is selected.
Note: You can select any task—either before or after the current one—as the next step. - Action 2 Name: Enter the label for the second decision button users click to complete the task (e.g., "Reject").
- Action 2 Status: Define the status that should be recorded when Action 2 is selected (e.g., "Rejected"). This will also be captured in the audit log.
- Goes to: Choose the next step in the workflow that should follow when Action 2 is selected.
Note: You can select any task—either before or after the current one—as the next step. - To add more actions:
- Click Add More Actions to add additional action buttons. These can be configured in the same way as Action 1 and Action 2.
Note: You can add a maximum of two additional actions. Only the additional actions can be deleted—not the default two actions.
- Click Add More Actions to add additional action buttons. These can be configured in the same way as Action 1 and Action 2.
- Default Action: Select the default action the system should take if the task is skipped. By default, this is set to Action 1. During runtime, the system will automatically proceed based on this setting.
Note: This option is primarily used for backend processing or automation scenarios.
Validation Tab
Use this tab to configure checklist and validation rules for the decision task. These settings help ensure that the required conditions are met before the task can be completed.
| Note: If you have selected Multi Components in the Approval Selection, an additional option called Component Form Validation will be visible. However, if your approval flow is set to Projects and Components, this option will not appear. |
- Component Form Validation
This setting ensures that the task cannot be completed unless at least one component is added in the Components tab.- When enabled, the user must add at least one component to proceed with completing the task.
- This validation can be applied even to the Start Activity.
- To enable this validation, simply check the Component Form Validation checkbox.
- Fill Checklist: This option is enabled by default for decision tasks, allowing users to fill out a checklist during task completion. You can disable it if not required.
- Checklist Strict Validation (available only for Decision task): Enable this option to enforce validations based on checklists. This feature prevents the user from approving the task if any checklist item marked as No in runtime.
- Refer to step 5. Validation Tab to configure remaining settings.

Instructions Tab (Optional)
- If necessary, use this tab to provide clear and detailed instructions to guide users in completing the task.
8. Save the Task
- Click the Save button to add the task.
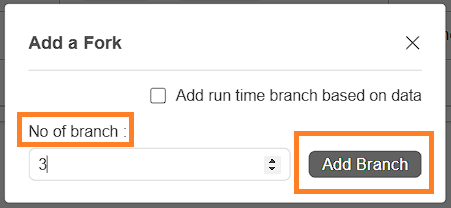
9. Configure Fork(s)
When you select Add a Fork from the Add a Task menu, an Add a Fork pop-up will appear. Forks allow you to create parallel tasks that run simultaneously, similar to branches splitting from a single point.
- Key Features of Forks:
- Parallel Branches:
- The number of branches you add to the fork determines the number of parallel activities.
- For instance, if you require three parallel activities, you must add three branches, with one task assigned to each branch.
- Within each branch, you can add multiple tasks. However, tasks inside a branch are executed sequentially.
- Only the branches execute in parallel. If you need three tasks to start simultaneously, you must create three branches, each with one task.
- Add Run-Time Branch Based on Data (Child Templates):
- This feature allows you to dynamically split a project into multiple sub-projects based on the components added.
- This option is available only if you selected Multi-Level Approval Flow (Project and Component) when creating the project template.
- If enabled, the project will split into multiple sub-projects based on the components, with tasks defined in a selected child template.
- Otherwise, this option will not appear in the Add a Fork menu.
- Parallel Branches:
Add Parallel Tasks
- If you prefer to add only parallel tasks:
- Enter the number of branches you need in the No. of Branches field.
- Click Add Branch to create the specified branches.
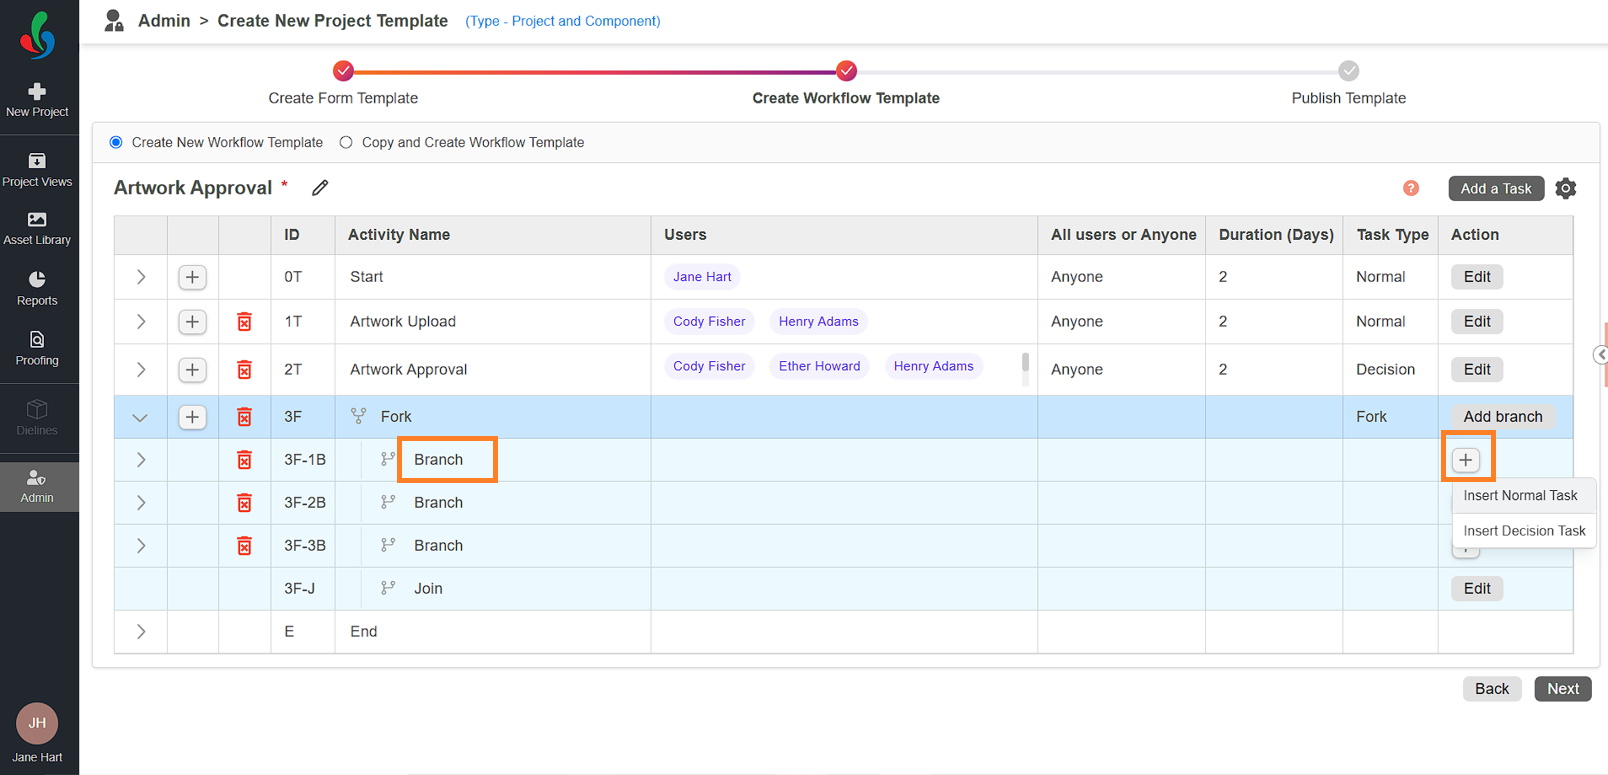
- Configuring Branches:
- Each branch allows you to add tasks.
- To add a task to a branch, click + plus icon in the Action column associated with the desired branch and select the task type:
- For Normal Tasks, refer to the Configure a Normal Task.
- For Decision Tasks, refer to the Configure a Decision Task.
Note: For tasks added to the branches, the default next task is set to the Join (Fork Join). If you have added additional tasks within a branch, ensure you configure the next task according to your project requirements.
- You can customize the placeholder names for forks and branches to align with your project requirements.

Configure Fork Join
For every fork added to a template, a Join (Fork Join) is automatically included at the end of the fork. The Join ensures that the workflow progresses to the next step only after all the branches of the fork have been completed. Its behavior depends on how the Join is configured.
By default, the Join is set to move forward to the next task available in the template once all branches are completed. However, you can modify this configuration to meet specific project requirements.
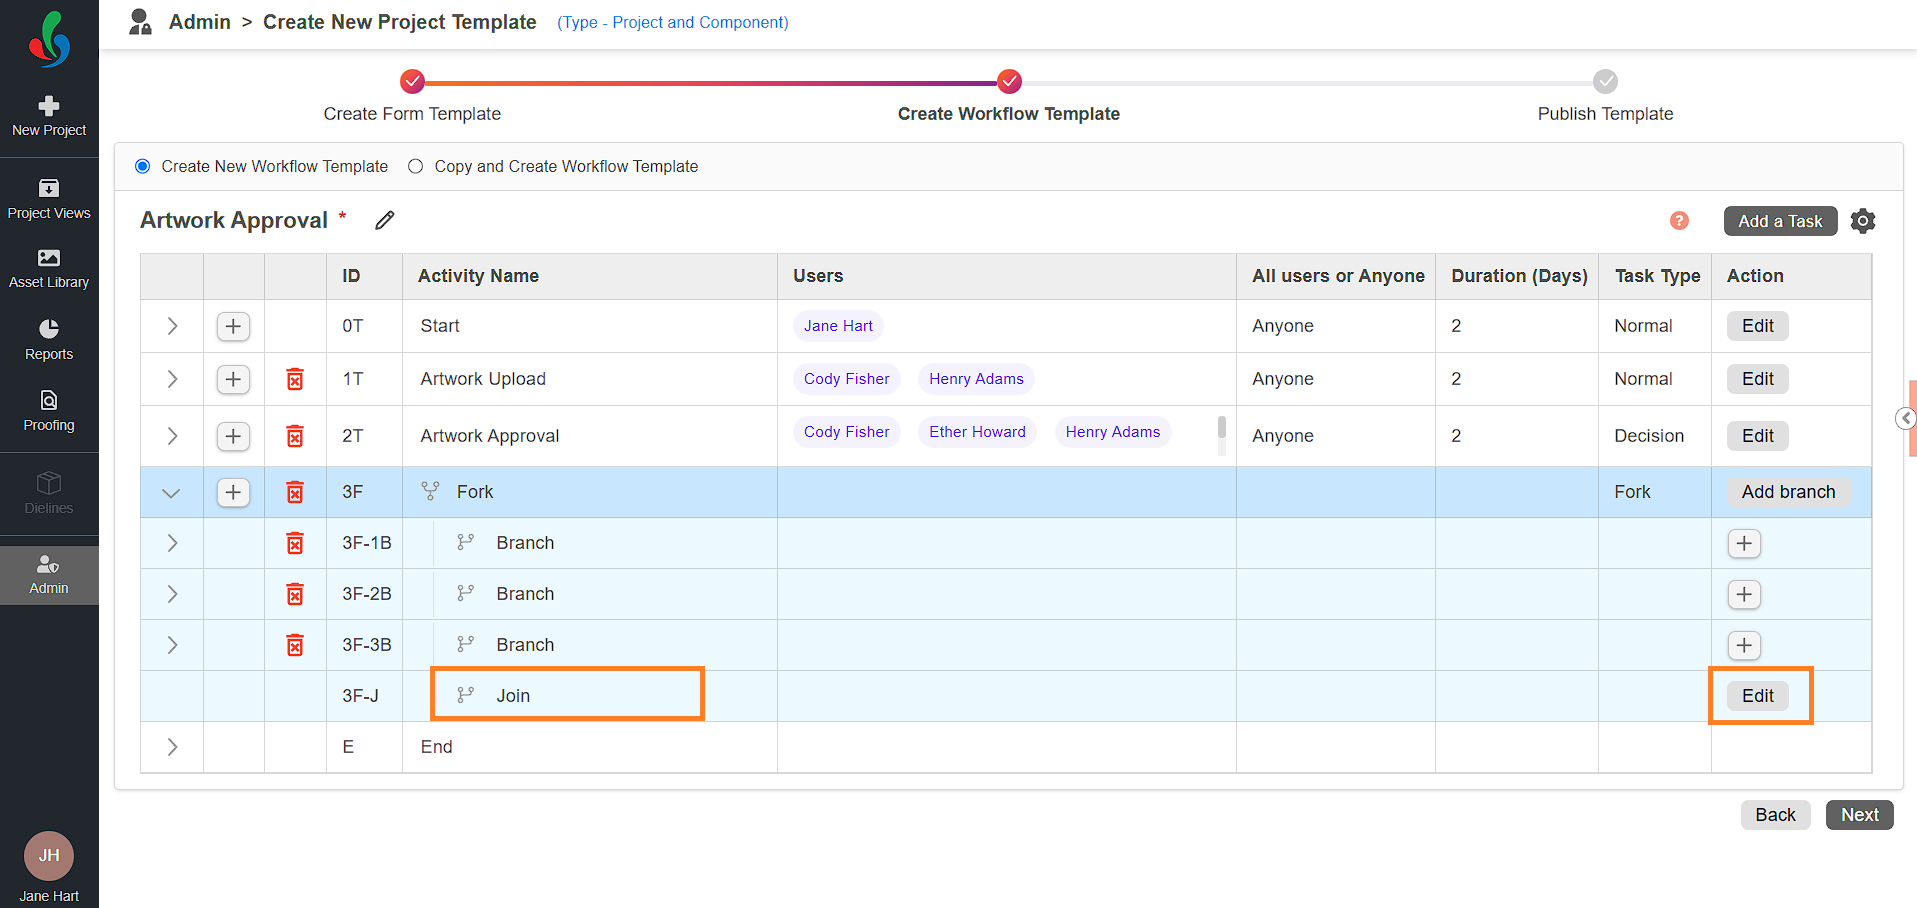
Steps to Configure Fork Join
- Edit the Join
- Click the Edit button associated with the Join.
- The Task Information tab will appear for customization.
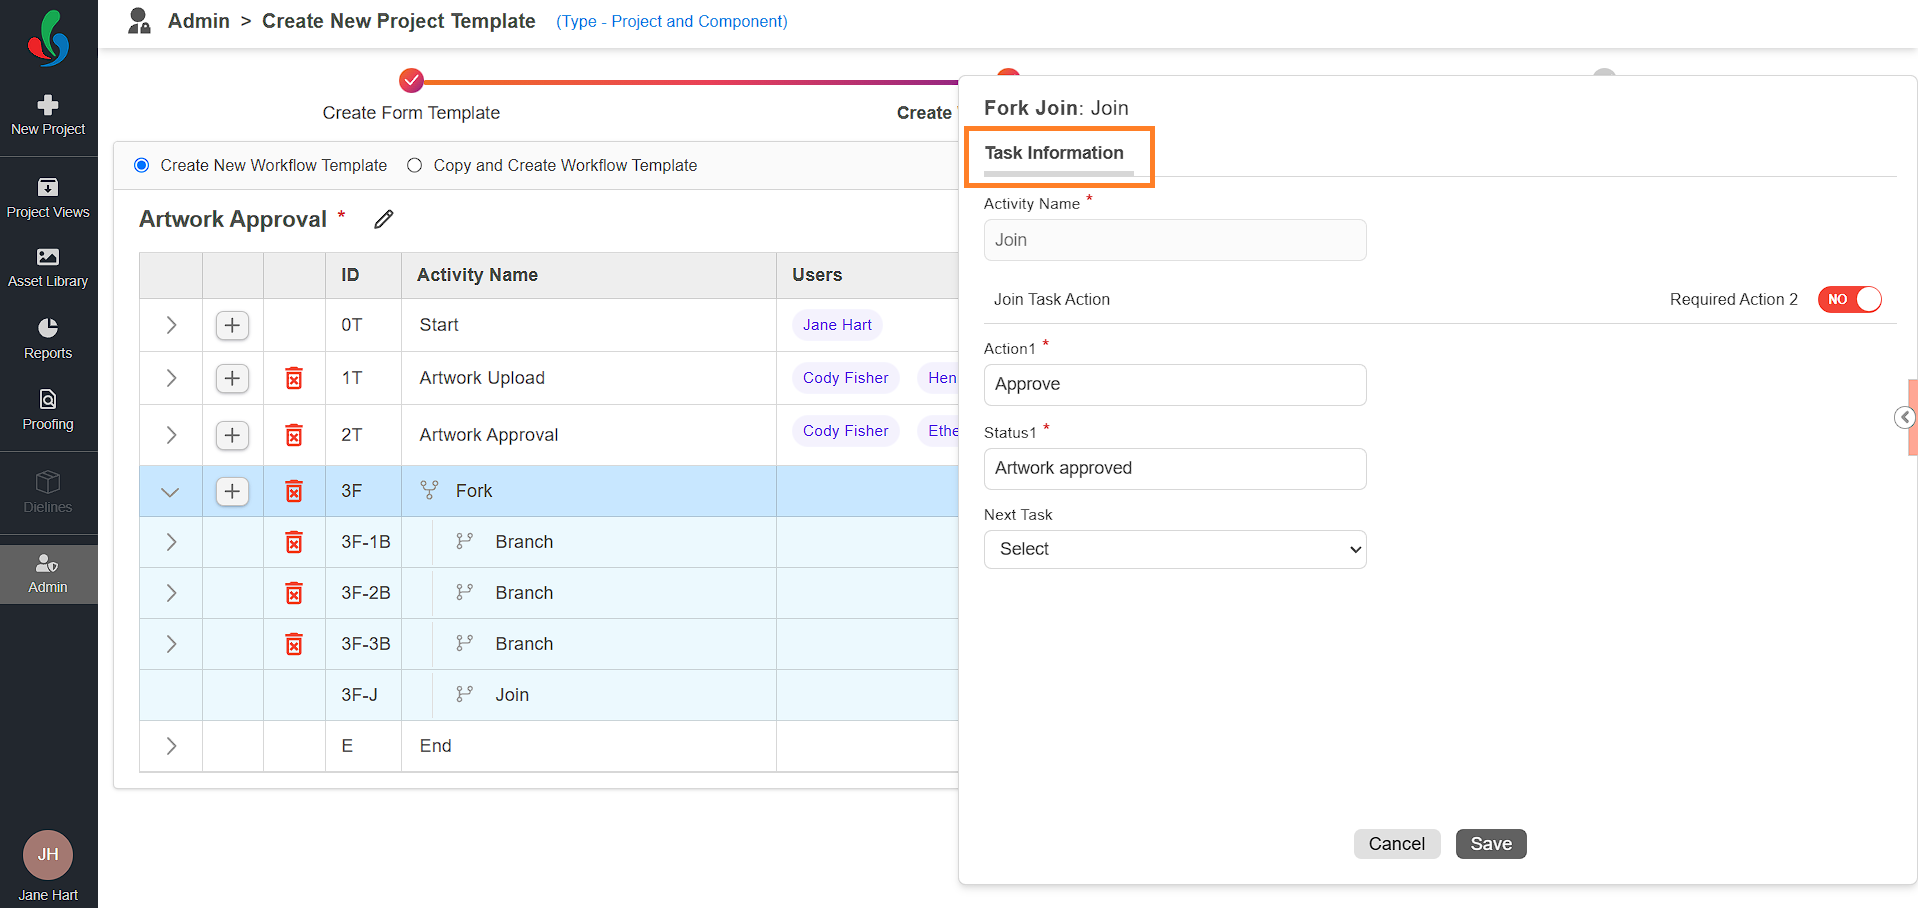
- Task Information Tab Configuration
- Action 1: Define the label for the decision button that users click to complete the task (e.g., Approve).
- Status 1: Specify the status displayed in the audit log after the task is completed (e.g., Artwork Approved).
- Next Task: Select the next step in the workflow after the fork is completed. By default, the next task in the template is selected.
Default Behavior for Forks
- If a fork contains only normal task(s), the default configuration of the Join is sufficient.
- Normal tasks are submit-based, meaning there are no rejections.
- Once all tasks across all branches are completed, the workflow automatically progresses to the next stage.
Handling Decision Tasks in Forks
If the fork contains decision task(s), you may need to configure the Required Action 2 option to handle scenarios where branches are rejected. The default Join configuration will not work in such cases, as it can only move forward or backward without distinction.
To address this limitation, enable Required Action 2.
Configuring Required Action 2
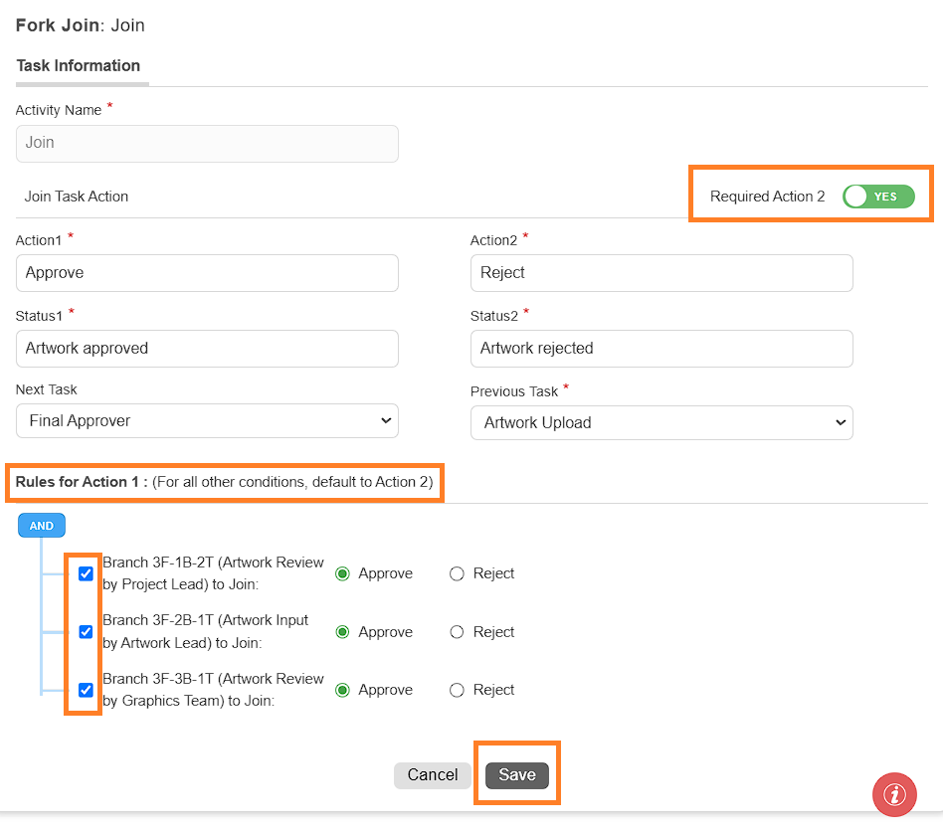
- Enable Required Action 2
- Toggle on the Required Action 2 option to access additional configuration properties.
- Additional Properties
- Action 2: Define the label for the decision button that users click for rejection (e.g., Reject from Join).
- Status 2: Specify the status displayed in the audit log after rejection (e.g., Fork Rejected).
- Previous Task: Select the workflow step the process should return to in case of rejection. By default, the previous task in the template is selected.
- Rules for Action 1: Specify conditions for moving forward with Action 1.
- All decision tasks in the fork will be listed here.
Note: Only the last decision tasks from each branch within the fork will be listed here. - For each decision task, select the desired outcome (e.g., Approve) that must be met for the workflow to move forward.
- For example, if a fork contains three decision tasks, you want to configure the Join to proceed only if all three are approved. Then select Approve for all three decision tasks.
- For any other outcomes (e.g., rejection), the system defaults to Action 2.
- All decision tasks in the fork will be listed here.
Save the Join Configuration
- Click the Save button to save the join configuration.
Example: Handling Rejections
- Scenario: A fork contains multiple branches with decision tasks. If one or more branches are rejected, the workflow should return to a previous step instead of moving forward.
- Use Action 2 to define the rejection flow.
- Configure rules under Action 1 to ensure the Join only moves forward if all required tasks are approved.
- By configuring each Join task of the fork appropriately, you can tailor the workflow to meet your project's requirements, ensuring smooth progression for both approvals and rejections.
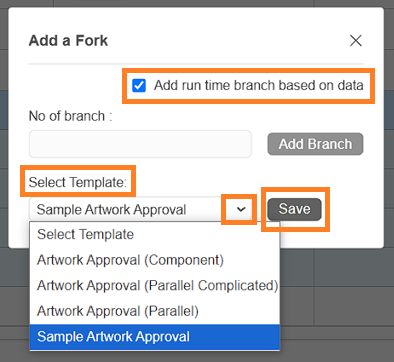
Add Run-Time Branch Based on Data (Available only with Multi-Level Approval Flow (Project and Component))
- If you want your project to split into multiple sub-projects based on the components added, select the checkbox for Add Run-Time Branch Based on Data.
- Use the Select Template drop-down menu to choose the desired child template from the list of active workflow templates.
- Click Save to apply the child template.
- Child Template Functionality:
- The project splits into multiple sub-projects only while the child template is active, based on the components added.
- Tasks before and after the child template remain part of the main project.
- The project resumes as the main workflow once the child template's tasks are completed.

10. Add More Task
- Repeat steps 4-9 to add more tasks as needed, connect them logically with the workflow template.
11. End Activity
- The End activity is automatically added, marking the workflow completion.
12. Configure Additional Details
- To configure the additional details, click the settings icon next to the Add a Task button:
- Template Description: Add a helpful description for your template.
- Project Number Prefix: Assign unique prefixes based on the template used.
- File Publish Status: Set the default status for files completed with this workflow (e.g., Approved).

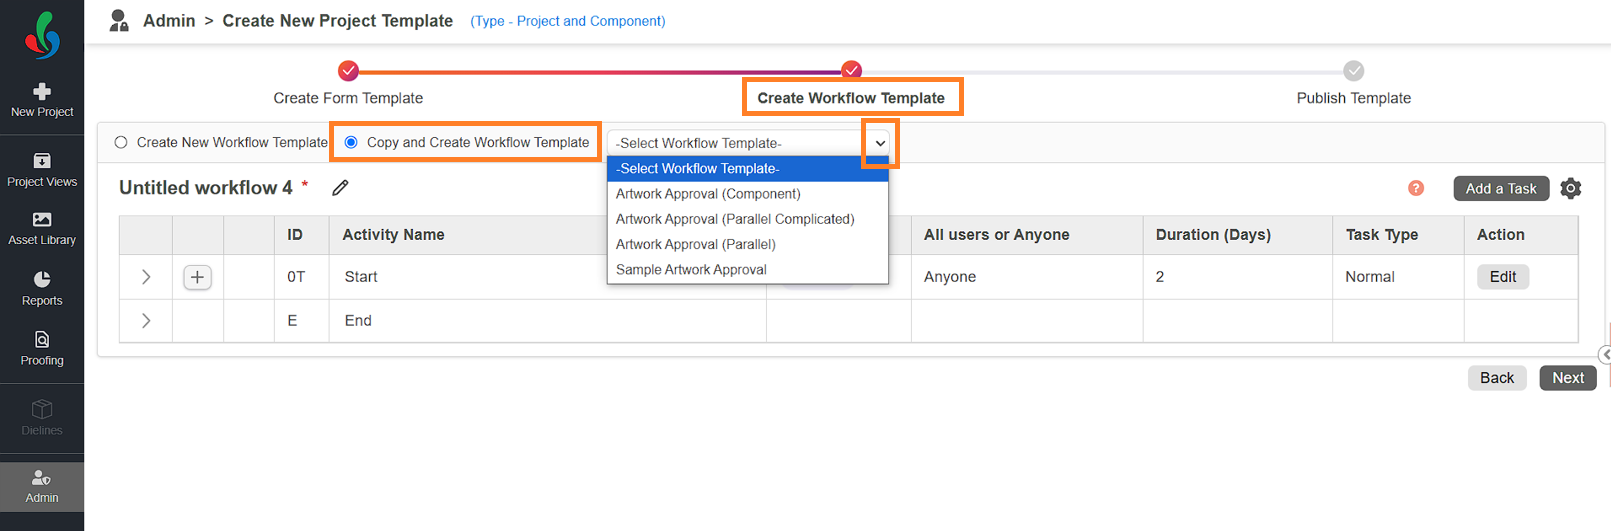
03: Build Your Workflow (Copy and Create Workflow Template Method)
- Select an Existing Template:
- Choose Copy and Create Workflow Template.
- Click Select Workflow Template and choose the template you'd like to modify.
- Customize the Workflow:
- Enter a descriptive name for the new template (e.g., Artwork Approval v2).
- Modify tasks as needed:
- Delete tasks: Click the delete icon associated with the task and confirm deletion.
- Add tasks: Follow the same steps as in Step 03.4. for adding Normal, Decision or Fork tasks.
- Refine Settings (Optional):
- Click the Settings icon to configure additional details:
- Template Description: Provide a helpful overview of the template's purpose.
- Project Number Prefix: Assign unique prefixes for organization.
- File Publish Status: Set the default status for completed files (e.g., Approved).
- Click the Settings icon to configure additional details:
04. Proceed to Publish Template
- Once your workflow is configured, click Next at the bottom right to move on to publishing your project template. If you still need to edit the form, click Back and adjust it as needed before publishing.