Copy Compare
The Copy Compare tool allows you to compare and verify collected copy content against the artwork in the Web Viewer.
 | Important Considerations
|
How to Copy Compare an Artwork
Follow these steps to compare and verify copy content with an artwork.
01. Open the Artwork in Web Viewer
- Sign in to your ManageArtworks account.
- You can open the artwork in the Web Viewer using one of the following methods:
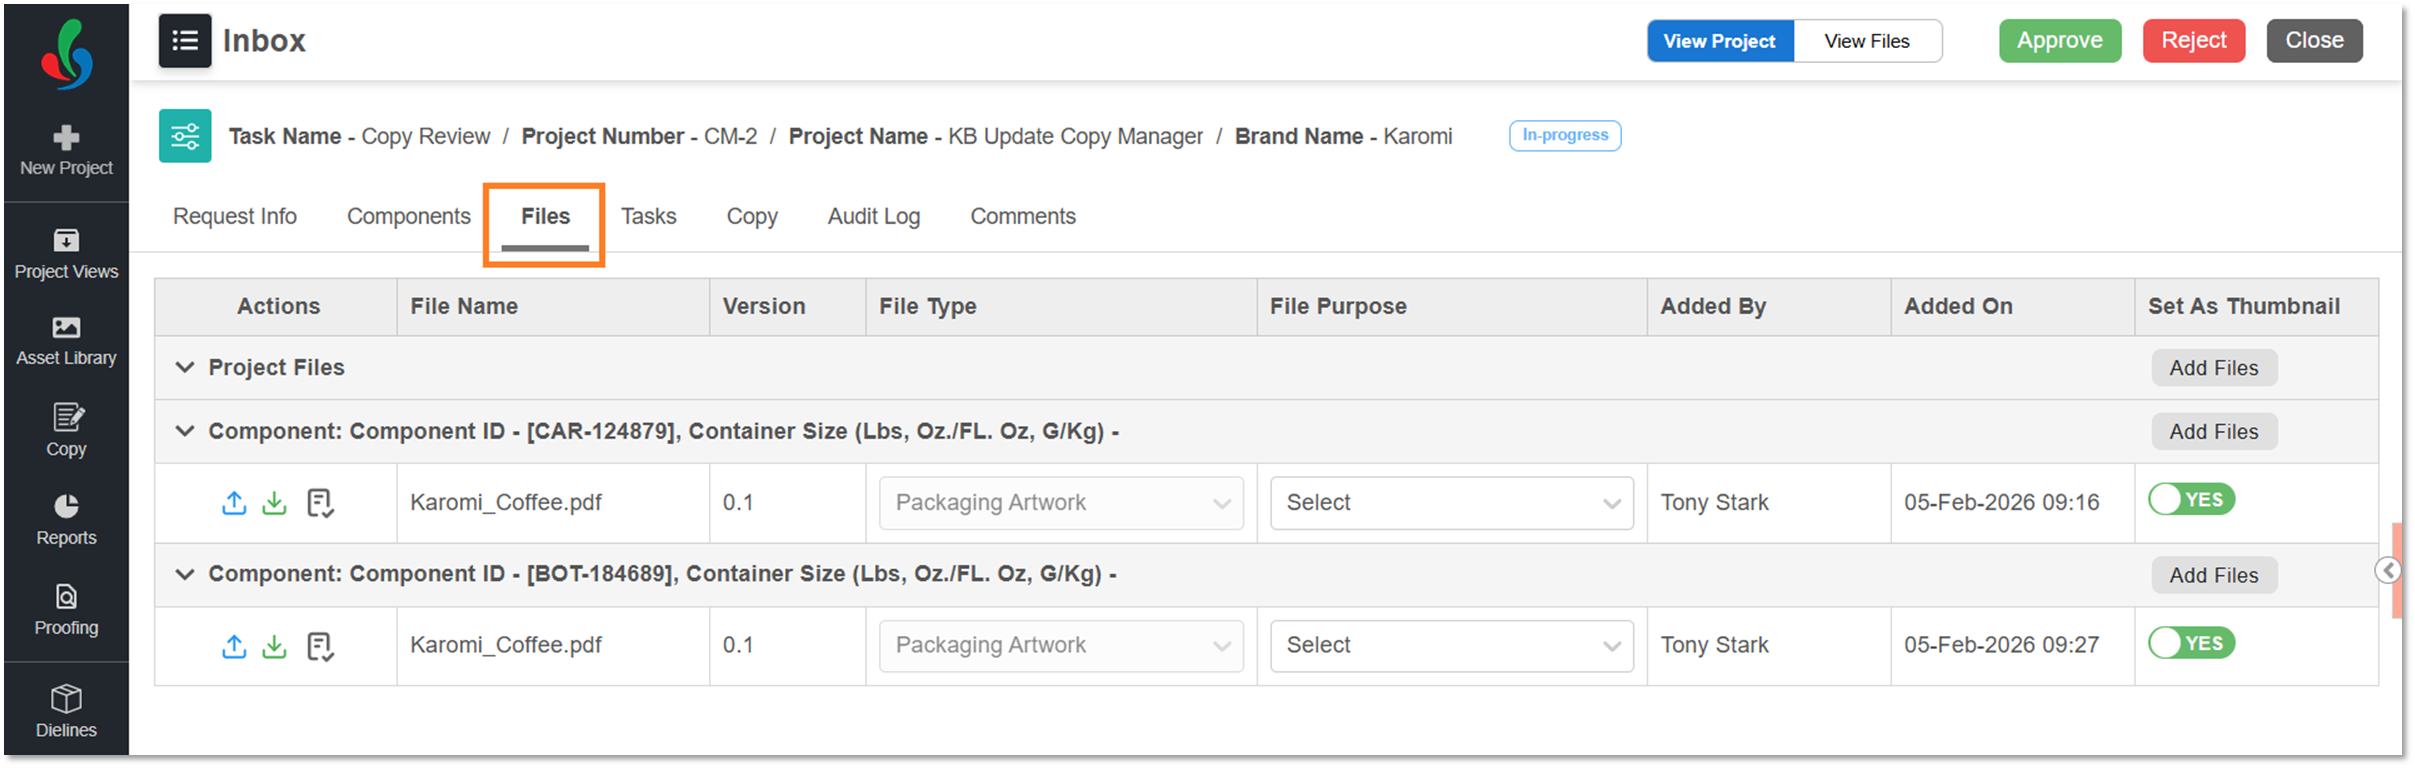
- From Project (Files Tab):
- Navigate to Project Views.
- Select the required project or task from any view (for example, Inbox, In Progress).
- Select the Files tab.
- Select the required artwork file. The file opens in the Web Viewer.
- From Copy Module:
- Hover over the Copy module.
- Select Copy Published.
- Select the required copy component.
- From the Links drop-down menu, select Asset Link. The linked artwork file opens in the Web Viewer.
- From Project (Files Tab):


02. Launch Copy Compare
- In the Web Viewer, select the Copy Compare tool from the left panel.
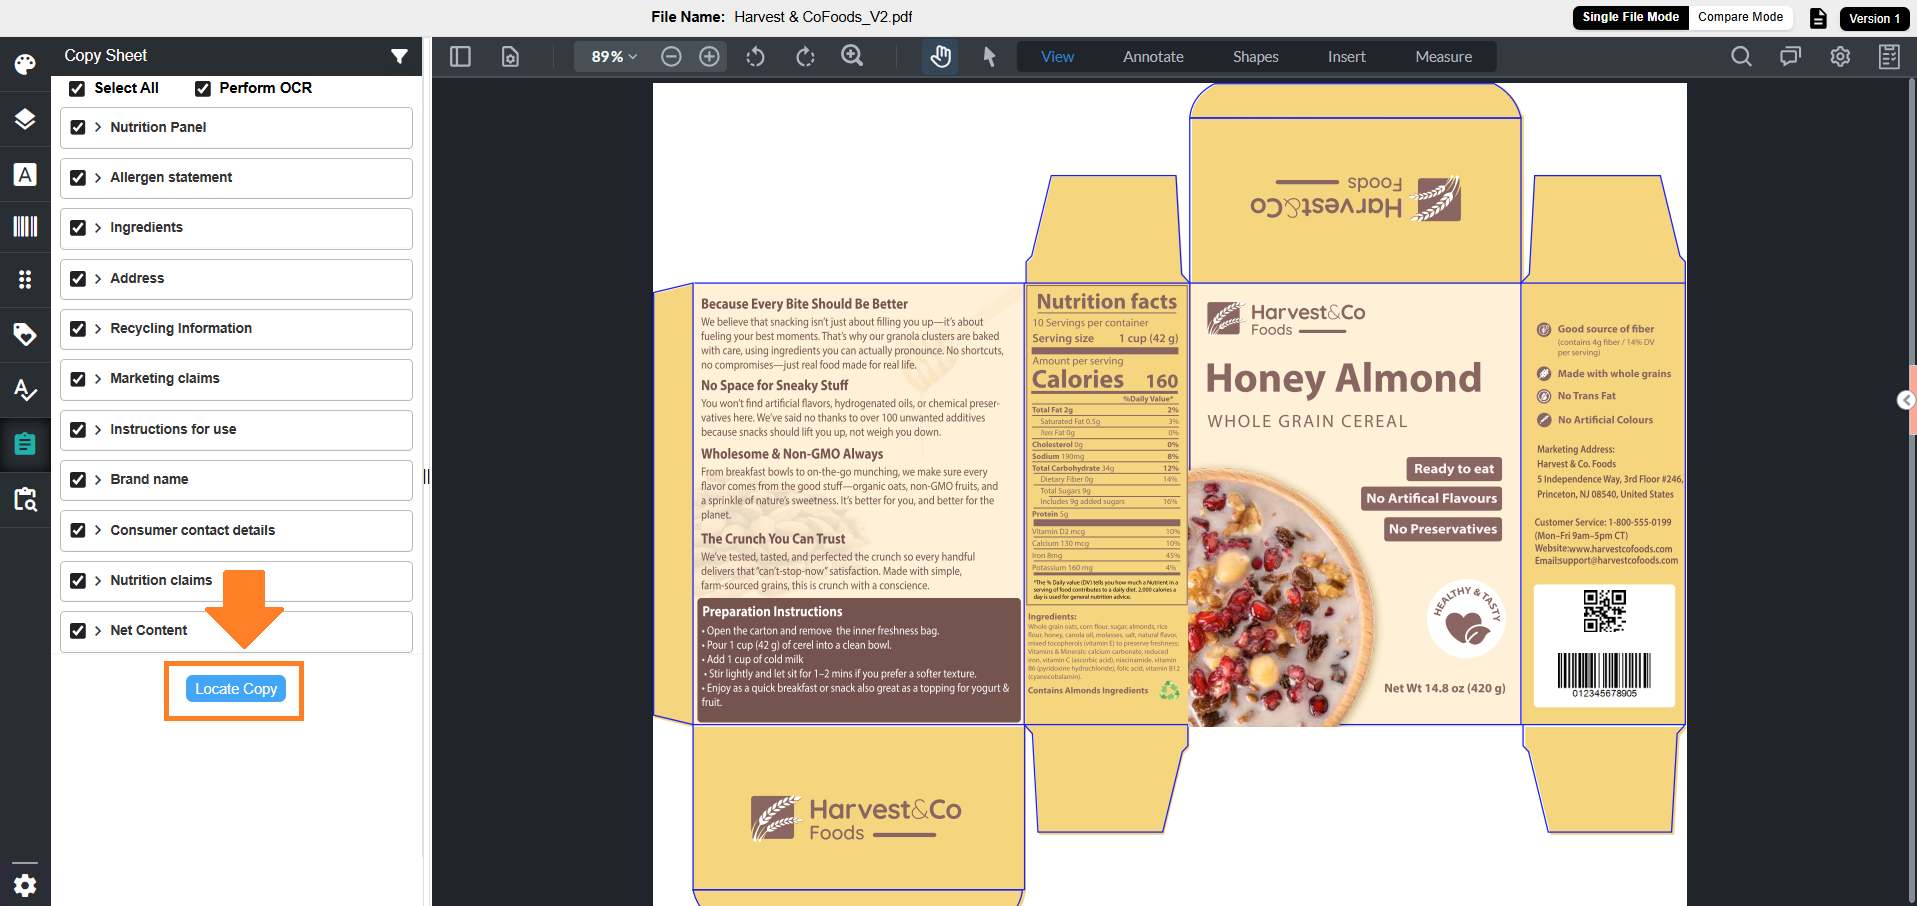
- The Copy Sheet panel is displayed, listing all copy elements associated with the project.
 | Note: If no copy elements are available, or the file is opened from a non–copy-integrated project, the Copy Compare tool is visible but not functional. On selecting the tool, the system displays a “Copy Sheet data not found” message. |

03. Filtering Copy Elements (Optional)
- You can filter copy elements by element name or language using the Filter icon available at the top-right corner of the panel.
- Group by Element (selected by default): Displays copy elements grouped by element name.
- Group by Language: Displays copy elements grouped by language.
- When Group by Language is selected, a language selection drop-down is displayed.
- You can select only one language at a time from the available languages.
Note: If no language is selected, copy elements are not filtered by language and continue to follow the default grouping behavior. - Only copy elements associated with the selected language are displayed in the Copy Sheet panel.
- When Group by Language is selected, a language selection drop-down is displayed.


04. Select Copy Elements for Comparison
- By default, all copy elements are selected.
- You can:
- Select or deselect individual copy elements as desired using the checkbox next to each element.
- Select or unselect all elements using the Select All checkbox.

05. Enable or Disable OCR
OCR (Optical Character Recognition) allows you to compare text in the artwork that is not directly selectable, such as curved or outlined text.
To enable or disable OCR:
- Select the Is OCR Needed? checkbox
Note: This option is selected by default. - When enabled, the system uses OCR to detect and compare text that is:
- Curved
- Outlined
- Not live or directly selectable
- If you are comparing only live (selectable) text, you can uncheck the Is OCR Needed? checkbox to disable OCR.

06. Locate Copy Elements in Artwork
After selecting the required copy elements and configuring the OCR option, locate the copy elements in the artwork.
- Select Locate Copy.
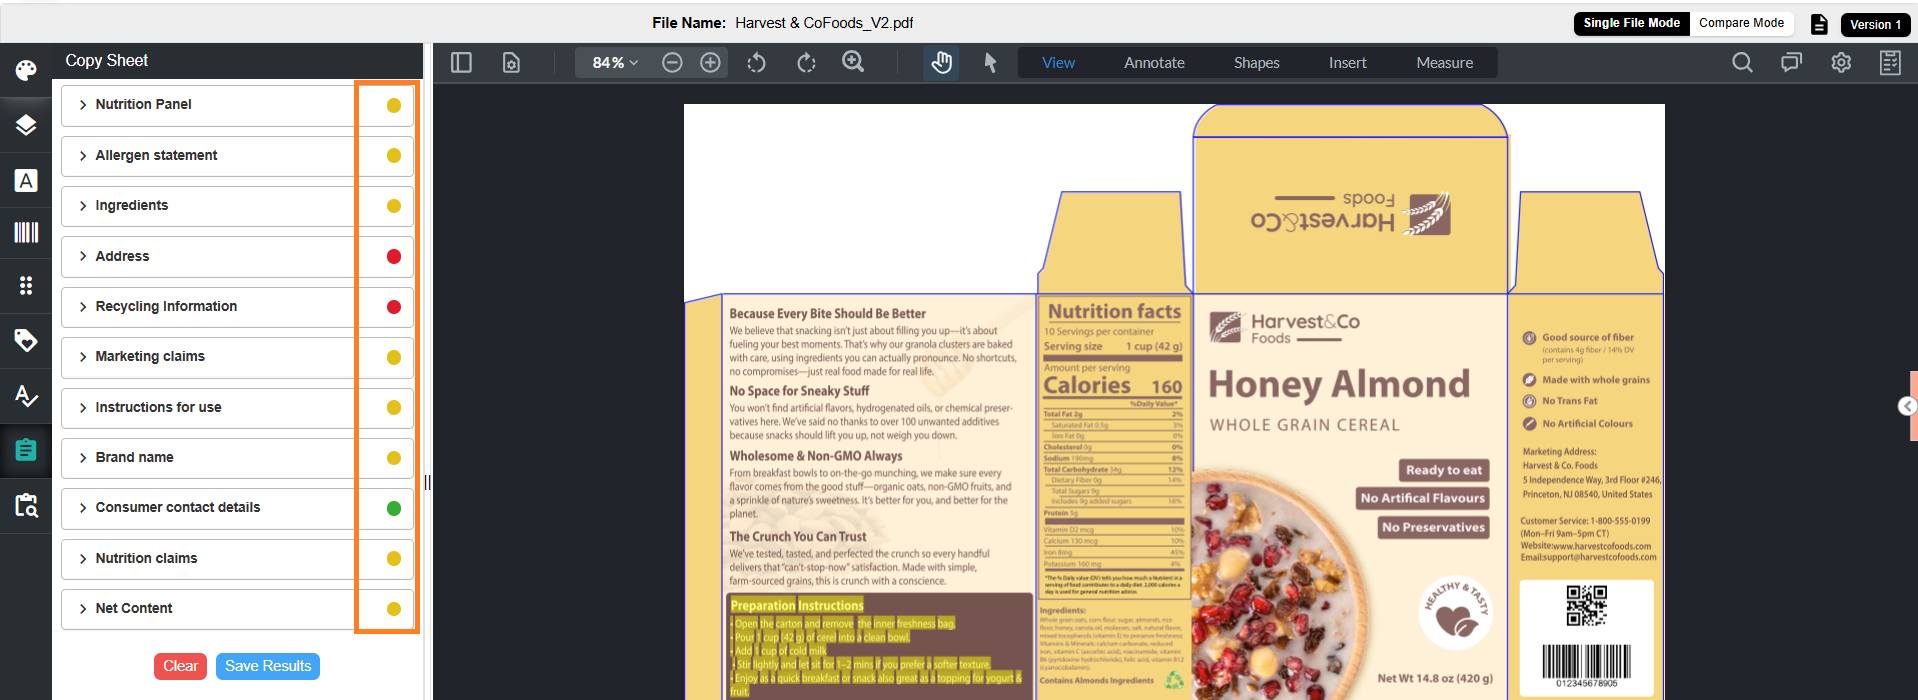
07. Review Detected Copy Elements
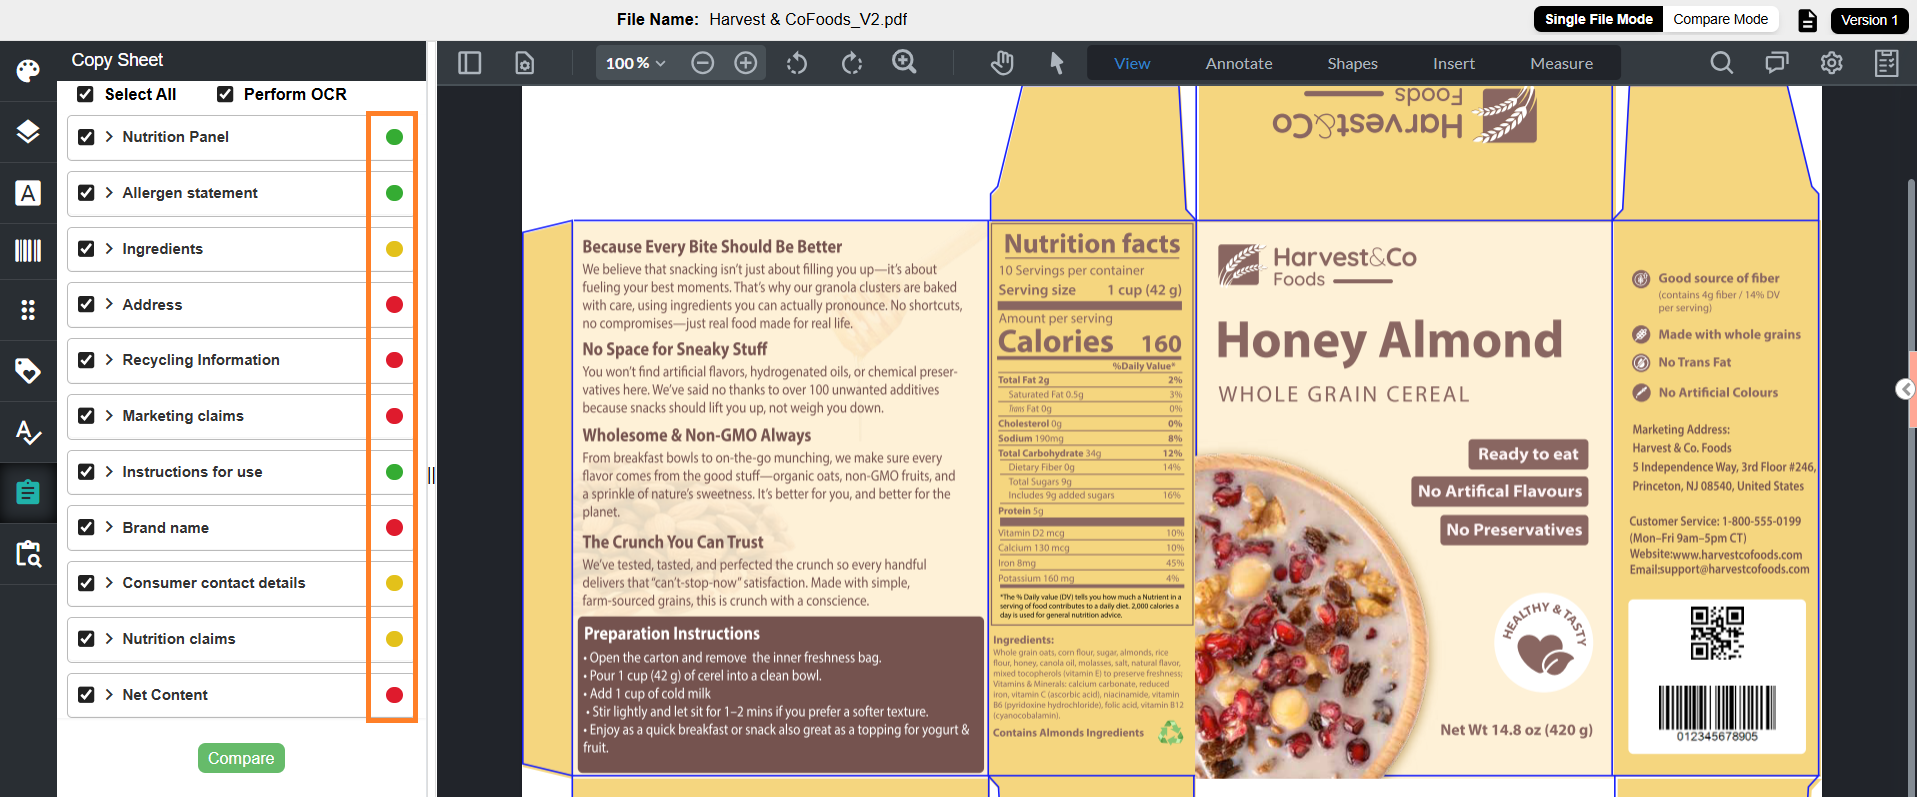
After selecting Locate Copy, the system analyzes the artwork and displays the identified copy locations in the Copy Sheet panel.
1. Status Indicators
Each copy element is displayed with a status indicator:
- Green – Element is present in the artwork
- Red – Element is not present in the artwork
- Orange – Some artwork text occurrences match the copy text, while others have differences.
| Note: Copy Compare is not supported for image-based elements (for example, barcodes). These elements are not identified by the system, and you cannot add locations or compare them against the artwork. |
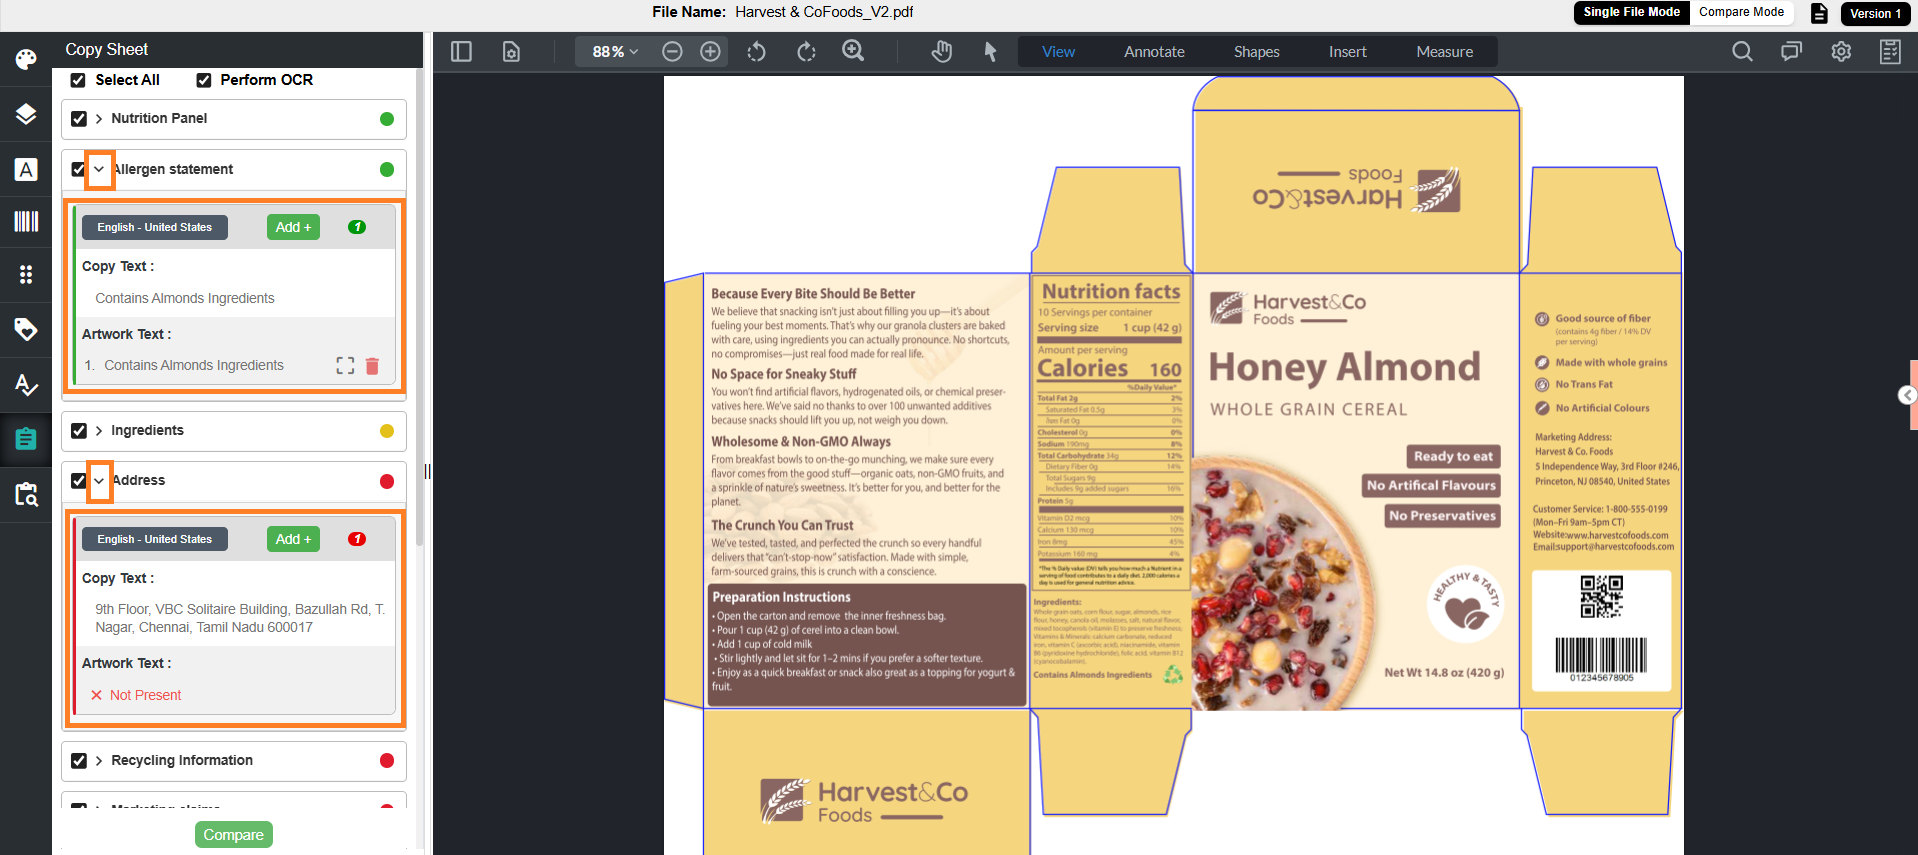
2. View Element Details
Each copy element includes a toggle control.
- Select the toggle to expand the element.
- The system displays detailed information, including:
- Associated language
- One or more language-specific sections (if available)
- For each language, the following details are shown:
- Copy Text – Displays the value configured in the Copy tab
- Artwork Text – Displays the text detected in the artwork corresponding to the copy element.
- If the copy text is detected multiple times in the artwork, each occurrence is listed separately.
- If the copy element is not detected in the artwork, the system displays “Not Present”.
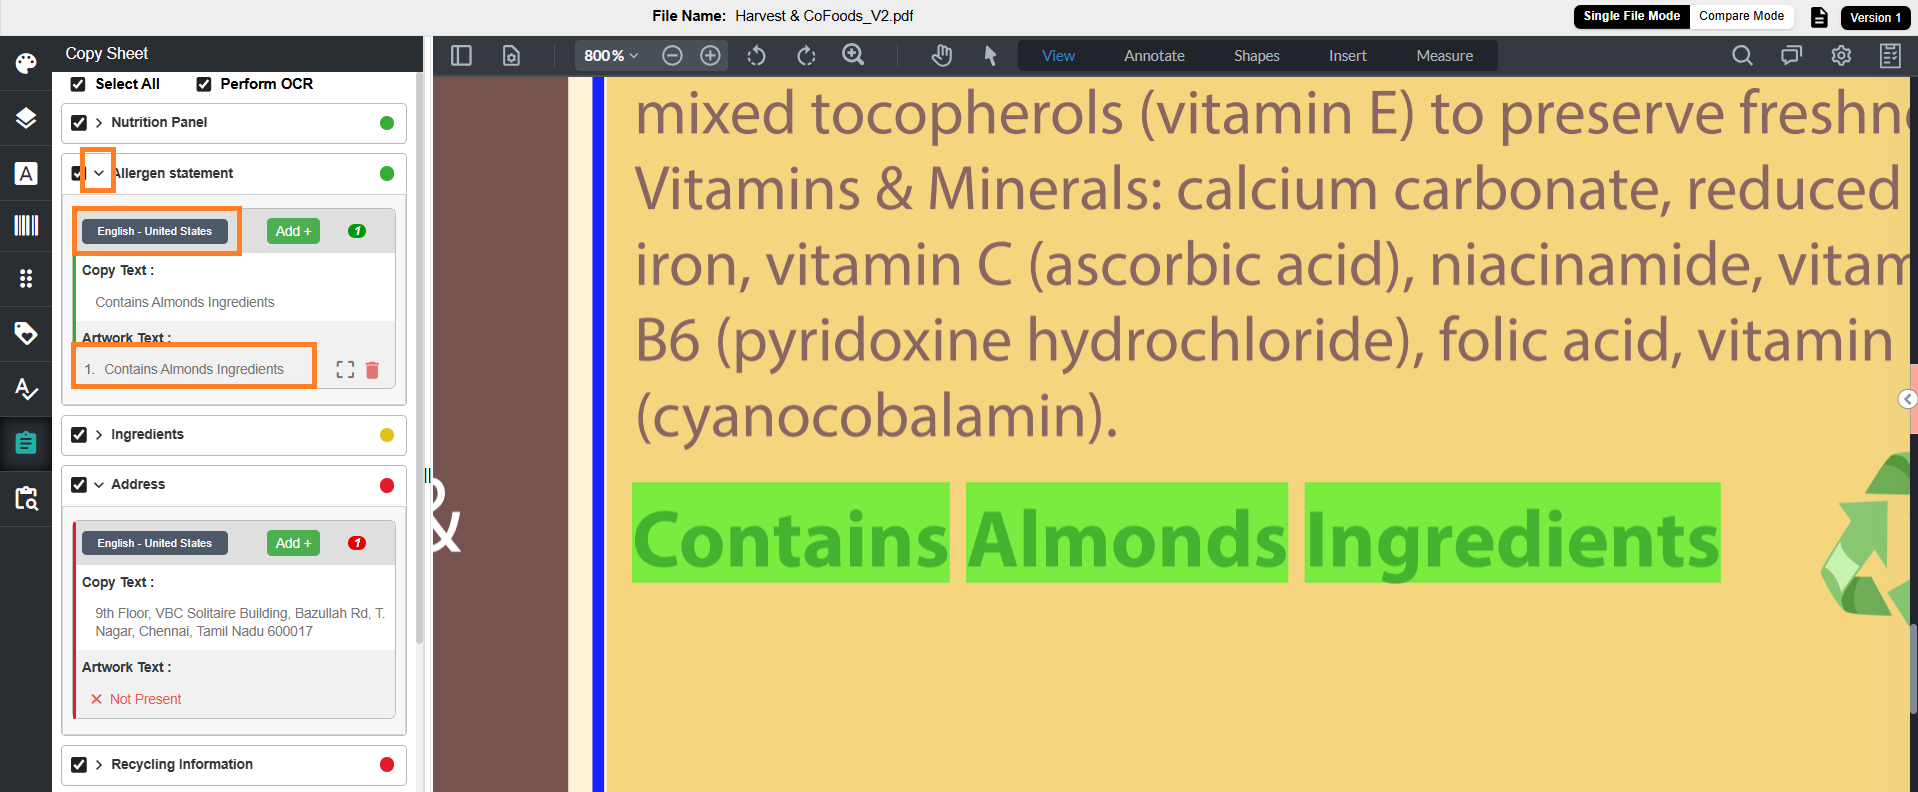
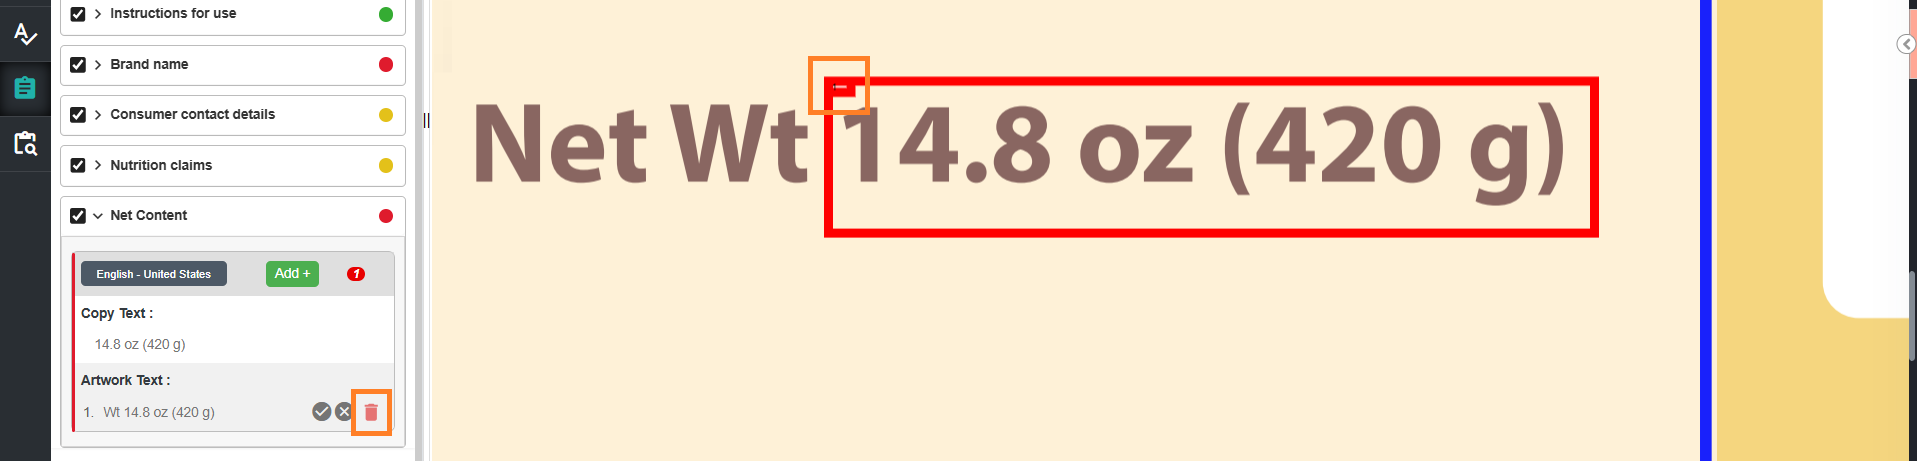
3. Review and/or Refine Detected Occurrence
To verify a detected occurrence:
- Select the toggle for required element to expand it.
- Select an Artwork Text entry or the associated language. The corresponding region is highlighted in the artwork.
Note: If the copy text is detected multiple times, each occurrence is listed separately. If the copy element is not detected, the system displays Not Present.
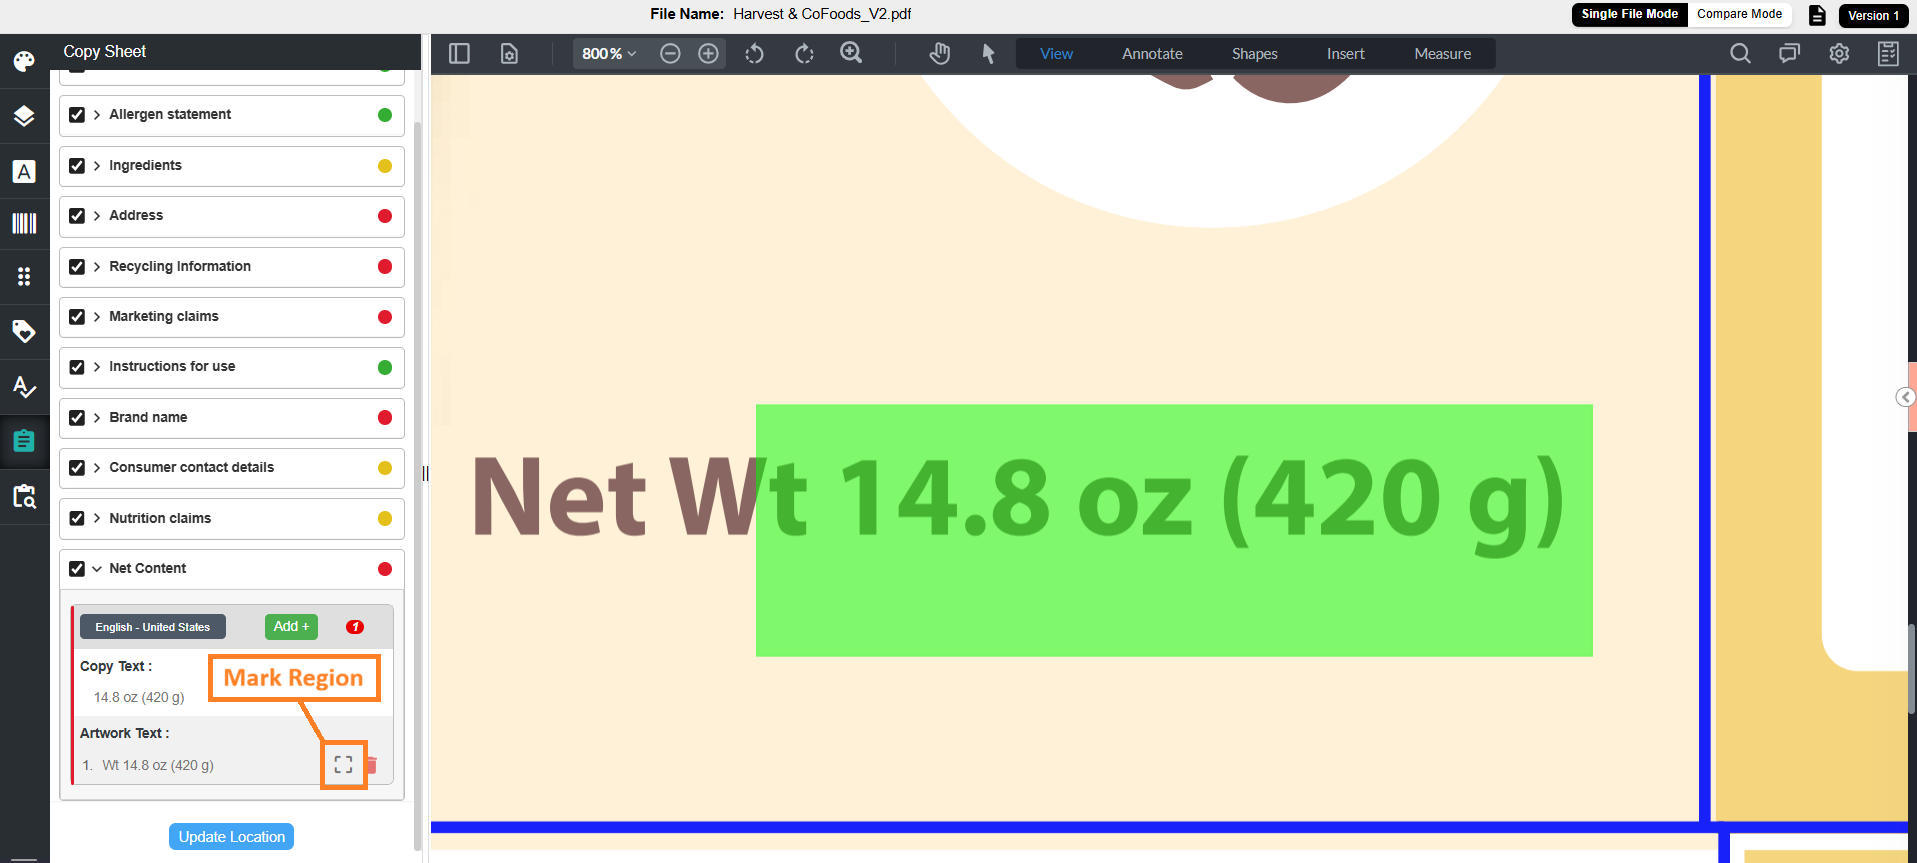
- If the detected location or artwork text occurrence is incorrect:
- Select Mark Region.
- Draw a bounding box around the correct area in the artwork.
- Select Crop Marked Region to save the updated location.
- To remove the incorrect detected artwork text occurrence, select the delete icon associated with it.
- Select Mark Region.
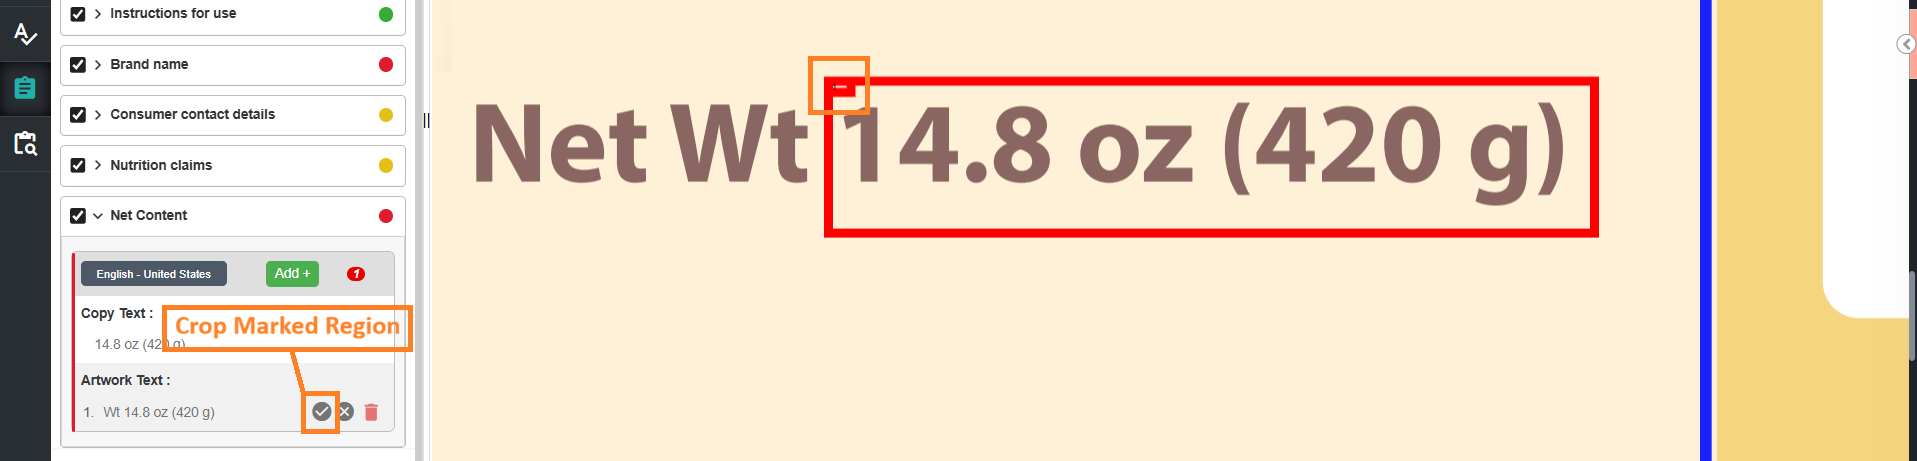
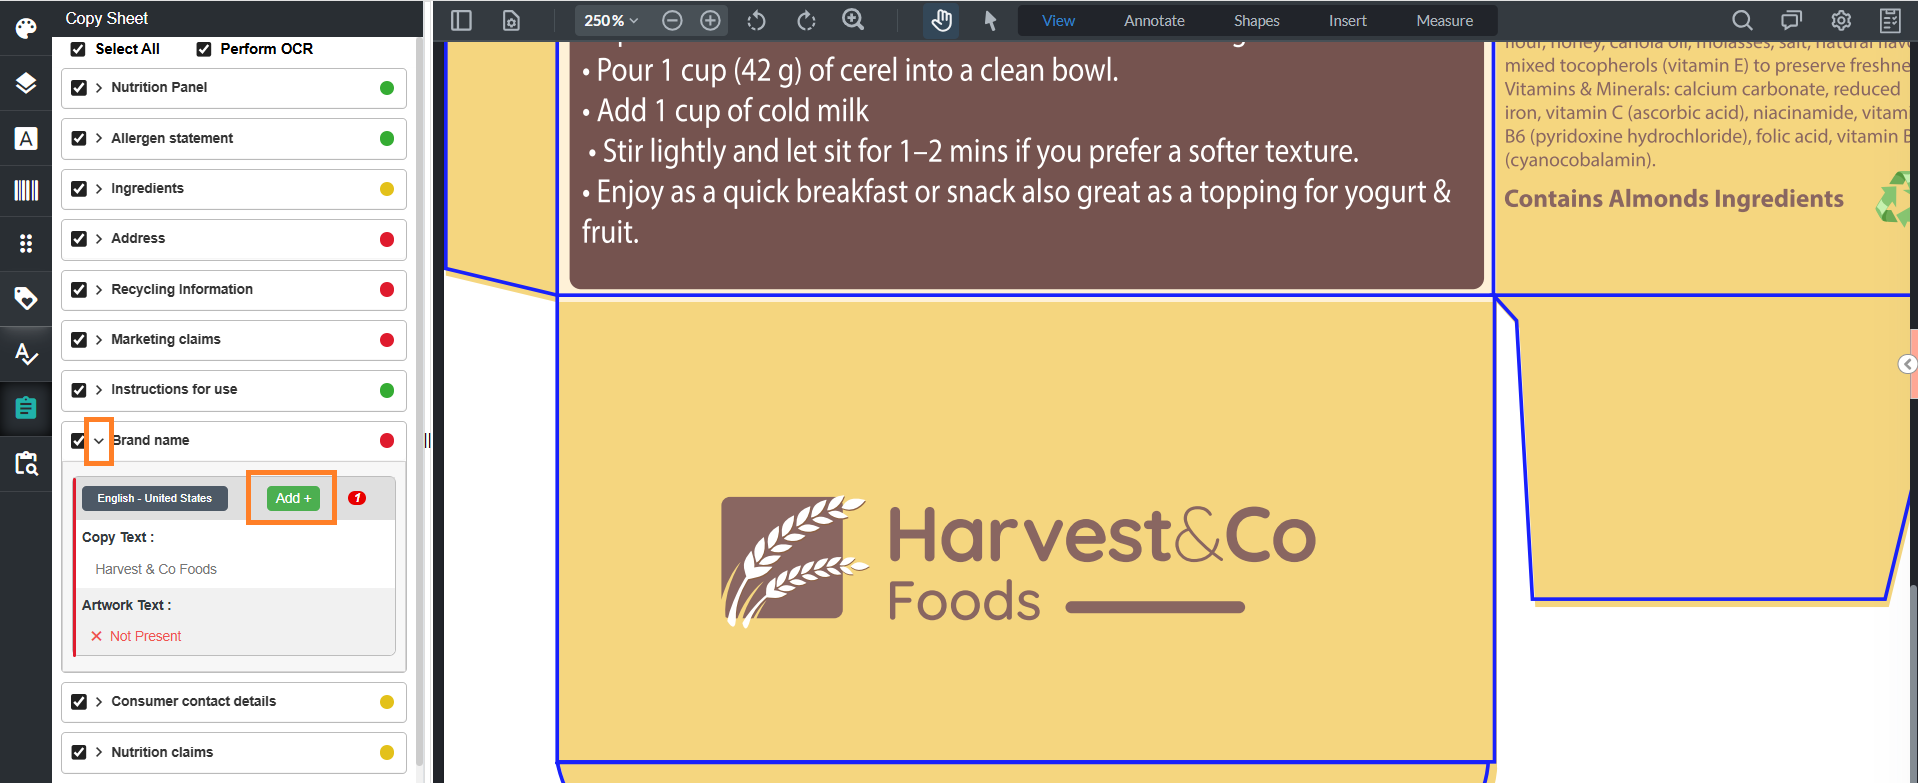
4. Add Missing Locations
If the system does not detect a valid location:
- Select the toggle associated with the required element to expand the element.
- Select Add (+) next to the element language.
- Draw a bounding box on the artwork.
- Select Crop Marked Region.
- The new occurrence is added under Artwork Text.
- You can add multiple occurrences for a single copy element if it appears in multiple locations in the artwork.

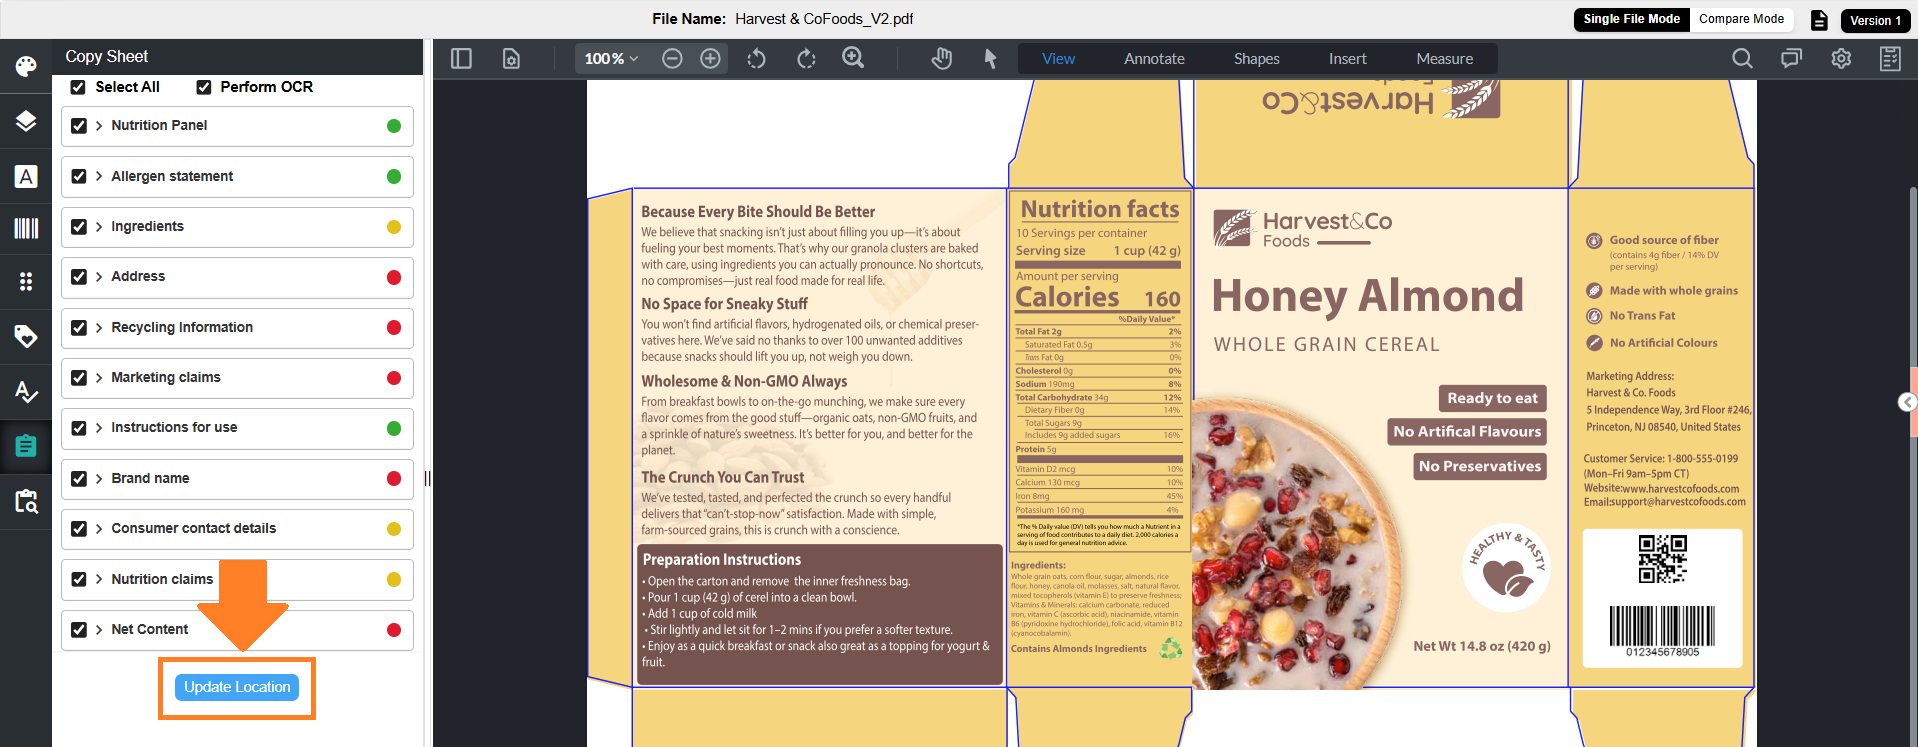
5. Update Location
After completing all refinements or adding missing artwork text occurrences:
- Select Update Location.
- The system updates the detected locations.
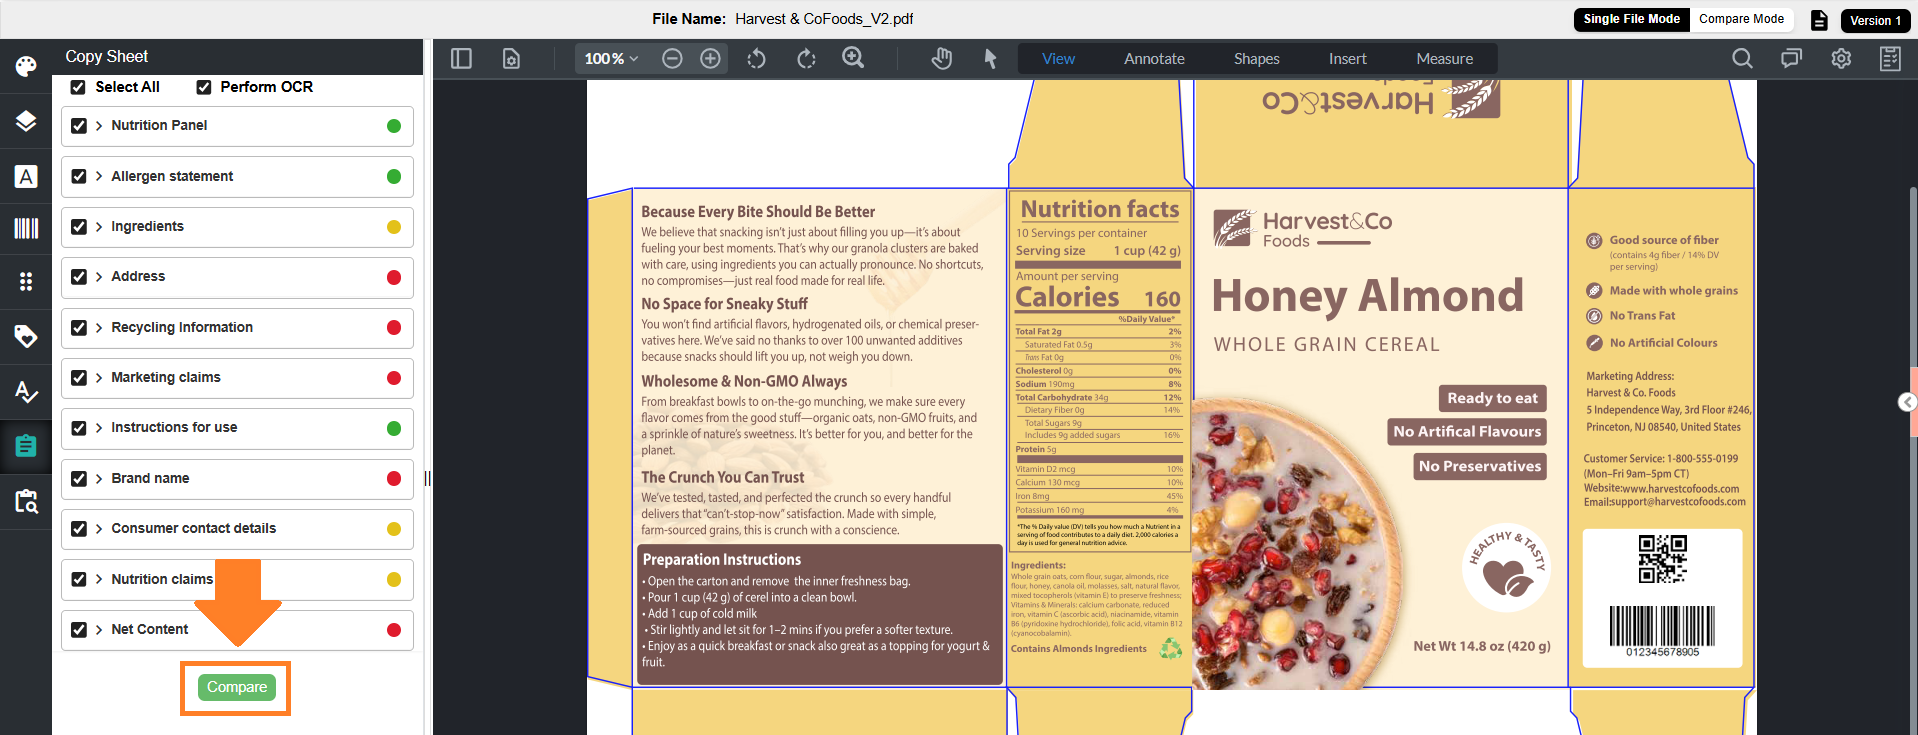
08. Initiate Comparison
After verifying and refining all copy elements and their corresponding artwork locations:
- Select Compare at the bottom of the Copy Compare panel.
- The system initiates the comparison using the validated locations.
09. View Comparison Results
After the comparison is completed, the system displays results using color-coded indicators in the Copy Sheet panel.
1. Result Indicators (Element Level)
Each copy element displays an overall status:
- Green – All artwork text occurrences match the copy text
- Orange – Some occurrences match, while others have differences
- Red – No occurrences match the copy text
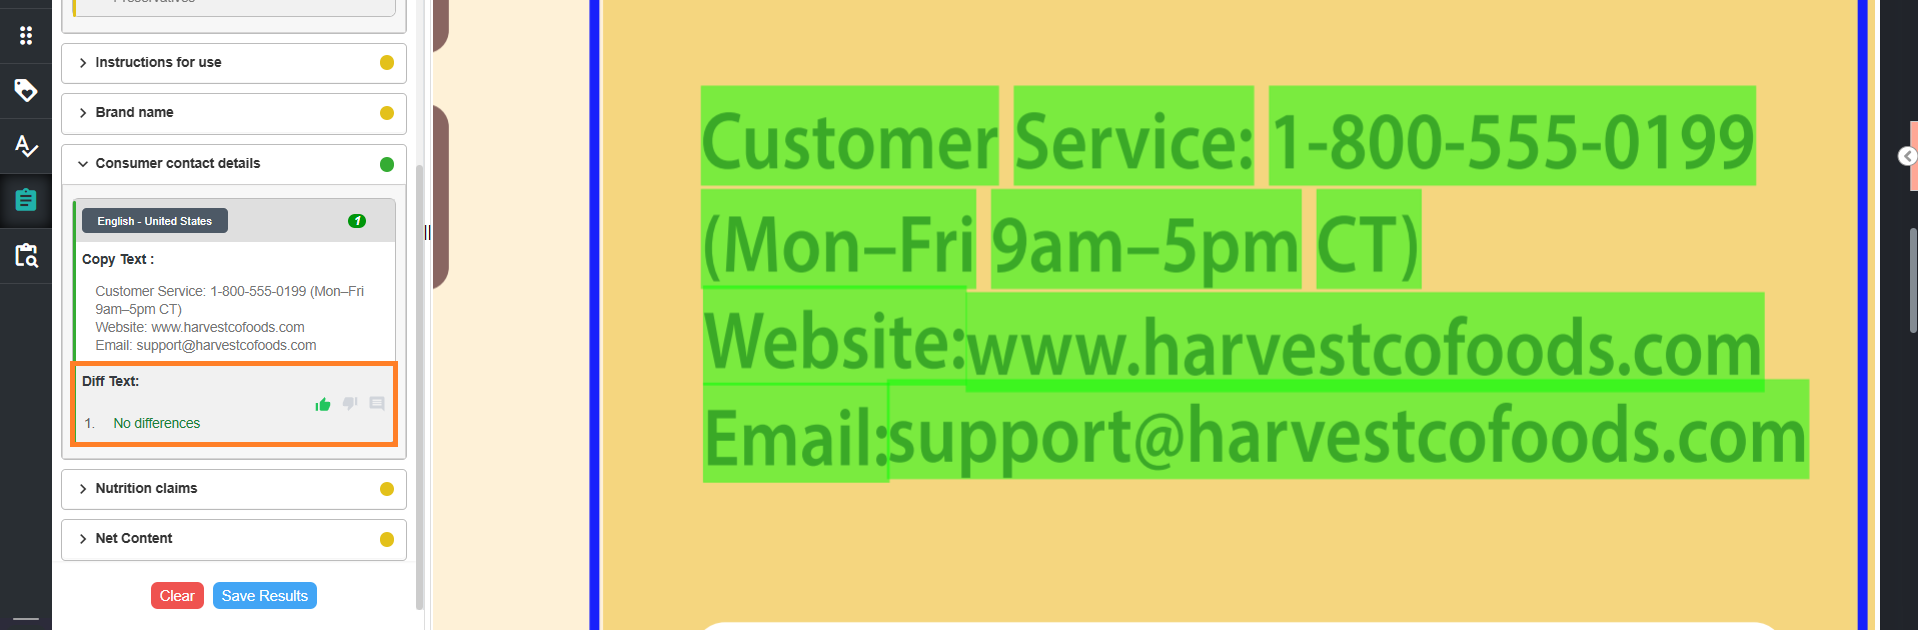
2. View Detailed Results
- Select the toggle for the required element to expand it.
- The system displays:
- Associated language(s)
- One or more language-specific sections (if available)
- For each language, the following sections are shown:
- Copy Text – Displays the value configured in the Copy tab
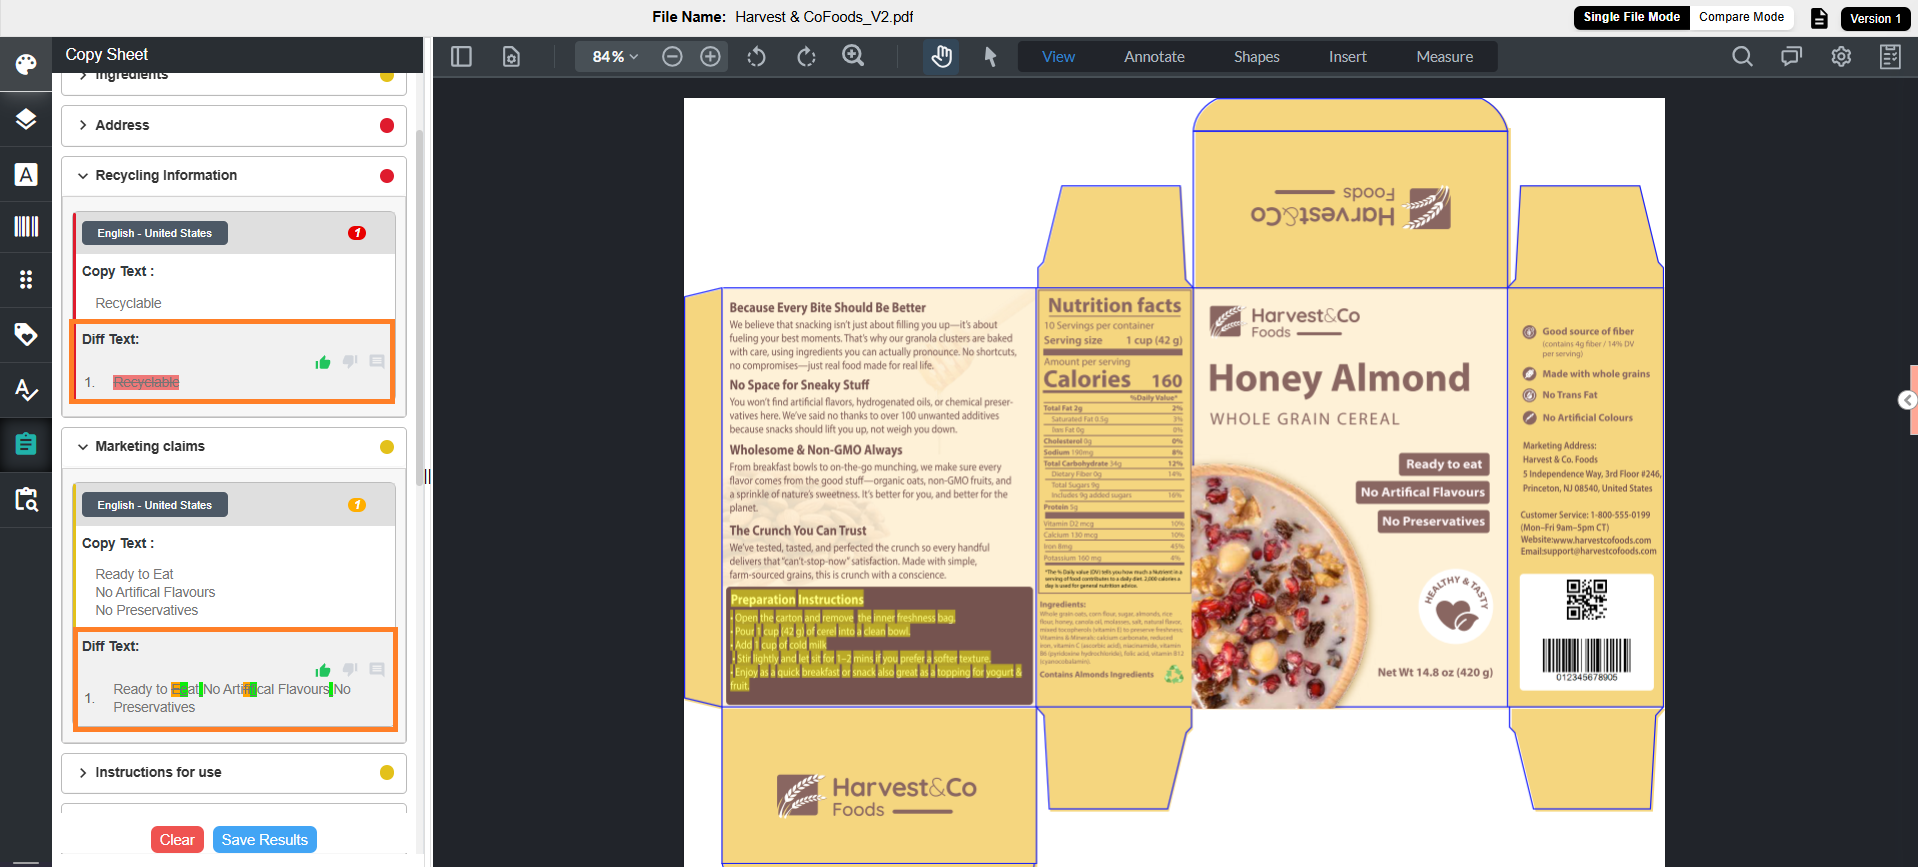
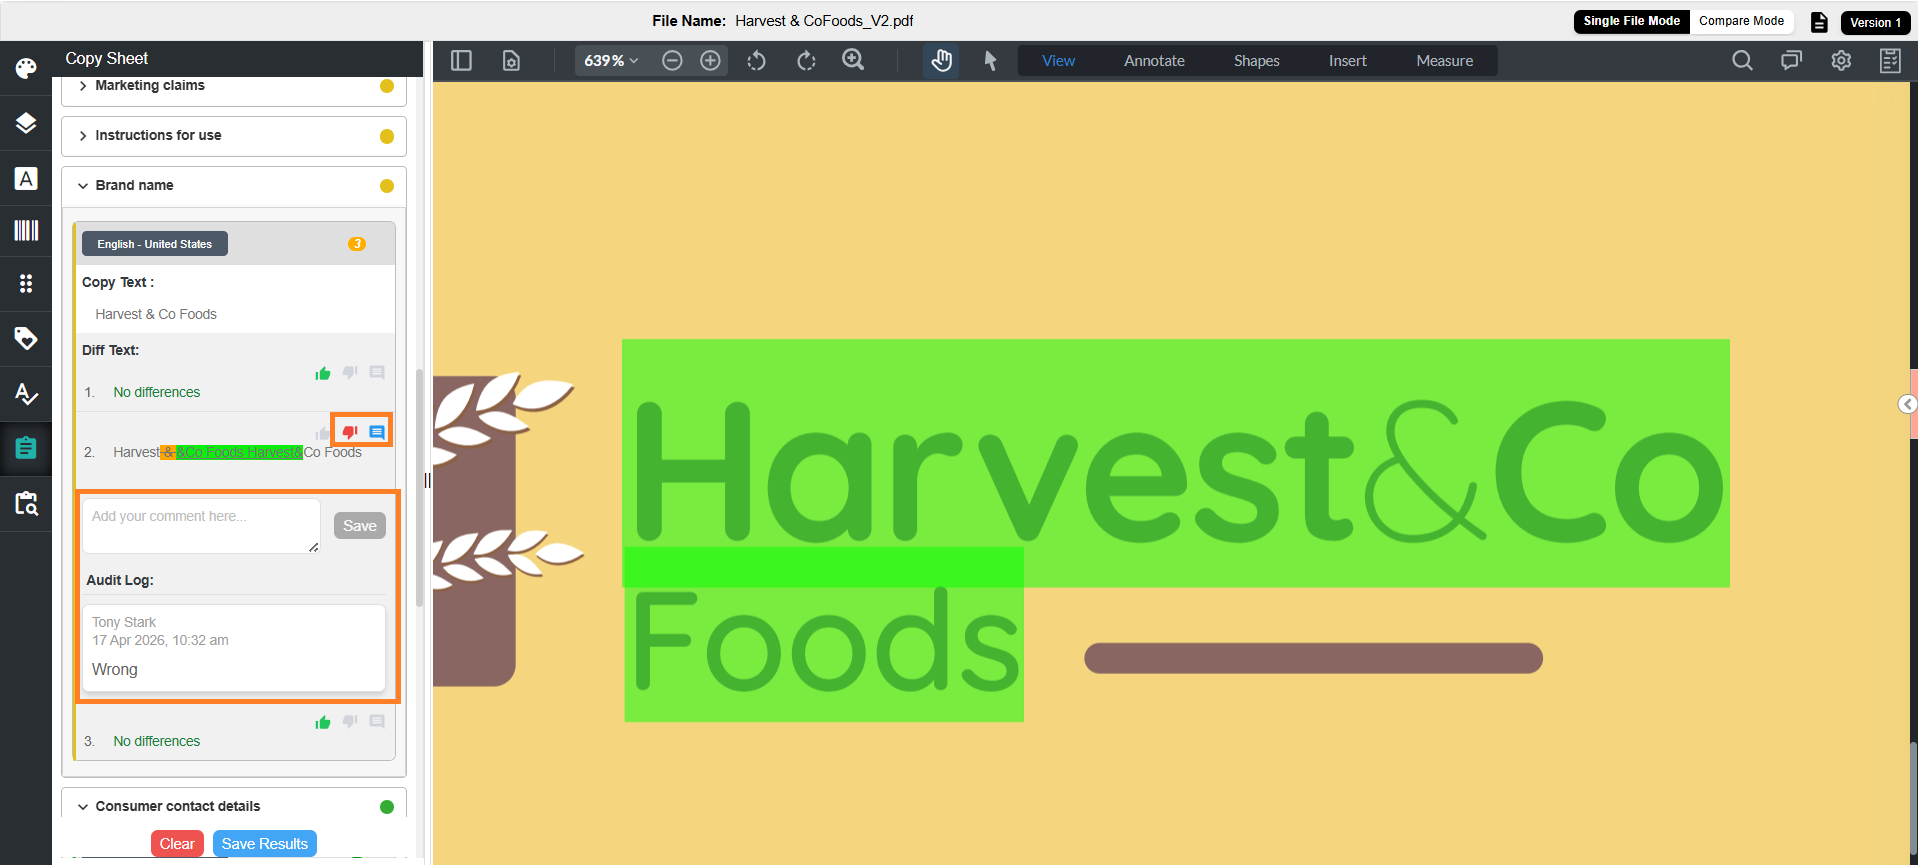
- Diff Text – Displays the comparison between copy text and artwork text with color-coded indicators
- Green – Artwork text matches the copy text
- Orange – Artwork text is present but contains differences
- Red – Copy text is not present in the artwork
- If no differences are found - the system displays No difference in green under Diff Text section.
- If the text is not available - the system displays copy text with red strikethrough.
- If differences are found - the differing text is highlighted in orange along with indicators for matching text.
- Each detected artwork text occurrence generates a corresponding Diff Text entry.
- If three artwork text occurrences are identified during the Locate Copy step, three Diff Text entries are displayed for that element.
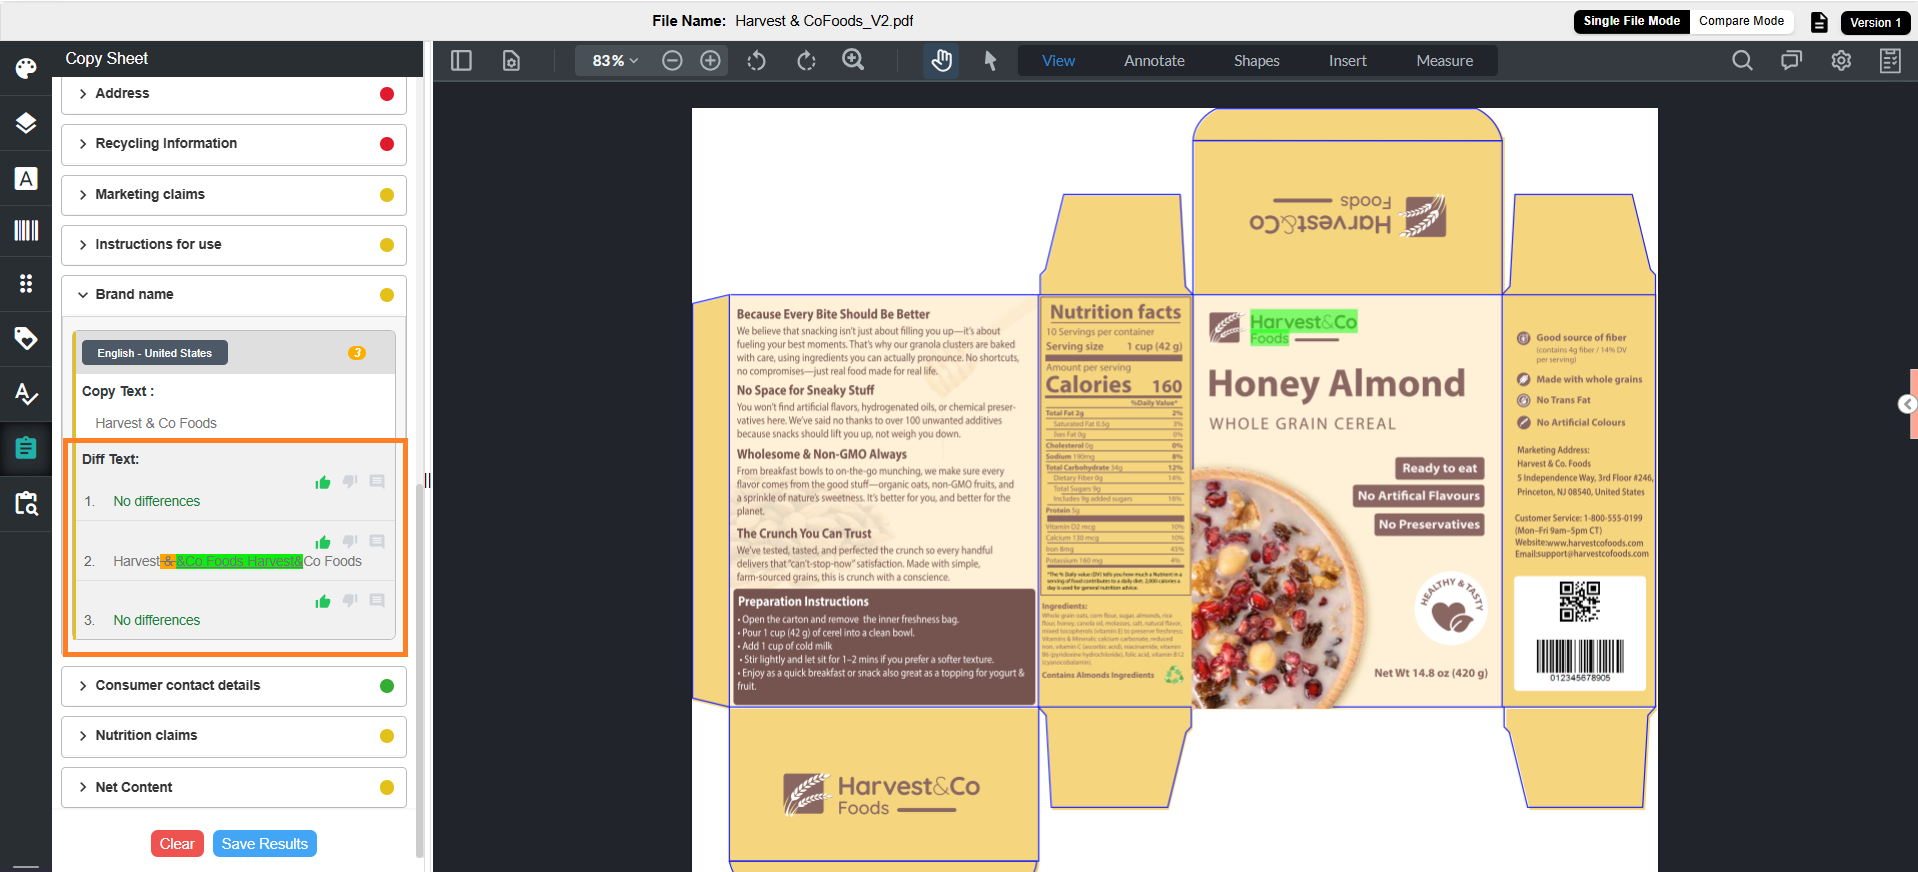
010. Validate Results and Add Comments (Optional)
After reviewing the comparison results, validate the findings and add comments if required.
- Review each Diff Text occurrence.
- Each Diff Text occurrence includes Thumbs Up and Thumbs Down options:
Note: Thumbs Up is selected by default.
- Select Thumbs Down to mark the result as incorrect.
- Enter the reason in the comment box displayed.
- To add a comment without changing validation:
- Select the comment icon for the required Diff Text occurrence.
- Enter your comment.
- Select Save.
Note:
|

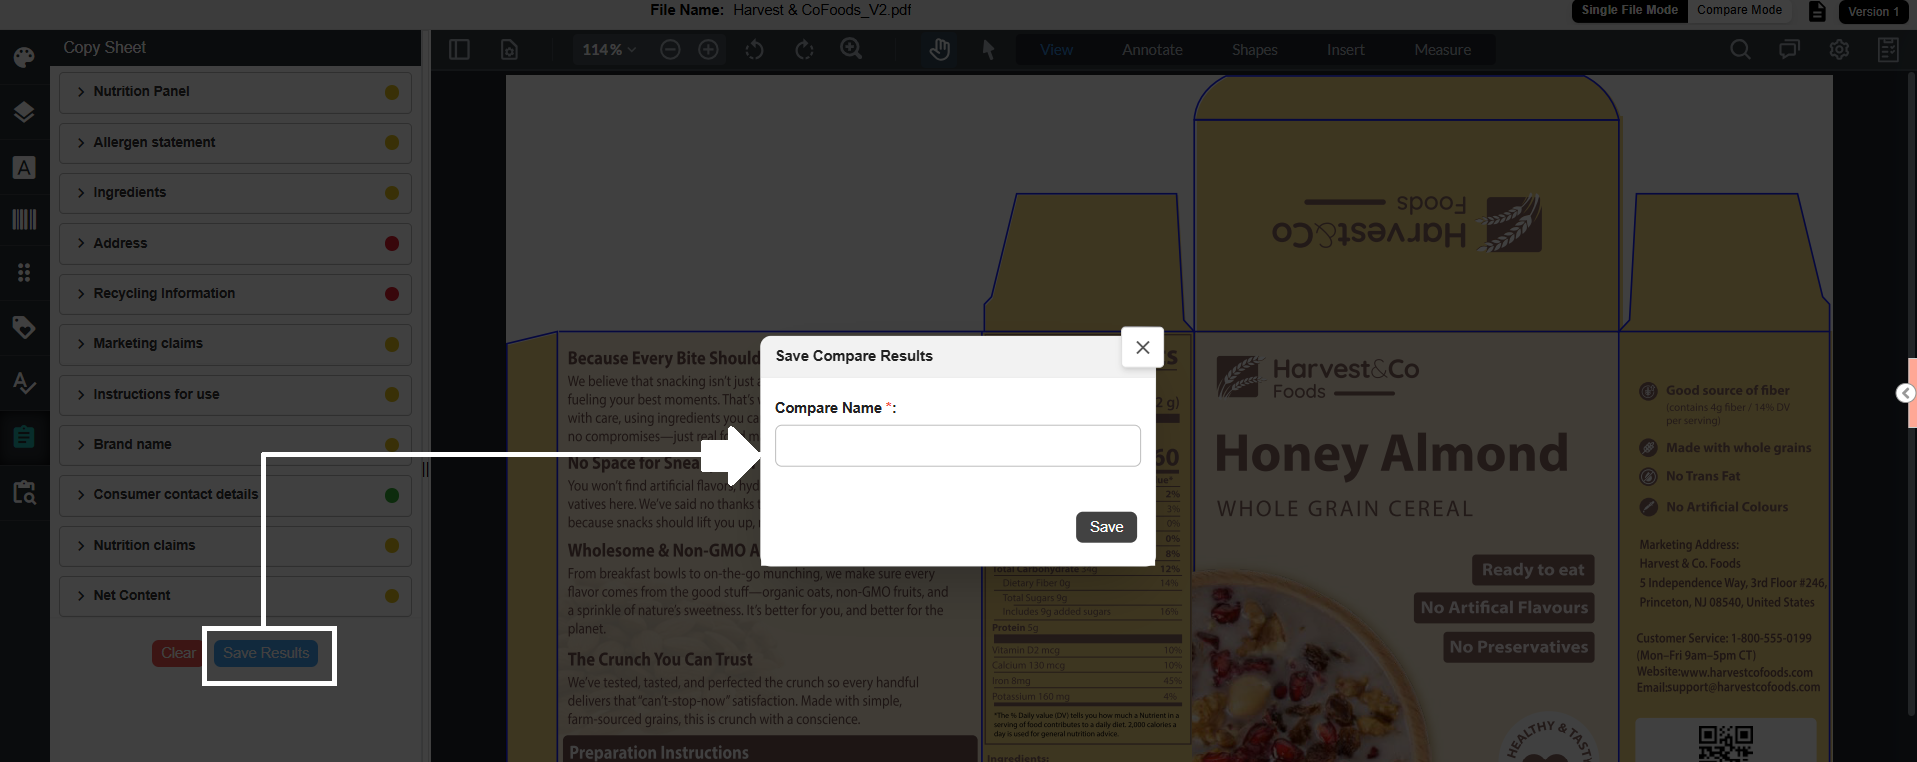
011. Save and Share Comparison Result (Optional)
Once you are satisfied with the comparison results, you can save and share them for future reference or collaboration.
Save Comparison Results
- Select Save Results at the bottom of the Copy Compare panel. The Save Compare Results dialog is displayed.
- Enter a unique name in the Compare Name field.
Note: Duplicate names are not allowed. - Select Save to store the results.
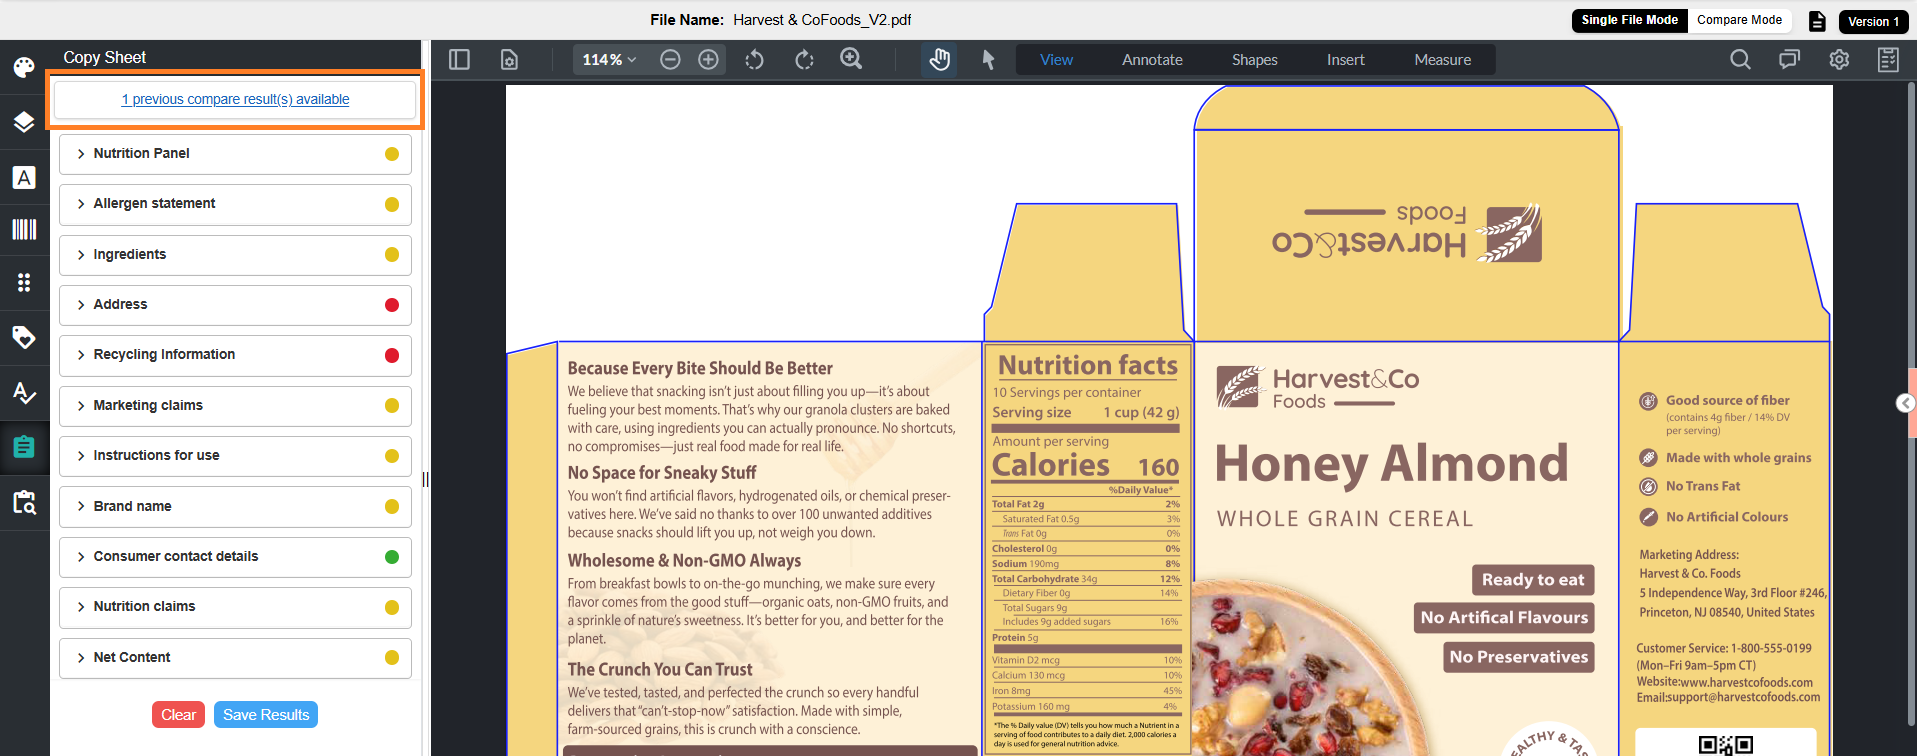
Access Saved Comparison Results
After saving comparison results, access them as follows:
- Locate the link at the top of the Copy Compare panel:
“X previous compare result(s) available” - Select the link to view saved comparison results.
Note:
|
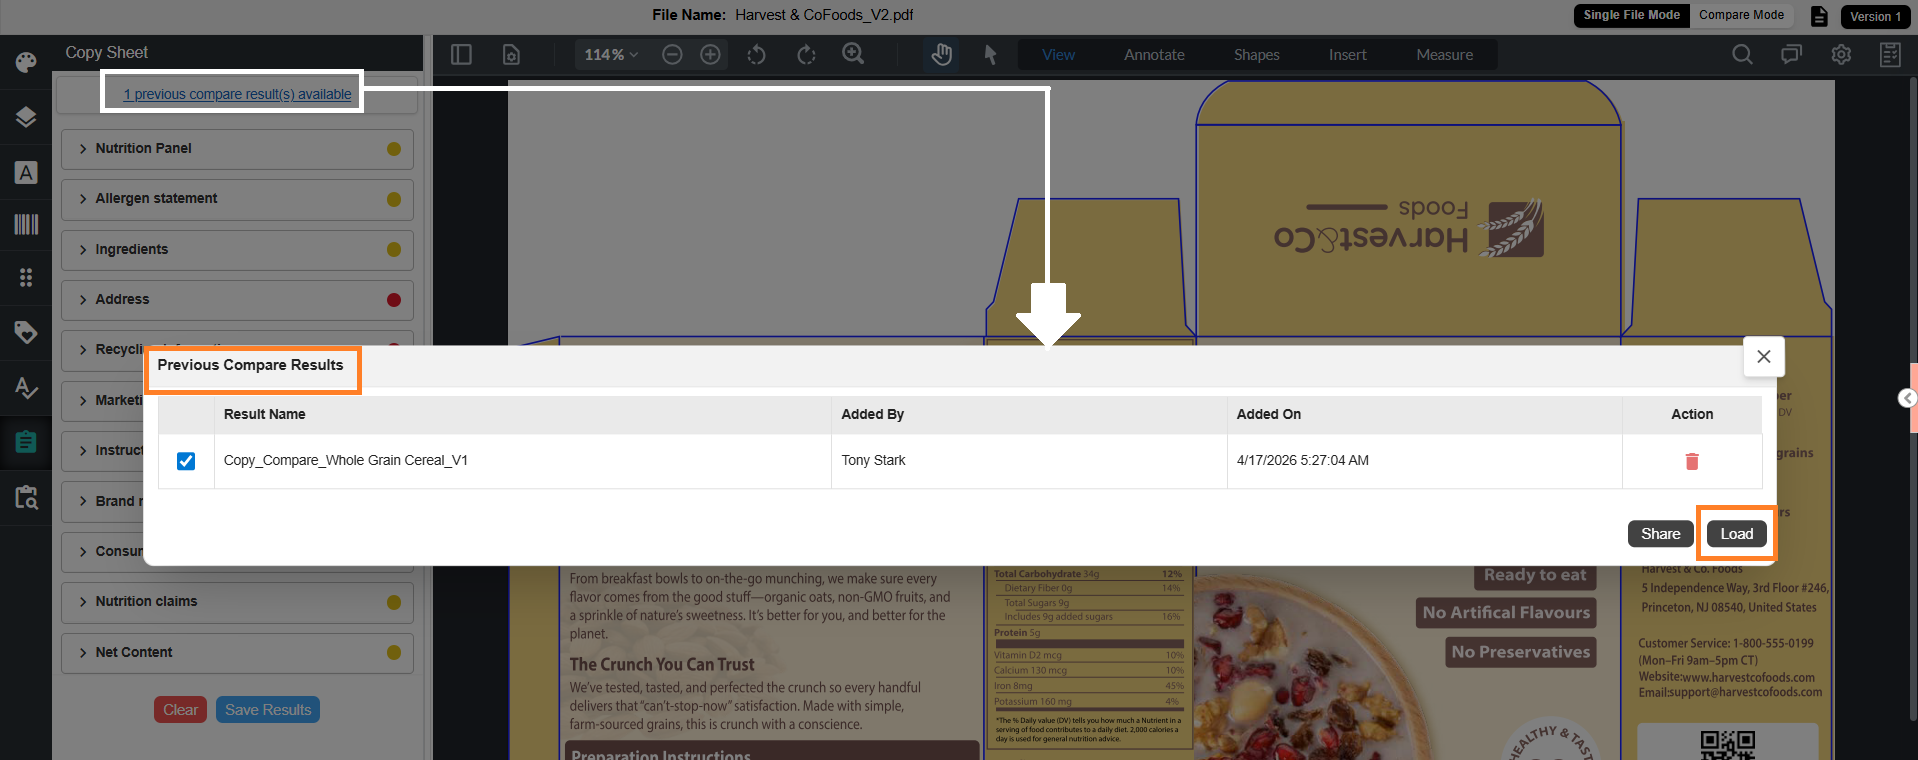
View Saved Comparison Results
- Select “X previous compare result(s) available”. The Previous Compare Results dialog is displayed with saved results.
- Select the required result.
- Select Load to load the result.
Note: Only one result can be loaded at a time.
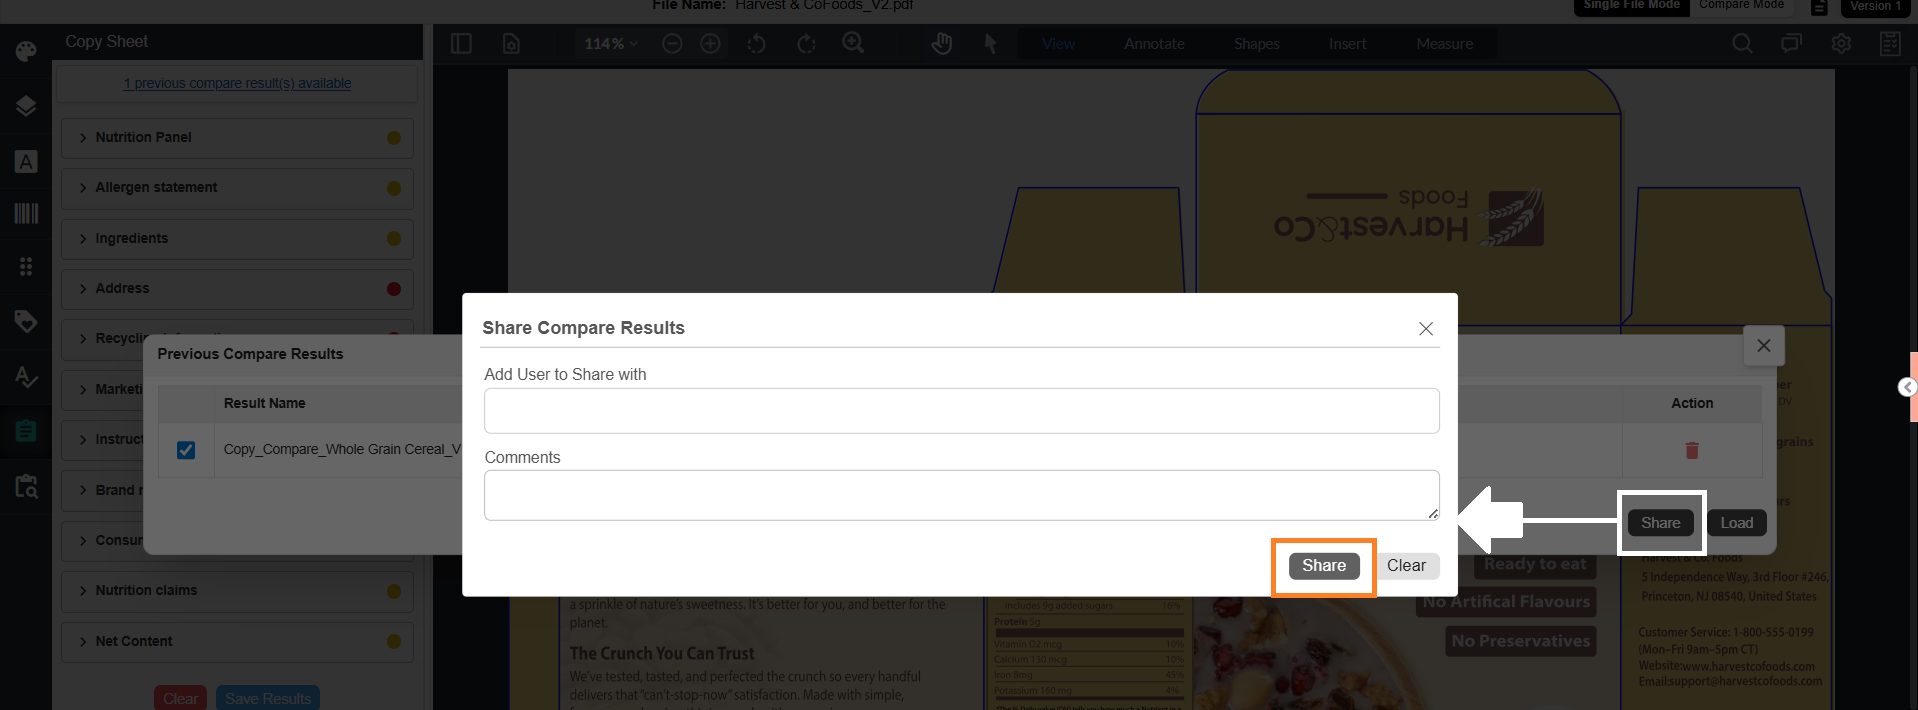
Share Compliance Results
- Select “X previous compare result(s) available”. The Previous Compare Results dialog is displayed with saved results.
- Select one or more results.
- Select Share. The Share Compare Results dialog is displayed.
- In Add User to Share With:
- Enter recipient email IDs
- You can add multiple users
- If required, enter comments in the Comments field.
- Select Share to send the results.
Note: Multiple results can be shared at the same time.