
Configure Validation Profile
The Validation Profile allows you to create and manage validation rules used in compliance checks within ManageArtworks. These rules help ensure that all elements in the artwork—such as text, labels, images, and formatting—follow the required regulatory standards and quality guidelines.
Validation Profiles help you:
- Ensure artwork meets regulatory requirements
- Maintain consistency across all artworks
- Reduce manual checking effort
- Identify issues early in the process
 | Note: Creating validation rules alone is not sufficient to run compliance checks. These rules must be mapped within a compliance profile to be applied during execution. For more details, refer to the How Validation Profiles Work in Compliance Checks section. |
Validation Categories
Validation rules in ManageArtworks are grouped into three categories:
| Validation Category | Description |
|---|---|
| Pre-Configured Validation | System-defined validations based on regulatory standards. Cannot be modified. |
| Configurable Validation | User-configurable validations where rules can be defined or adjusted. |
| General Validation | Common validations applied across the entire artwork (not element-specific). |
Pre-Configured Validation
Pre-configured validations are based on official regulatory guidelines.
- These validations are ready to use
- They cannot be modified
- Each regulatory standard includes multiple checks
Supported Pre-Configured Validation Profiles
| Regulatory Standard | Description |
|---|---|
| FSSAI | India Food Safety and Standards Authority |
| US FDA | United States Food and Drug Administration |
| CFIA | Canadian Food Inspection Agency |
| LMPC | Legal Metrology Packaged Commodities |
| FSIS (USDA) | Food Safety and Inspection Service (United States Department of Agriculture) |
Pre-Configured Validation – What Checks Are Included
| Note: Each validation is applied to a specific element within a compliance profile. To execute validations during compliance checks, ensure that they are properly mapped to the respective elements. ManageArtworks provides pre-configured validation profiles and compliance profiles with relevant elements and validation rules already mapped. You can use these compliance profiles directly or modify them as required. |
| Regulation | Validation Checks Included |
|---|---|
| FSSAI | Allergen Declaration, Veg/Non-Veg Symbol, Manufacturer Address, FSSAI Logo, Ingredients, Nutrition Info, Net Quantity, Product Name |
| US FDA | Allergen Labeling, Nutrient Claims, Nutrition Labeling, Ingredients, Net Quantity |
| CFIA | Storage Instructions, Name & Address, Nutrition Table, Allergen Declaration, Ingredients, Net Quantity |
| LMPC | Numeration Format, Claims & Declarations, Manufacturer Address, Net Quantity, Product Name |
| FSIS | Safe Handling, Inspection Details, Nutrition Panel, Allergen Info, Ingredients, Net Quantity |
Configurable Validation
Configurable validations allow you to define custom rules based on your business or brand requirements.
- You cannot create new validation types
- You can add multiple rules within existing validation types
- These can be linked to artwork elements and used in compliance checks
Available Configurable Validations
The following validation types can be configured to verify different aspects of artwork elements during compliance checks.
| Note: Each validation is applied to a specific element within a compliance profile. These validations must be mapped to elements to be executed during compliance checks. |
| Validation Type | Description |
|---|---|
| Font Name Validation | Ensures that the correct font family is used in the associated element. |
| Text Formatting | Verifies whether the associated element text follows required formatting such as bold, italics, or alphanumeric rules. |
| Minimum Font Size (PDP Area) | Ensures that the font size of the associated element meets minimum requirements based on the Principal Display Panel (PDP) area. |
| Exact Characters | Checks whether the associated element text contains the exact number of characters as defined. |
| Max Characters | Ensures that the associated element text does not exceed the defined maximum character limit. |
| Min Characters | Ensures that the associated element text meets the required minimum character count. |
| One from the allowed values | Validates that the associated element value matches one of the predefined allowed values (configured in Copy Value Master). |
| Font Size Comparison | Compares the font size between two elements to ensure consistency. |
| Minimum Font Size | Ensures that the associated element text meets the defined minimum font size for readability. |
General Validation
General validations are validation rules that are applied at the overall artwork level, rather than to a specific element.
| Note: Unlike element-based validations, general validations are not linked to individual elements. However, they still need to be added within a compliance profile to be executed during compliance checks. Once added, these validations are applied across the entire artwork. |
Available General Validations
| Validation Type | Description |
|---|---|
| Pantone | Ensures that the artwork uses the correct brand-approved colors (Pantone values). |
| Run Spell Check | Identifies spelling errors across all text present in the artwork, supporting multiple languages. |
| Image Resolution | Ensures that all images in the artwork meet the required DPI standards for printing. |
How Validation Profiles Work in Compliance Checks
Validation Profiles define the rules, but they are not directly used during compliance checks. As mentioned earlier, validation rules must be mapped within a compliance profile before they can be executed. The following flowchart explains how this works.

- Create Validation Rules
Define the required validation rules in the Validation Profile.- Each validation type (such as Font name Validation, Pantone) is configured here with the necessary parameters.
- For Pre-Configured validations, no setup is required. Ensure they are available for use.
- Configure Compliance Profile
- Create or open a Compliance Profile to organize how validations should be applied during compliance checks.
- For Pre-Configured and Configurable Validation types:
- Add the required artwork elements (for example, Product Name, Address, or Nutrition Table).
- For General Validations:
- No element configuration is required. These validations are applied at the overall artwork level.
- Assign Validation Rules
Assign validation rules within the Compliance Profile.- Map validations to specific elements for Pre-Configured and Configurable Validation types.
- Directly include validations for General Validation types.
- Run Compliance Check
- Open the artwork in the Web Viewer and select the required Compliance Profile.
- The system executes all configured validations and displays the results.
 | Important Behavior
|
Example
To validate Product Name font family details:
- Create a rule in the Font Name Validation Profile (for example, set Font = Arial).
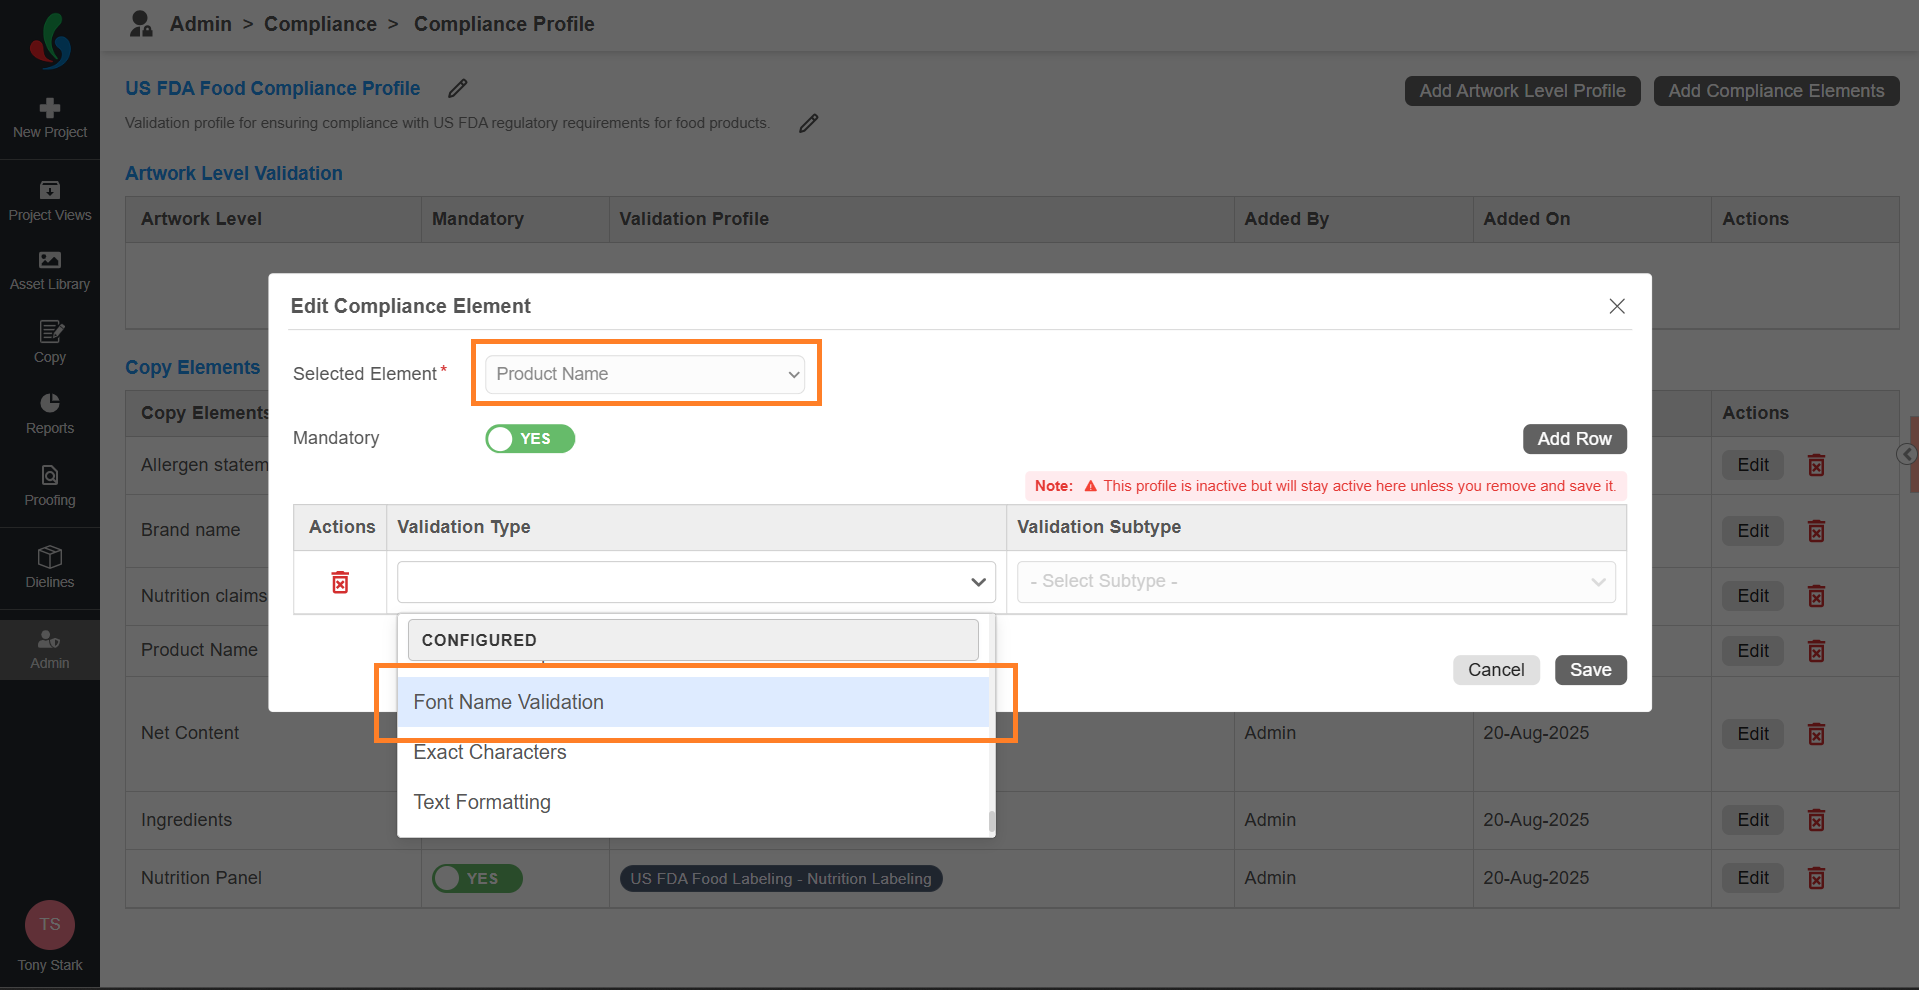
- Open Compliance Profile.
- Add the Product Name element.
- Map the Font Name Validation Profile and the required validation subtype (check) to the Product Name element.
- Open the artwork in Web Viewer and select the Compliance Profile.
- The system validates the Product Name font and displays the result in the compliance report.
How to Configure Validation Profile
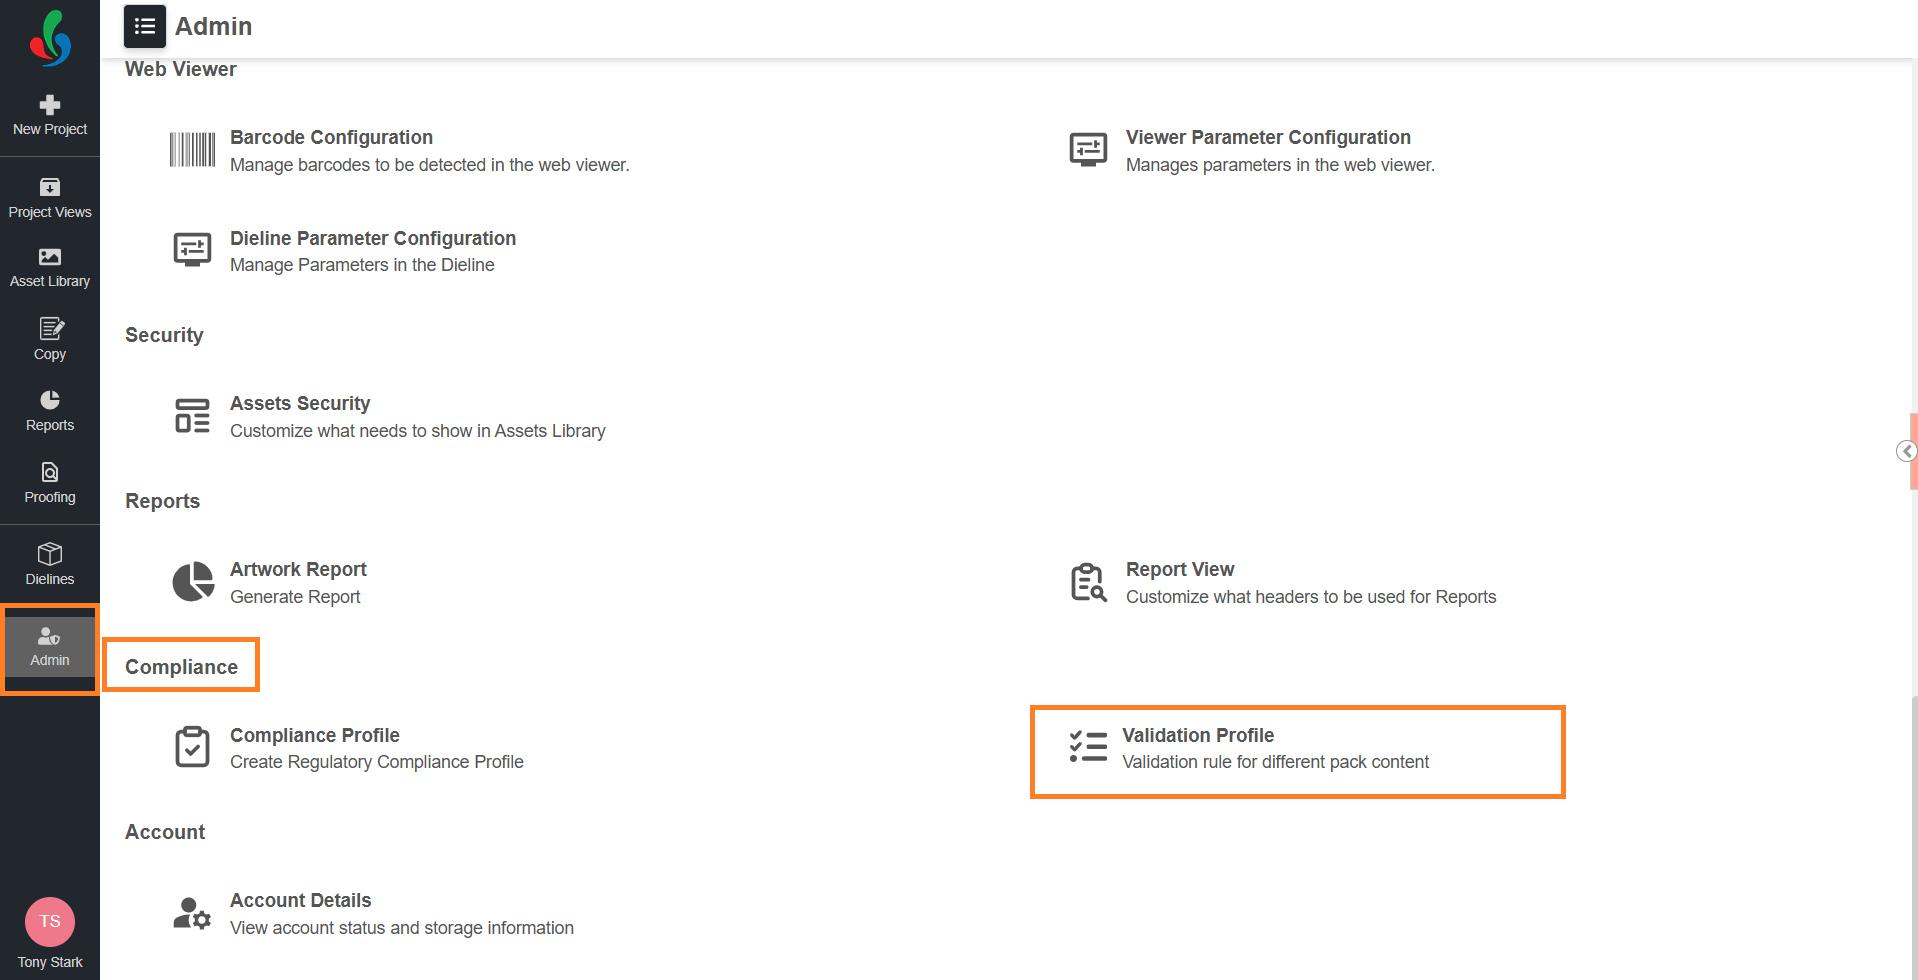
01. Access Validation Profile
- Sign in to your ManageArtworks account.
- Navigate to the Admin module.
- Under Compliance, select Validation Profile.
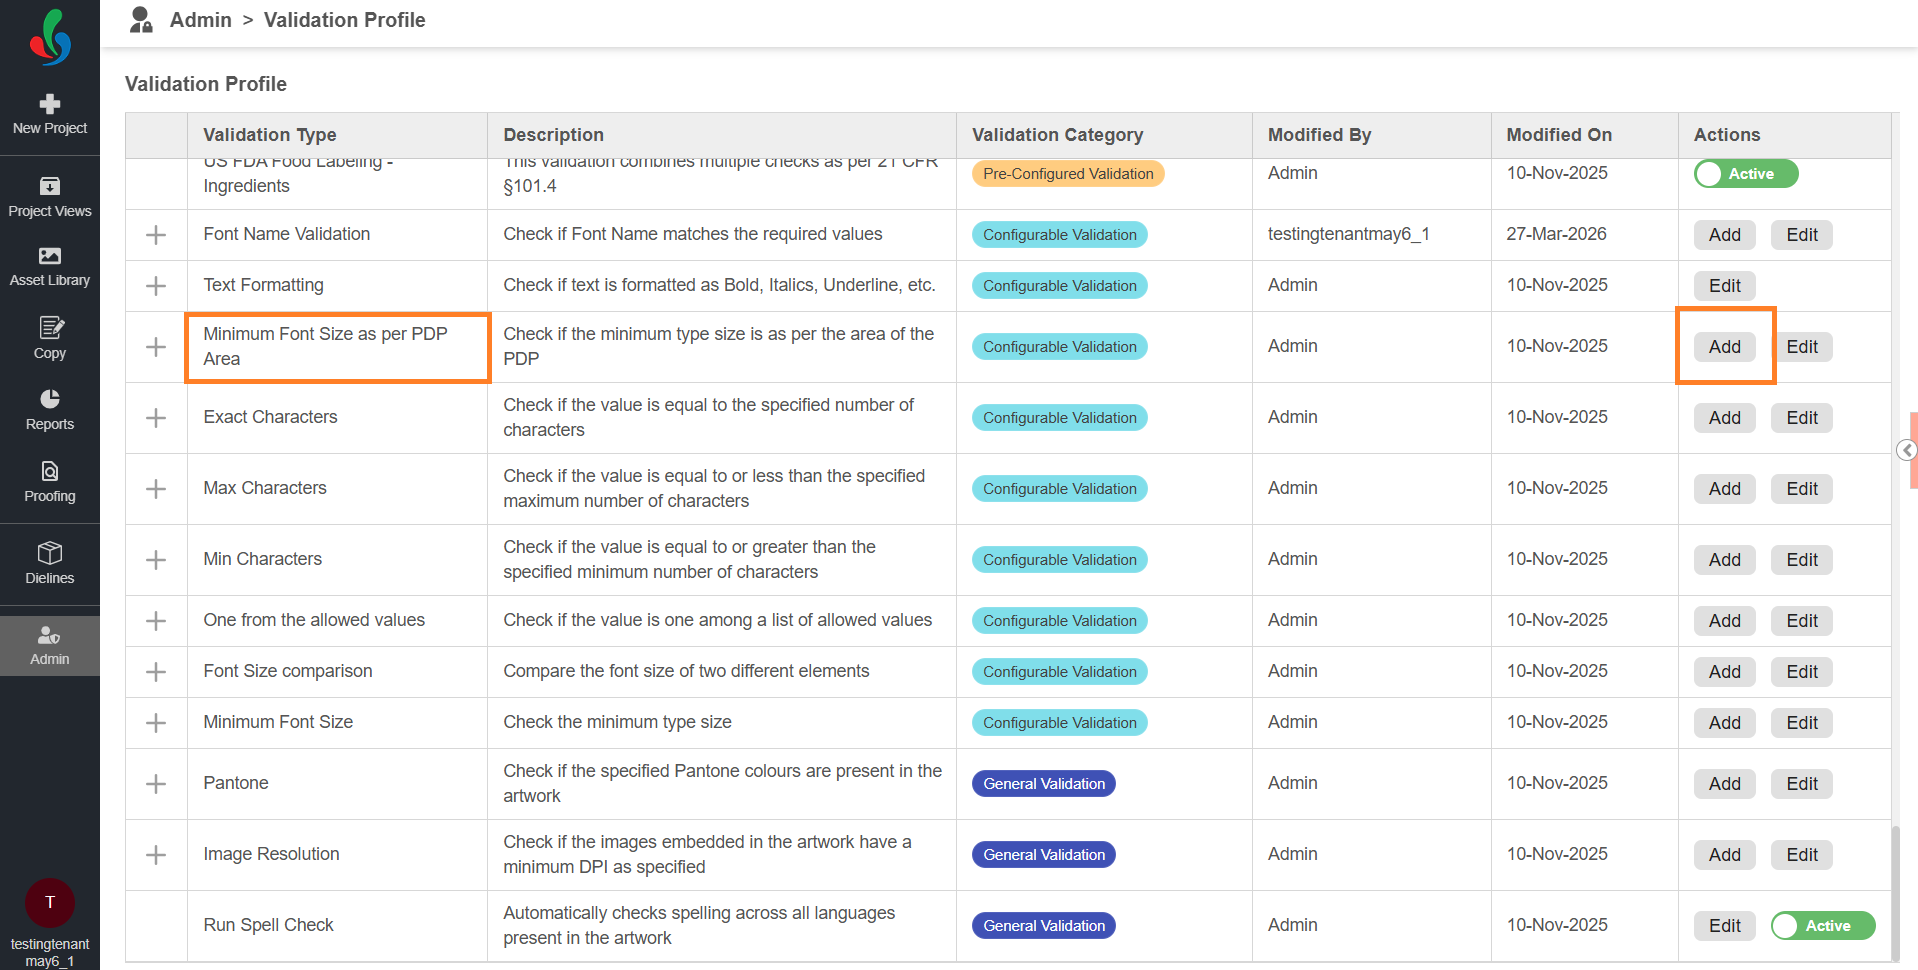
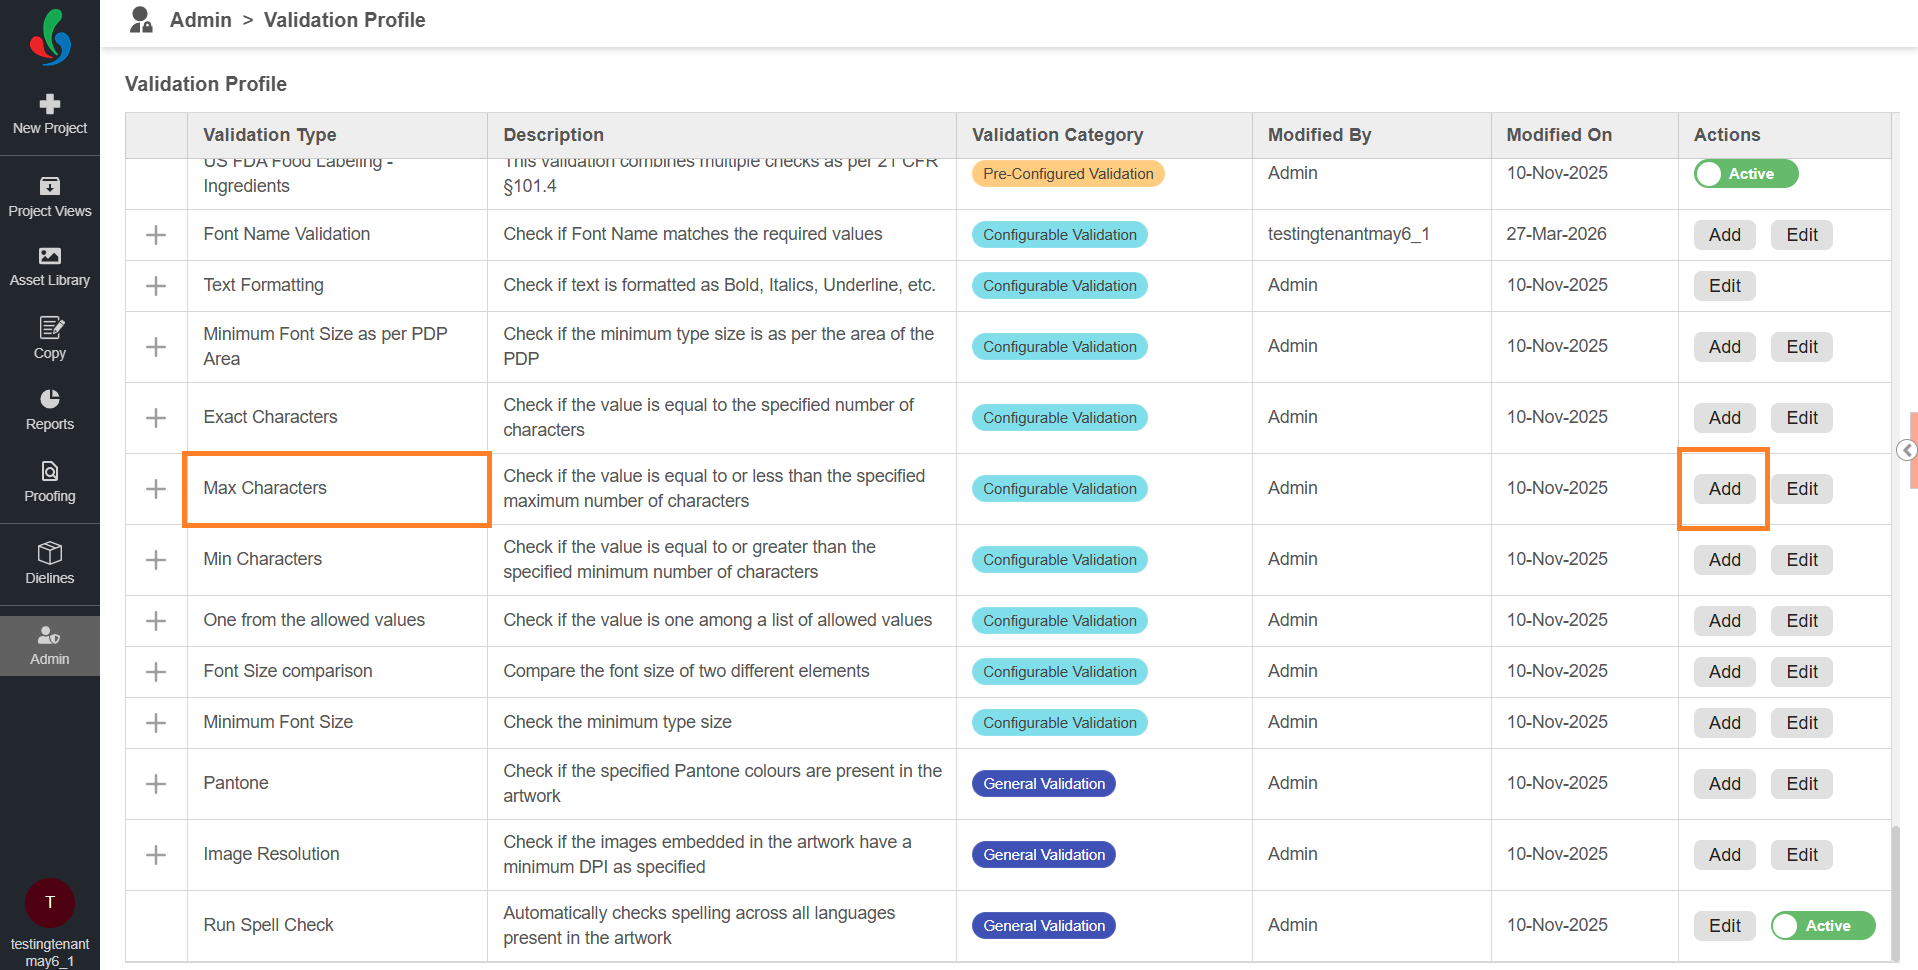
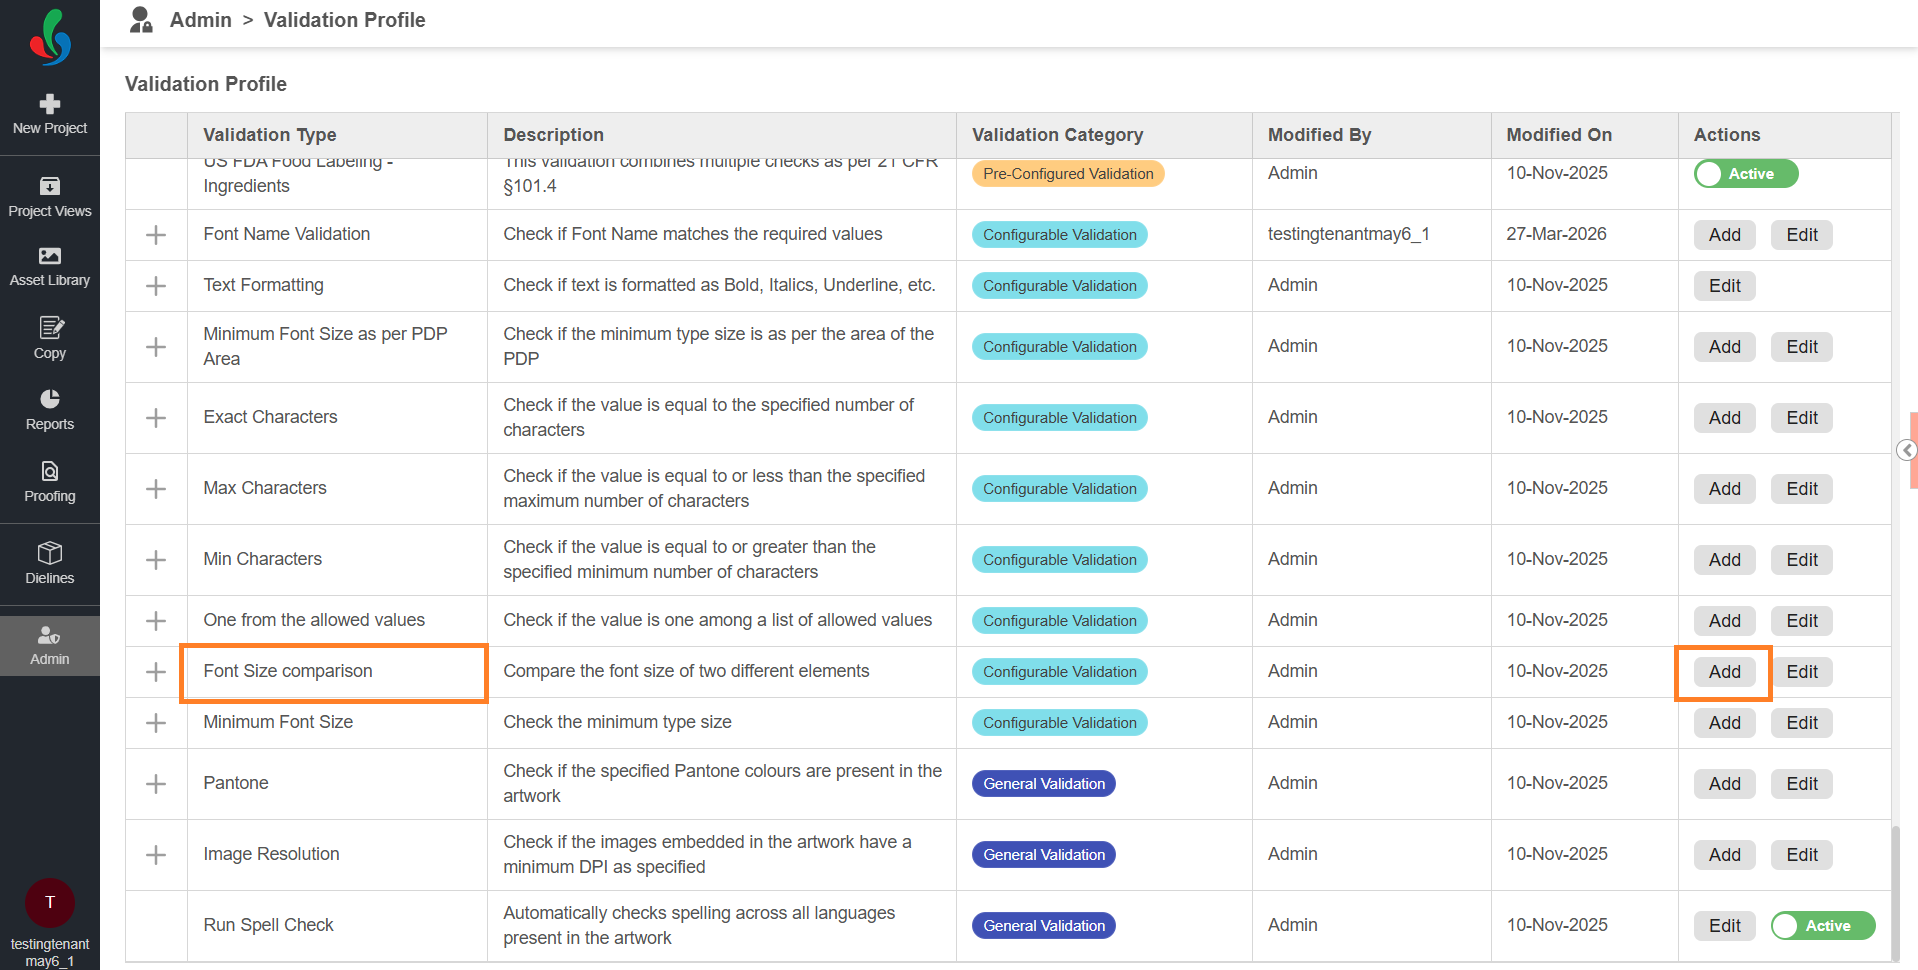
The Validation Profile page displays a list of all available validation types.
02. Configure Validation Profile
You can configure validation checks only for the following categories:
- Configurable Validation
- General Validation
Pre-Configured Validation categories cannot be modified.
 | Note: You are not required to configure all validation types. Configure only the validations that are relevant to your requirements. |
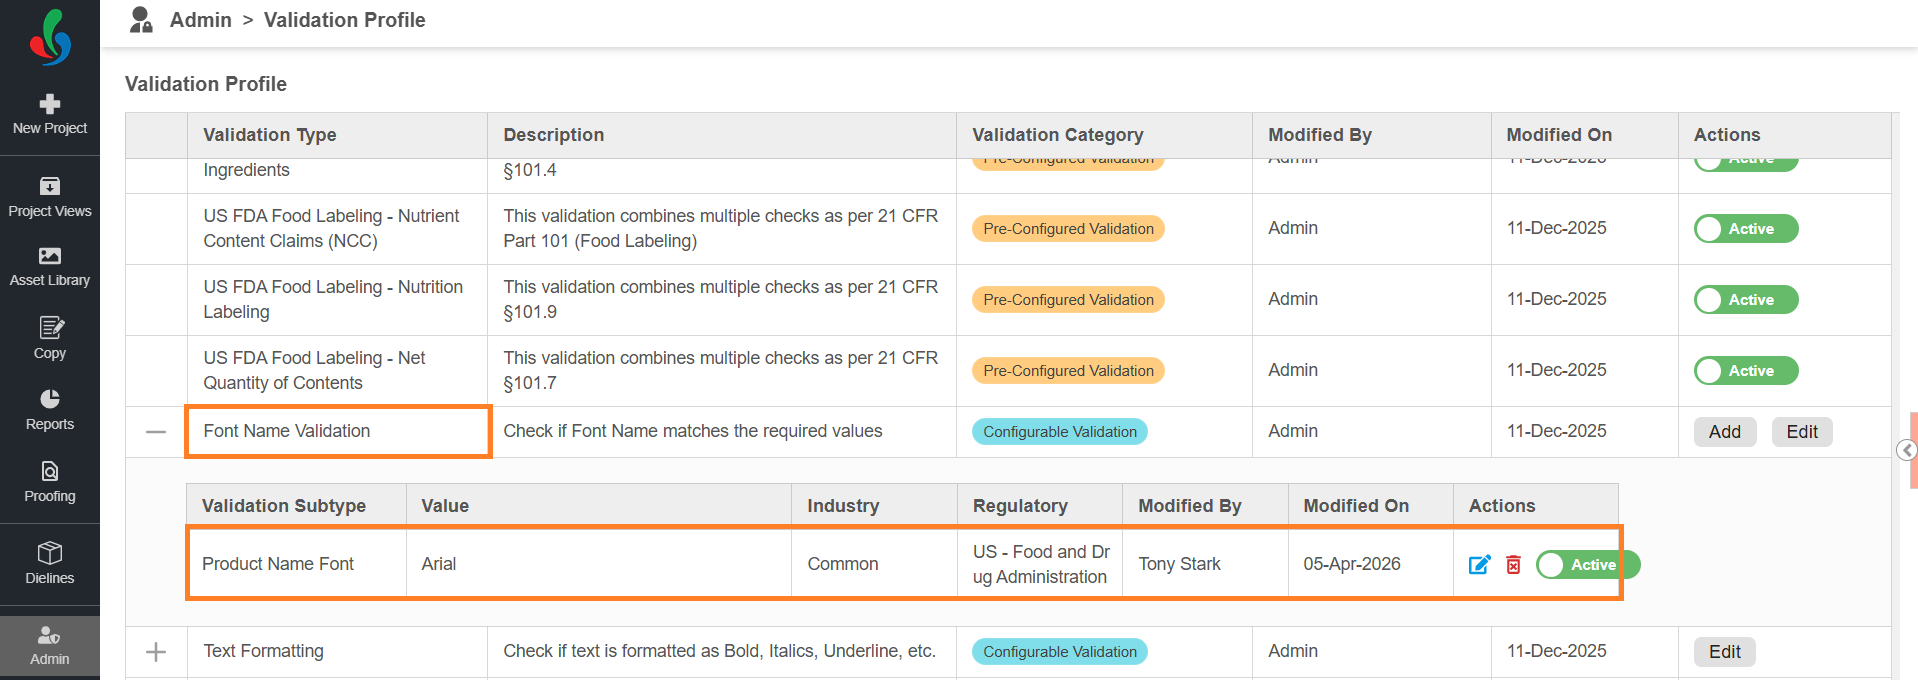
Font Name Validation
Font Name Validation ensures that the correct font family is used in the associated element.
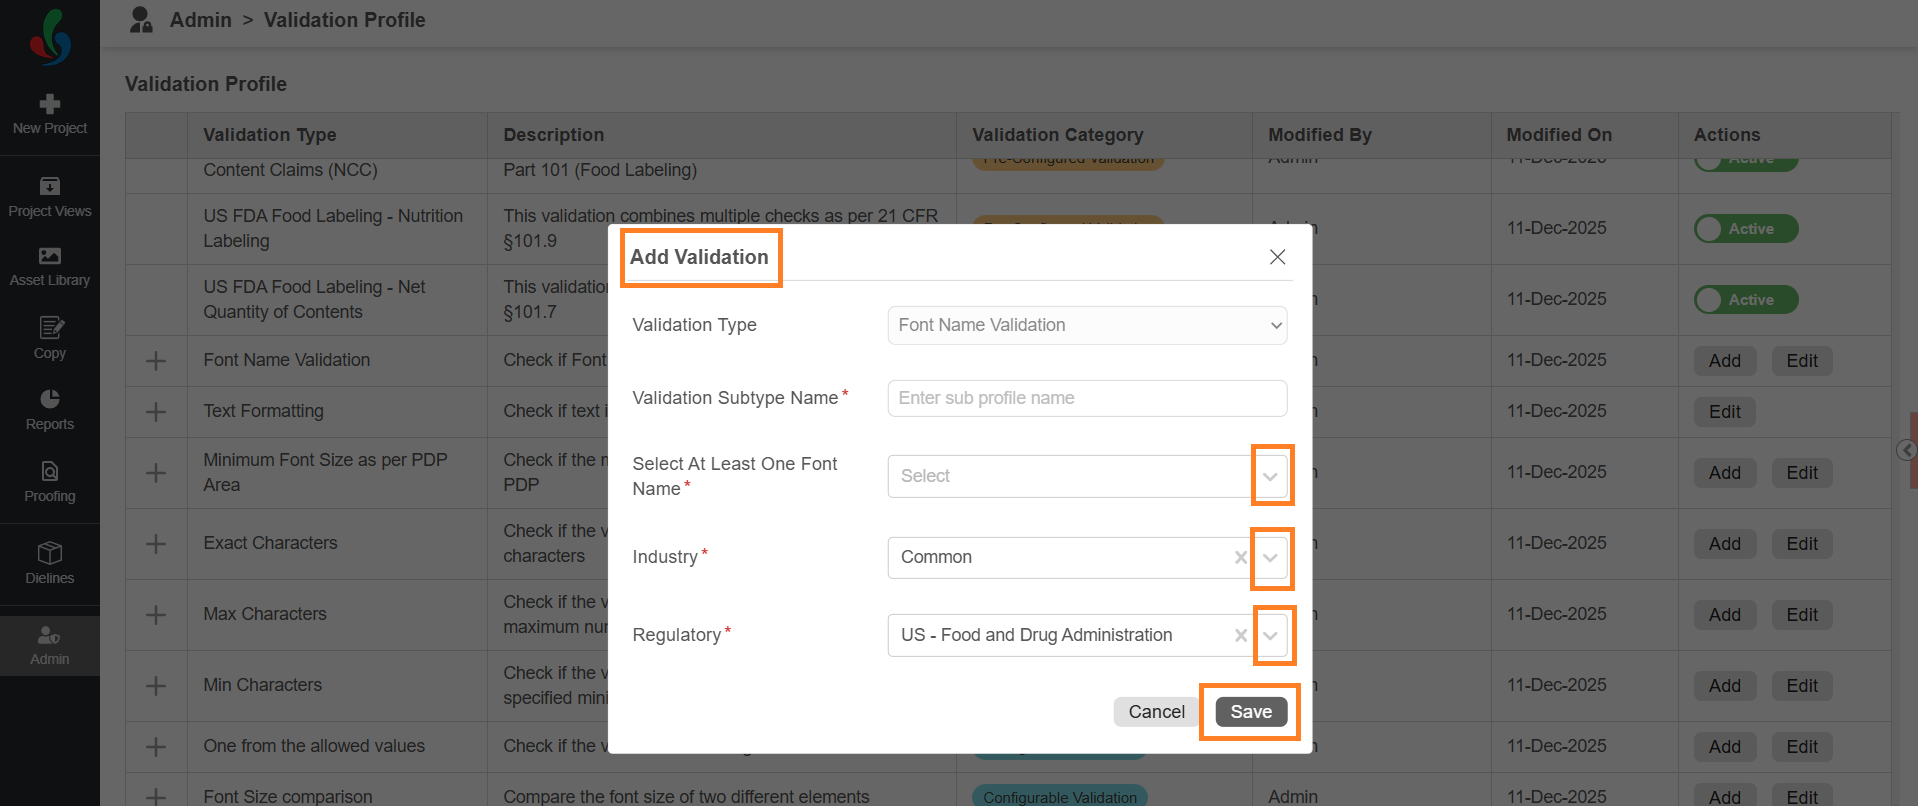
Add a Font Name Validation Check
To add a new validation check:
- On the Validation Profile page, locate Font Name Validation profile.
- Select Add in the Actions column for Font Name Validation.
- In the Add Validation dialog:
- Enter a descriptive name in Validation Subtype Name field (for example, Product Name Font Validation).
- Select one or more font families from Select At Least One Font Name drop-down list.
- Select the required Industry.
- Select the required Regulatory.
- Select Save to add the validation check to the profile.

Minimum Font Size as per PDP Area
Ensures that the font size of the associated element meets minimum requirements based on the Principal Display Panel (PDP) area.
Add a Minimum Font Size as per PDP Area Validation Check
To create a new validation check:
- On the Validation Profile page, locate Minimum Font Size as per PDP Area profile.
- Select Add in the Actions column for Minimum Font Size as per PDP Area.
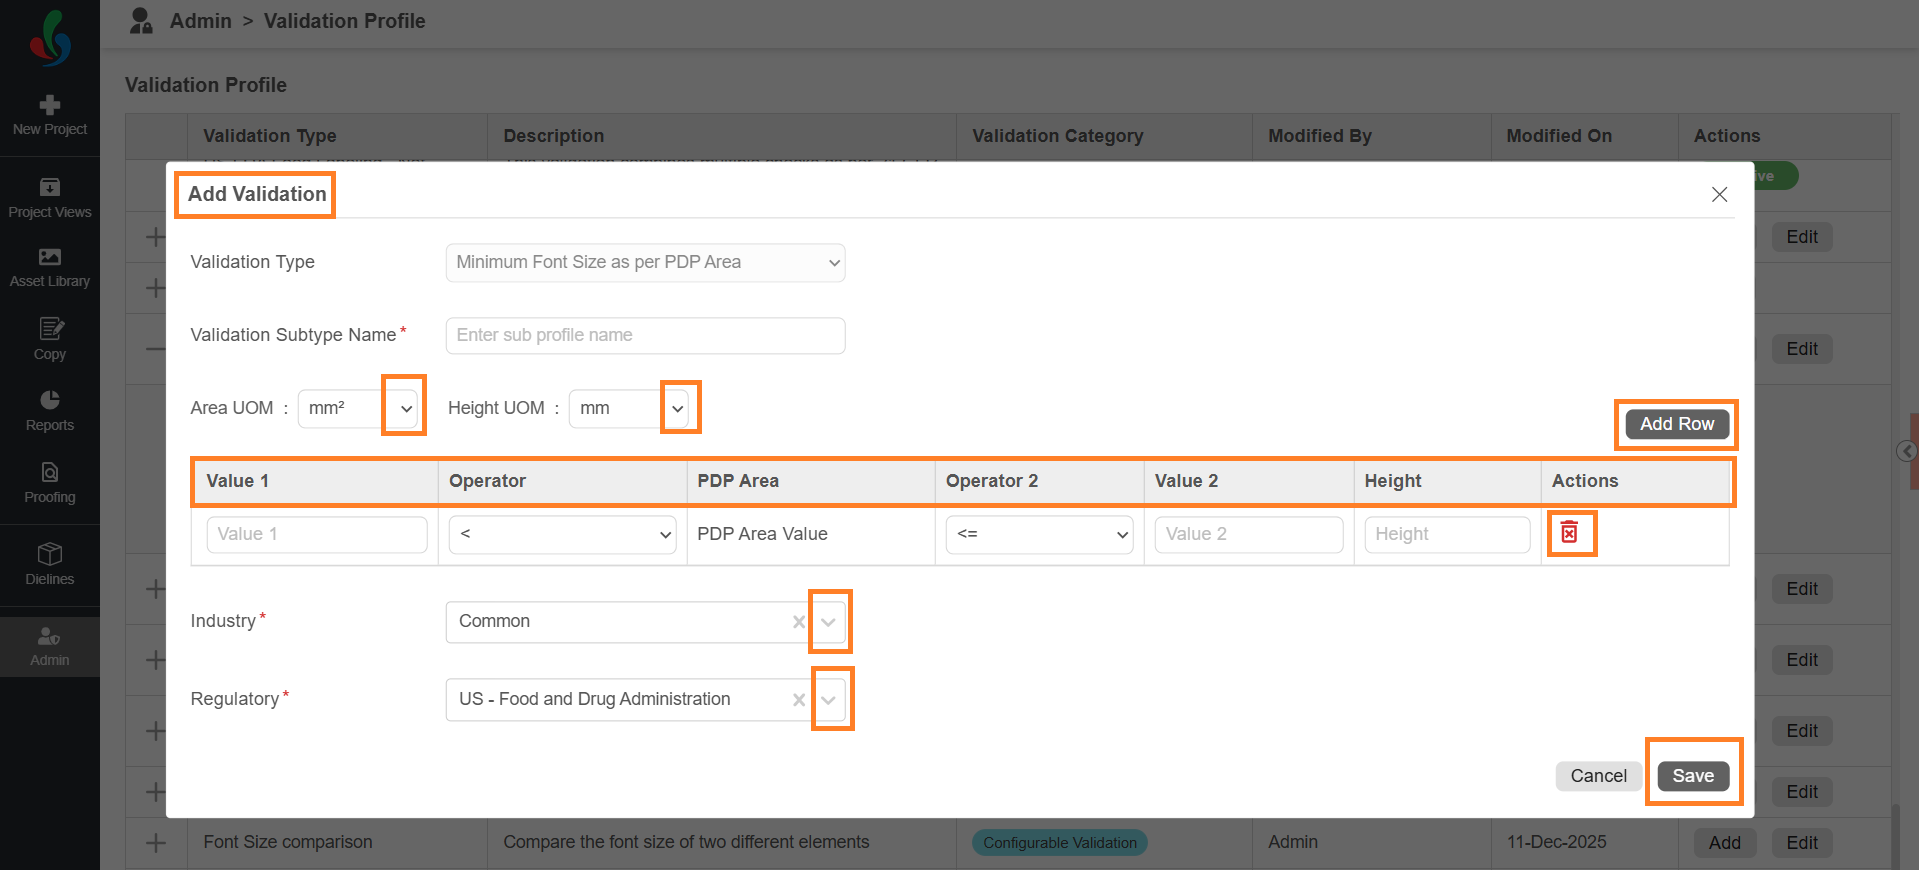
- In the Add Validation dialog:
- Enter a descriptive name in Validation Subtype Name (for example, Net Content Font Check).
- Select the required units:
- Select the Area UOM (Unit of Measurement) for PDP Area.
- This defines how the system calculates the PDP area (for example, mm²).
- Select the Height UOM for font size.
- This defines how the font size is measured (for example, mm or cm).
- Select the Area UOM (Unit of Measurement) for PDP Area.
- Define the validation conditions in the grid:
- For each row:
- Enter Value 1.
- Select an Operator (for example, <, ≤, >, ≥).
- The system uses PDP Area Value automatically.
- Select Operator 2.
- Enter Value 2 (if applicable).
- Enter the required Height (minimum font size).
- This defines a rule such as:
- If the PDP area falls within a specified range, the font height must meet the defined value.
- To add more conditions, select Add Row and repeat the steps.
- To delete a condition, select the Delete icon in the Actions column for the required condition.
- For each row:
- Select Industry.
- Select Regulatory.
- Select Save to add the validation check to the profile.
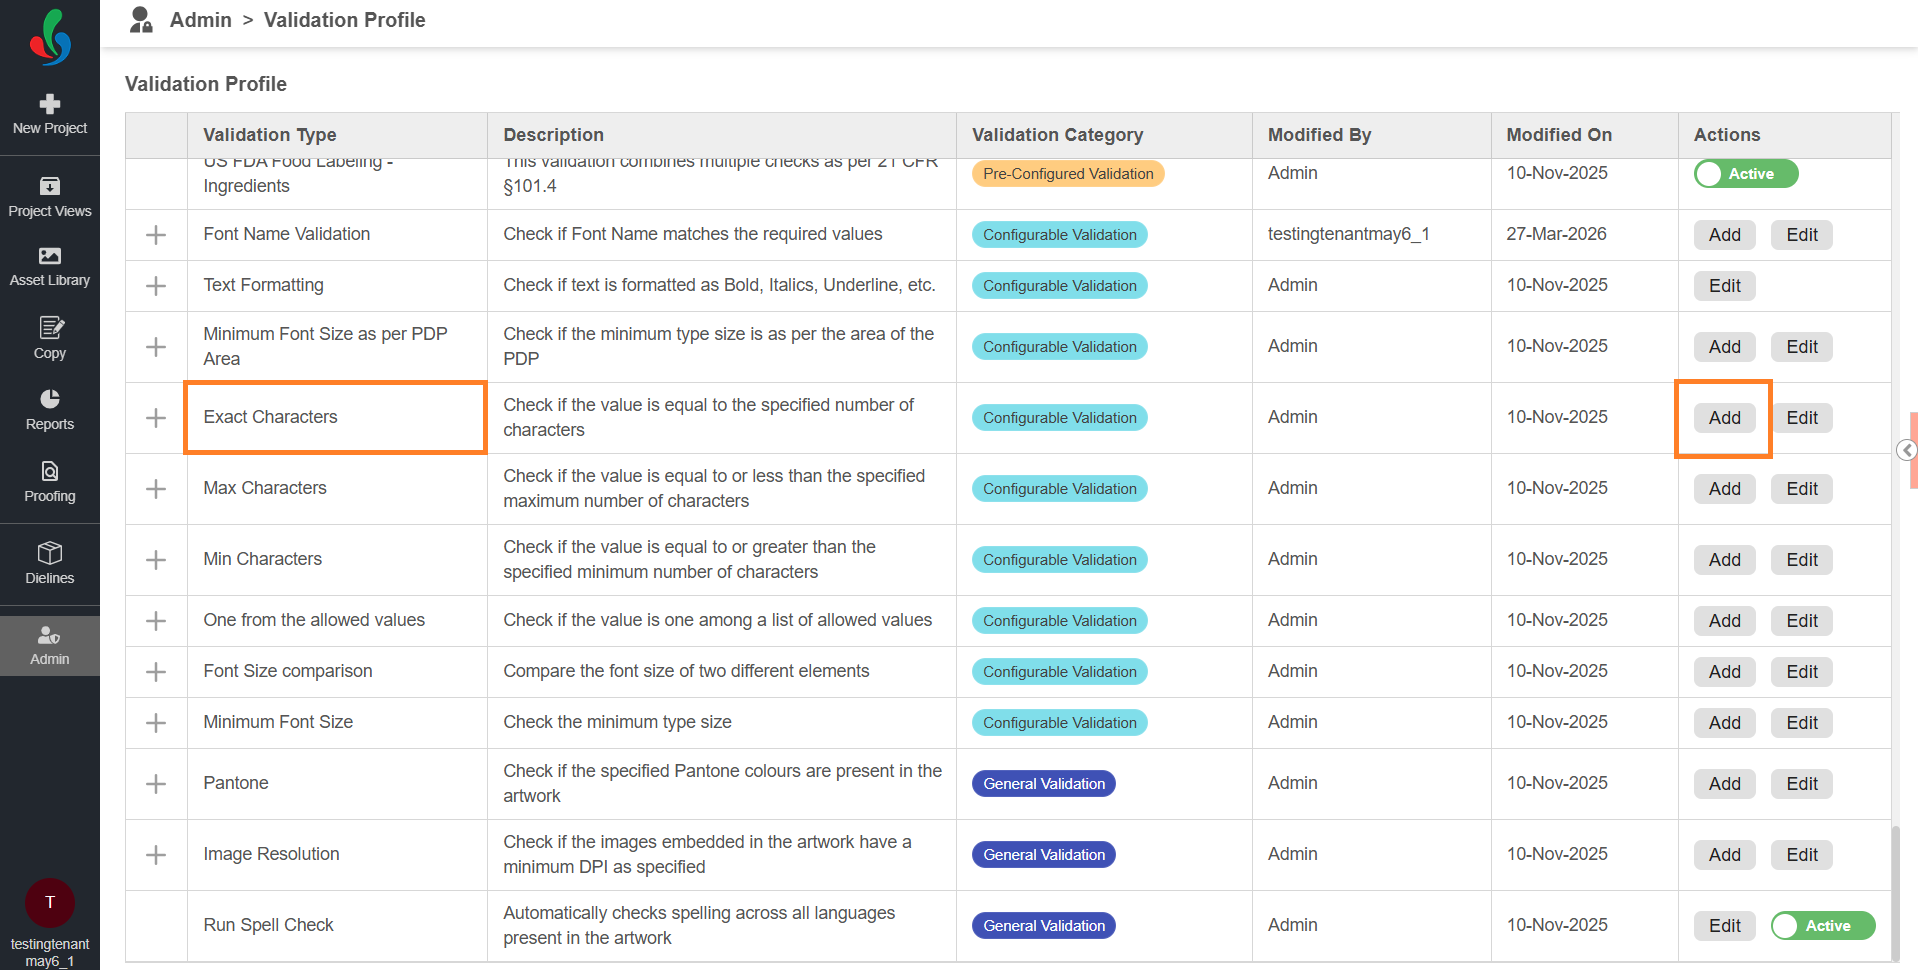
Exact Characters
Checks whether the associated element text contains the exact number of characters as defined.
Add an Exact Characters Validation Check
To create a new validation check:
- On the Validation Profile page, locate Exact Characters profile.
- Select Add in the Actions column for Exact Characters.
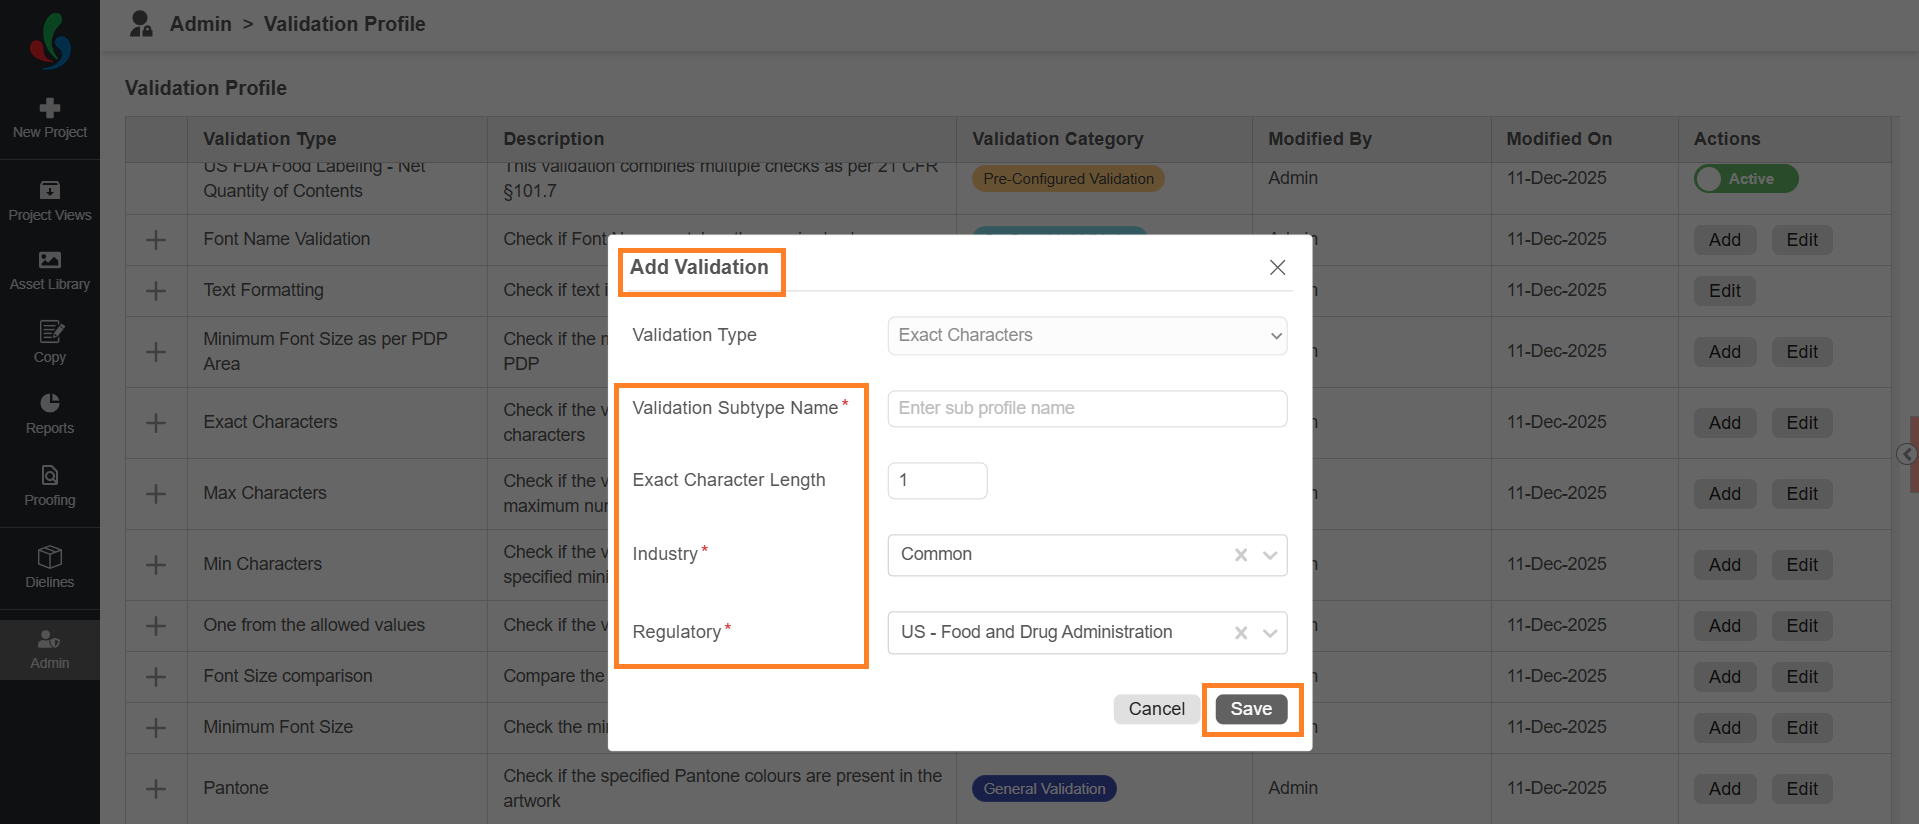
- In the Add Validation dialog:
- Enter a descriptive name in Validation Subtype Name (for example, Contact Info).
- Enter the required number of characters in Exact Character Length. This defines the exact number of characters the text must contain during validation.
- Select Industry.
- Select Regulatory.
- Select Save to add the validation check to the profile.
Max Characters
Ensures that the associated element text does not exceed the defined maximum character limit.
Add a Max Characters Validation Check
To create a new validation check:
- On the Validation Profile page, locate Max Characters profile.
- Select Add in the Actions column for Max Characters.
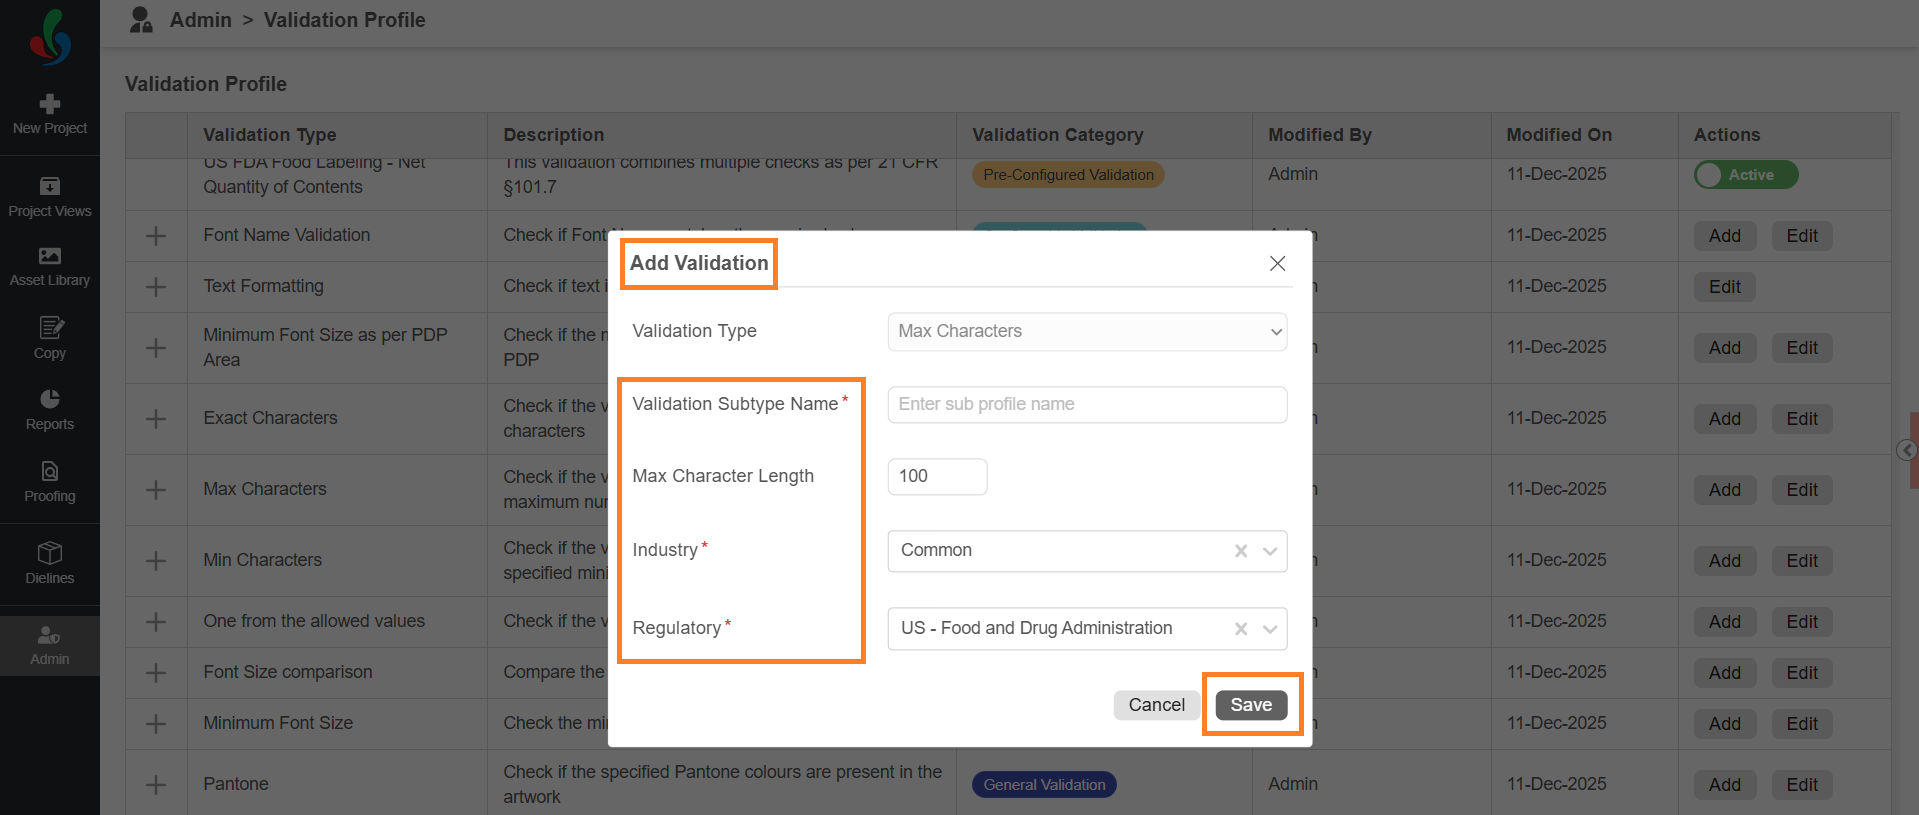
- In the Add Validation dialog:
- Enter a descriptive name in Validation Subtype Name (for example, Storage Instruction).
- Enter the maximum number of characters in Max Character Length. This defines the maximum number of characters allowed in the text during validation.
- Select Industry.
- Select Regulatory.
- Select Save to add the validation check to the profile.
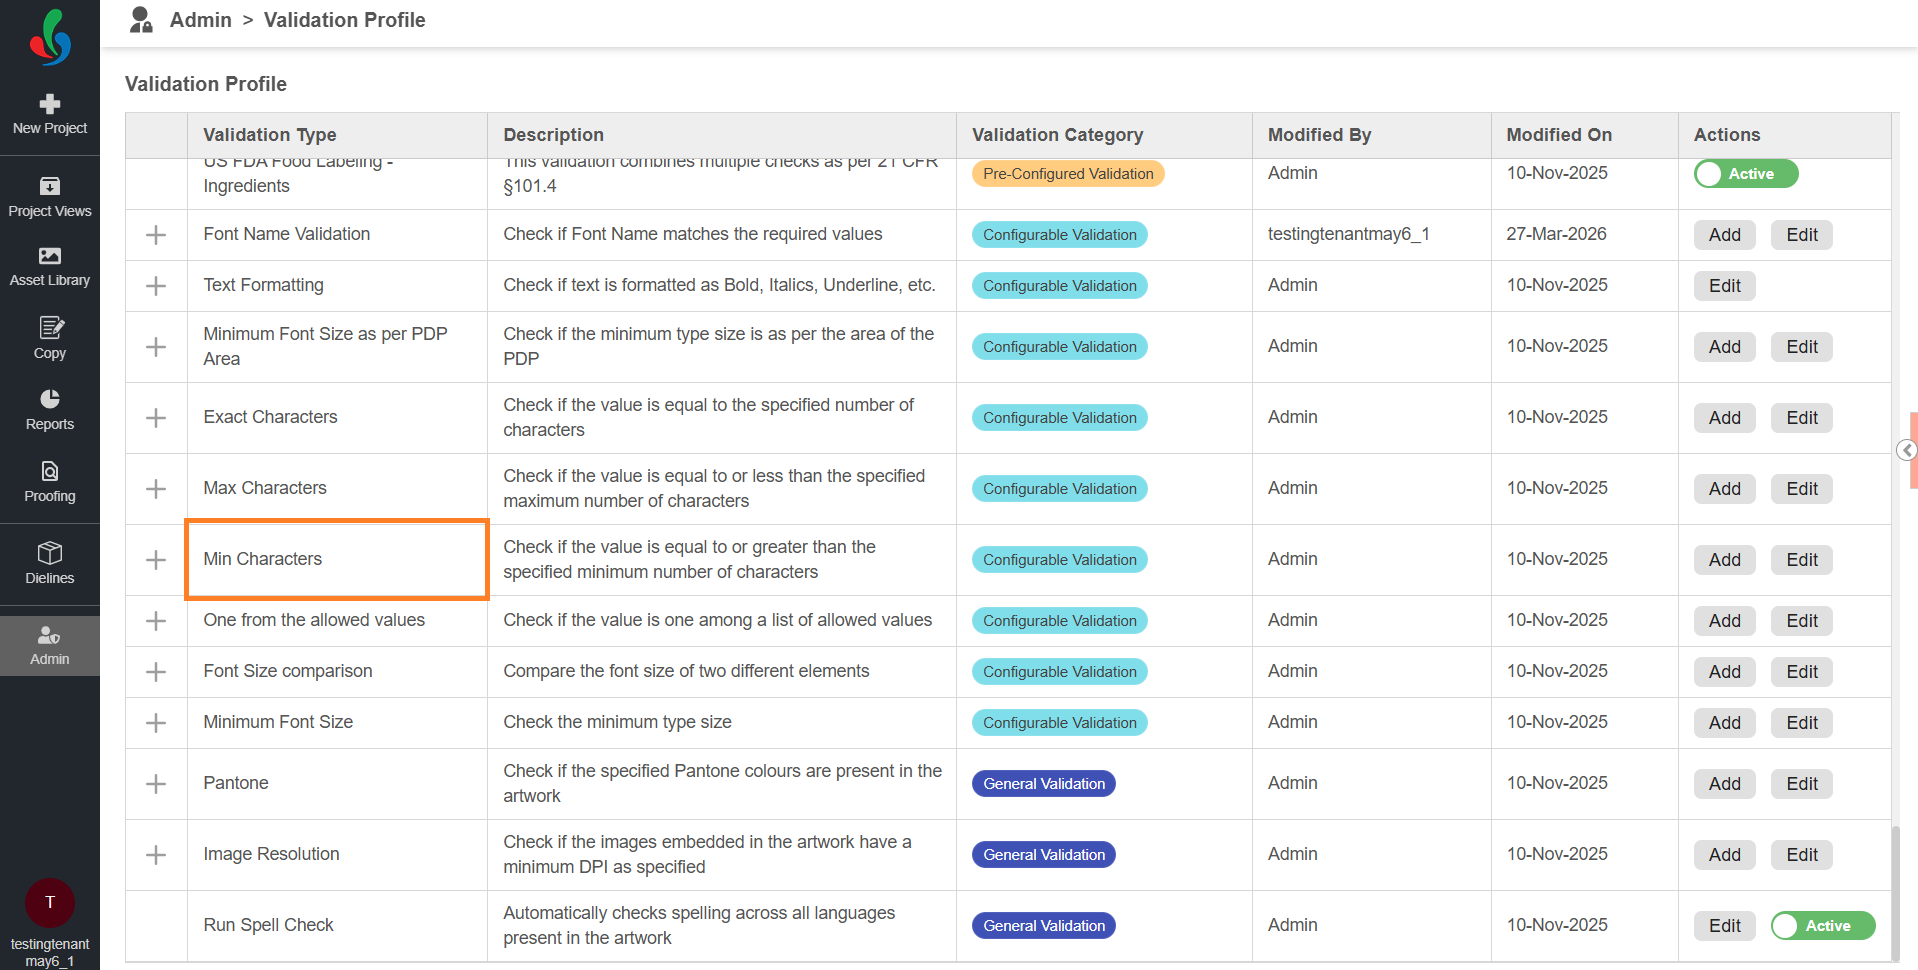
Min Characters
Ensures that the associated element text meets the required minimum character count.
Add a Min Characters Validation Check
To create a new validation check:
- On the Validation Profile page, locate Min Characters profile.
- Select Add in the Actions column for Min Characters.
- In the Add Validation dialog:
- Enter a descriptive name in Validation Subtype Name (for example, Storage Instruction).
- Enter the maximum number of characters in Min Character Length. This defines the minimum number of characters allowed in the text during validation.
- Select Industry.
- Select Regulatory.
- Select Save to add the validation check to the profile.

One from the Allowed Values
Validates that the associated element value matches one of the predefined allowed values configured in Copy Value Master.
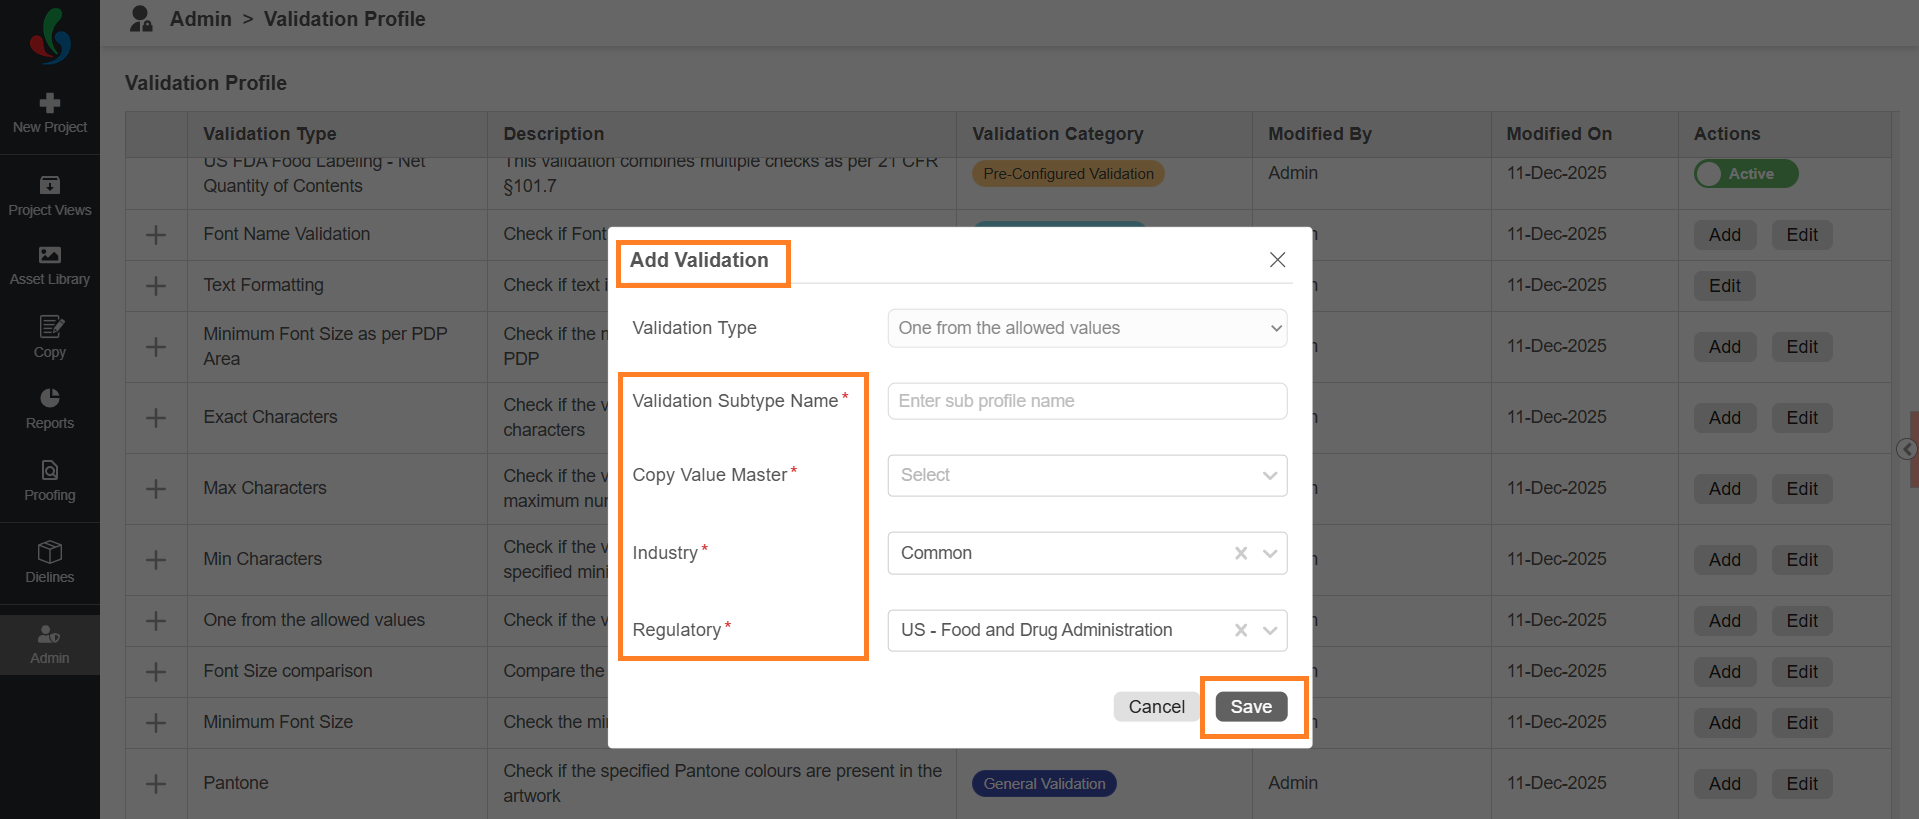
Add a One from the Allowed Values Validation Check
To create a new validation check:
- On the Validation Profile page, locate One from the Allowed Values profile.
- Select Add in the Actions column for One from the Allowed Values.
- In the Add Validation dialog:
- Enter a name in Validation Subtype Name (for example, Manufacturing Address).
- Select a value in Copy Value Master.
Note: The system validates whether the content matches one of the predefined values in the corresponding Value Master. Ensure that values are configured in Copy Element Value Master for the selected element. - Select Industry.
- Select Regulatory.
- Select Save to add the validation check to the profile.

Font Size Comparison
Compares the font size between two elements to ensure consistency.
Add a Font Size Comparison Validation Check
To create a new validation check:
- On the Validation Profile page, locate Font Size Comparison profile.
- Select Add in the Actions column for Font Size Comparison.
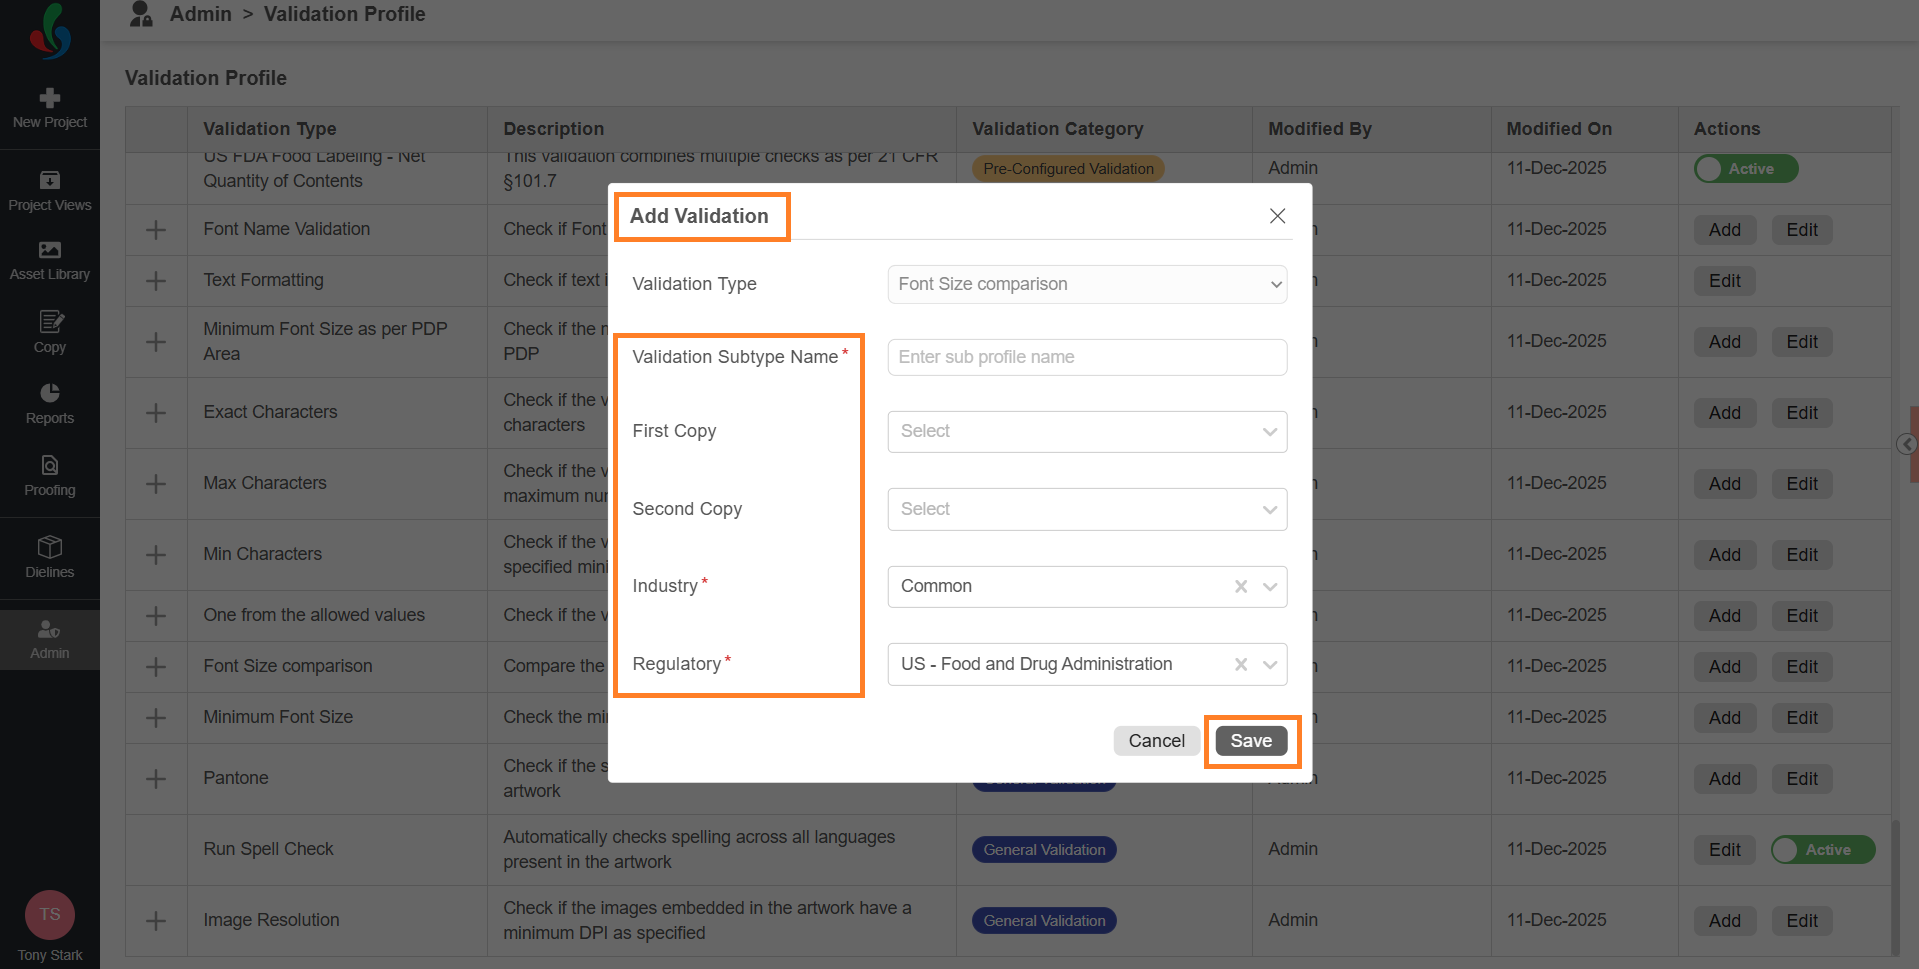
- In the Add Validation dialog:
- Enter a name in Validation Subtype Name (for example, Storage Instruction).
- Select First Copy. This defines the first element used for comparison.
- Select Second Copy. This defines the second element used for comparison.
- Select Industry.
- Select Regulatory.
- Select Save to add the validation check to the profile.
Minimum Font Size
Ensures that the associated element text meets the defined minimum font size for readability.
Add a Minimum Font Size Validation Check
To create a new validation check:
- On the Validation Profile page, locate Minimum Font Size profile.
- Select Add in the Actions column for Minimum Font Size.
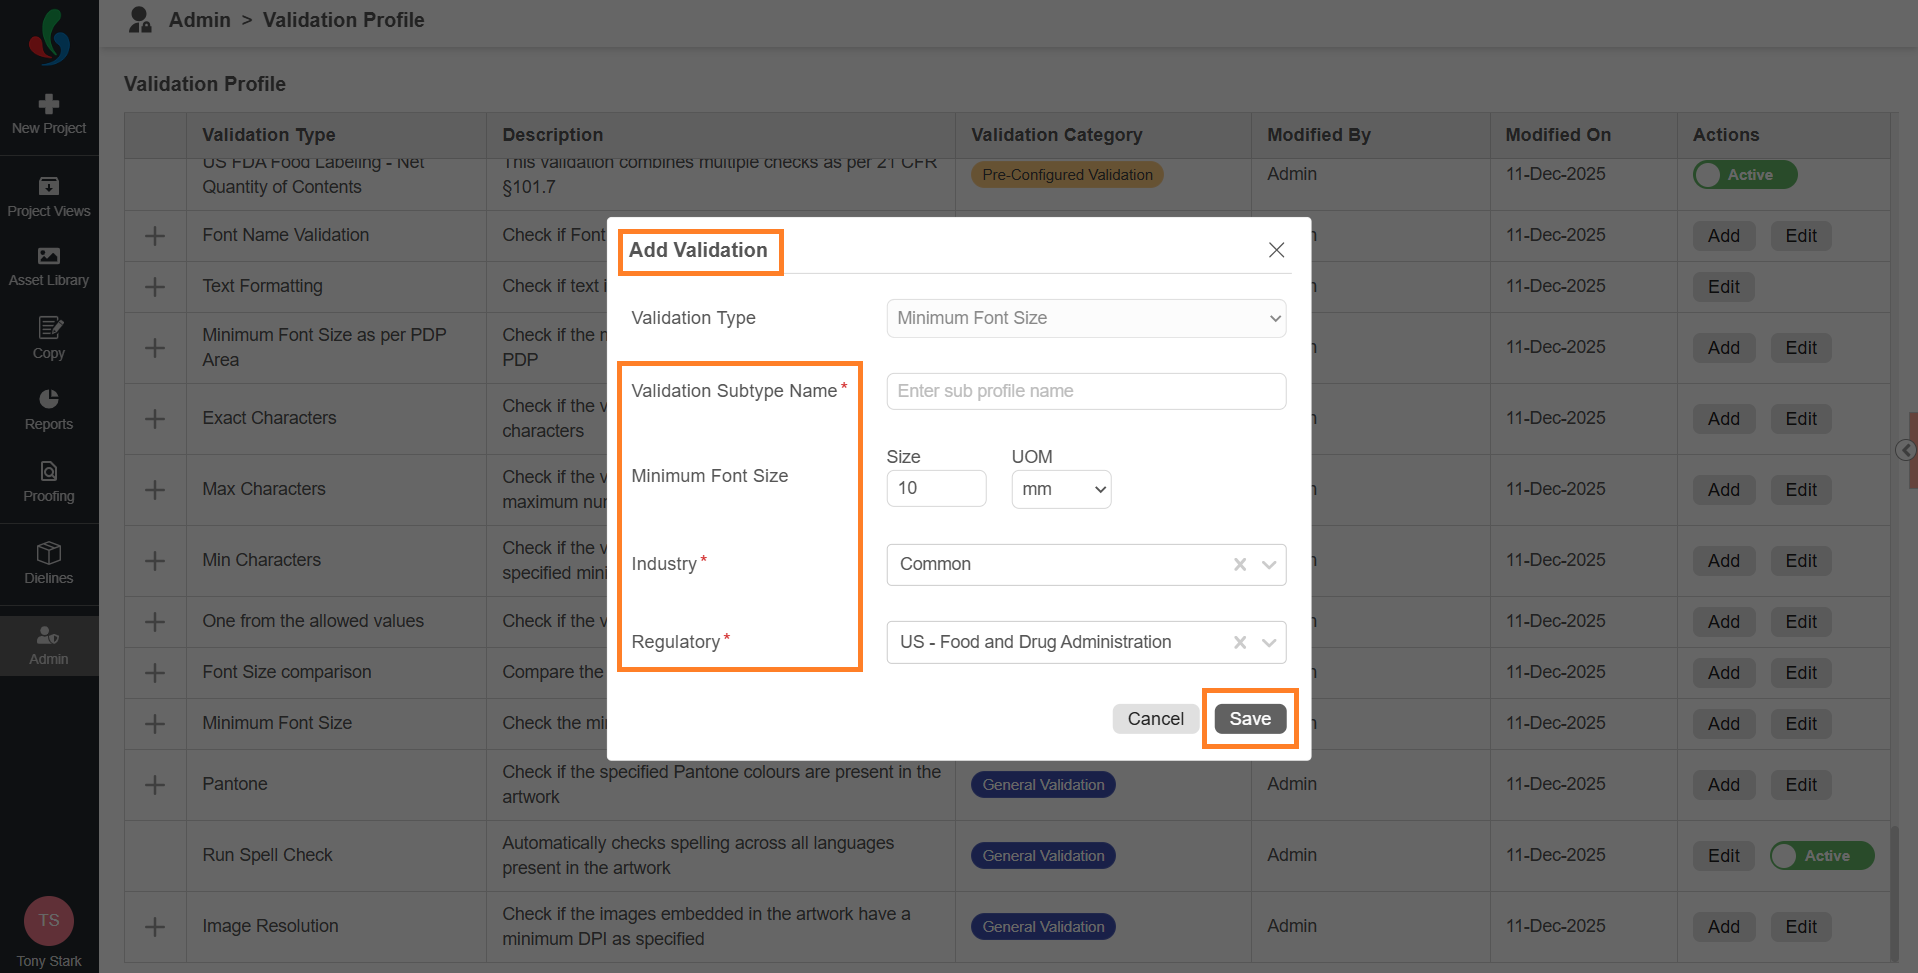
- In the Add Validation dialog:
- Enter a name in Validation Subtype Name (for example, Warning Text Size).
- Enter the minimum font size in Size.
- Select the unit in UOM (for example, mm).
- This defines the minimum font size allowed during validation.
- Select Industry.
- Select Regulatory.
- Select Save to add the validation check to the profile.

Pantone
Ensures that the artwork uses the correct brand-approved colors (Pantone values).
Add a Pantone Validation Check
To create a new validation check:
- On the Validation Profile page, locate Pantone profile.
- Select Add in the Actions column for Pantone.
- In the Add Validation dialog:
- Enter a name in Validation Subtype Name (for example, Brand Color Check).
- Enter one or more values in Pantone color(s). This defines the allowed Pantone colors for validation.
- Select Industry.
- Select Regulatory.
- Select Save to add the validation check to the profile.
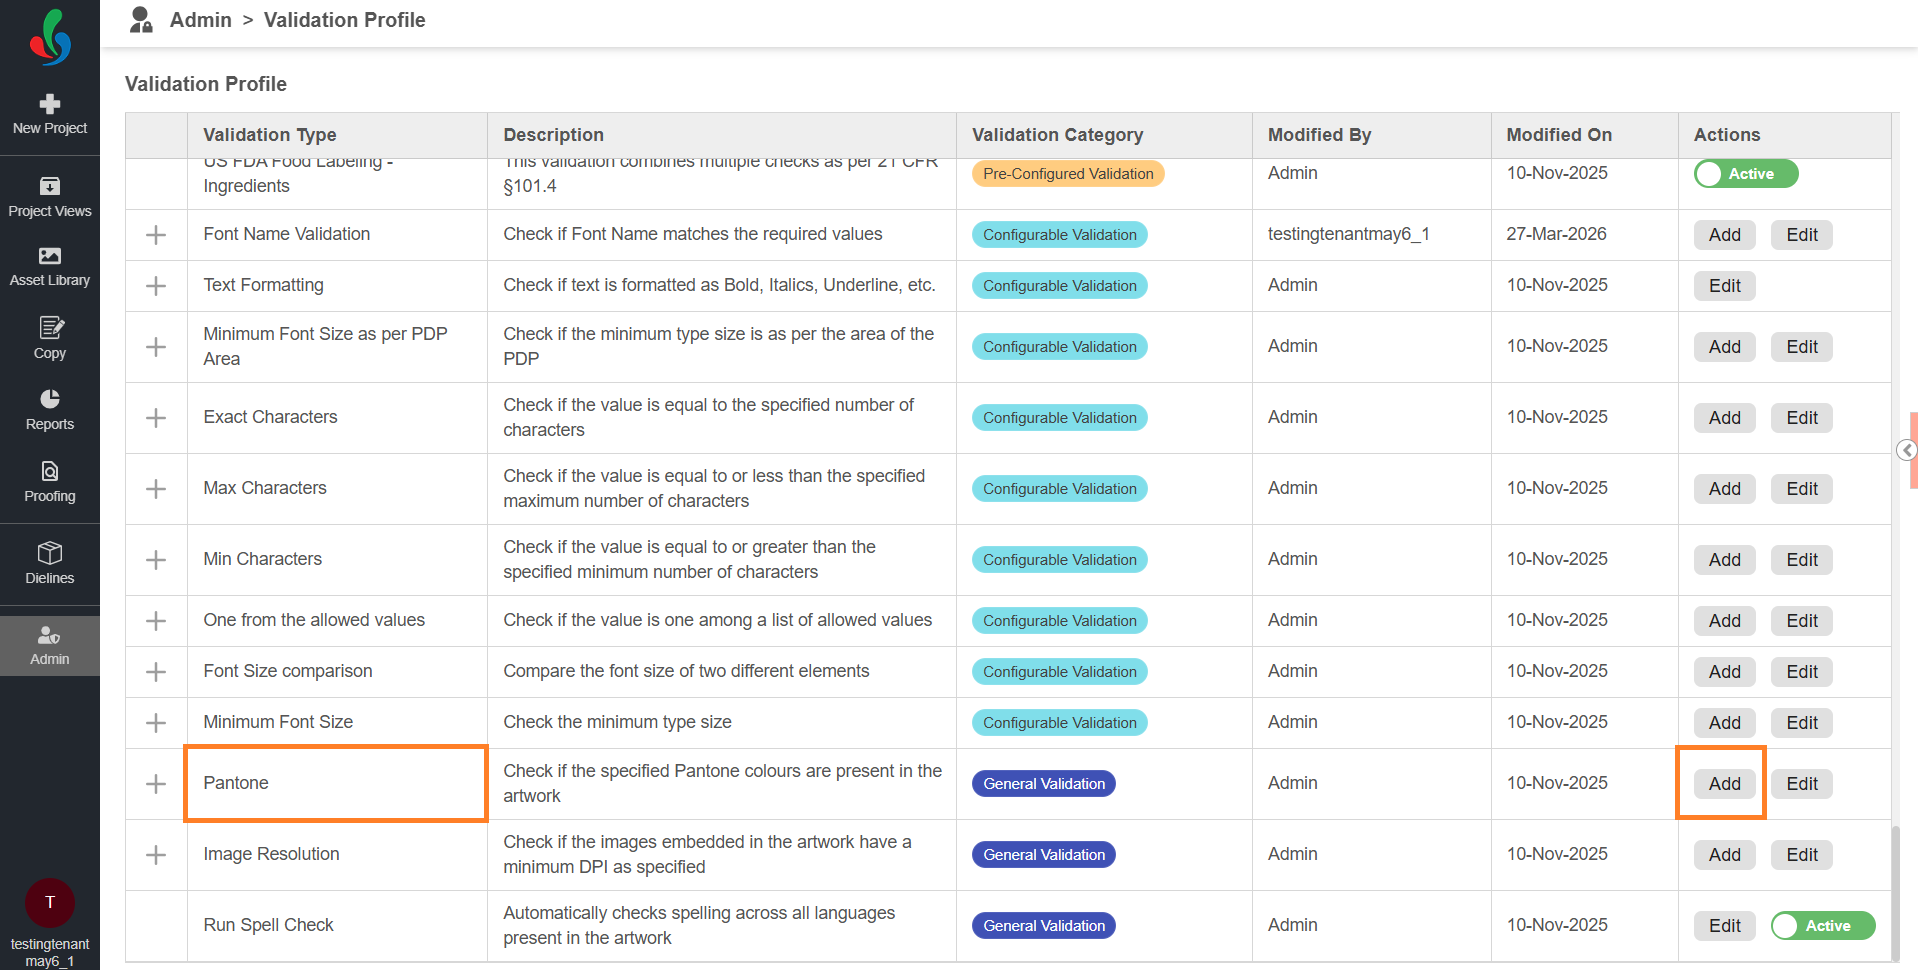
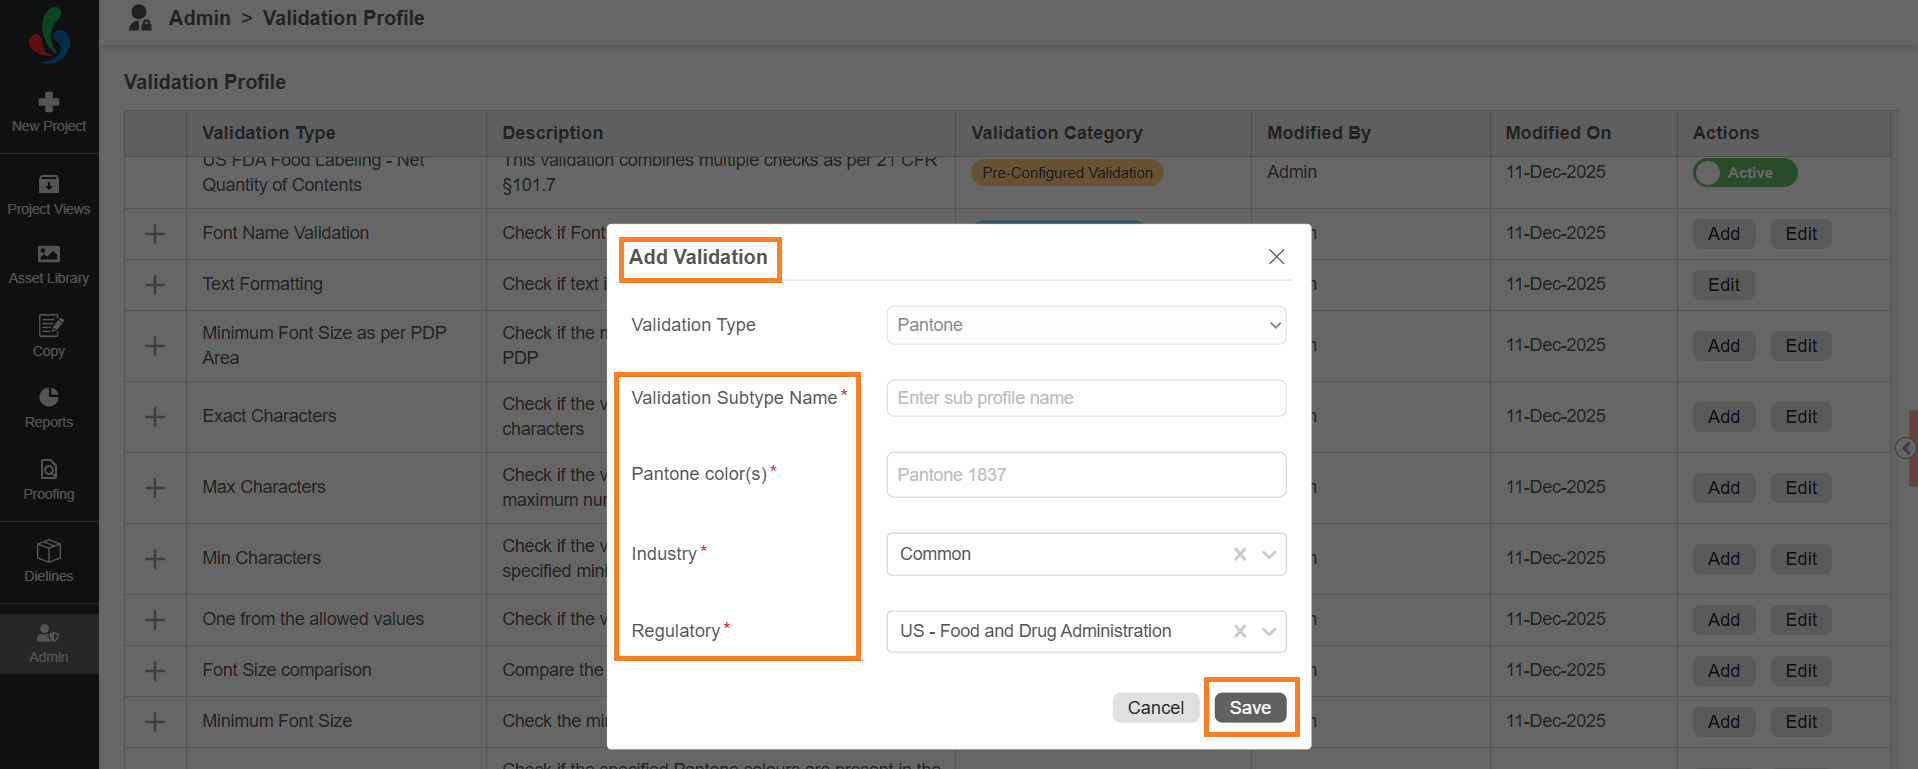
Image Resolution
Ensures that all images in the artwork meet the required DPI standards for printing.
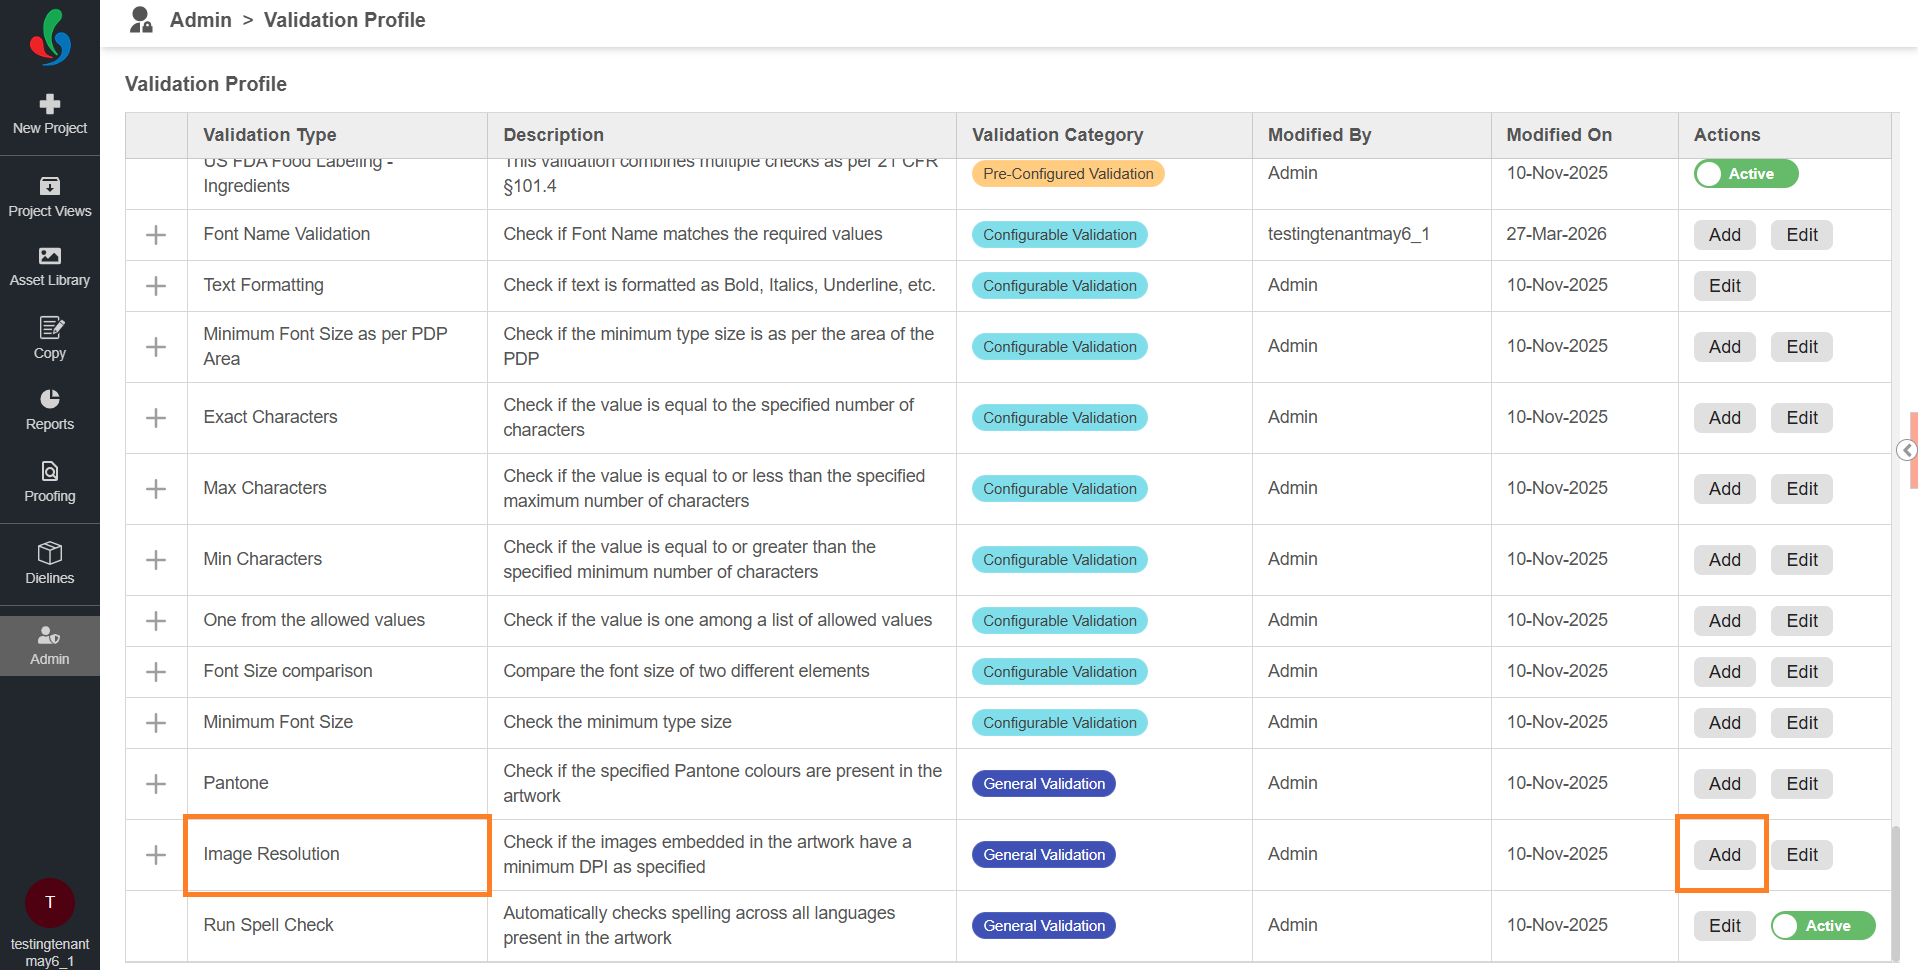
Add an Image Resolution Validation Check
To create a new validation check:
- On the Validation Profile page, locate Image Resolution profile.
- Select Add in the Actions column for Image Resolution.
- In the Add Validation dialog:
- Enter a name in Validation Subtype Name (for example, Print Quality Check).
- Enter the minimum resolution in Value.
- This defines the minimum resolution required for images during validation.
- Select Industry.
- Select Regulatory.
- Select Save to add the validation check to the profile.

Run Spell Check
Identifies spelling errors across all text present in the artwork, supporting multiple languages. This is a General Validation. No additional validation checks are required to configure it. You can enable or disable this validation as needed.
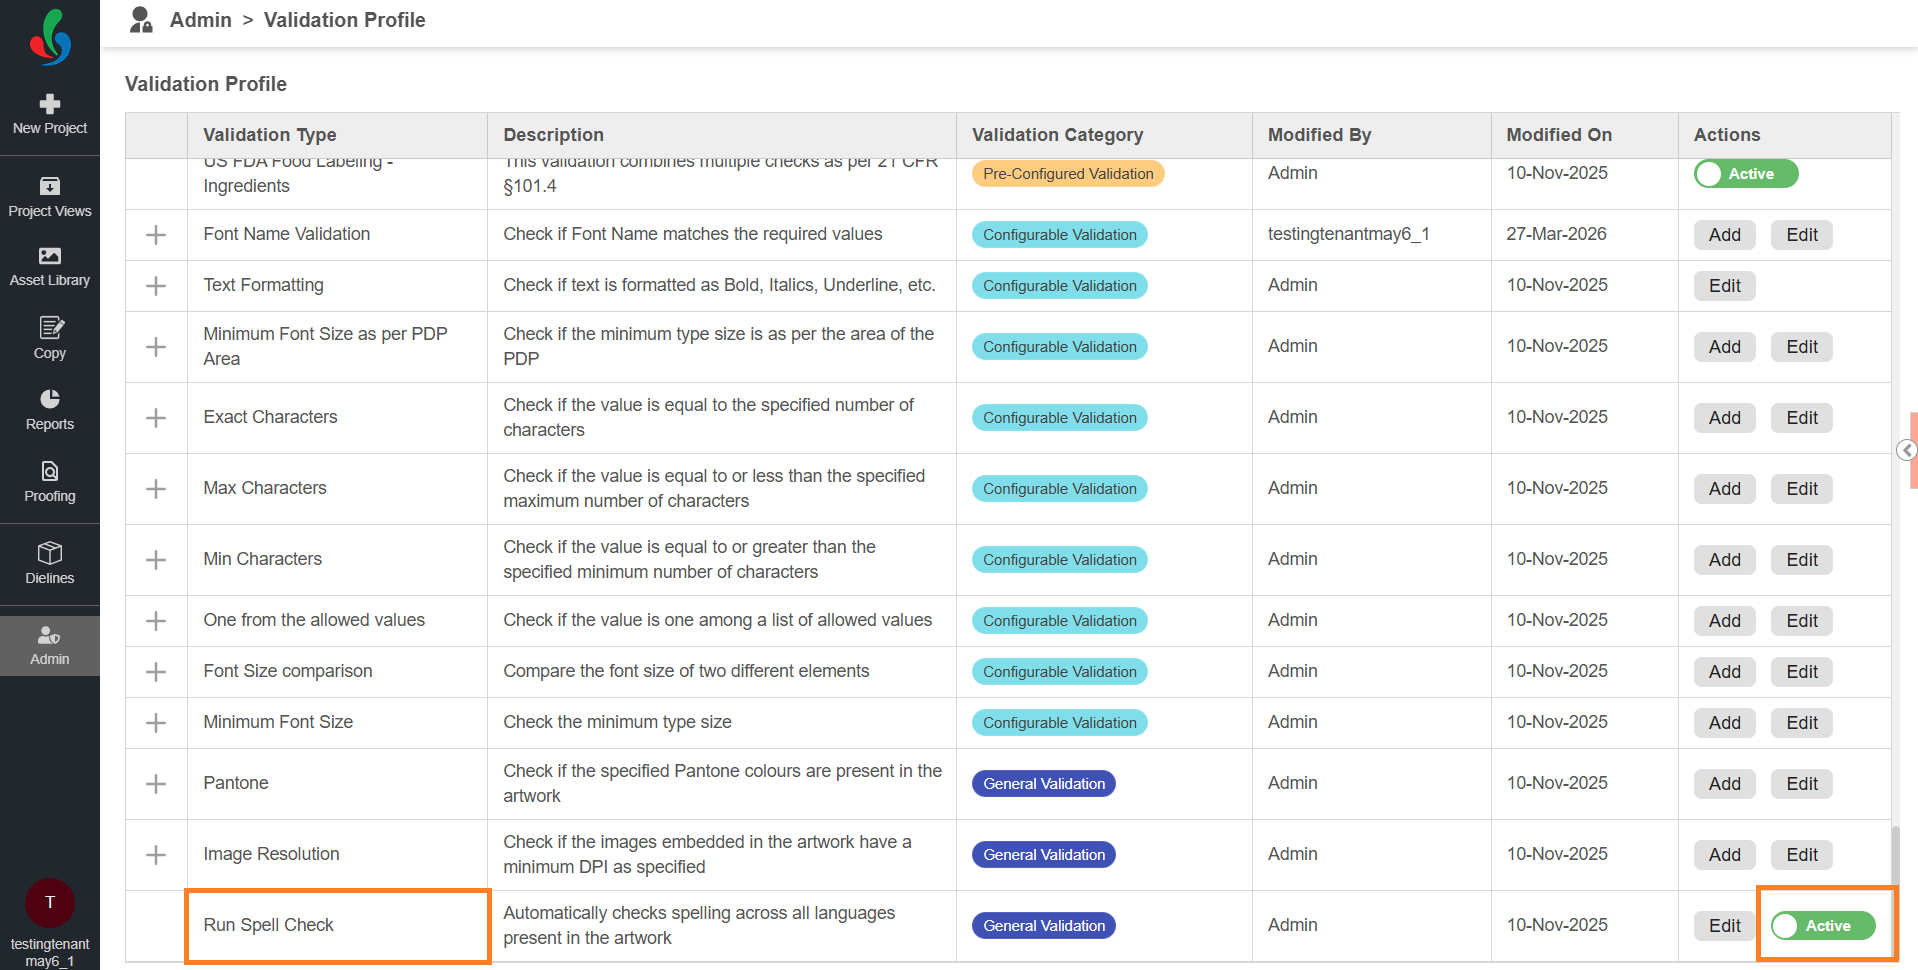
Enable or Disable Run Spell Check
To enable or disable the validation:
- On the Validation Profile page, locate Run Spell Check profile.
- Use the Active toggle in the Actions column.
Behavior
- Active – The validation is available when configuring a Compliance Profile.
- Inactive – The validation is not available for selection.
Manage Validation Checks
Once created, validation checks can be managed as required.
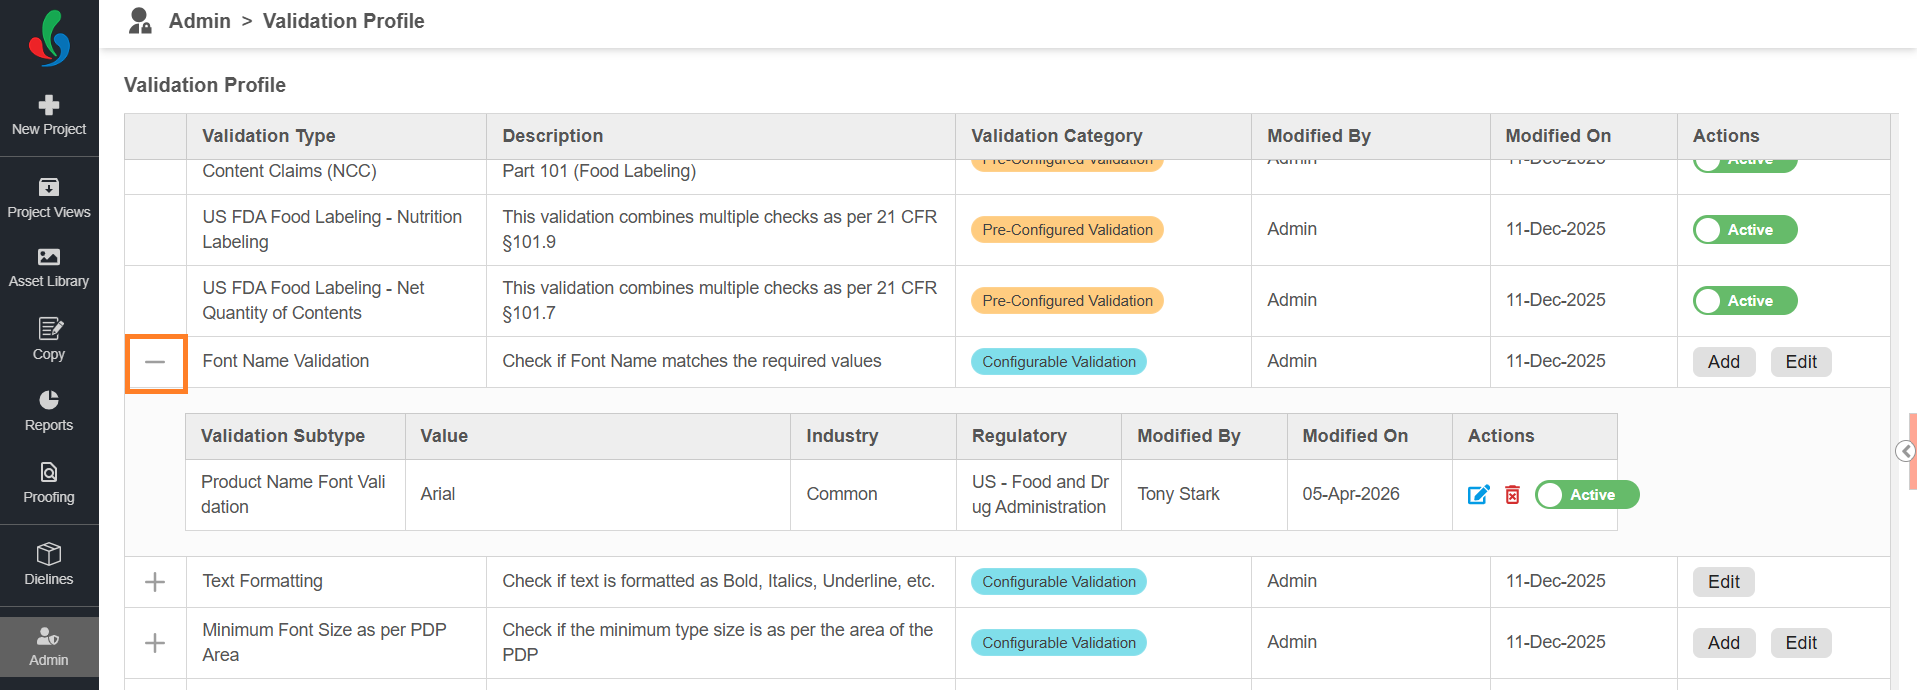
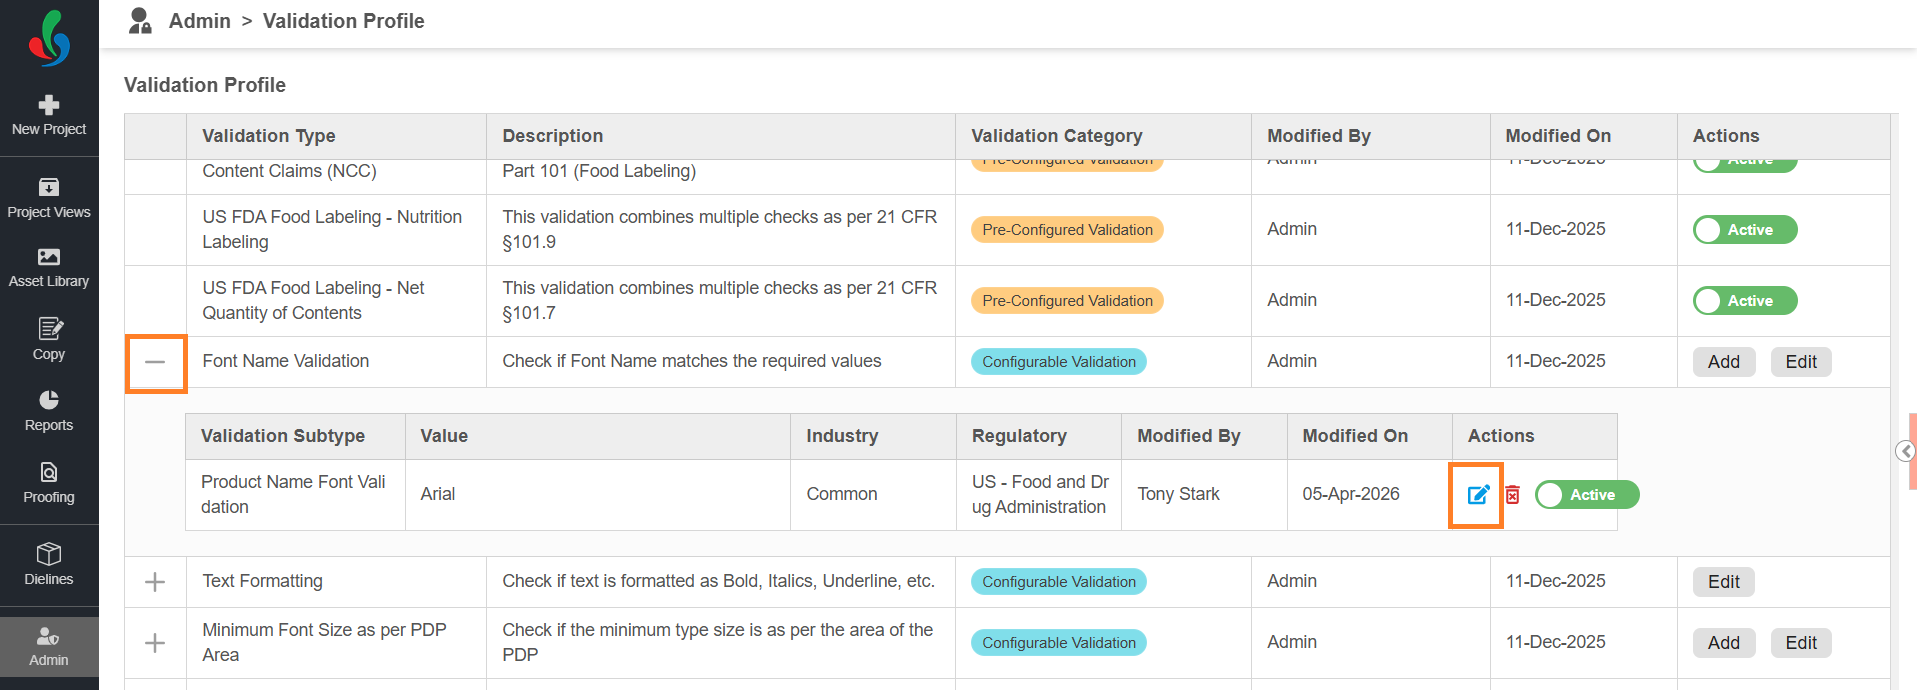
View Validation Checks
To view the configured validation checks:
- Select the expand (+) icon next to Validation profile.
- The list of added validation checks will be displayed.
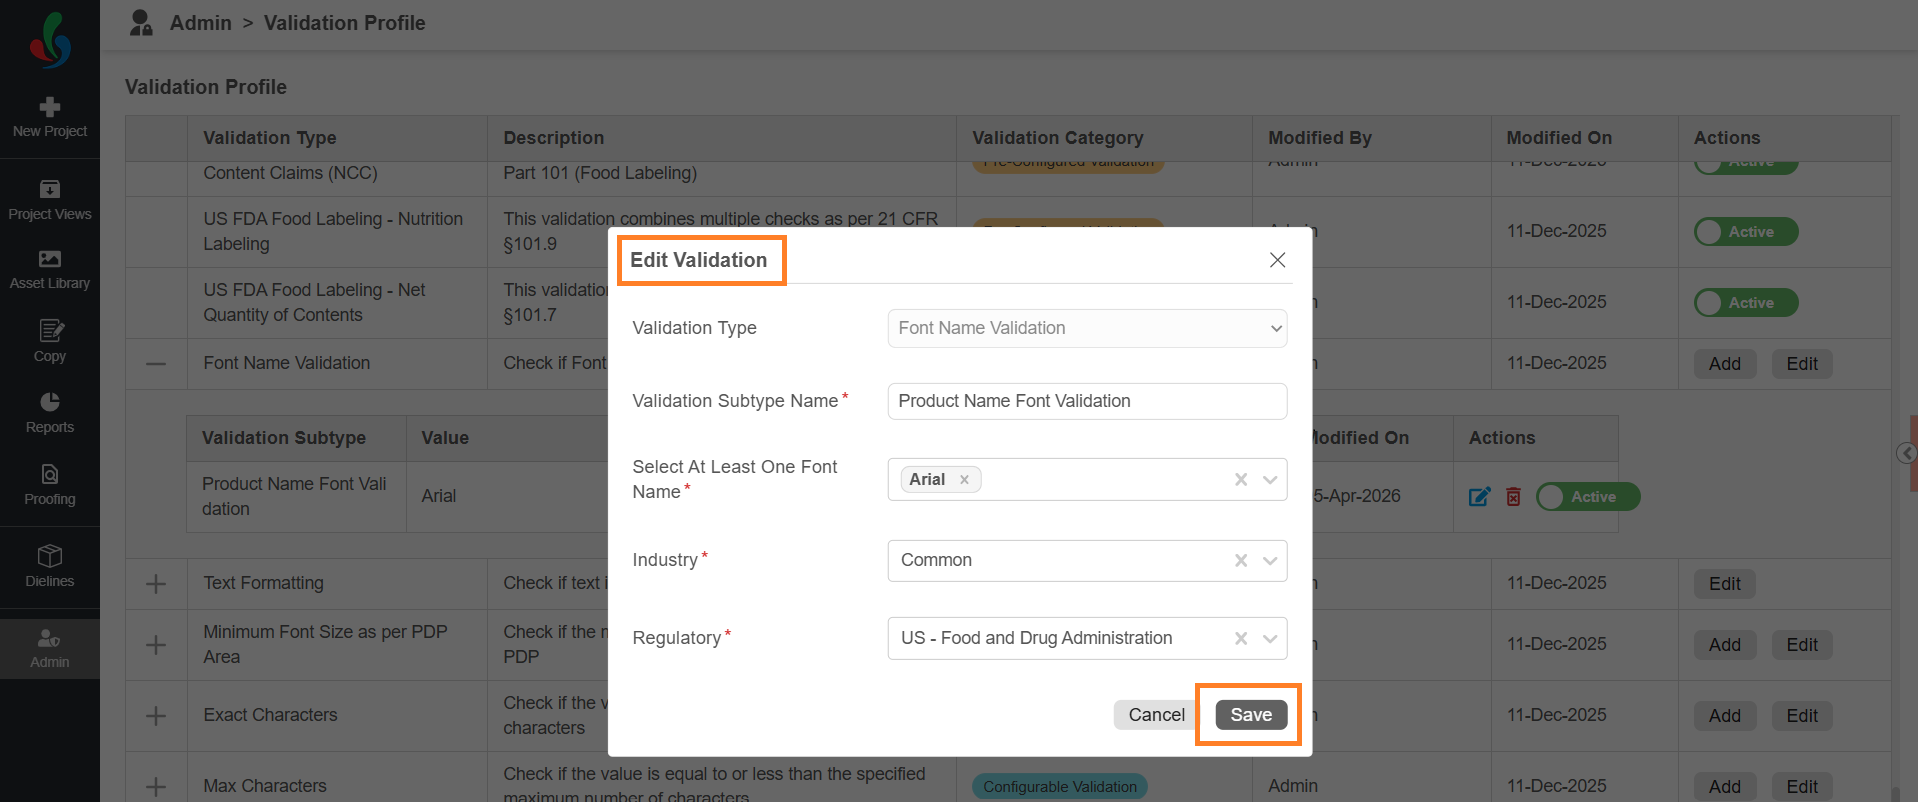
Edit a Validation Check
To update an existing validation check:
- Select the expand (+) icon next to Validation profile.
- Select Edit in the action column associated with the required validation check.
- Update the required fields in the Edit Validation dialog.
- Select Save to apply the changes.
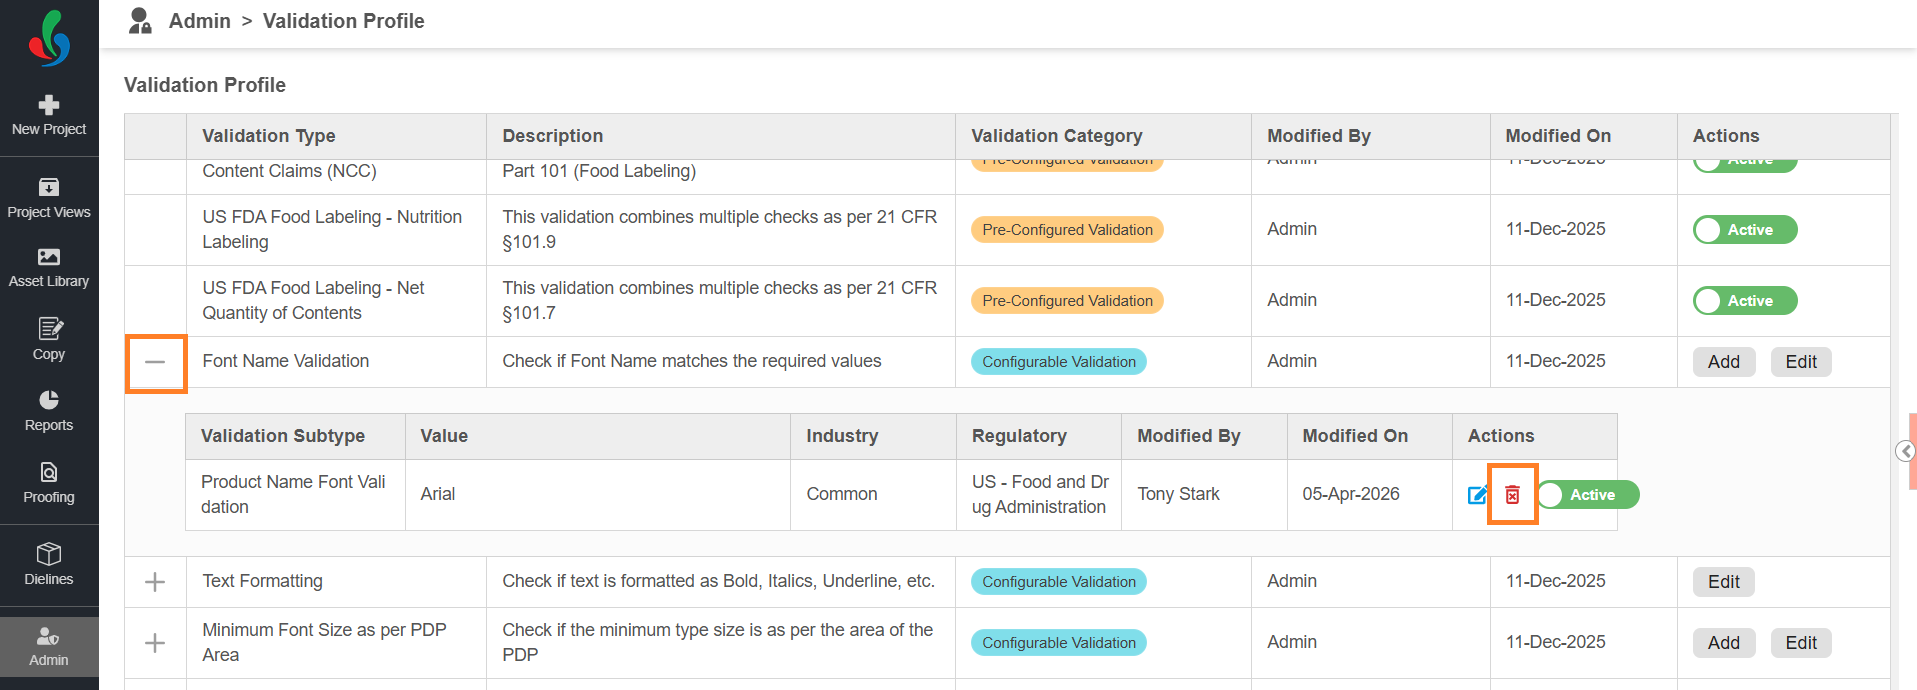
Delete a Validation Check
To permanently remove a validation check:
- Select the expand (+) icon next to Validation profile.
- Select the Delete icon for the required validation check.
| Note: Deletion is permanent and cannot be undone. No confirmation message is displayed before deletion. |
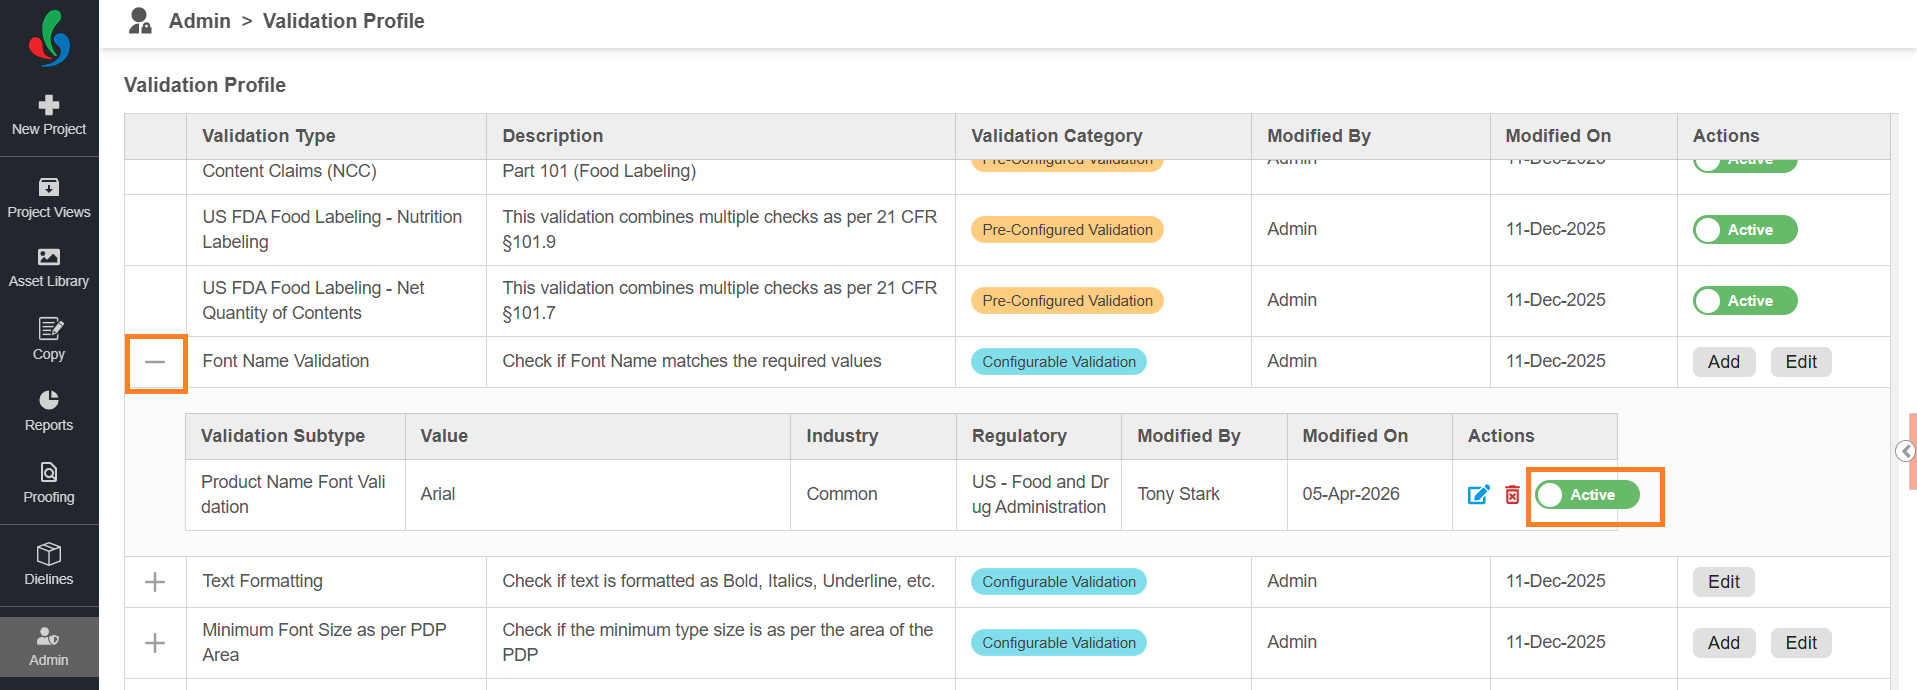
Enable or Disable a Validation Check
You can temporarily disable a validation check without deleting it.
- Select the expand (+) icon next to Validation profile.
- Use the Active toggle for the required validation check.
Behavior:
- Active – The validation check is available when configuring a Compliance Profile.
- Inactive – The validation check is not available for selection.
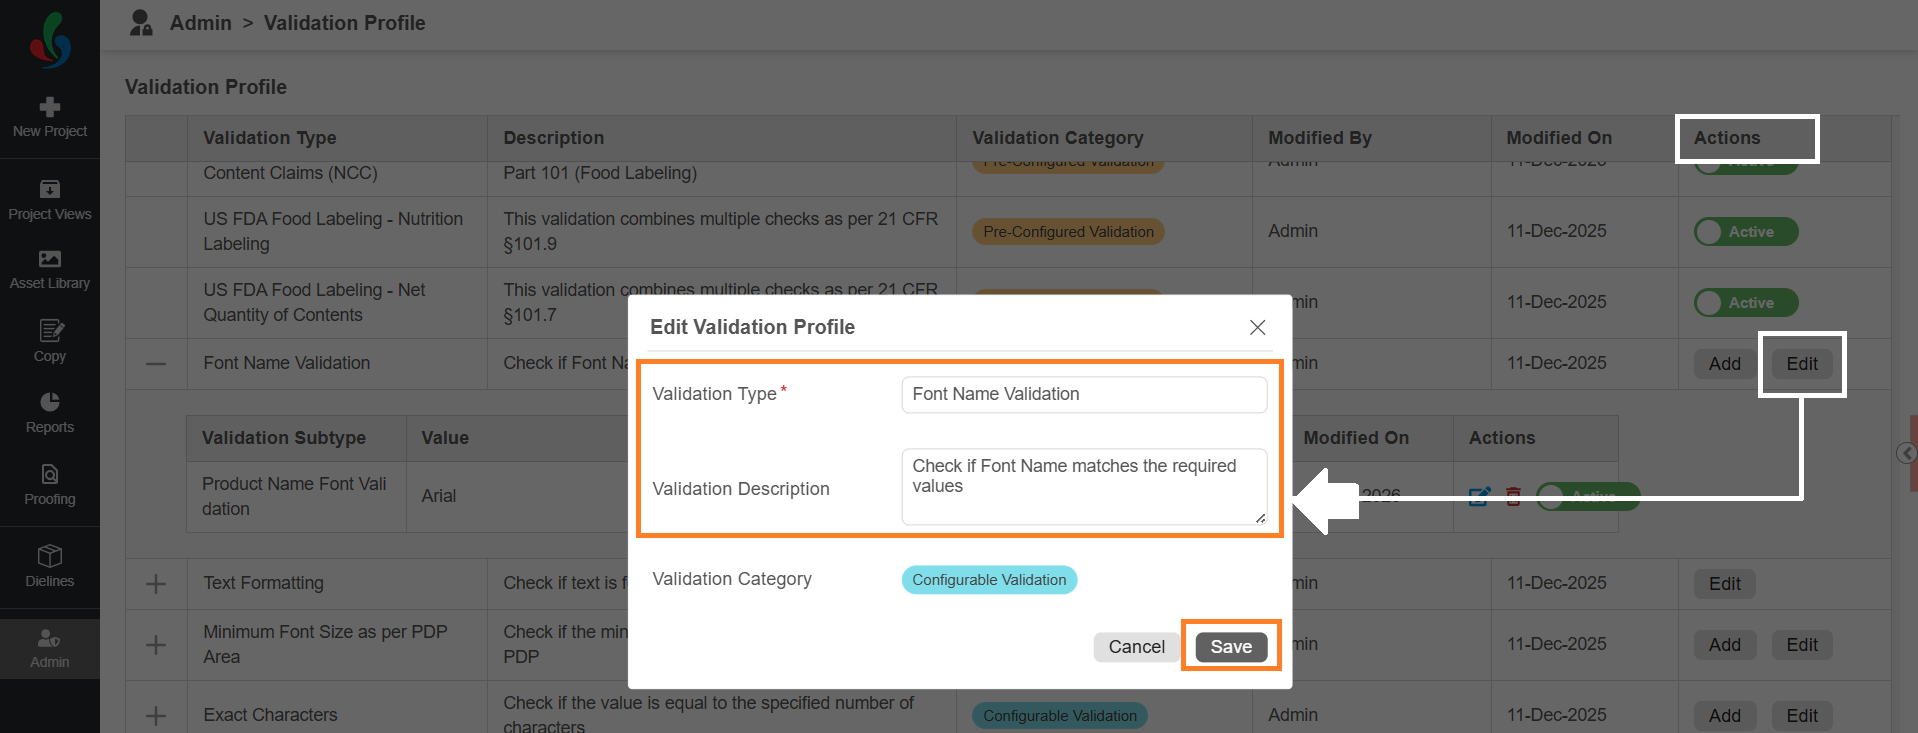
Edit Font Name Validation Profile
You can update the name and description of the validation profile. This does not affect how the validation works.
To edit the validation profile:
- On the Validation Profile page, locate desired Validation profile.
- Select Edit in the Actions column for Validation profile.
- Update the Validation Type name and Description as required.
- Select Save to apply the changes.
Next, Configure Compliance Profile