
Copy Templates
A Copy Template allows you to preconfigure and group copy elements, along with their associated settings, such as:
- Participant assignments
- Translation configuration
- Translation participants
- Predefined values
- Approval status (if applicable)
By using a Copy Template, you can add multiple predefined copy elements to a project in a single action, instead of creating and configuring each element individually.
This helps maintain standardization, ensures consistent participant assignments, and significantly reduces setup time.
 | Runtime FlexibilityEven after importing elements from a Copy Template during project execution:
Using Copy Templates provides a balance between standardization and flexibility, allowing organizations to enforce consistent copy structures while still supporting project-specific adjustments. |
Create a New Copy Template
To create and configure a copy template:
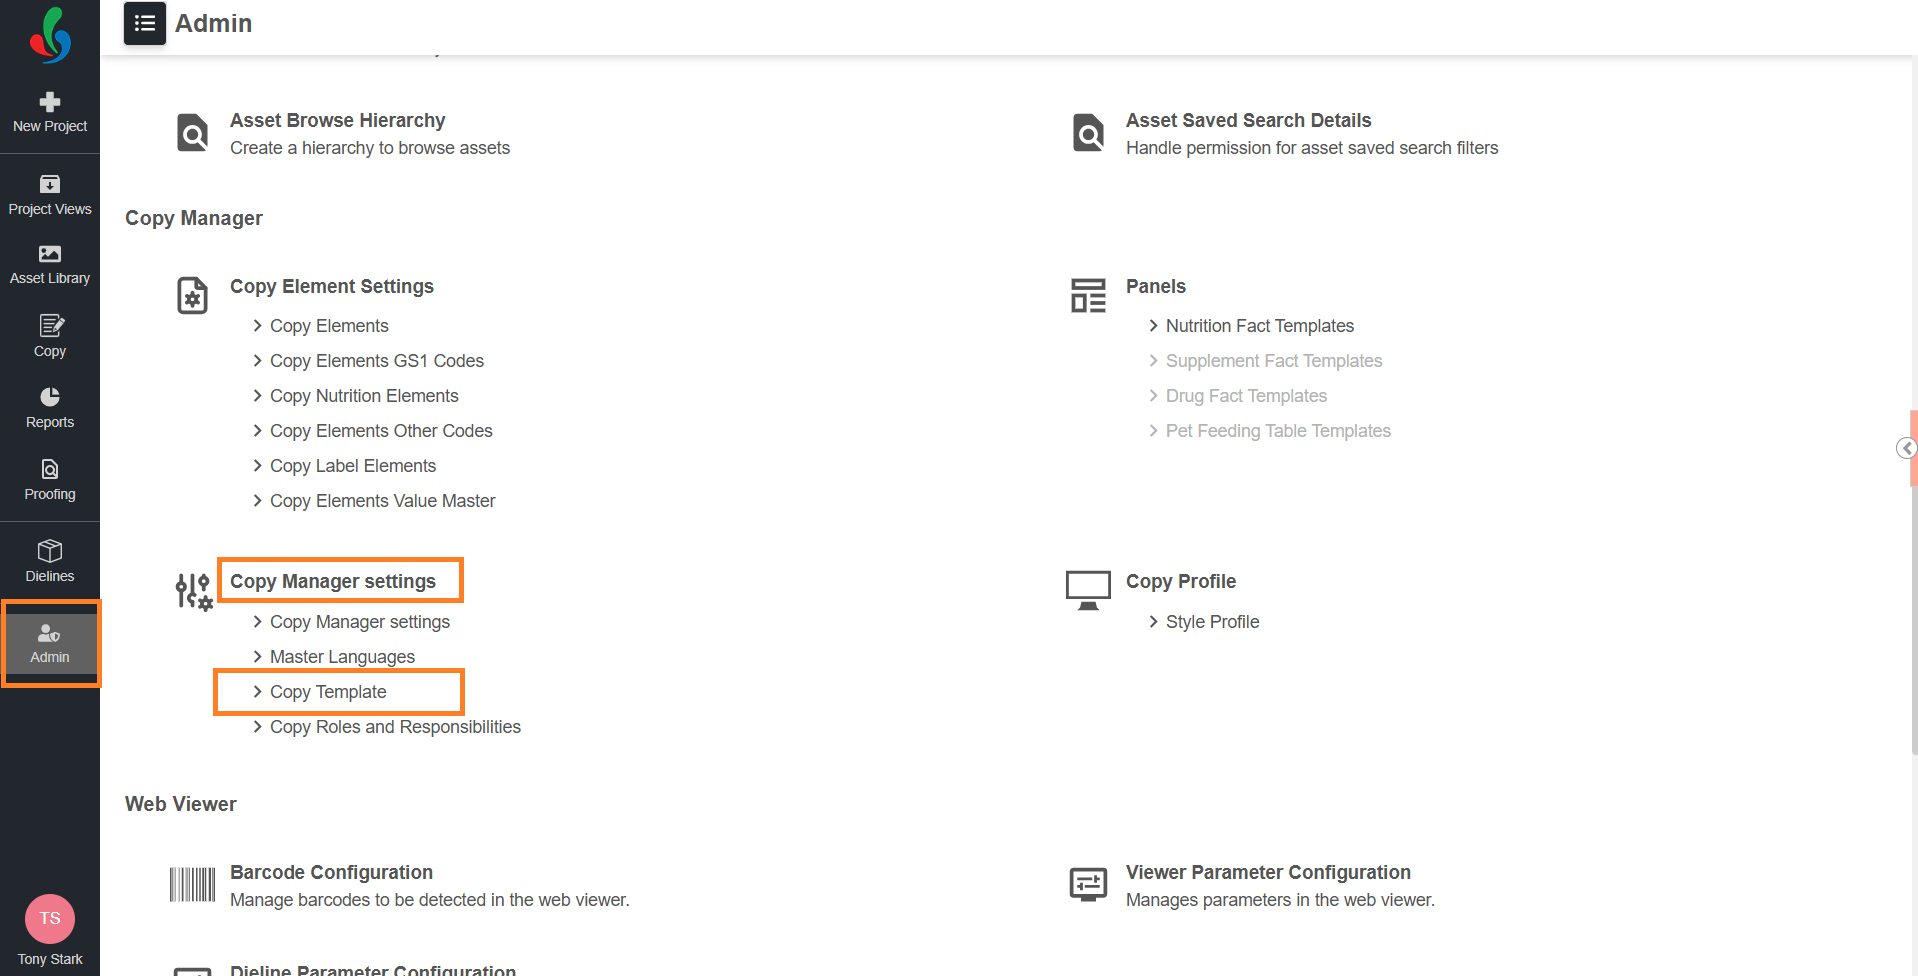
01. Access Copy Template
- Sign in to your ManageArtworks account.
- Navigate to the Admin module.
- Under Copy Manager Settings, select Copy Template.
The Copy Template page displays all existing templates.
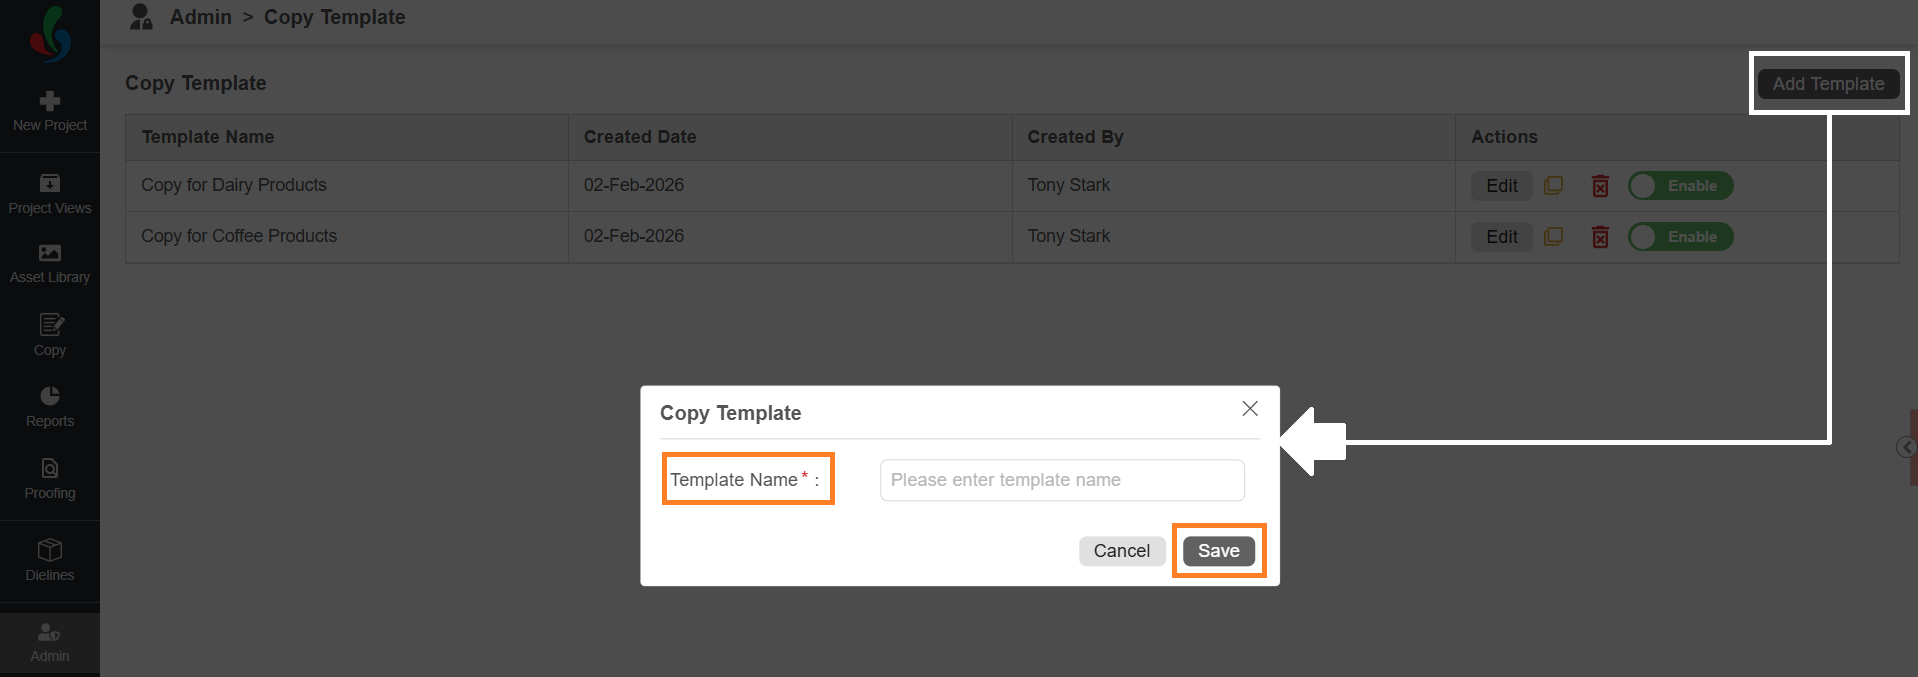
02. Create the Template
- Select Add Template in the top-right corner.
- Enter the Template Name.
- Select Save.
The system redirects you to the Edit Template page, where you can configure the template.
03. Configure the Template
On the Edit Template page, configure the template based on your business requirements.
You can:
- Associate metadata
- Add copy elements
- Configure translation languages
- Assign participants
1. Add Metadata (Optional)
You can associate a Copy Template with specific project metadata. Metadata configuration helps the system identify when a template is applicable during project execution.
Metadata configuration is useful in the following scenarios:
- Matched Templates During Runtime
- When metadata is configured for a Copy Template:
- During project execution, if a user selects From Copy Template, the pop-up displays:
- All Templates – All templates available in the system
- Matched Templates – Only templates whose metadata matches the project
- This helps users quickly identify which template is relevant for the project.
- A template appears under Matched Templates only when the metadata values configured in the template match the project’s metadata.
- During project execution, if a user selects From Copy Template, the pop-up displays:
- When metadata is configured for a Copy Template:

- Auto Template Load (If Enabled)
- If Auto Template Load is enabled in Copy Manager Settings, the system automatically loads a matching Copy Template when the user opens the Copy tab during project execution.
- A template is considered a match when:
- The metadata fields configured in the template match the project’s metadata values.
 | Note: Only Project Metadata fields with the Use as Collection property enabled are available for selection. Copy template appears under Matched Templates and loads automatically (if enabled) only when all the configured metadata field and its selected value match the project’s metadata. |
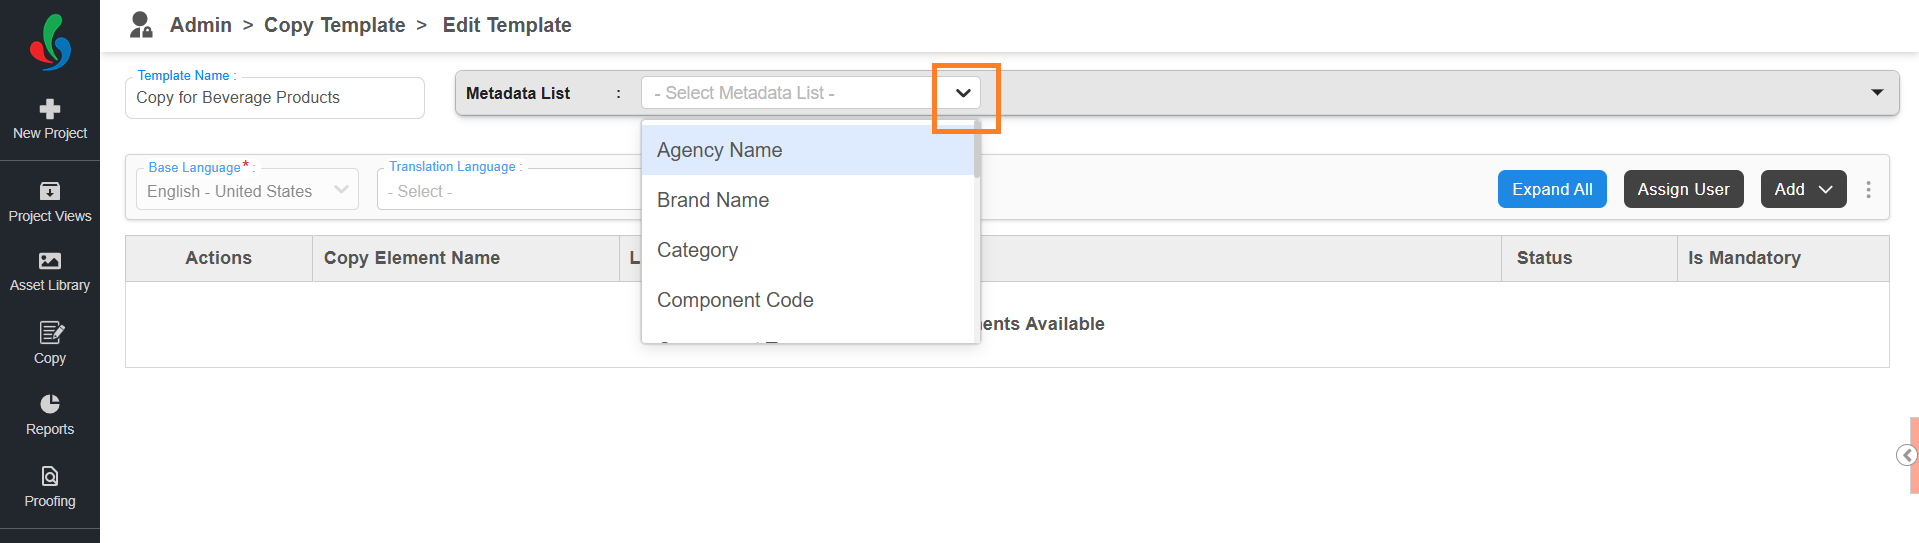
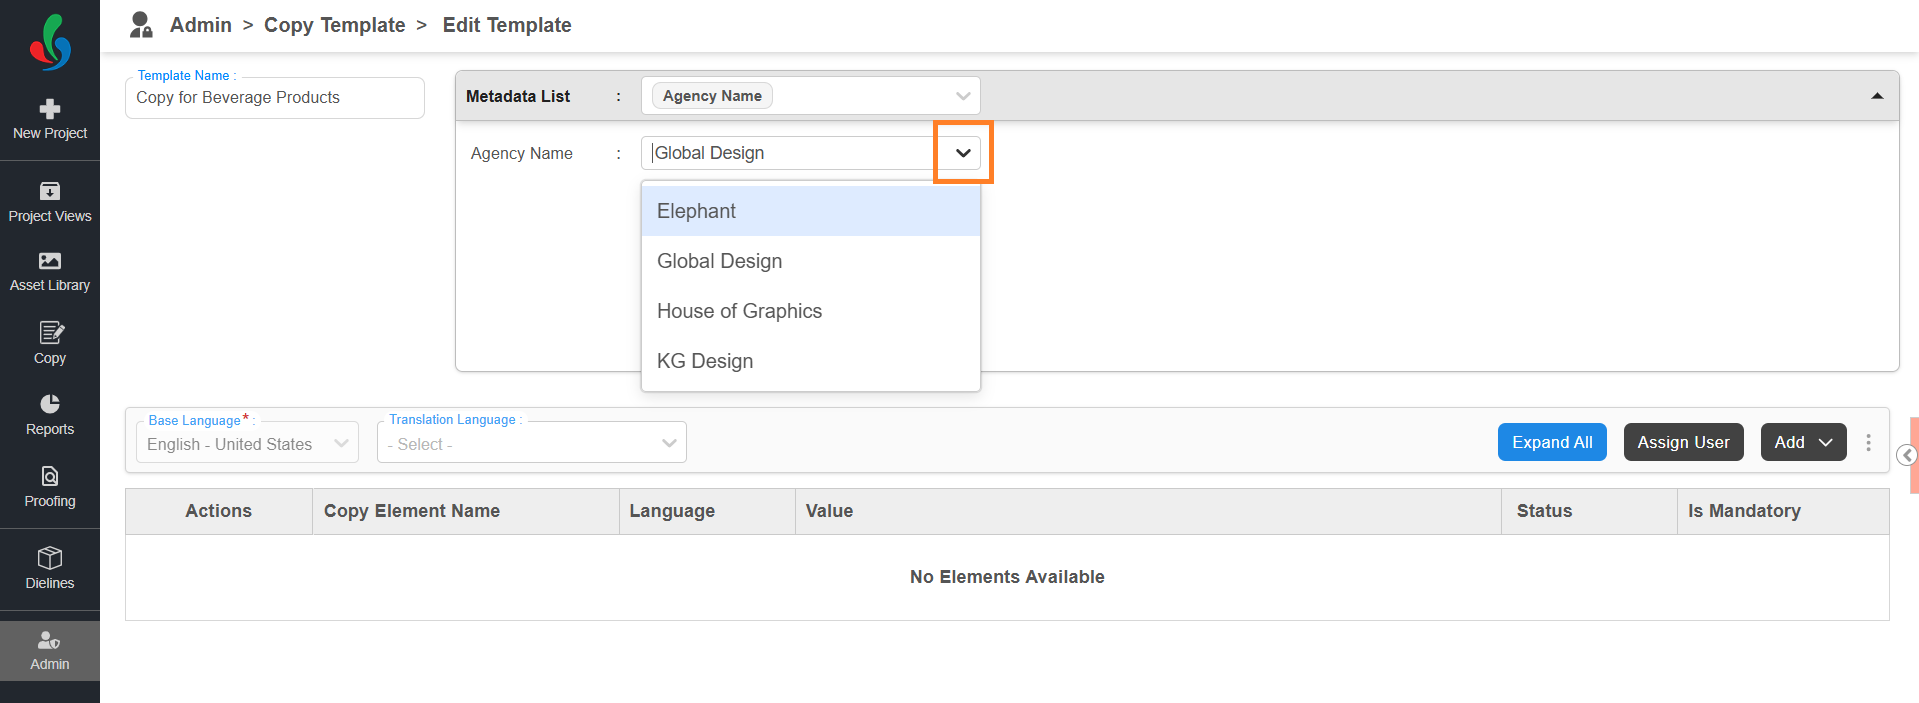
Configure Metadata for a Copy Template
To associate metadata:
- Select the Metadata List drop-down menu.
- Select the required metadata field.
- Once selected, the metadata field appears below the Metadata List section.
- Select the appropriate value using the associated drop-down menu.
Note: If a metadata field is selected but no value is defined, it will not be considered for matching.
- Once the metadata value is configured:
- The template becomes available under the Matched Templates tab when the project metadata matches.
- If Auto Template Load is enabled, the template is automatically loaded when a match is found.
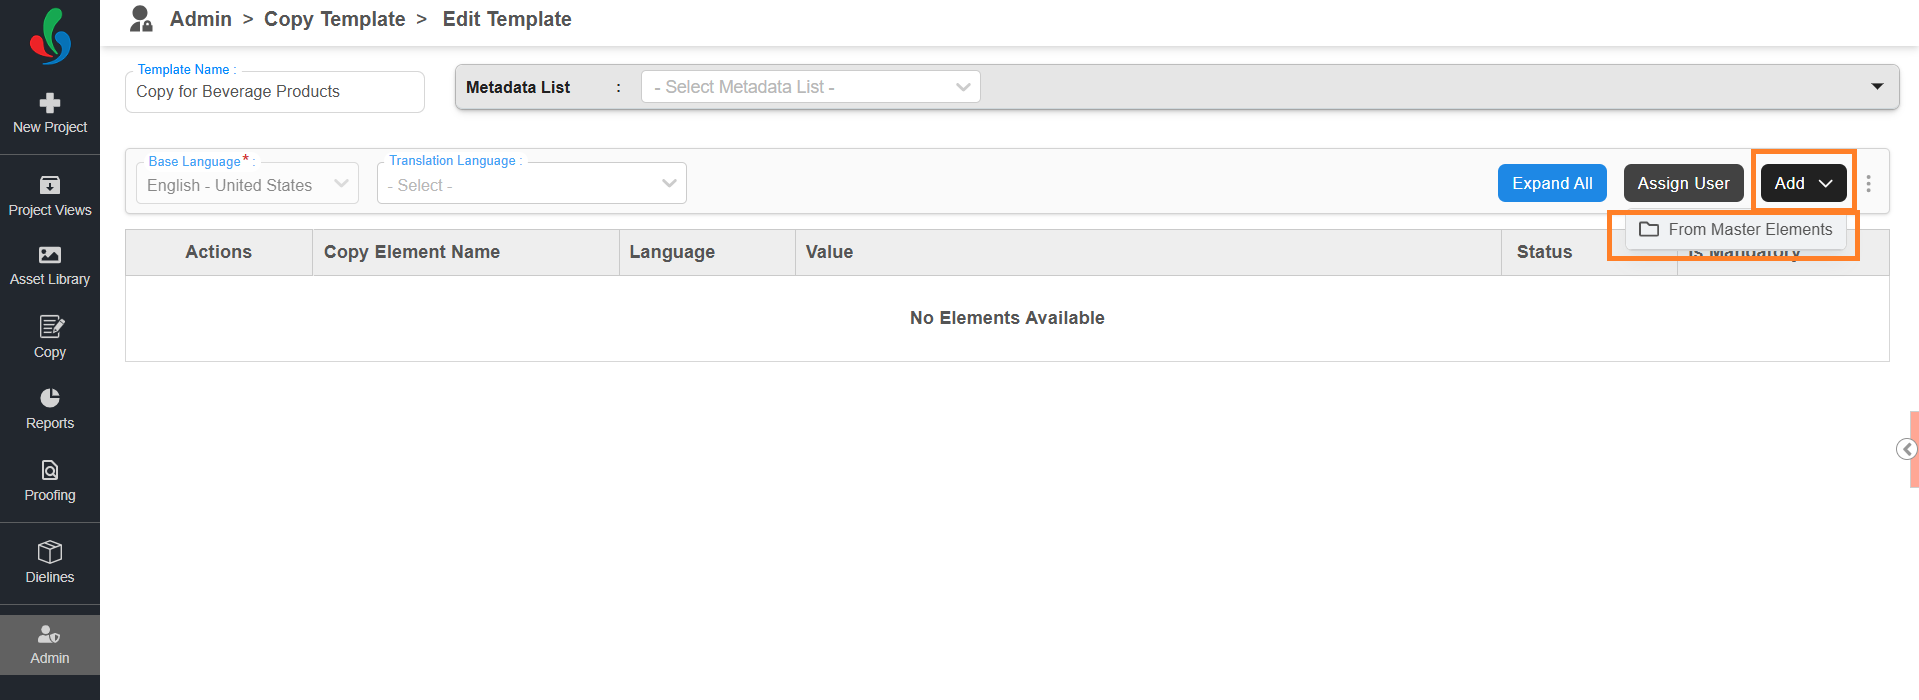
2. Add Copy Elements
To add copy elements:
- Select the Add drop-down menu.
- Select From Master Elements.
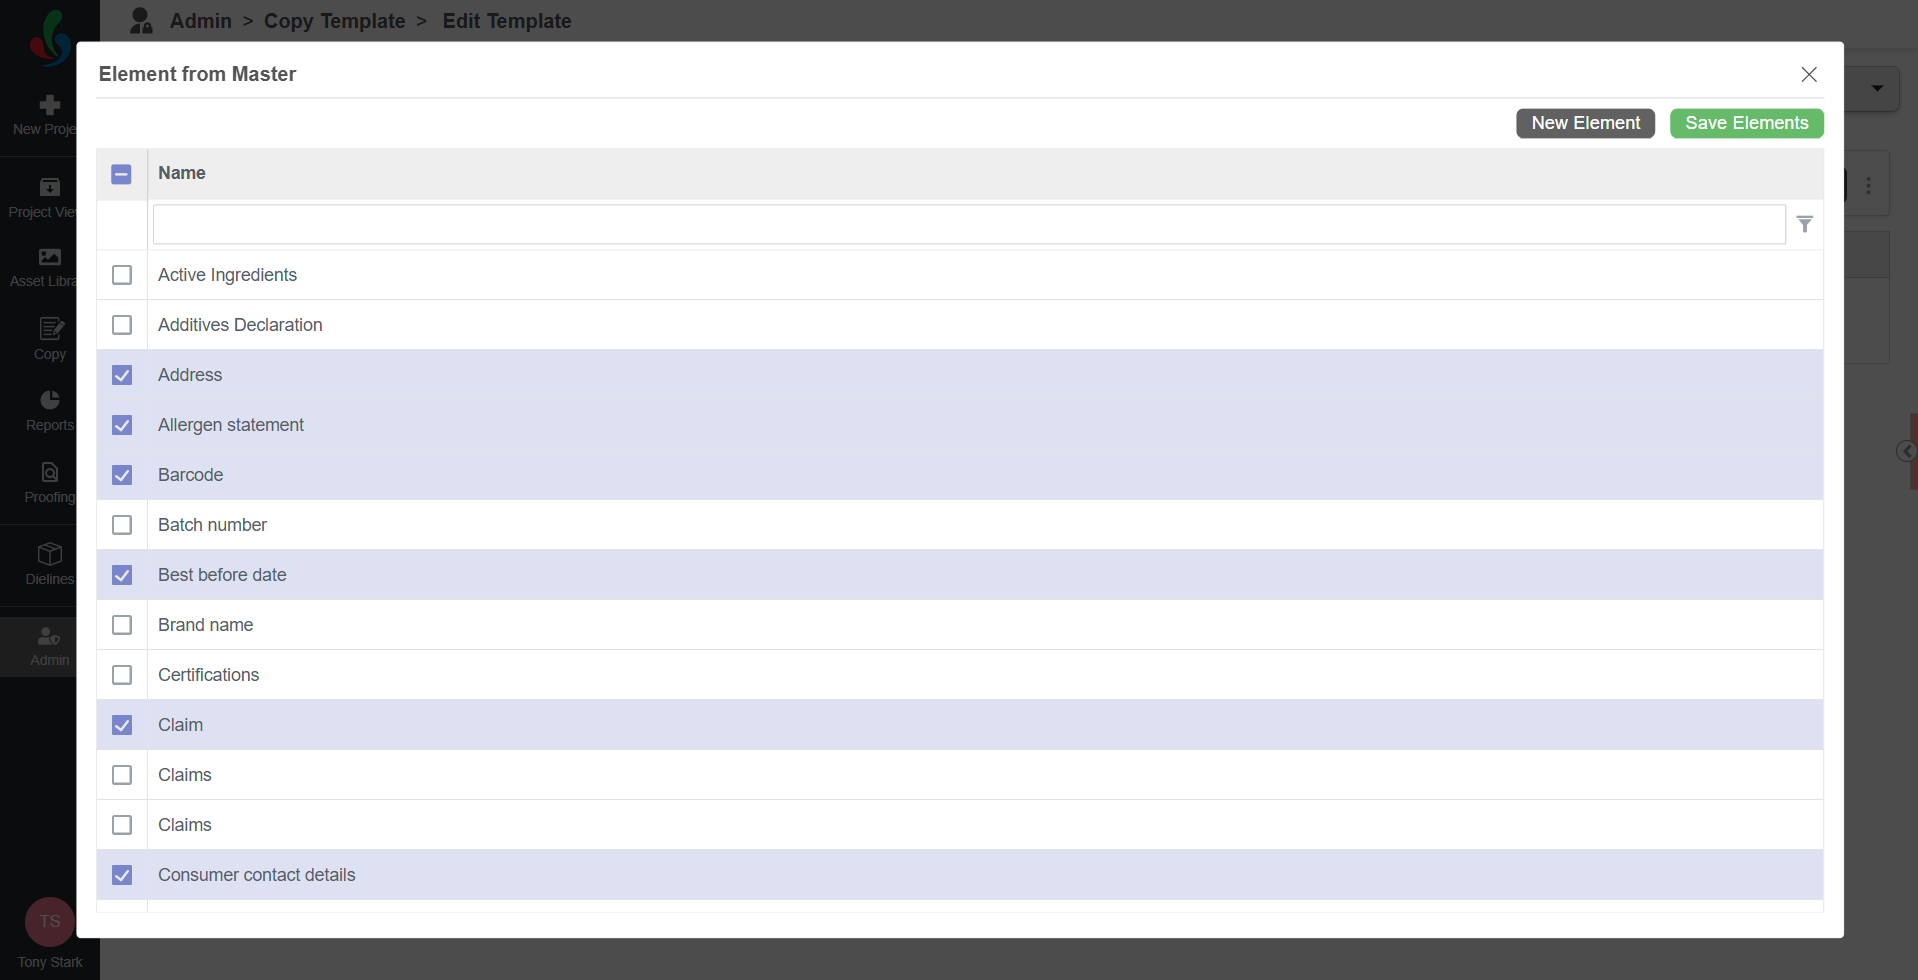
- A list of copy elements defined in Master Data appears.
Note: To manage Master Data elements, refer to the Copy Elements section. - Select the elements you want to include in the template.
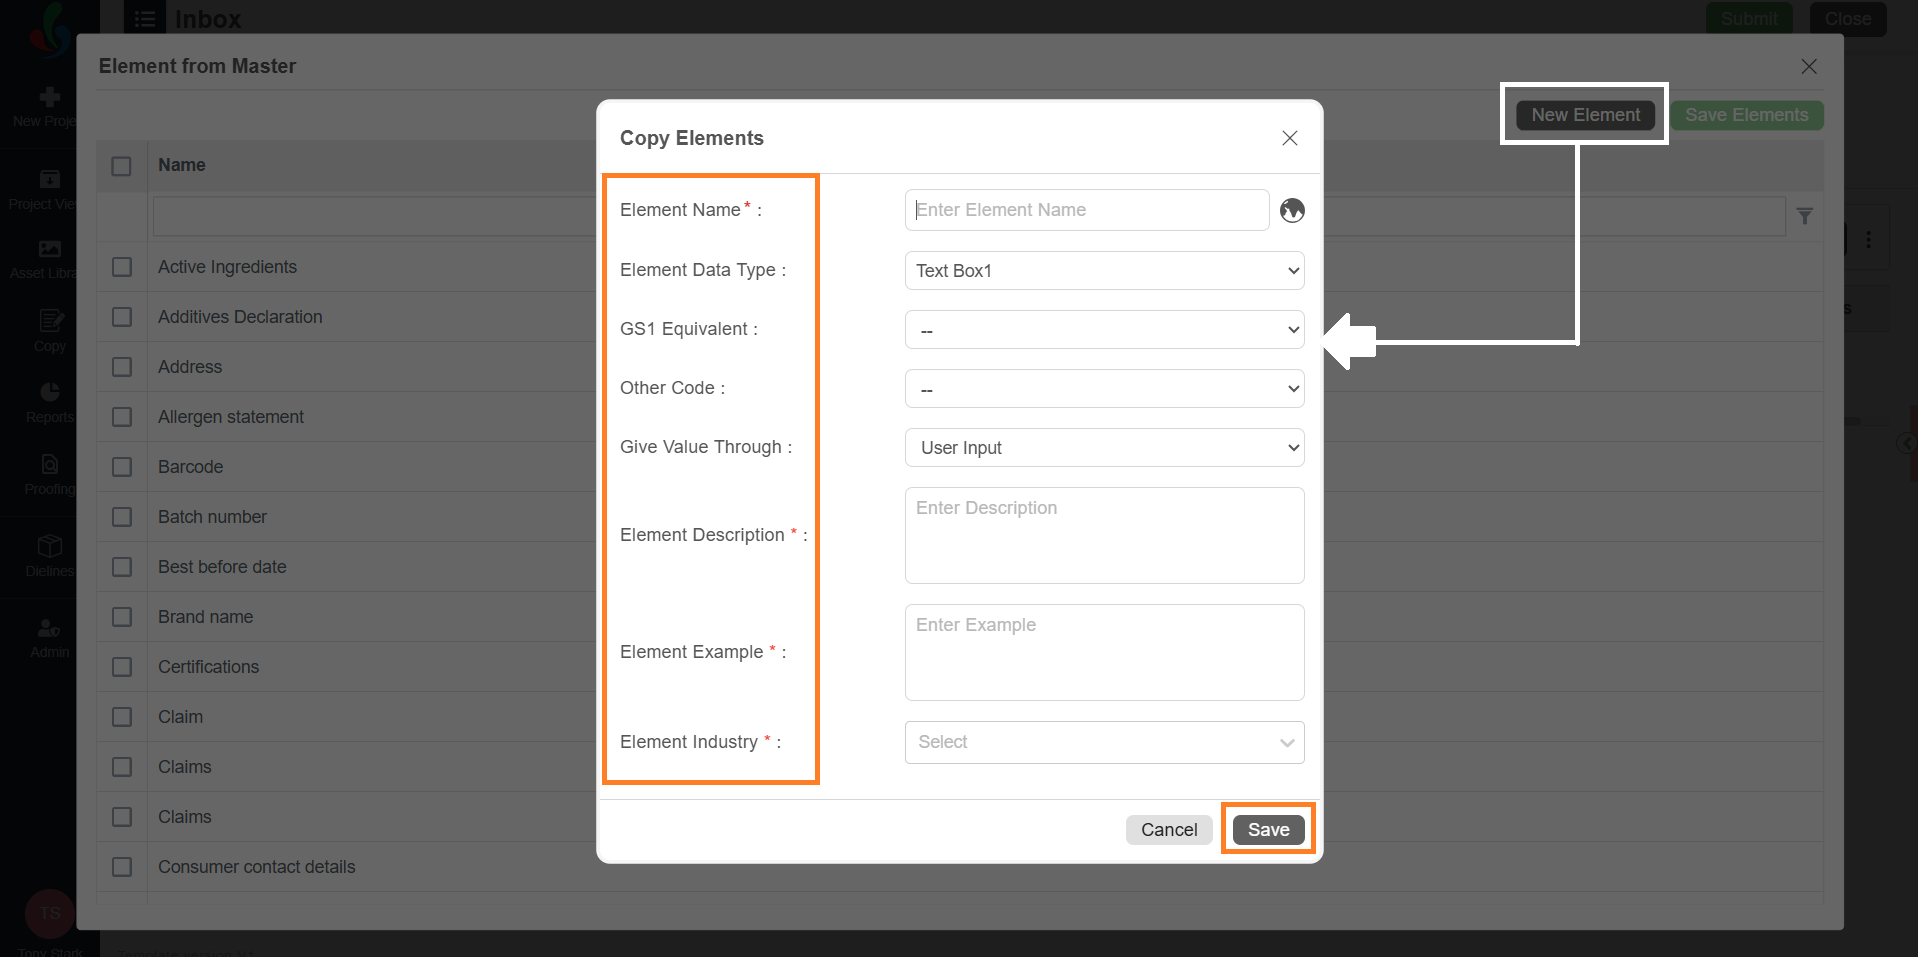
- If a required element is not available in the list, select New Element to create one:
- In the New Element popup, provide the following details:
Note: Fields such as GS1 Code, Other Code, and Priority are displayed only if they are enabled in Copy Manager Settings.- Element Name: Enter the name of the copy element. To add the name in another language, click the globe icon and enter the translated name in the appropriate language box.
- Element Data Type: Choose a suitable data type from the dropdown:
- Text Box1: For alphanumeric text entries.
- Nutrition Panel: For elements related to nutrition facts.
- Image: Use this if the element value should be an image (e.g., Barcode).
- Text Box1 + Text Box2: If you require two text inputs for the element (e.g., size with unit).
- GS1 Equivalent (optional): If applicable, select a corresponding GS1 code from the dropdown.
Note: Ensure the relevant GS1 code is already defined in the GS1 Master Data, or it won't appear in the dropdown. - Other Code (optional): If applicable, select a corresponding other code from the dropdown.
Note: Ensure the relevant Other Code is already defined in the Other Code Master Data, or it won't appear in the dropdown. - Give Value Through: Select a suitable option from the dropdown:
- User Input: Allows users to manually enter values.
- Value Master: Restricts users to select predefined values.
Note: The corresponding values must be configured under Copy Elements Value Master.
- Priority (optional): Set a numeric priority for the element.
- Element Description: Provide a brief description explaining the purpose or usage of the element. This helps users understand the element and supports copy extraction, compliance-related automated validations, and AI training. The description does not need to be exact; a brief or sample description is sufficient.
- Element Example: Provide a sample value for the element. This helps users understand the expected format and supports automated validation and AI training. The example does not need to be exact.
- Element Industry: Select the industry relevant to the element. This helps users contextualize the element and allows the system to apply industry-specific compliance checks, and AI training.
- Select Save to add the element to the system or master data.
- In the New Element popup, provide the following details:
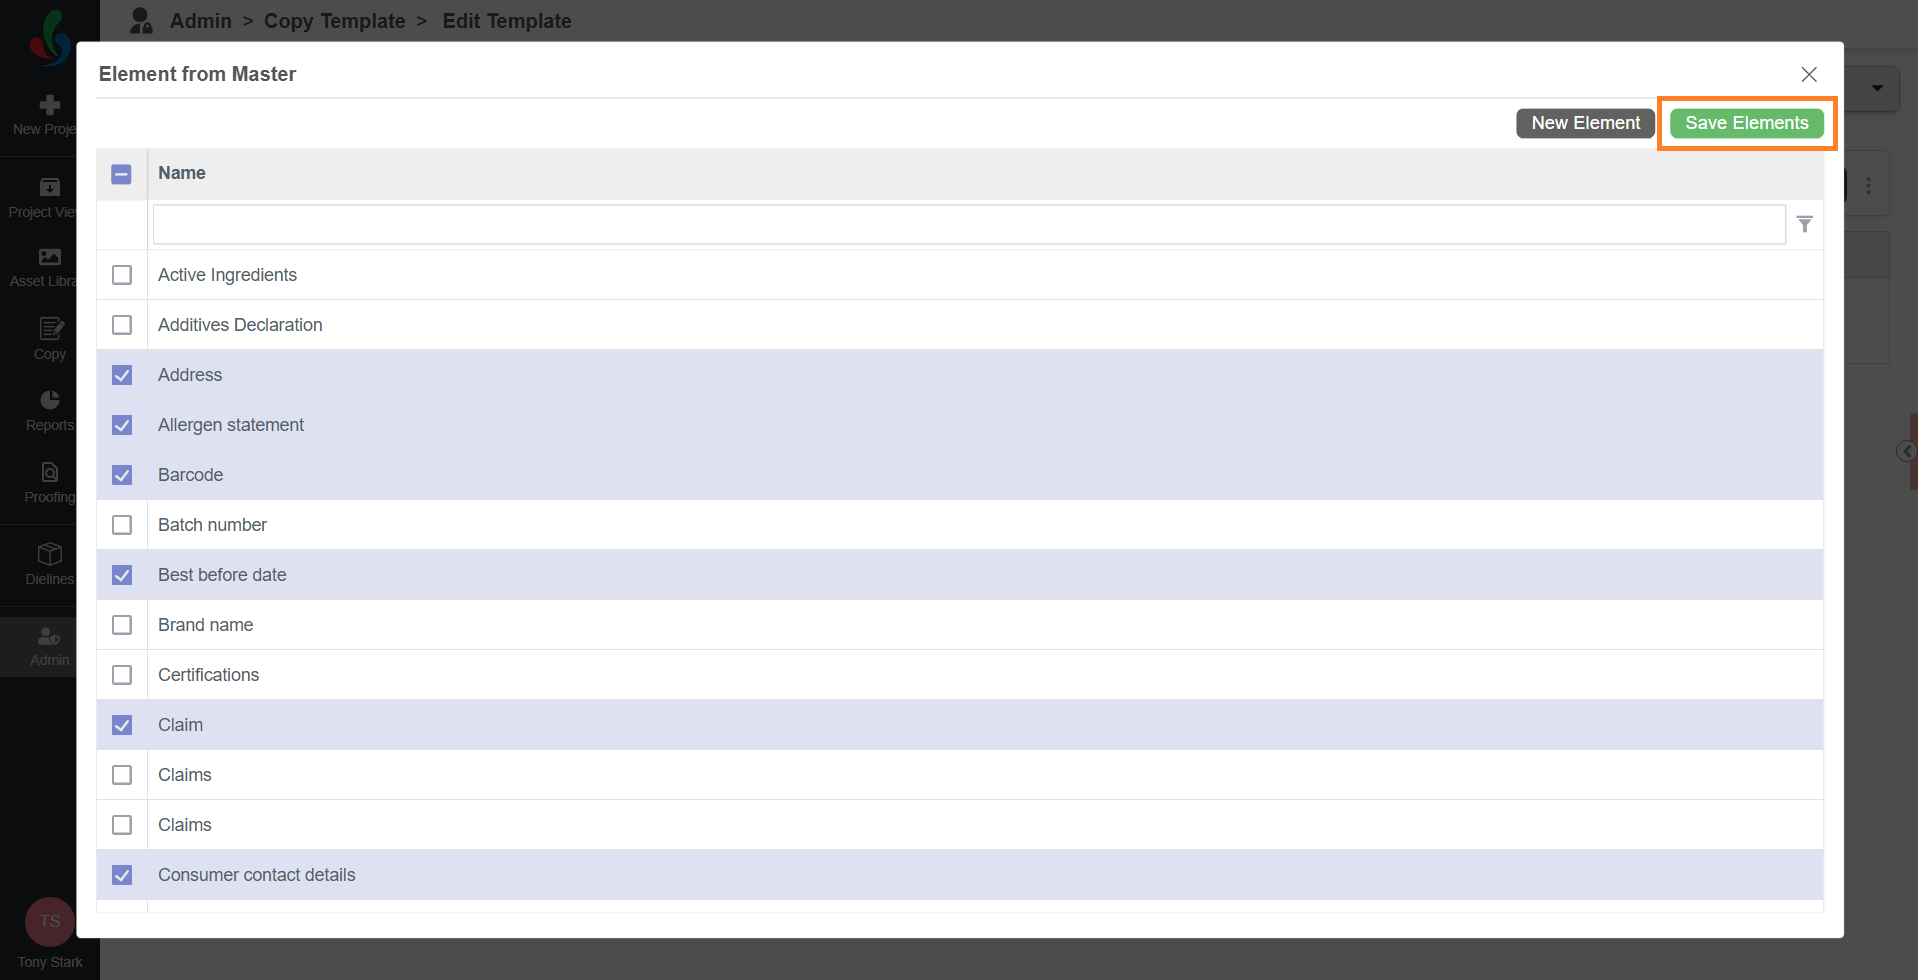
- Once all desired elements are selected, select Save Elements to add them to the copy template.
3. Add Translation to Copy Elements
If your project requires copy content in multiple languages, you can configure translations at the element level. This allows you to control exactly which elements require translation and which languages apply to each element.
Translation configuration defined here is used later during:
- Translation Input Task
- Translation Approval Task
| How Translation Configuration Works
Auto Translation Behavior (If Enabled) If Auto Translation is enabled in Copy Manager Settings, the system behaves as follows:
|
| Note: Even when translation configuration is imported from a copy template, end users can edit or update the translation settings during project execution. |
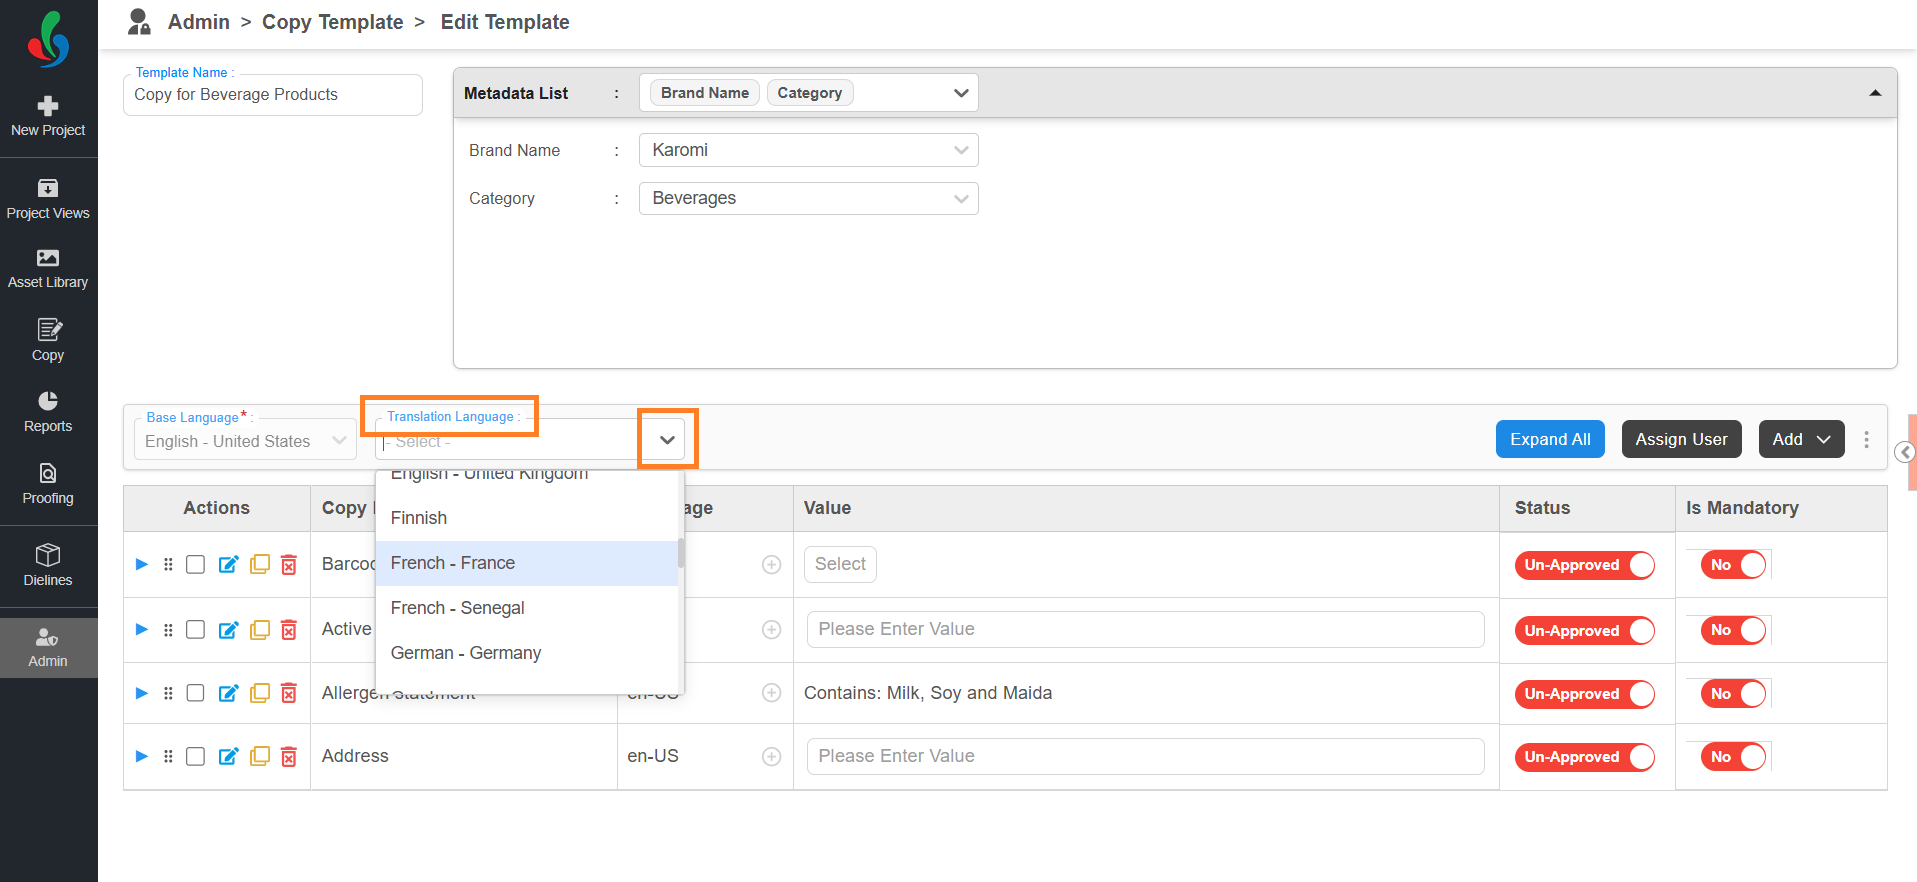
- Select the Translation Language drop-down menu.
- Select the required language.
Example: Select French – France if you want to provide French translations.
Note: You can add multiple translation languages by selecting them one by one from the dropdown.
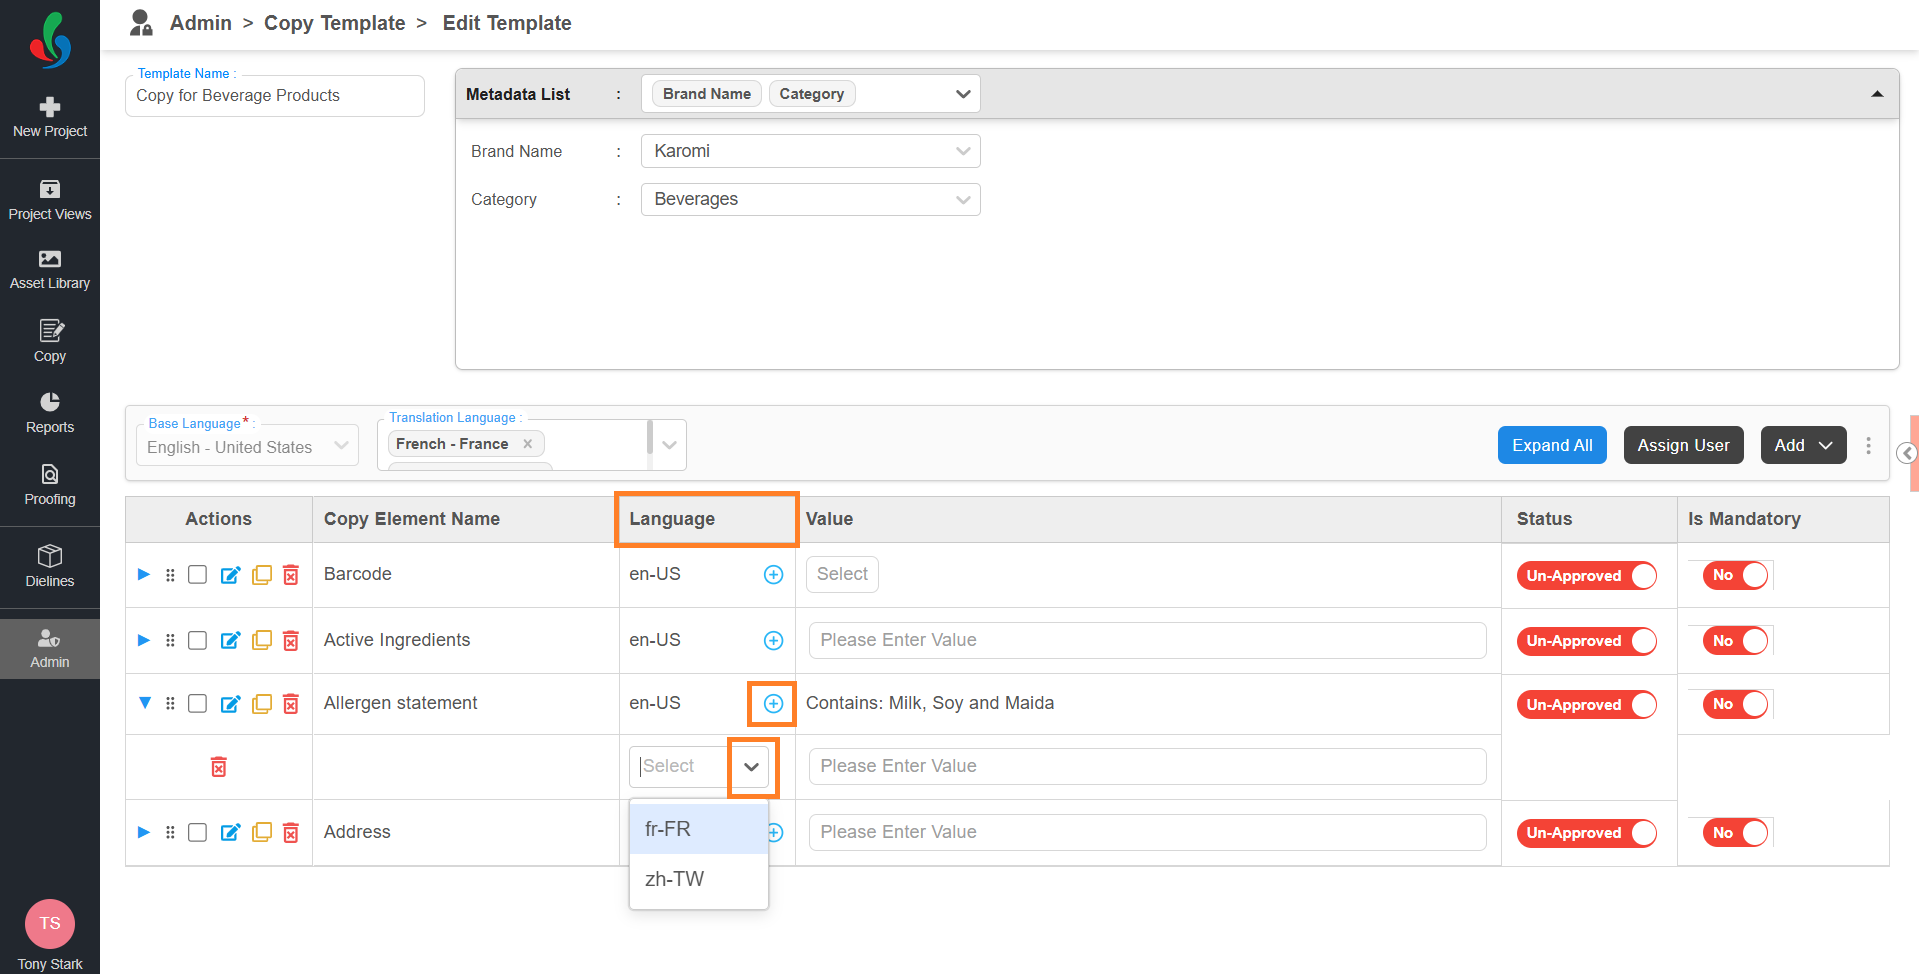
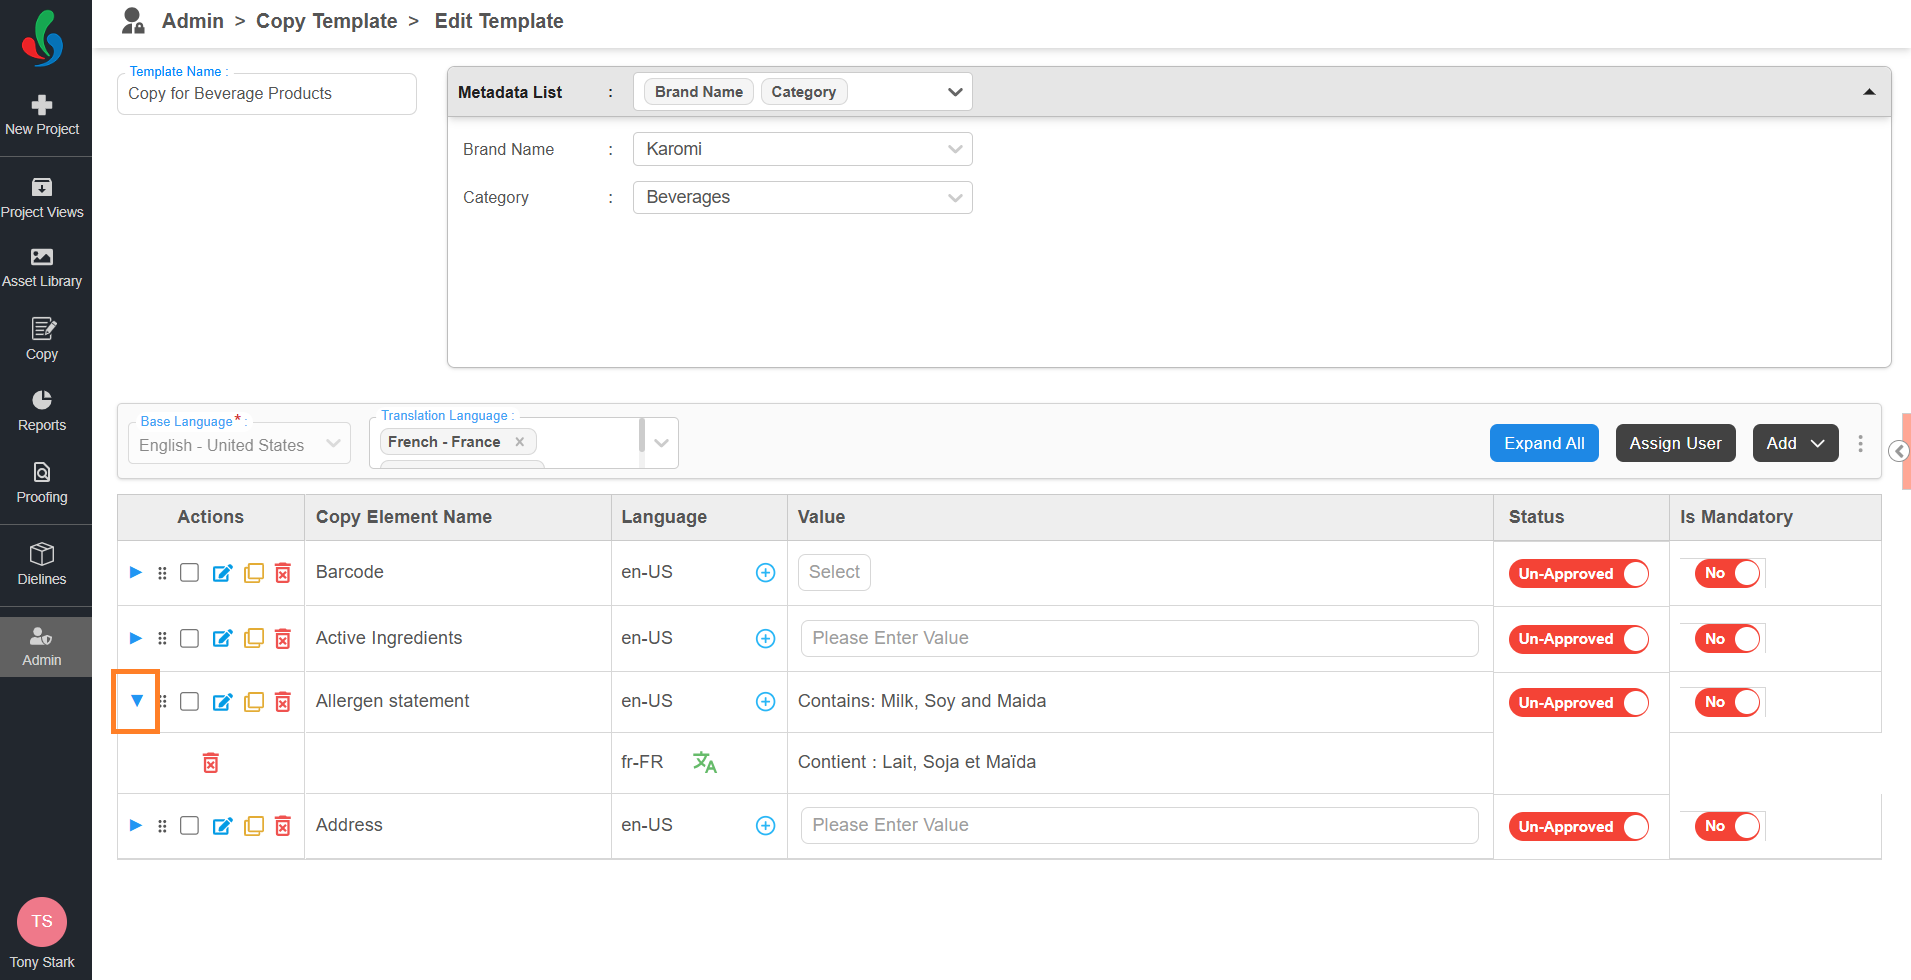
- After selecting a translation language, locate the copy element to which you want to apply translation.
- Select the plus (+) icon in the Language column for that element.
- Select the drop-down menu and select the required translation language from the list. (e.g., French - France).
- The selected language is now associated with the copy element.
- Repeat Steps 3-5 for any other elements that need translation.
- You can assign different translation languages to different elements, or use the same one across all.
- You can expand each element using the ▶ expand icon to view and manage translation assignments.
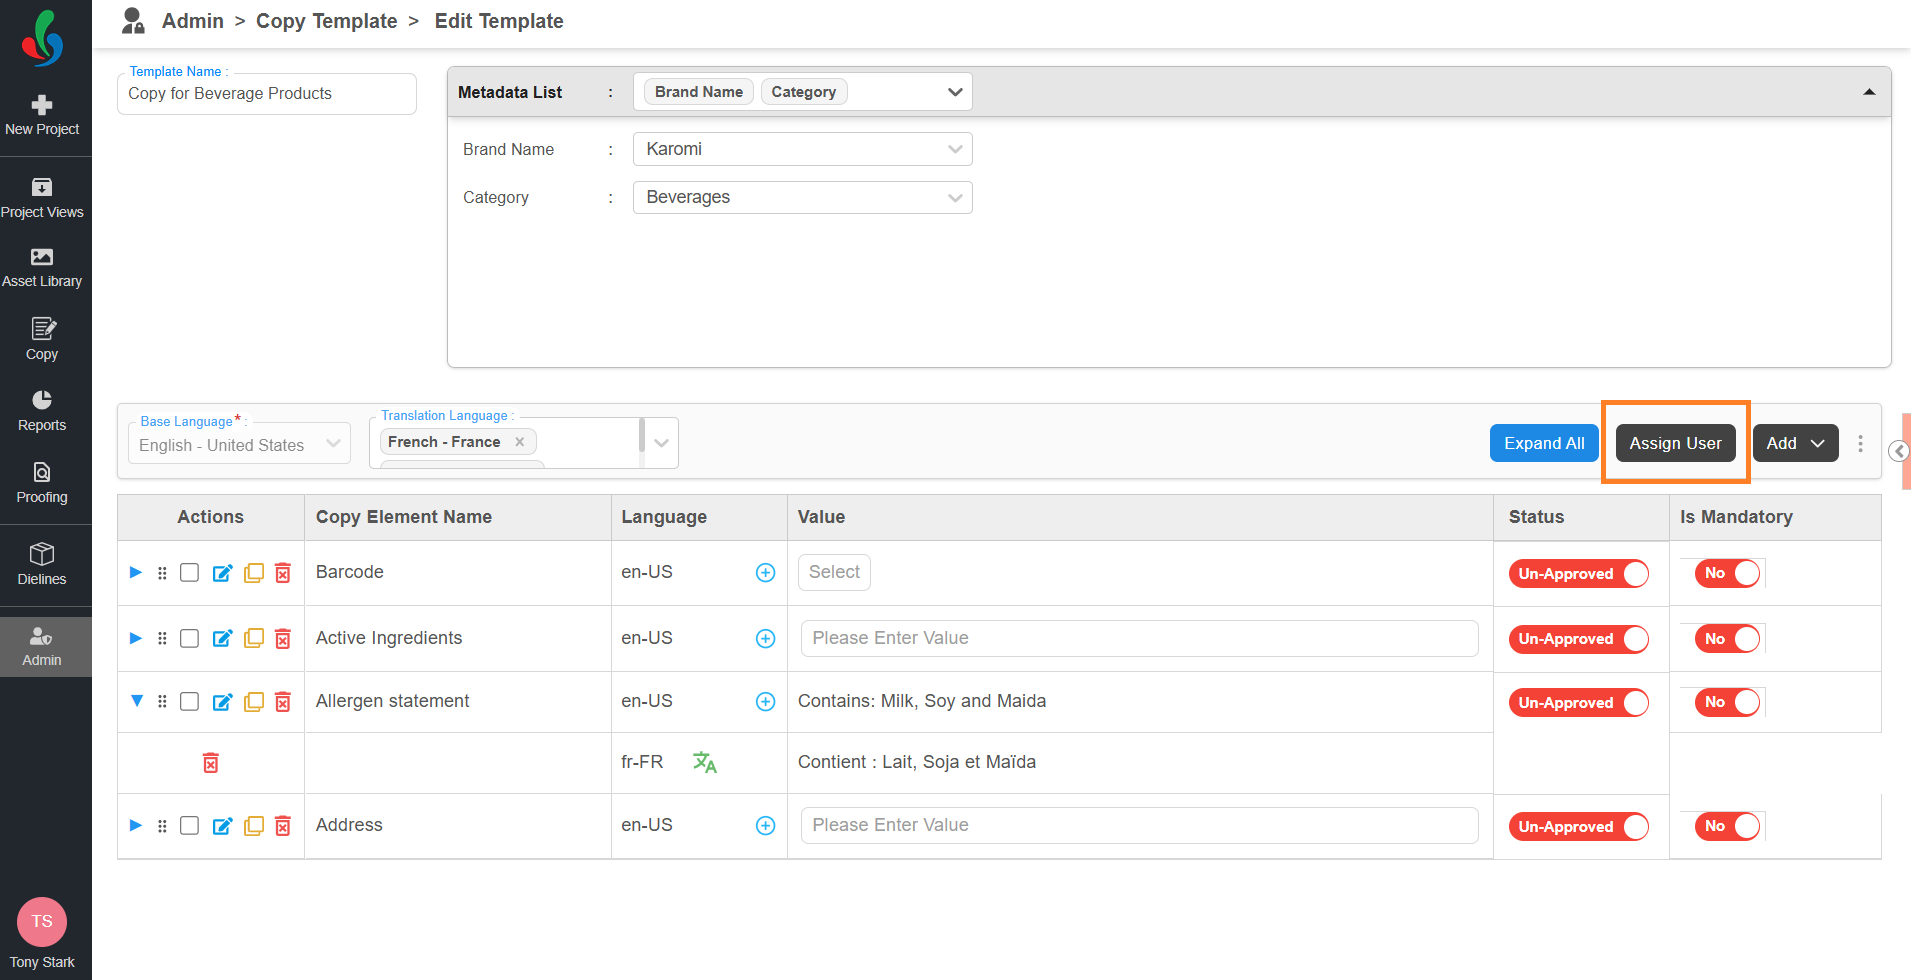
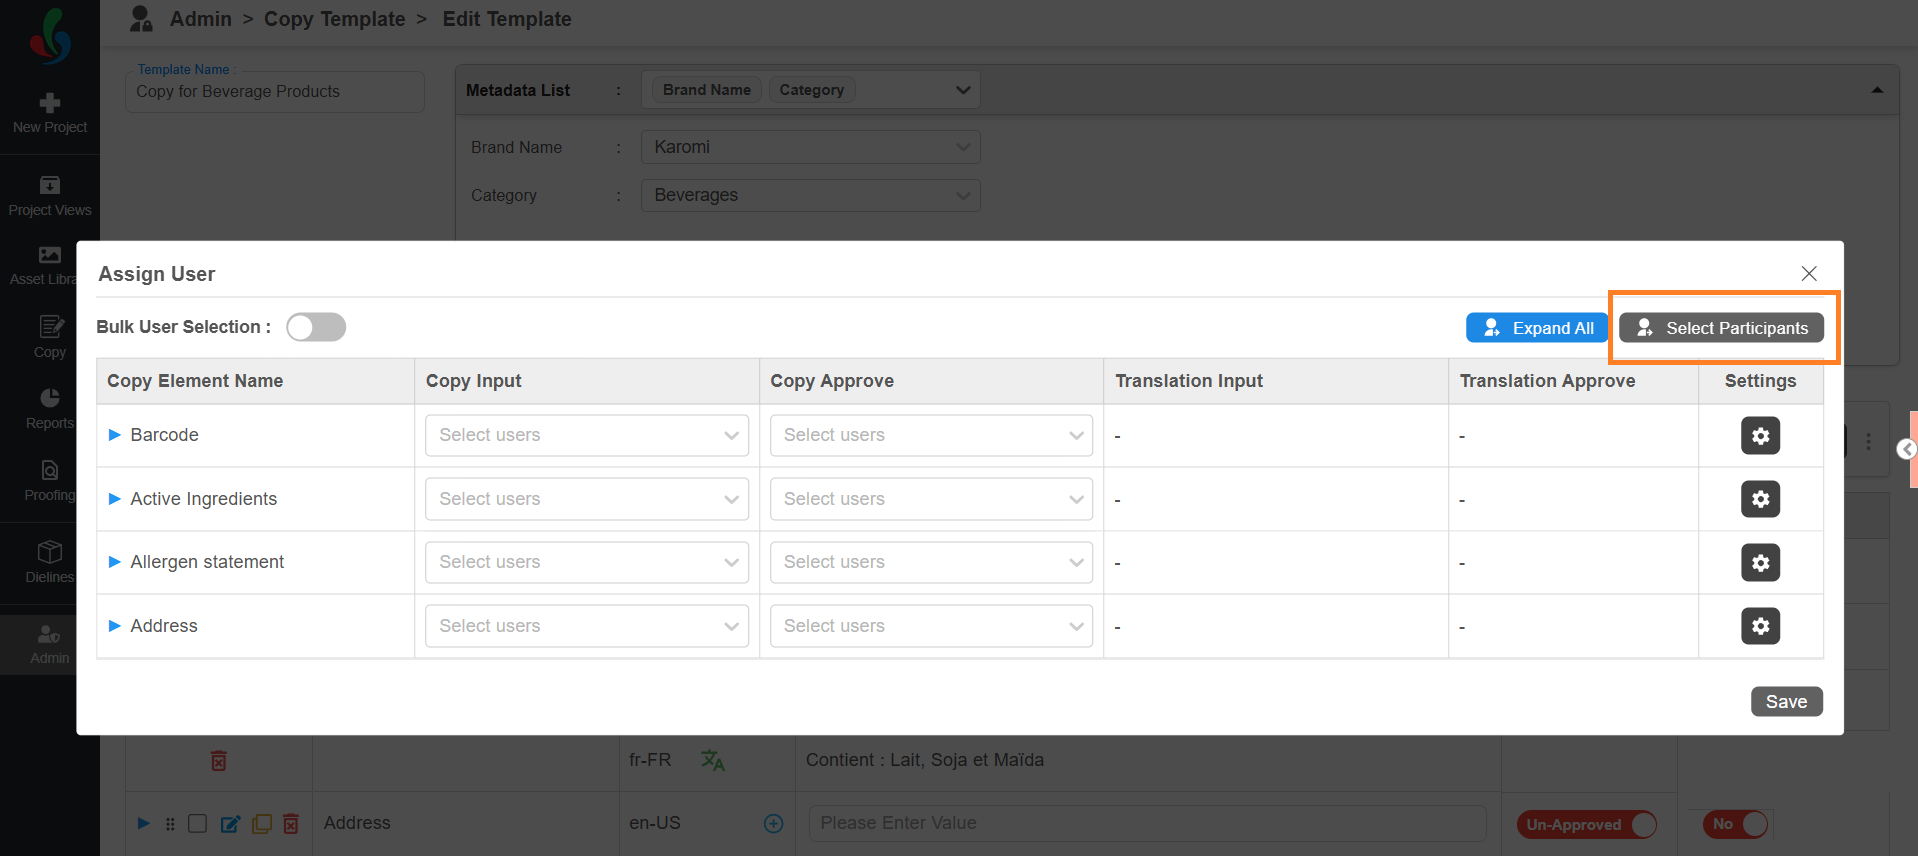
4. Assign User to Copy Elements
After adding copy elements and configuring translations (if required), you must assign users who are responsible for entering and approving copy content.
| Copy Template Participant Behavior If users are configured in a Copy Template:
Example: Note: Users can still modify participants later if required. |
User assignment happens in two levels:
- Assign participants to Copy tasks
- Assign those participants to individual copy elements
You must complete Step 1 before performing Step 2.
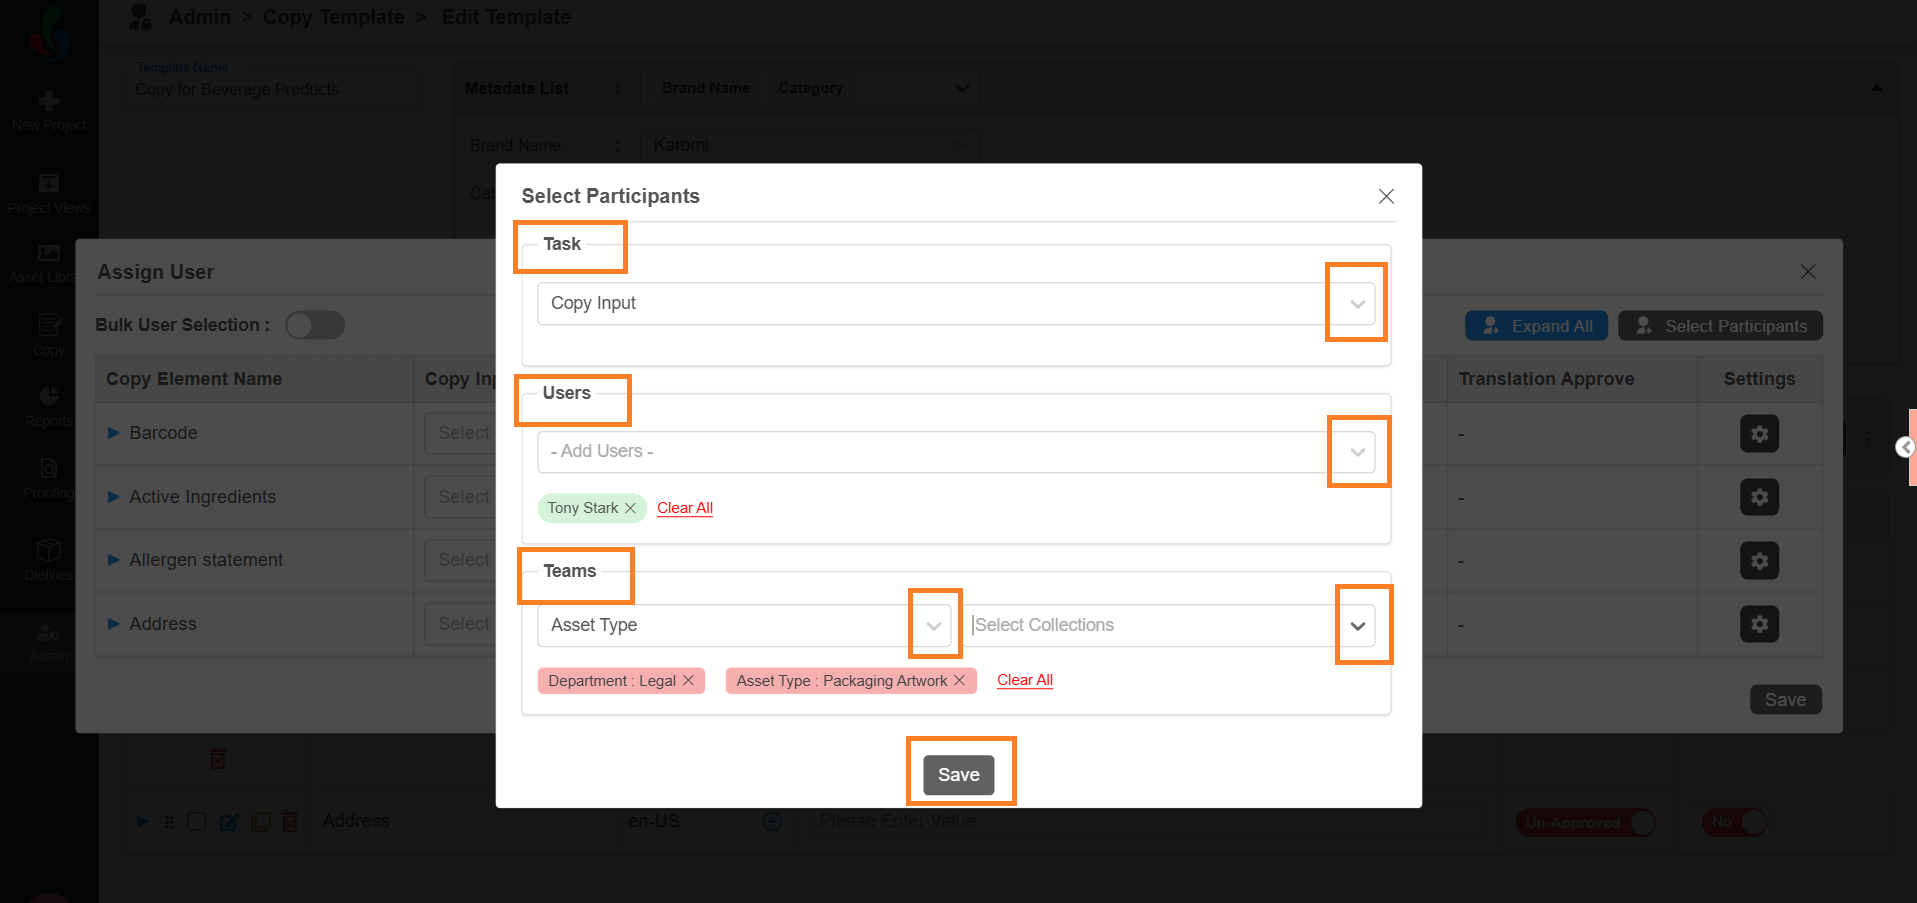
- Assign Participants to Copy Tasks:
Before assigning users to individual elements, you must first define the participants for each Copy task.- Select Assign User.
- Select Select Participants.
- Select the required task from the Task drop-down menu (e.g., Copy Input).
- You will see the available Copy tasks:
- Copy Input
- Copy Approval
- Translation Input
- Translation Approval
- Add Users:
- Select the Add Users drop-down menu to view available users.
- Select the desired user(s) from the list.
- To remove a selected user(s), select the Close icon next to their name.
- To remove all the selected users, select Clear All.
- Add Teams (Optional):
- Select the Team Attribute drop-down menu and select the desired attribute (e.g., "Department").
- Next, select the Collections drop-down menu and choose the specific collection(s) (e.g., "Marketing").
Note: Even if a team is assigned, the element-level drop-down will display individual users resolved from that team — not the team name itself. For example, If one individual user and two collections (Legal and Marketing) are assigned, and each collection contains five members, the drop-down will display 11 individual users. - To remove a selected team(s), select the Close icon next to the team’s name.
- To remove all the selected teams, select Clear All.
- Repeat the process for all required tasks (Copy Approval, Translation Input, Translation Approval).
Note: If a task does not have participants assigned, you cannot assign users to elements for that task. - Select Save.
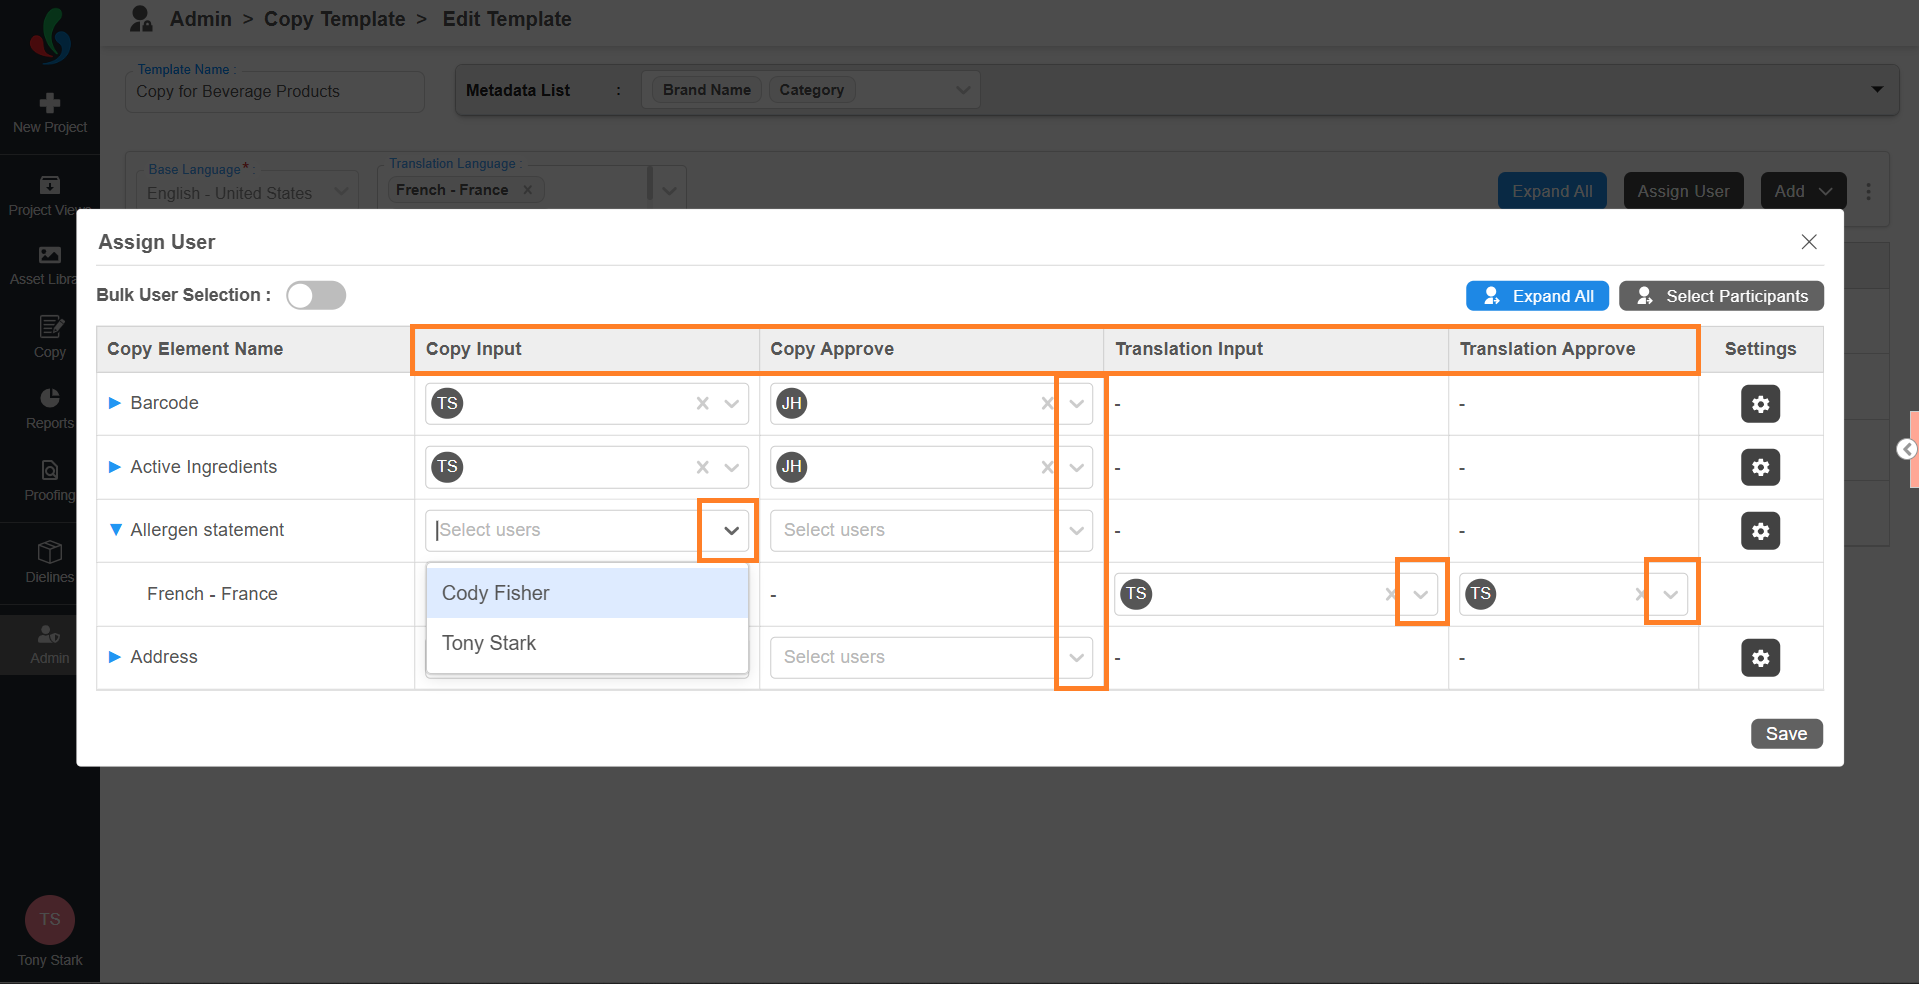
- Assign Users to Individual Elements
After task participants are configured, you can assign users to each element.- In the Assign User window, you’ll see all the added copy elements along with user selection fields for each task type.
- For each element, select the dropdown in the Copy Input and Copy Approve columns and select the appropriate users.
- Copy Input – the person who will fill in the content.
- Copy Approve – the person who will review and approve the content.
Note: You can select multiple user only for Copy Approval.
- Assign users for translation (if applicable):
- If a copy element includes translation, select the expand (▶) icon next to the element.
- Assign users to Translation Input and Translation Approve from the respective dropdowns.
Note: You can select multiple user only for Translation Approval.
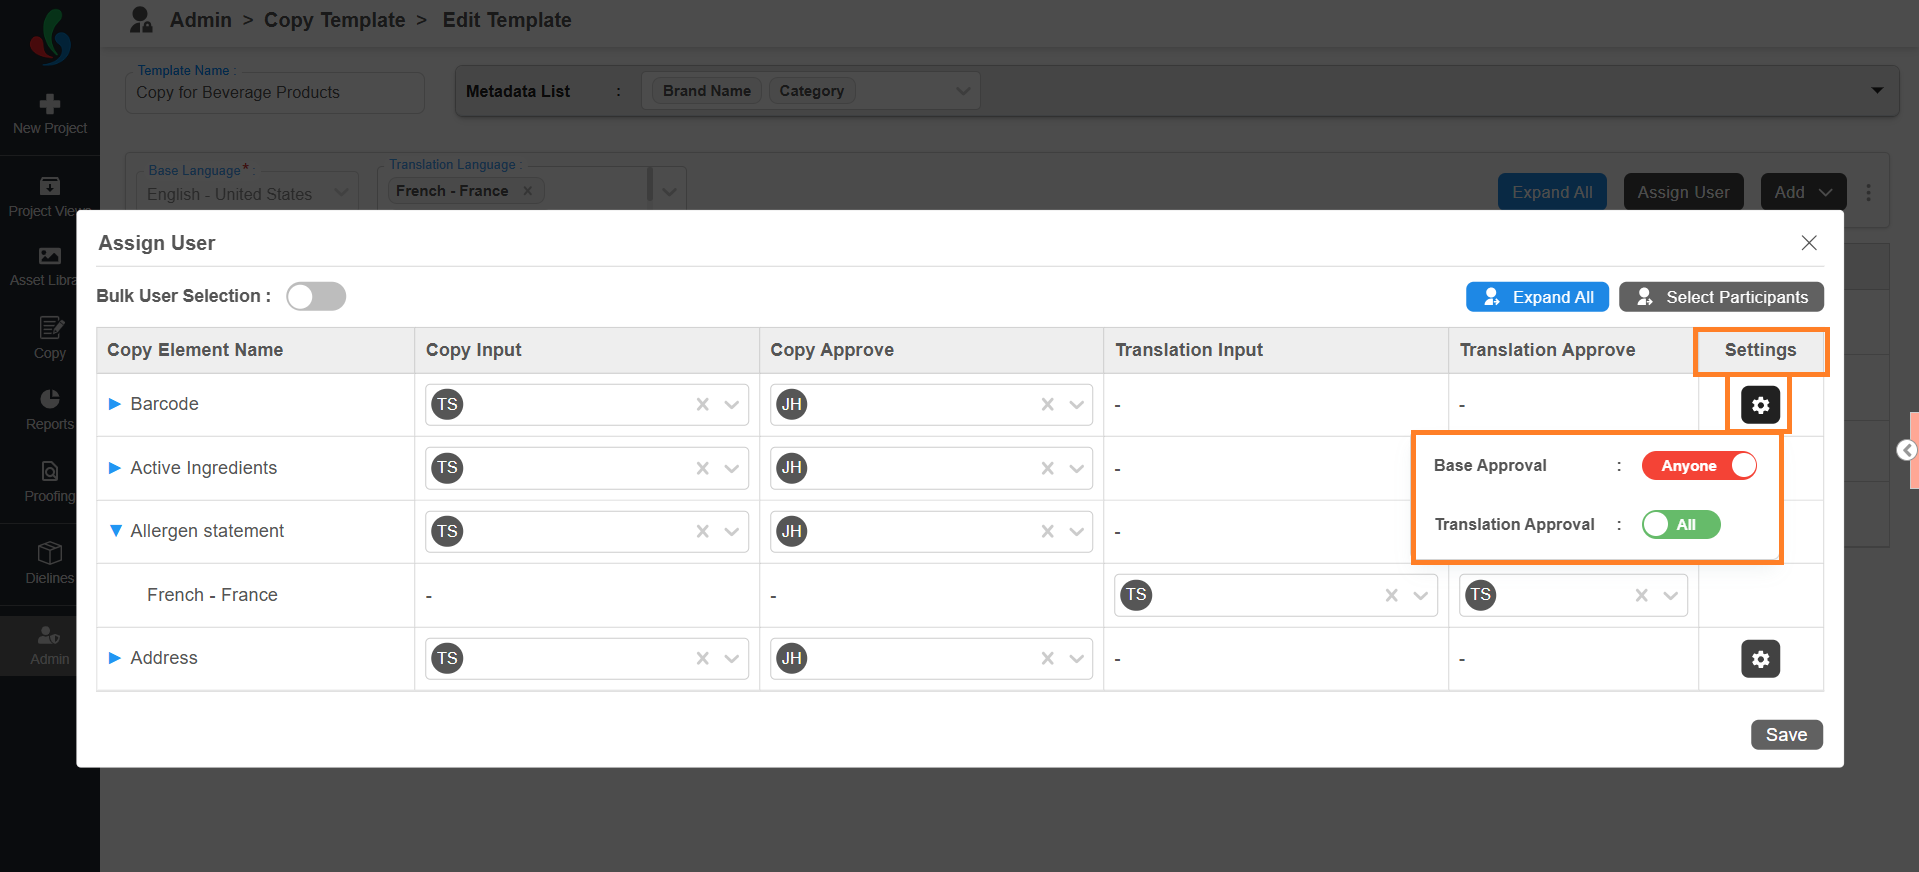
- Configure Approval Settings (All or Anyone):
If you’ve assigned multiple users for approving an element, you can control how approvals are handled by setting it to "All" or "Anyone"- Select the Settings icon associated with the element where multiple users are assigned.
- Use the toggles associated with Base Approval or Translation Approval to select your preferred setting.
- Anyone: Approval from any one of the assigned users is enough to proceed.
- All: Every assigned user must approve the element for it to move forward.
- Select the Settings icon associated with the element where multiple users are assigned.
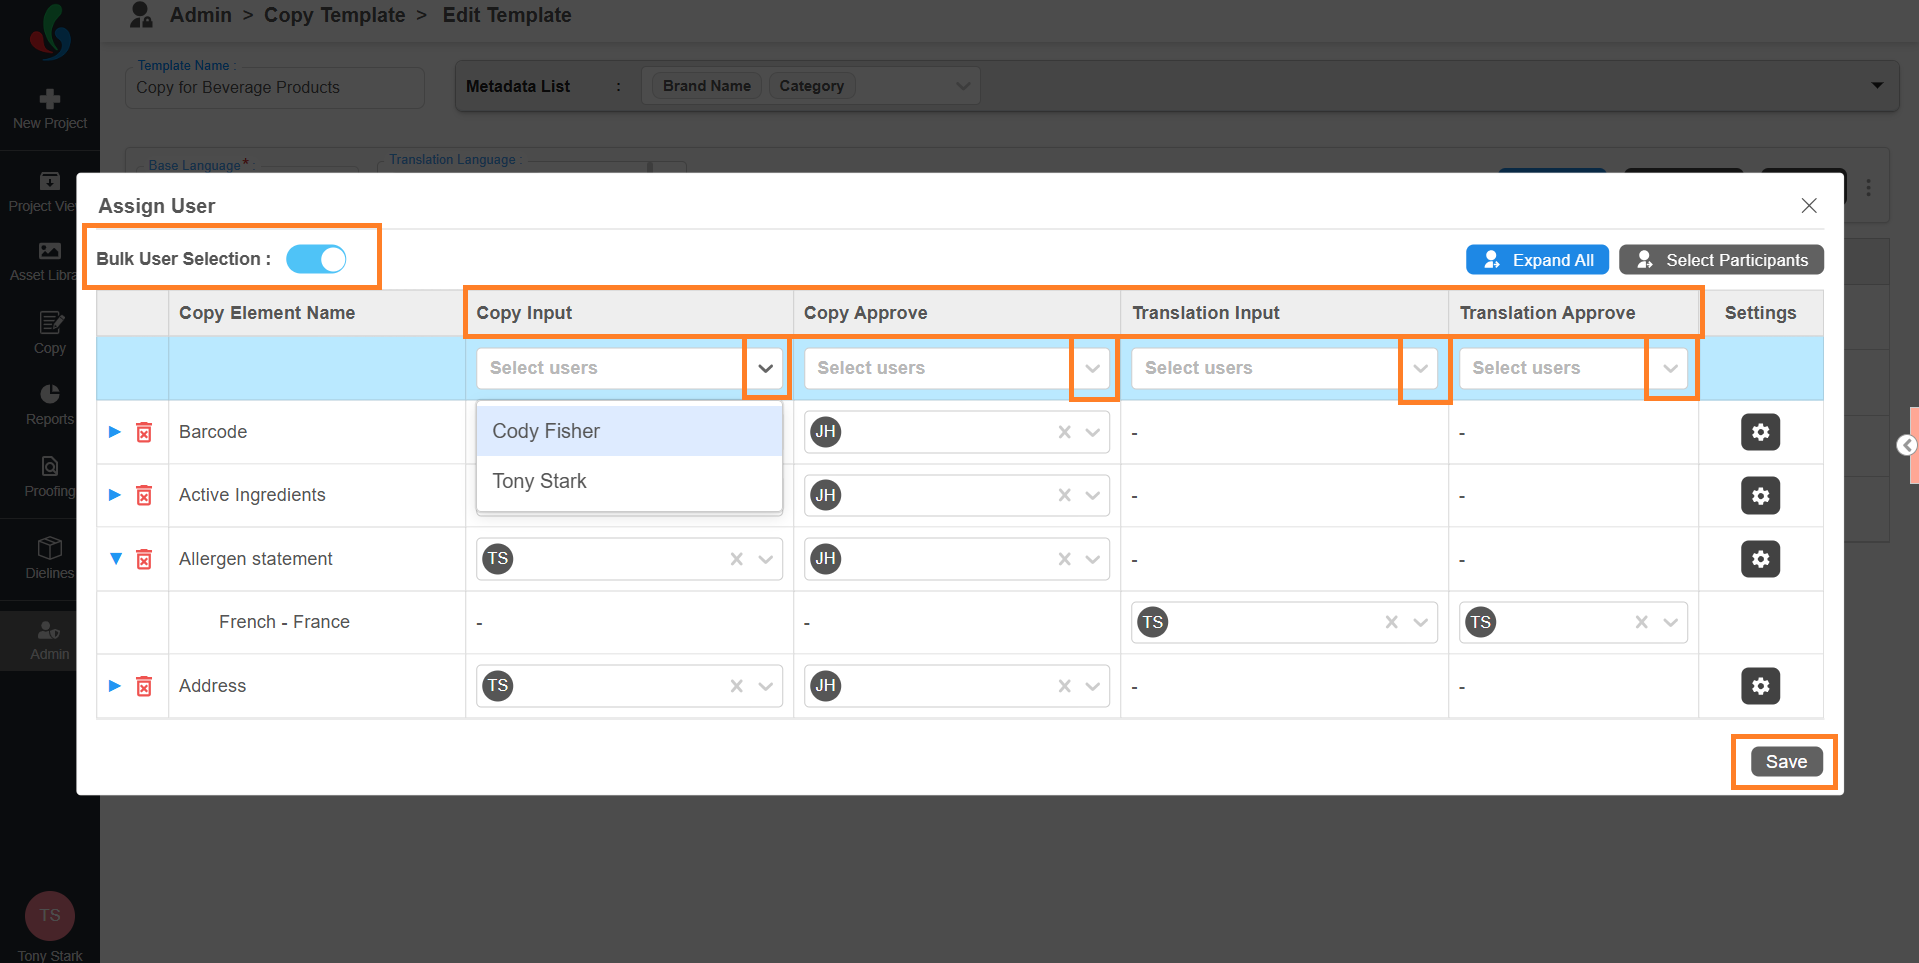
- Use Bulk User Assignment (If needed):
If you want to assign the same user to multiple elements quickly:- Toggle the Bulk User Selection button.
- Use the dropdown in the first row to assign a user to any of the following columns:
- Copy Input
- Copy Approval
- Translation Input (if applicable)
- Translation Approval (if applicable)
- The selected user will be automatically applied to all corresponding elements in the list.
- In the Assign User window, you’ll see all the added copy elements along with user selection fields for each task type.
- After completing the user assignments, select Save to apply your configuration.
5. Configure Copy Element Additional Properties
In a Copy Template, you can configure additional properties for each copy element to control how it behaves when the template is used in a project.
The two configurable properties are:
- Status
- Is Mandatory
- Configure Element Status
The Status setting defines the initial status of the element when the Copy Template is imported into a project. This is typically used when a value is already predefined for the element in the Copy Template.- To configure the status:
- Toggle the status button in the Status column for the required element.
- Available Status Options
- Approved
- When the template is used in a project, the element will be imported in an Approved state.
- Users can modify the value only by using the Revise option.
- This is typically used when the element already contains a finalized value in the template.
- Un-Approved
- When imported, the element will be in a Pending for Input state.
- Users must enter and complete the content during project execution.
- Approved
- To configure the status:
- Configure Mandatory Setting
The Is Mandatory setting defines whether the element must be completed during project execution.- To configure:
- Toggle the button in the Is Mandatory column for the required element.
- If an element is marked as Mandatory:
- Users cannot remove the element when the template is used.
- The project cannot move forward if the mandatory element remains incomplete.
- To configure:

04. Save and Publish
In Copy Template, saving and publishing are handled automatically.
Once you configure the template, it is auto-saved and immediately available for use in projects. There is no separate Publish action required.
If you make changes to an existing template:
- The updates will apply only to projects where the template is used after the modification.
- Changes will not automatically update projects that are already in progress.
Manage Template Availability
If a template is no longer required, you can:
- Delete the template, or
- Make it inactive to prevent further usage.
- For more details, refer to Manage Copy Template.