Create Artwork Variants with Adapt AI
Most packaging artwork is not created from nothing. A brand approves one artwork for a pack, and then needs the same design on a range of variants that differ only in size, flavor, language or market. The design change for each variant is small, but routing it to a design studio usually turns a two-to-three-hour job into a request that takes several days.
With Adapt AI, you create the variant yourself, inside the plugin. You choose the approved artwork and the dieline of the variant you need, and the plugin adapts the design onto the new dieline in minutes.
Some terms used in this article:
- Variant: any version of a pack that shares the same design but differs in one or more attributes, for example pack size (250 ml, 500 ml and 750 ml), flavor, language or market.
- Dieline: the KLD (Key Line Diagram) of a pack, which shows its cut and fold lines.
- Source: the approved artwork that the new variant is based on, together with its dieline.
- Destination: the dieline of the variant you want to create.
While the artwork is adapted, you can also change its content. There are four adaptations, each turned on with its own toggle. Turn on only the ones the variant needs:
| Adaptation | What it does | Example |
|---|---|---|
| Copy | Replaces the text of the source artwork with the text of the destination variant, read from the source and destination copy sheets. | The source artwork carries the copy of the 750 ml pack. You select the copy sheet of the 250 ml pack, and its text is applied. |
| Images | Replaces the images of the source artwork with the image files you supply. | The source artwork uses the 750 ml pack image. You browse to the 250 ml pack image, and it is applied. |
| Colors | Replaces the spot colors of the source artwork with the spot colors you choose. | The source artwork uses Pantone 368 C and Pantone 369 C. You map Pantone 369 C to Pantone 368 C. |
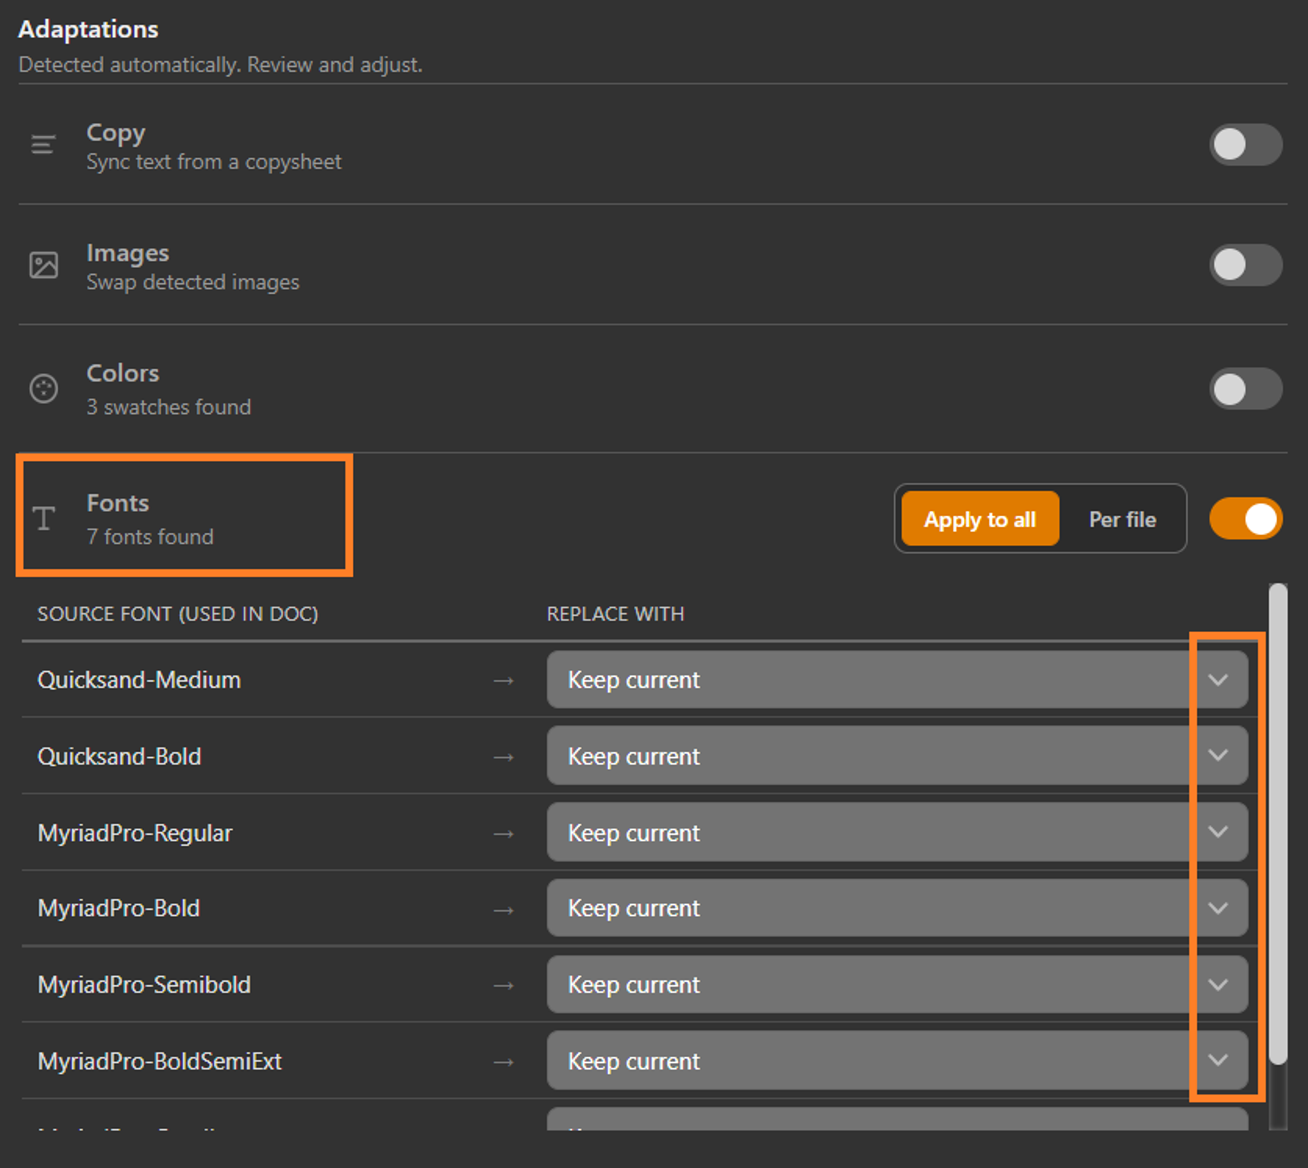
| Fonts | Replaces the fonts of the source artwork with the fonts you choose. | The source artwork uses Arial. You map Arial to Open Sans. |
You can adapt an artwork in one of two ways:
| Mode | What it does | Use it when |
|---|---|---|
| One dieline | Adapts the source artwork onto one destination dieline, and opens the adapted artwork in Illustrator. | You need one variant. |
| Many dielines (Adapt to many files) | Adapts the source artwork onto every dieline in a folder in one operation, and saves one adapted artwork for each dieline in an output folder. | You need a whole range, for example every pack size launched together. |
The adapted artwork is a draft for review. Adapt AI handles the basic differences between the source and the destination, but you still need to review the adapted artwork and correct it where required before you send it on.
 | Note:
|
Open Adapt AI
- Make sure that you are signed in to the plugin. For more information, refer to Sign In to the ManageArtworks Plugin.
- In Adobe Illustrator, open the source artwork.
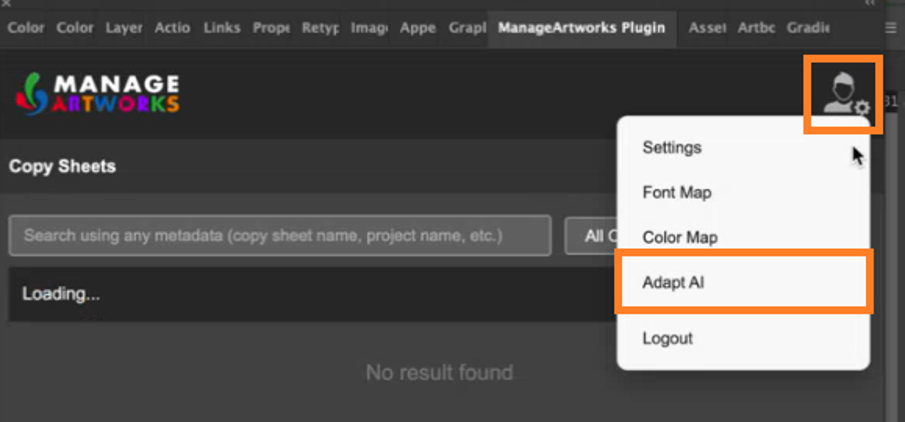
- In the upper-right corner of the plugin panel, hover over the Settings icon.
- Select Adapt AI. The Adapt AI panel opens.
- To create one variant, go to Adapt an Artwork onto One Dieline.
- To create a range of variants in one operation, go to Adapt an Artwork onto Many Dielines.
Adapt an Artwork onto One Dieline
Make sure that the Adapt to many files toggle is off. The system turns it off by default.
01. Select the Source Dieline
| Note: The source needs both the dieline and the artwork. You select the dieline in the SOURCE section; the plugin reads the artwork from the document open in Illustrator. |
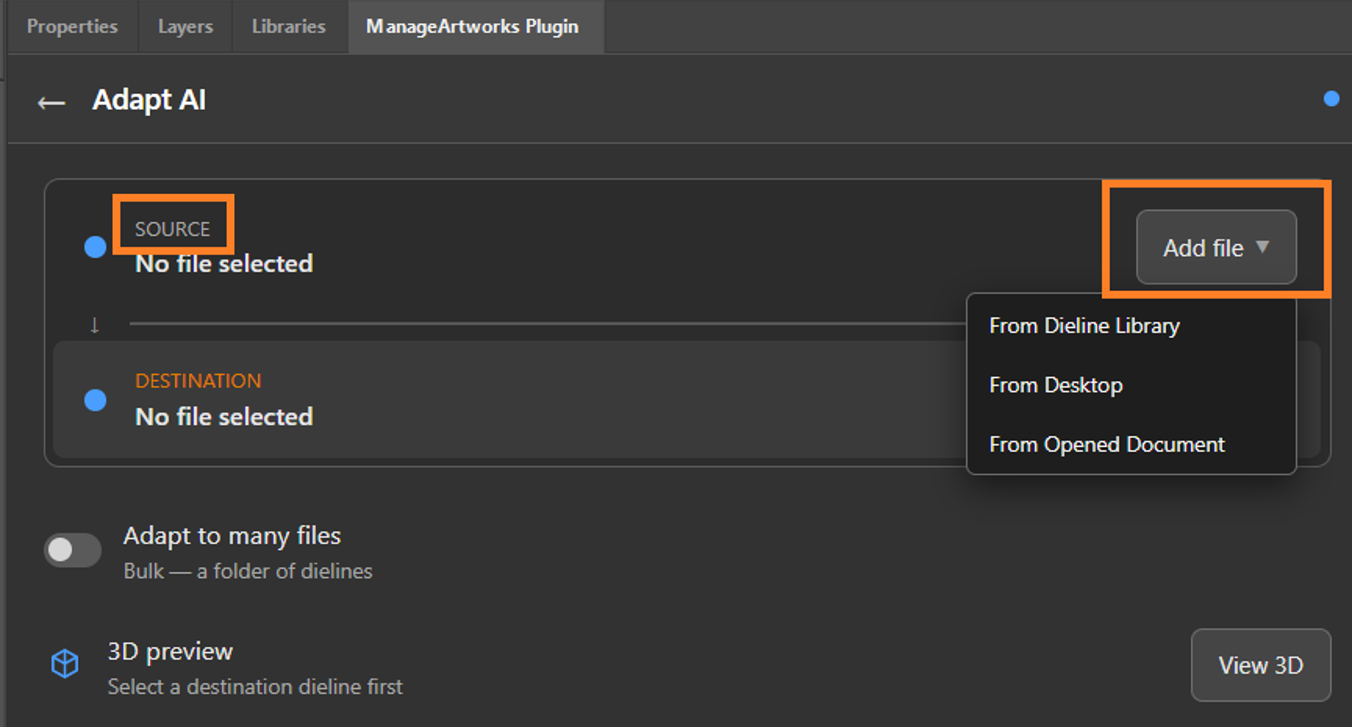
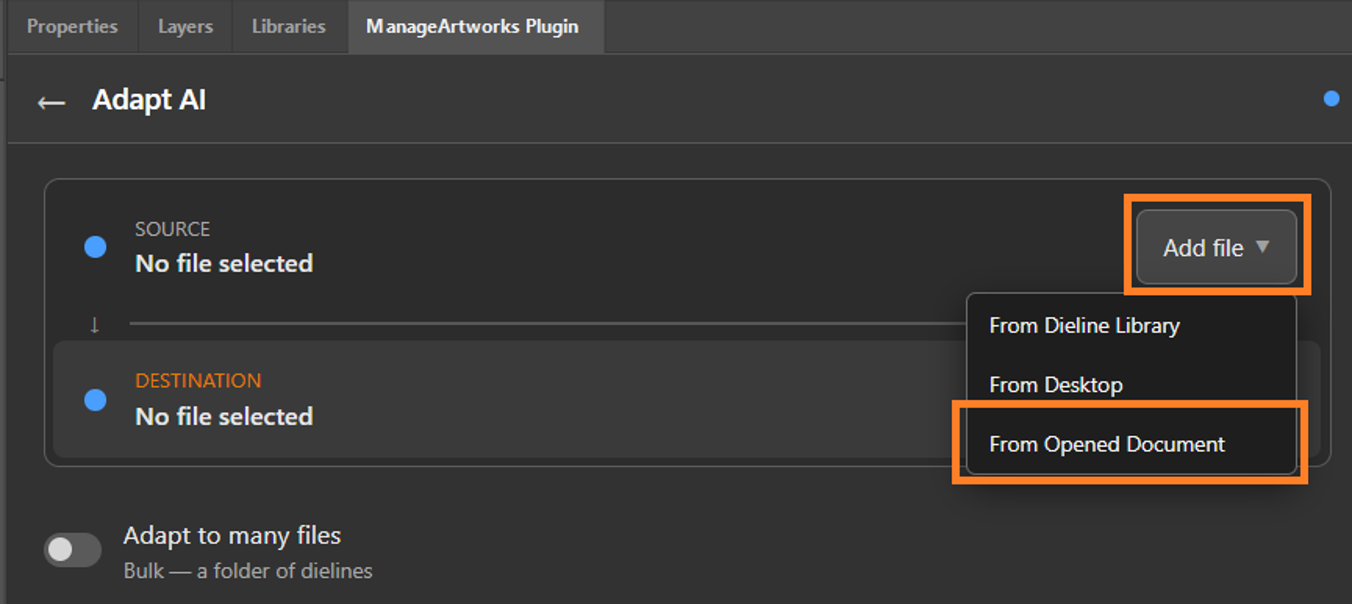
- In the SOURCE section, select the Add file drop-down menu.
- Select one of the following methods:
- From Dieline Library – selects a dieline template from the Dieline Library.
- From Desktop – selects a dieline file from the local system.
- From Opened Document – selects a document that is already open in Illustrator.
To Select a Dieline from the Dieline Library
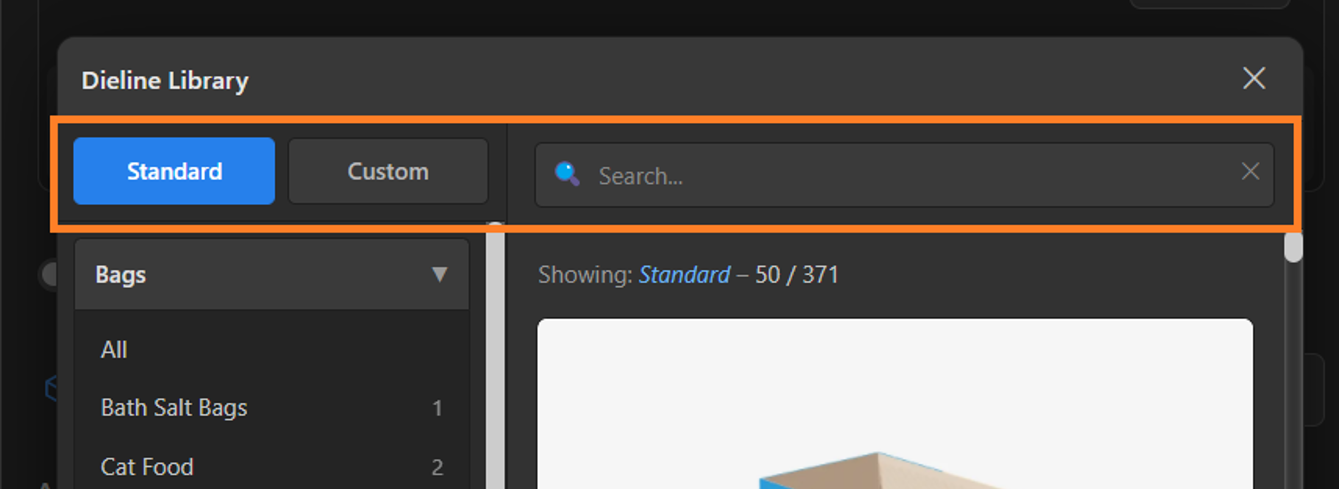
- Select From Dieline Library from the Add file drop-down menu. The Dieline Library dialog box opens.
- Select the Standard tab or the Custom tab.
- Browse the categories, or enter a term in the Search box, to locate the required dieline template.
- Select the required dieline template.
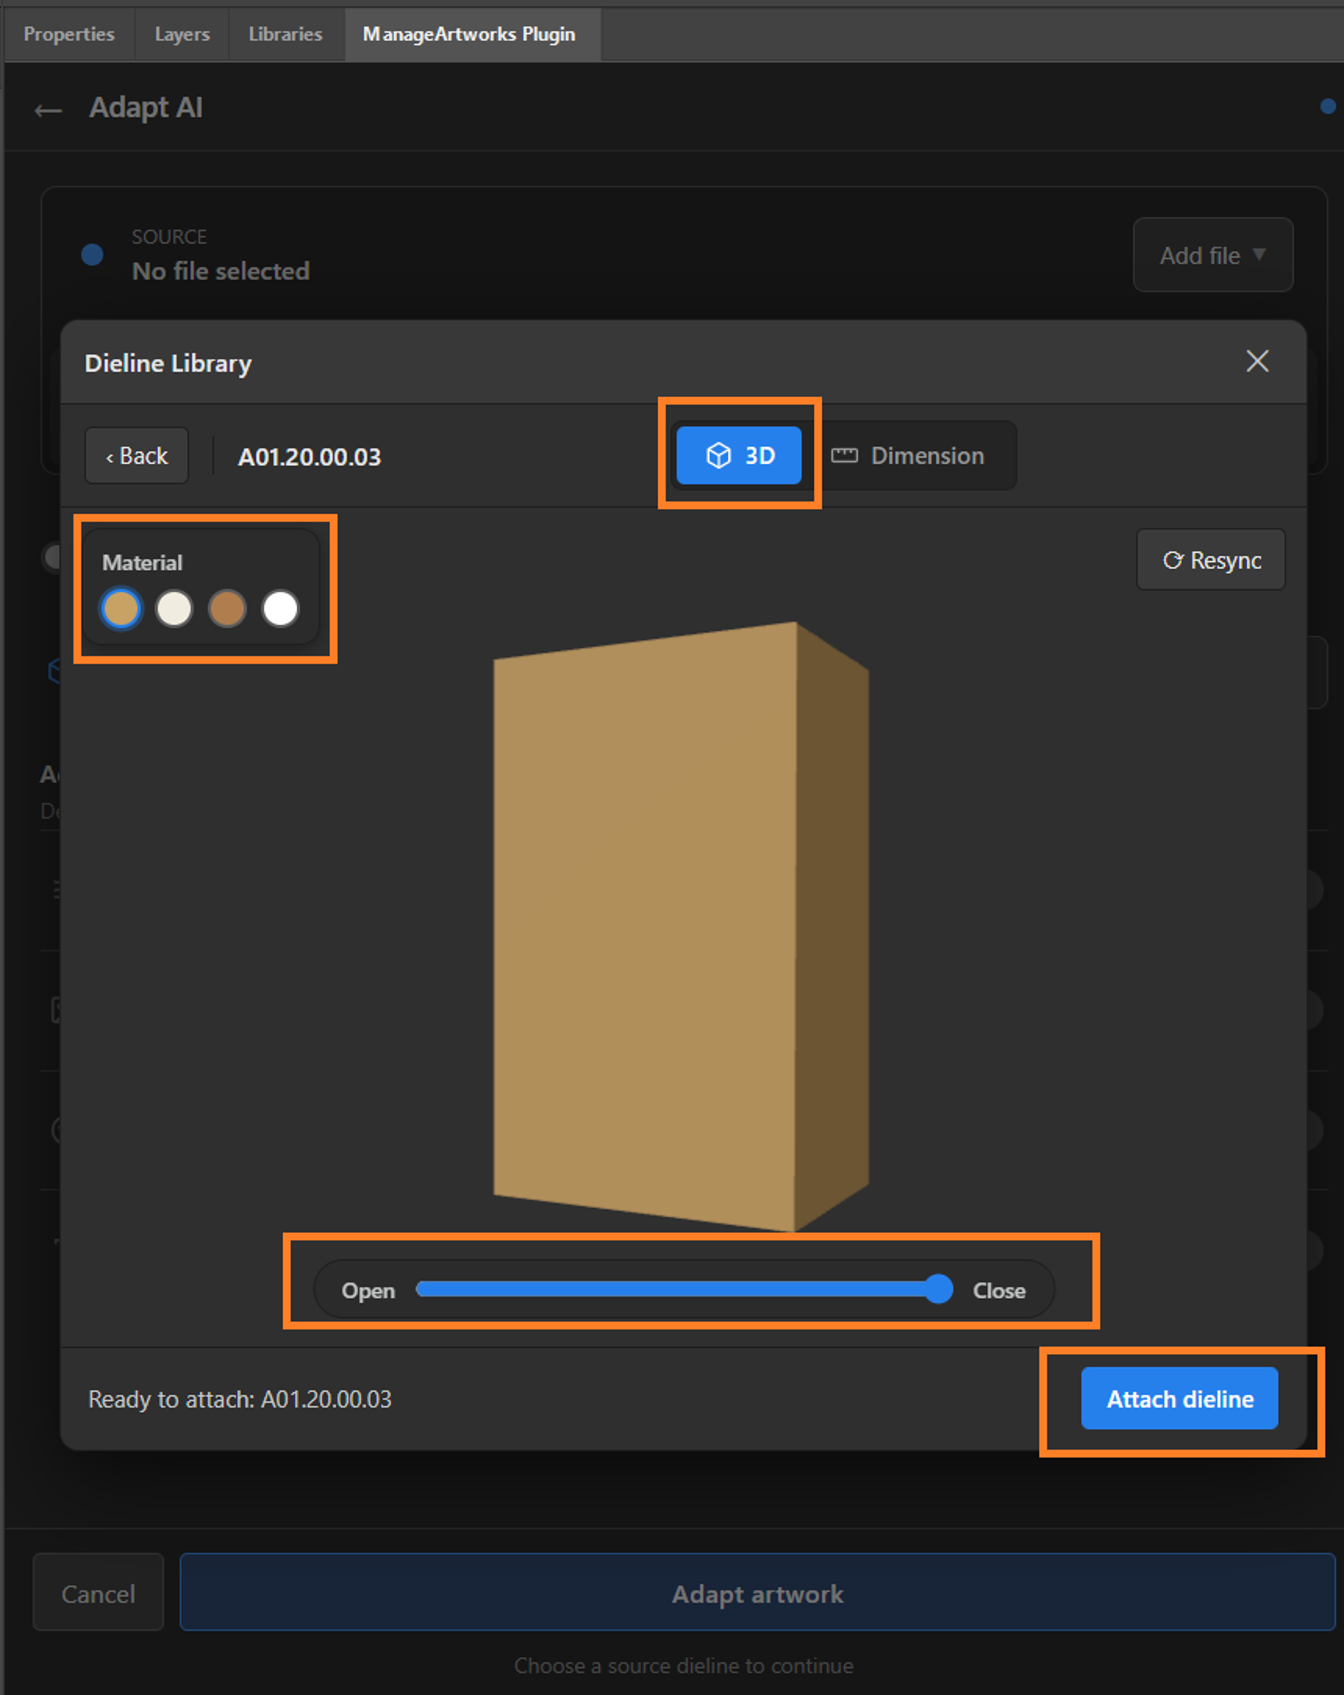
- If required, review the dieline in three dimensions:
- Select 3D.
- In the Material palette, select a material.
- Drag the Open–Close slider to open or close the pack.
- To reload the preview, select Resync.
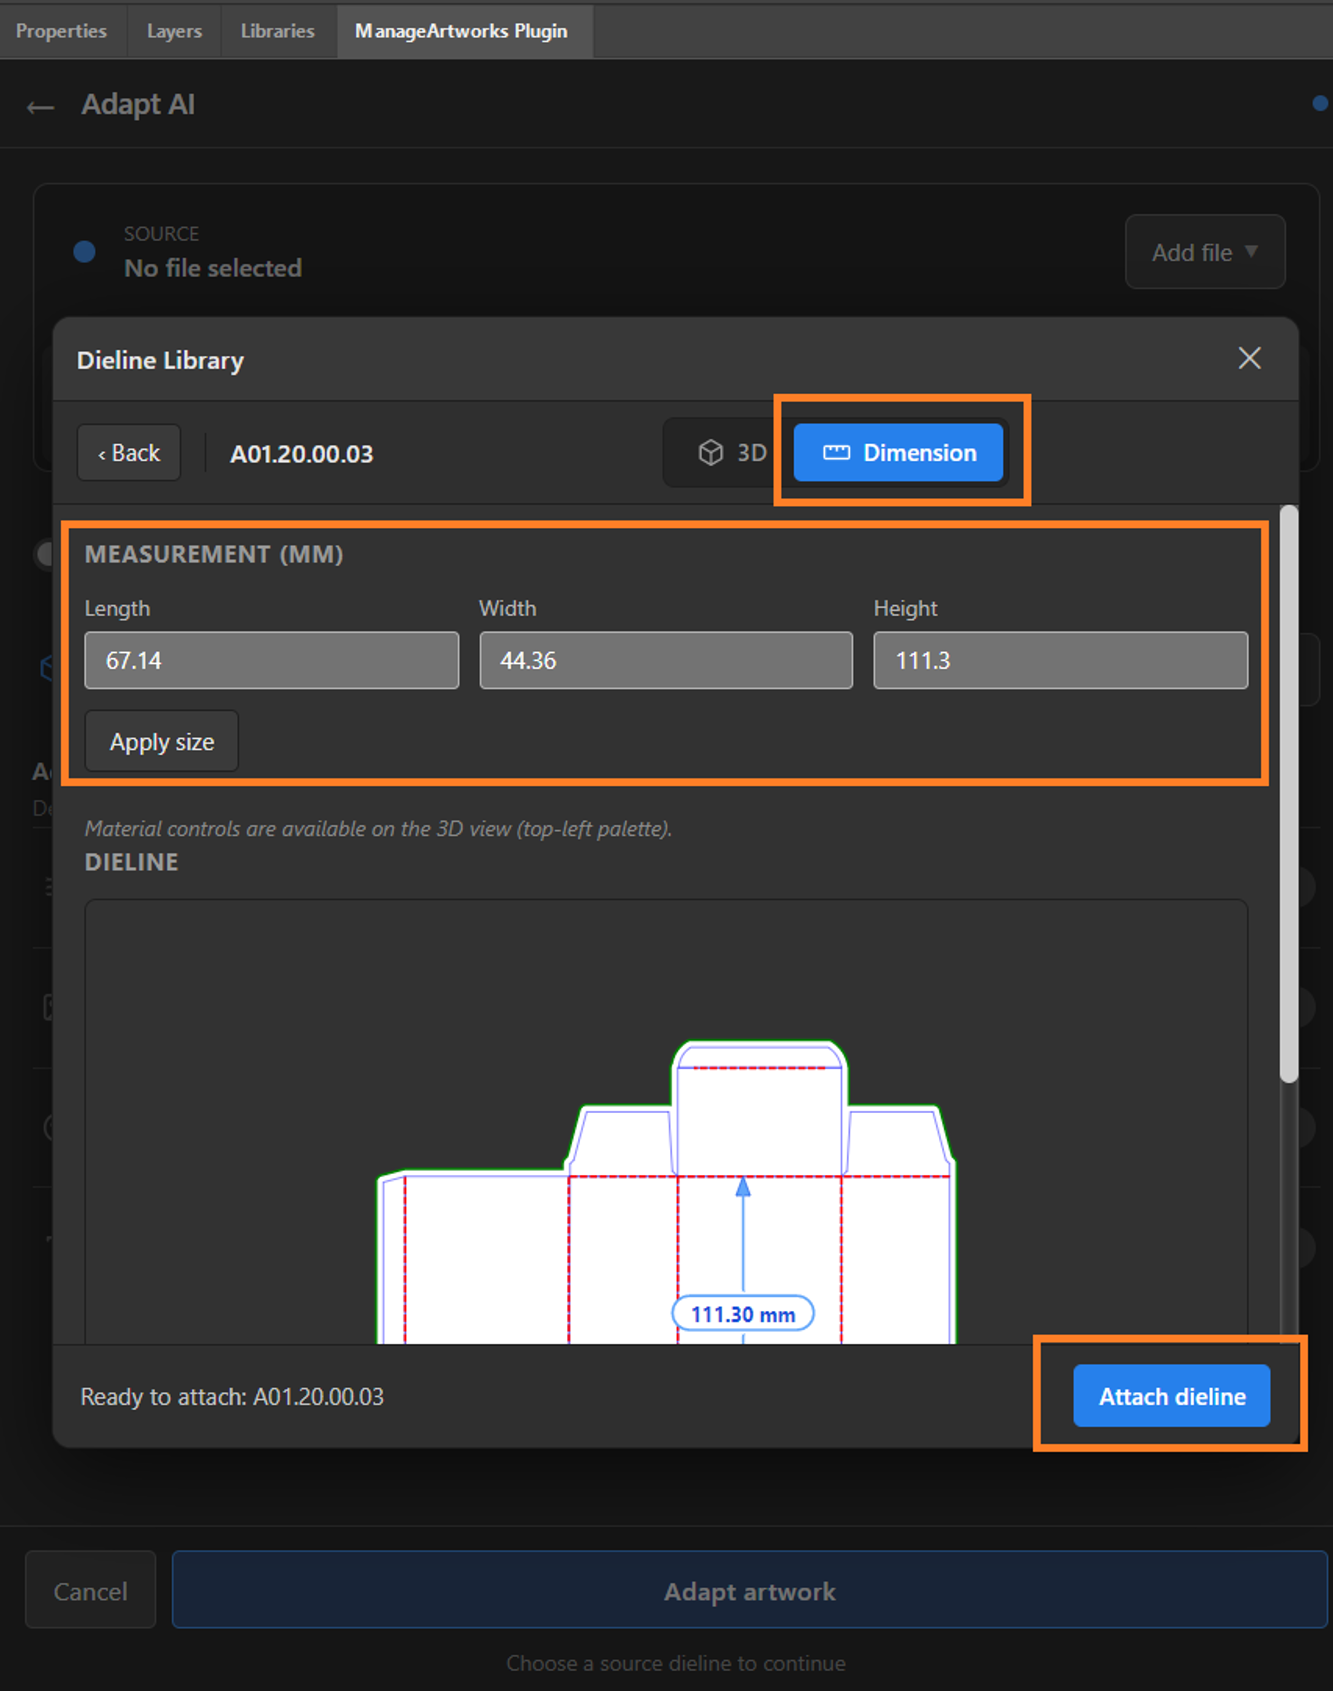
- If required, change the measurements:
- Select Dimension.
- Enter the measurements.
Note: Measurements in the Dimension tab are in millimeters. - Select Apply size.
- Select Attach dieline. The system opens the dieline in Illustrator and attaches it as the source.
To Select a Dieline from the Desktop
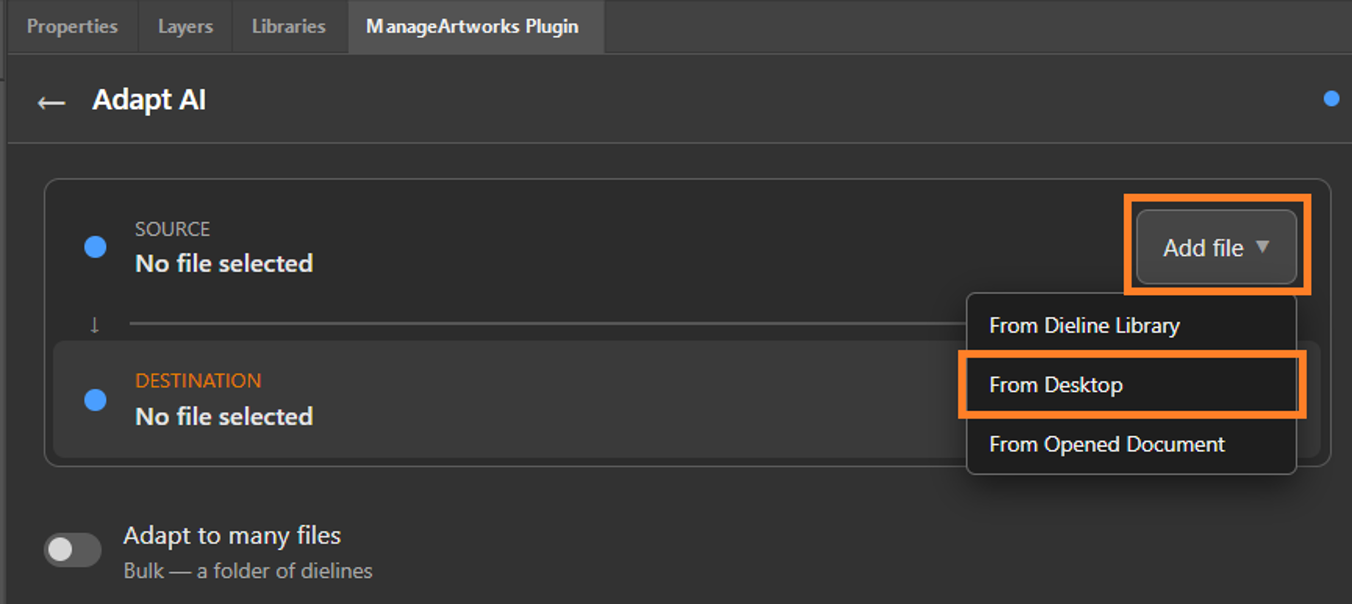
- Select From Desktop from the Add file drop-down menu.
- In the file selection dialog box, browse to and select the dieline file.
- Select Open.
Note: You can use AI files, and AI files saved as PDF compatible.
To Select an Opened Document
- Select From Opened Document.
- Select the required document. The system attaches the document as the source.
02. Select the Destination Dieline
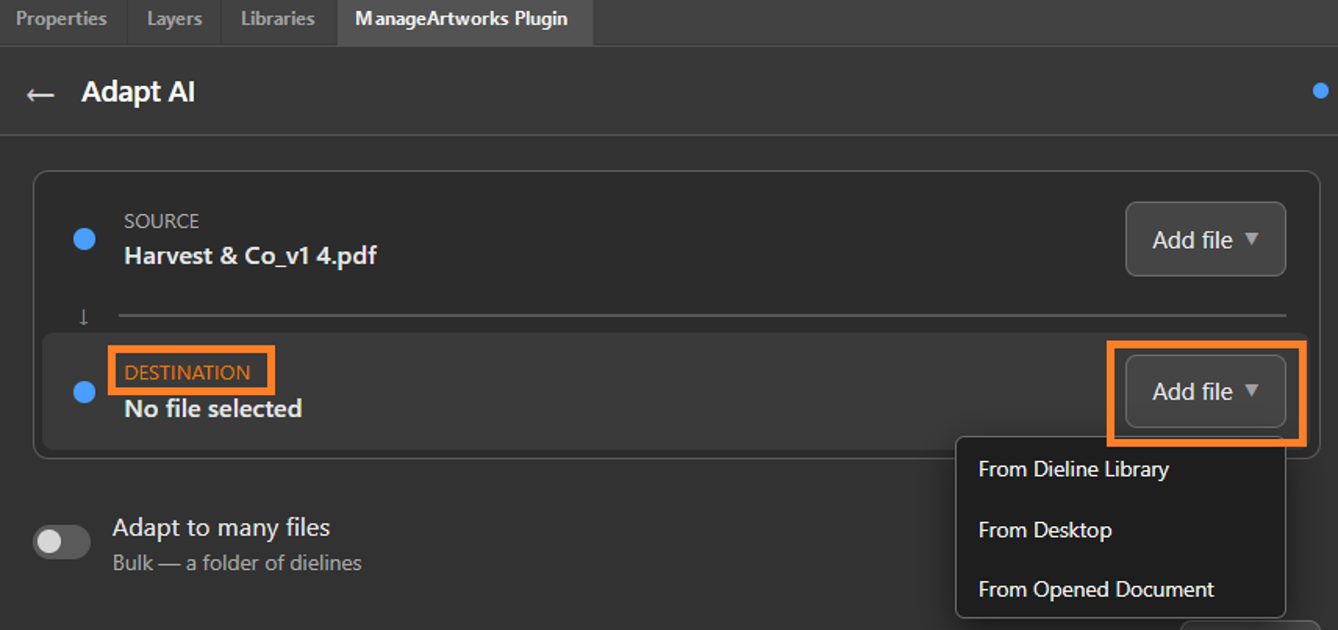
- In the DESTINATION section, select the Add file drop-down menu.
- Select one of the following methods:
- From Dieline Library – selects a dieline template from the Dieline Library.
- From Desktop – selects a dieline file from the local system.
- From Opened Document – selects a document that is already open in Illustrator.
03. Preview the Destination Dieline in 3D (If Required)
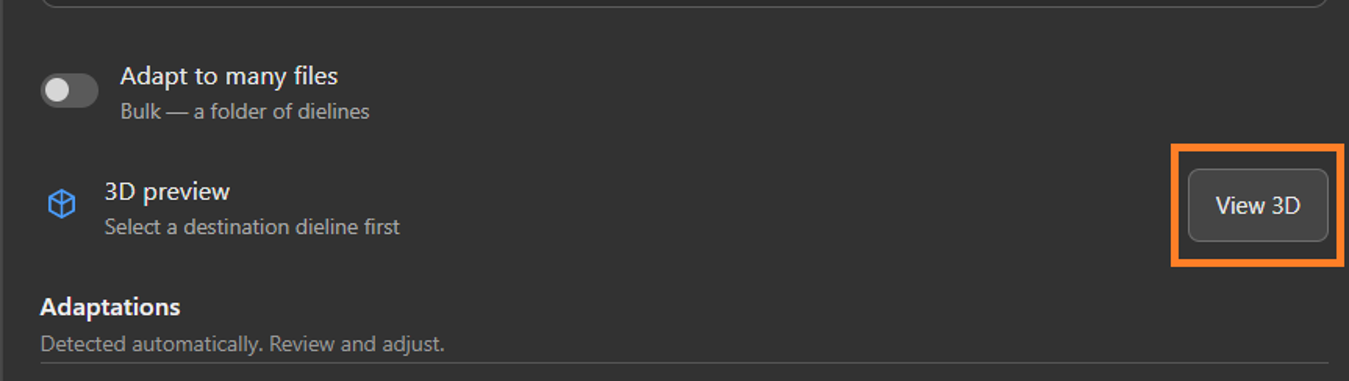
- Next to 3D preview, select View 3D. The system displays the destination dieline in three dimensions.
Note: View 3D is available only after you select a destination dieline.
04. Change the Copy, Images, Colors and Fonts (If Required)
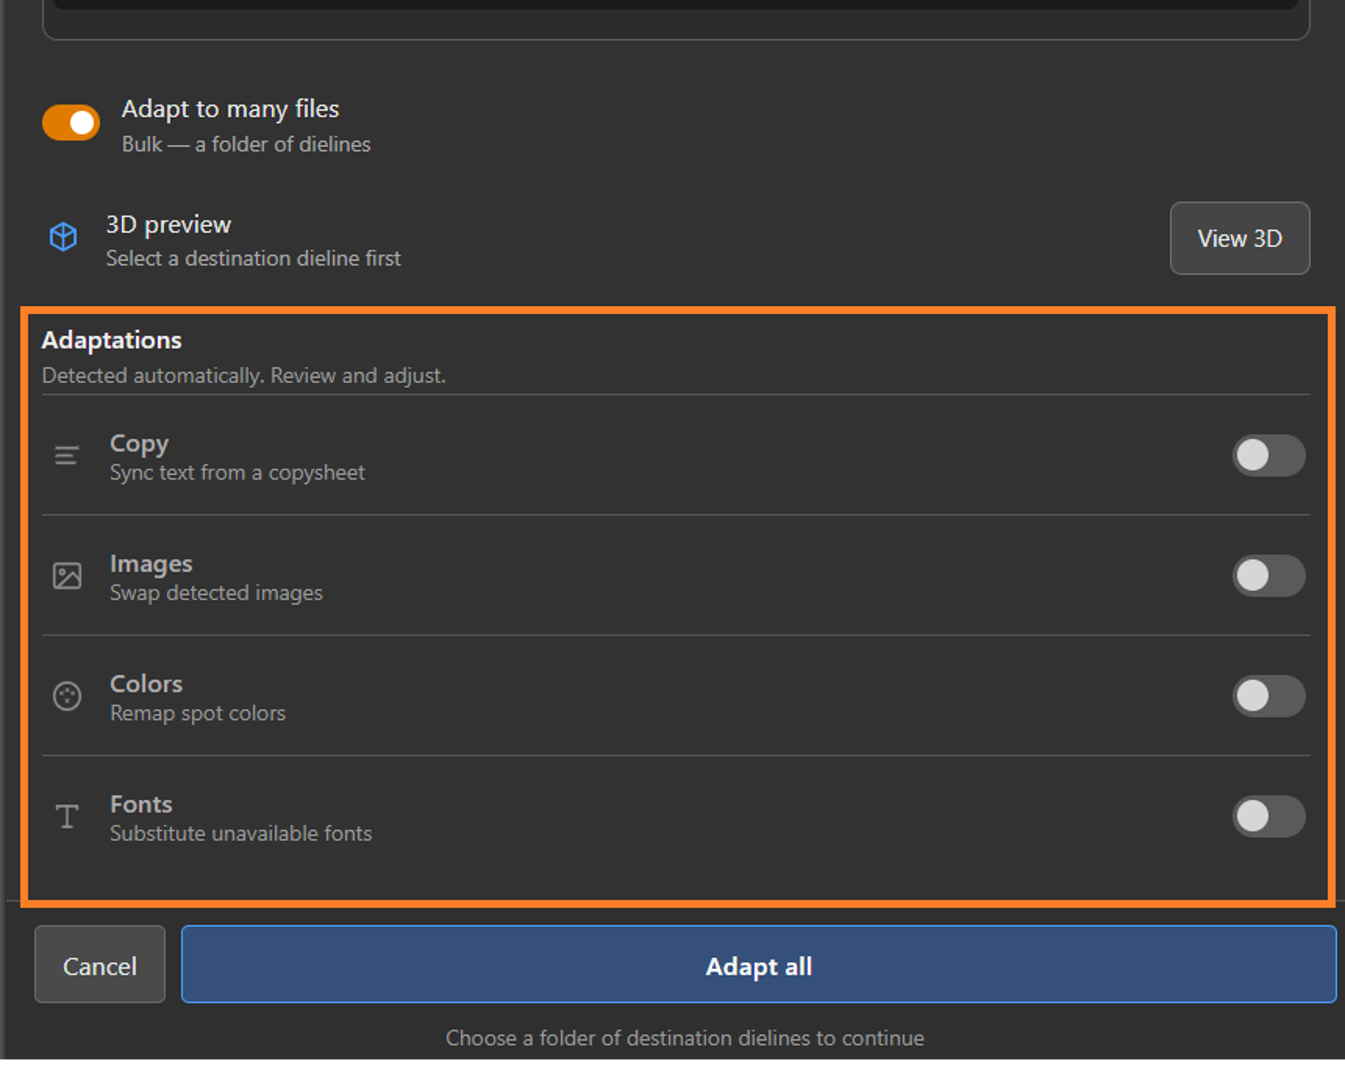
- In the Adaptations section, turn on the toggle of each adaptation the variant needs.
- Set up each adaptation you turned on. For the steps, refer to Set Up the Adaptations.
| Note: Only the adaptations you turn on change the artwork. For example, if you turn on Images only, the adapted artwork has the new images, and its copy, colors and fonts stay the same as in the source artwork. |
05. Adapt the Artwork
- In Illustrator, select the tab of the source artwork, so that it is the document in focus.
Note: If you attached a dieline from the Dieline Library, it opened in its own tab. Switch back to the source artwork before you continue. If more than one document is open, the plugin uses the document in focus as the source artwork.
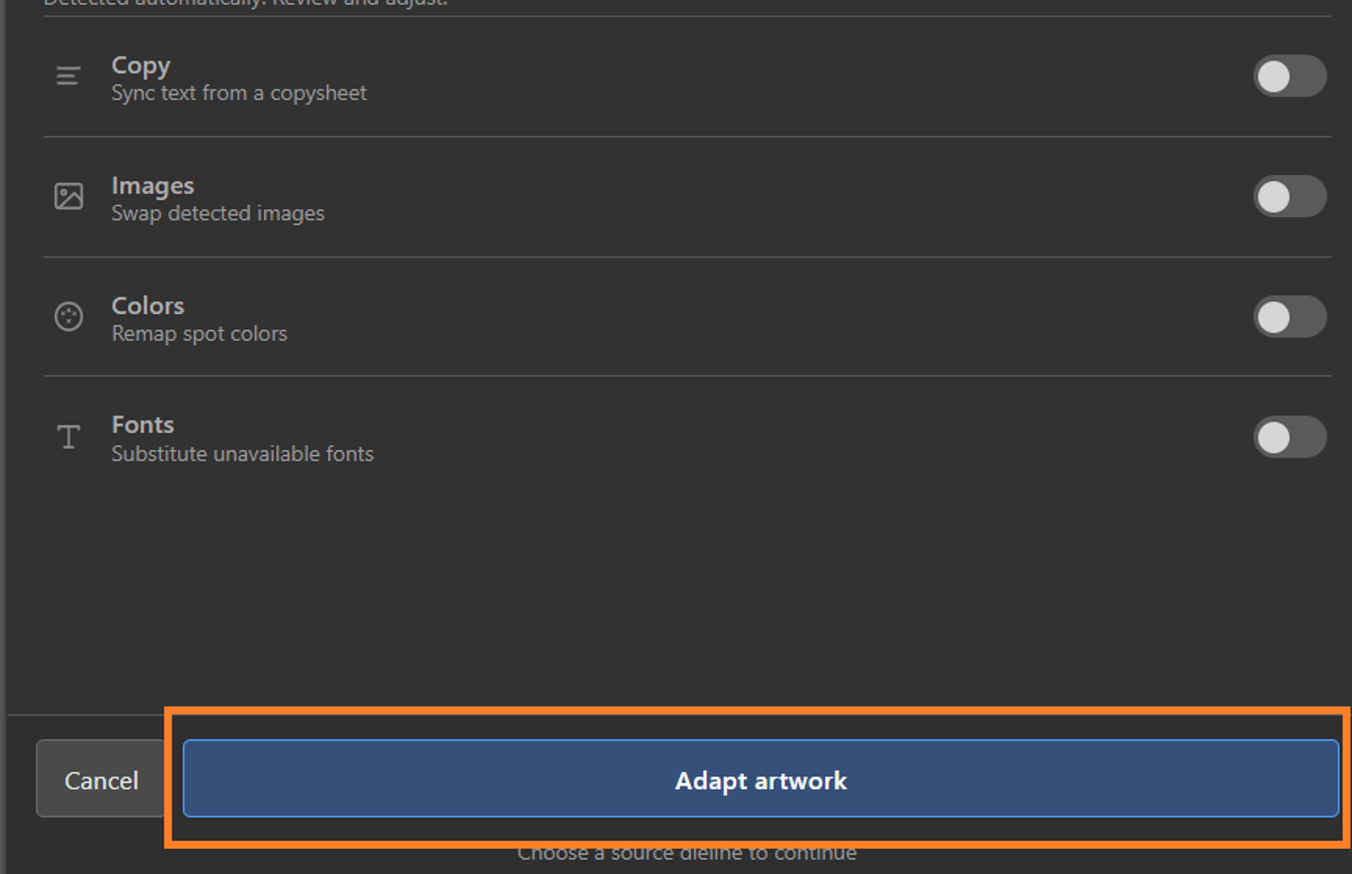
- In the Adapt AI panel, select Adapt artwork. The system adapts the source artwork onto the destination dieline and opens the adapted artwork in Illustrator.
- Review the adapted artwork, and correct it where required.
- Export the adapted artwork, or move it to the next stage, as required.
Adapt an Artwork onto Many Dielines
01. Select the Source Dieline
| Note: The source needs both the dieline and the artwork. You select the dieline in the SOURCE section; the plugin reads the artwork from the document open in Illustrator. |
- Select the source dieline as described in One-to-One Adaptation.
02. Turn On Adapt to Many Files
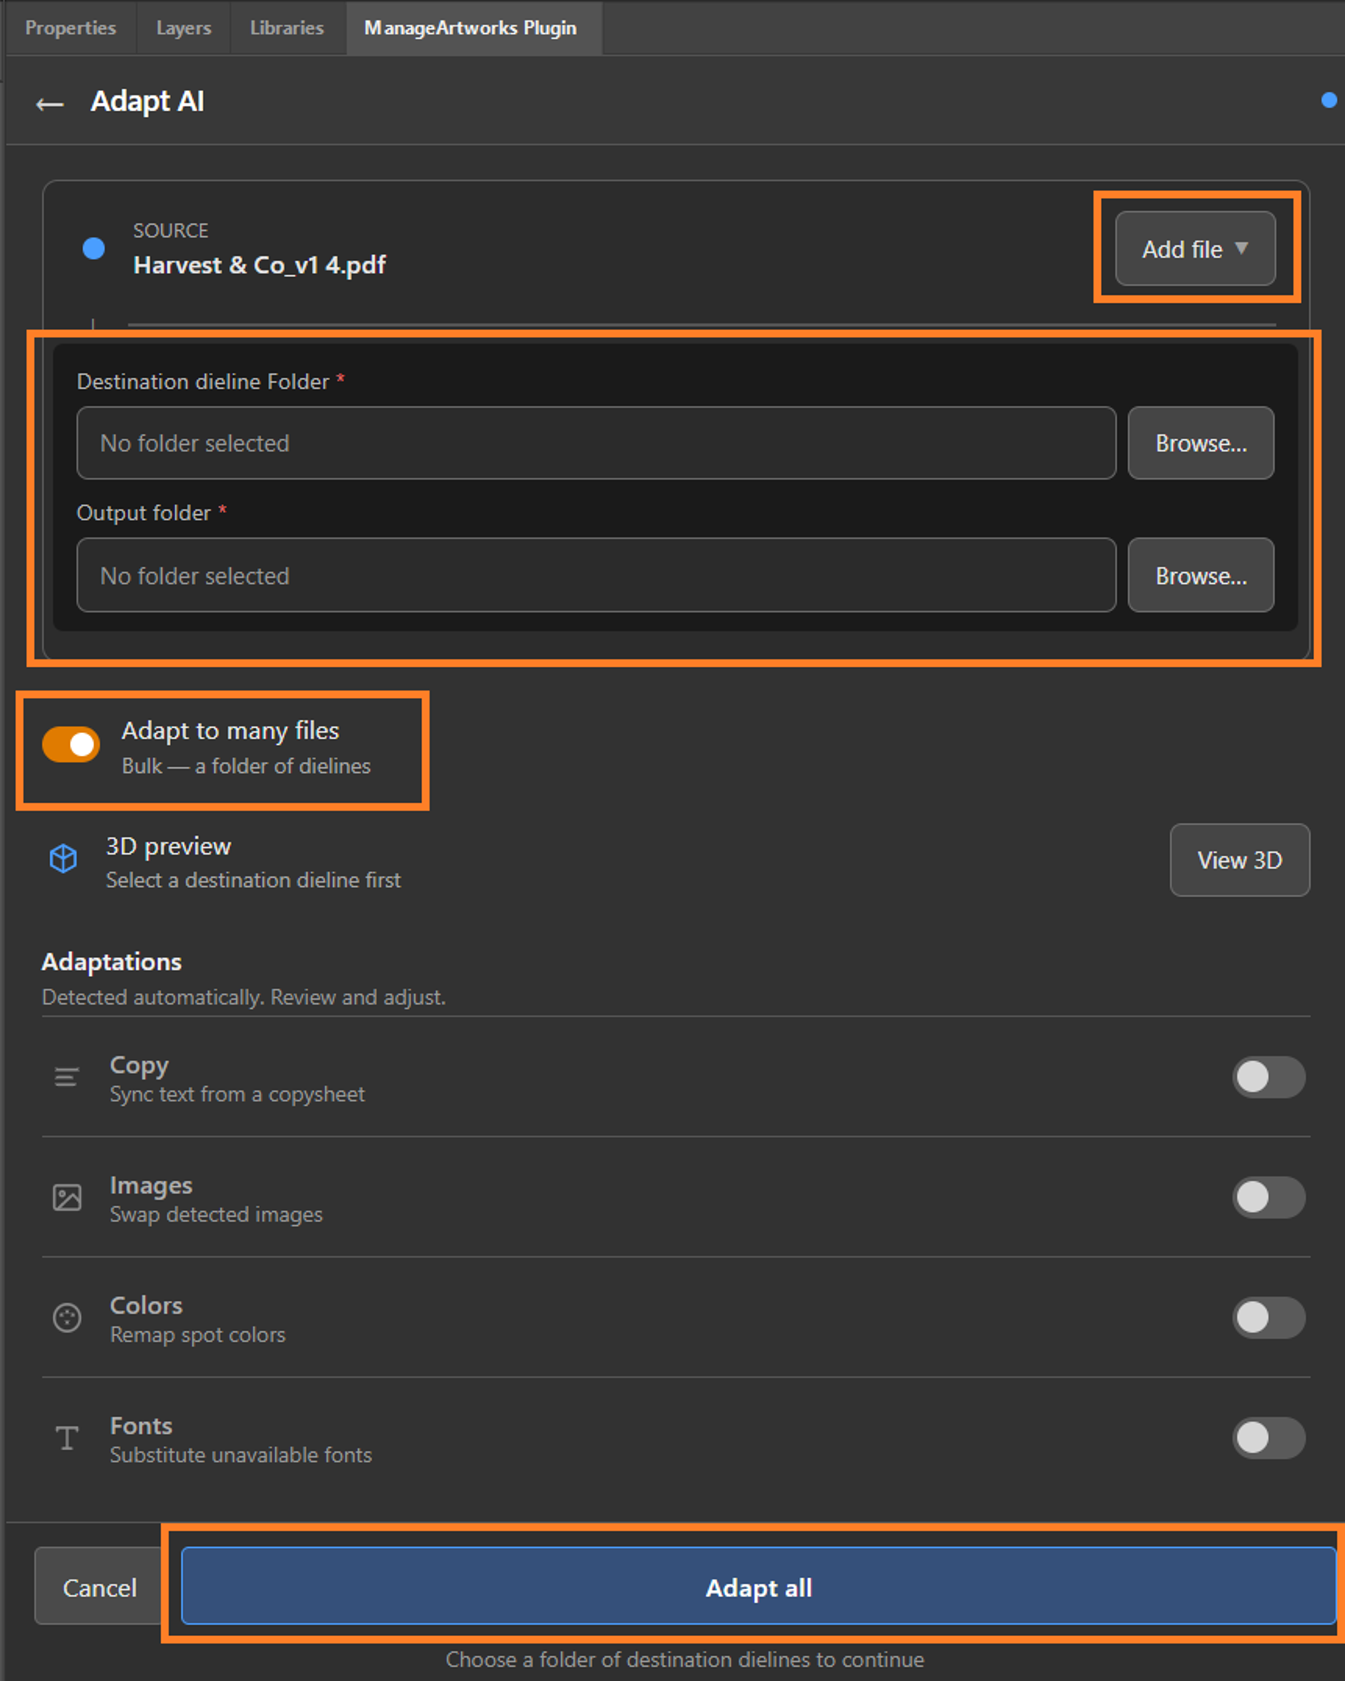
- Turn on the Adapt to many files toggle. The DESTINATION section is replaced by the Destination dieline Folder and Output folder boxes, and the button at the bottom changes to Adapt all.
03. Select the Destination Dieline Folder
- Next to Destination dieline Folder, select Browse.
- In the folder selection dialog box, browse to and select the folder that contains the destination dielines.
Note: Until you select a folder of destination dielines, Adapt all is unavailable, and the line below it reads Choose a folder of destination dielines to continue.
04. Select the Output Folder
- Next to Output folder, select Browse....
- In the folder selection dialog box, browse to and select the folder where the adapted artworks are to be saved.
Note: You need to select both the destination dieline folder and the output folder.
05. Change the Copy, Images, Colors and Fonts (If Required)
- In the Adaptations section, turn on the toggle of an adaptation the variant needs. The system displays Apply to all and Per file next to the toggle.
- Apply to all: uses the same settings for every dieline in the folder. Set up the adaptation once.
- Per file: lists every file in the folder, so that you can set up the adaptation separately for each file. Repeat the setup steps for each file in the list.
- Set up the adaptation. For the steps, refer to Set Up the Adaptations.
06. Adapt All
- In Illustrator, select the tab of the source artwork, so that it is the document in focus.
Note: If you attached a dieline from the Dieline Library, it opened in its own tab. Switch back to the source artwork before you continue. If more than one document is open, the plugin uses the document in focus as the source artwork. - In the Adapt AI panel, select Adapt all. The system adapts the source artwork onto each dieline in the destination dieline folder, and saves one adapted artwork for each dieline in the output folder. For example, if the folder has five dielines, five adapted artworks are saved.
- Open each adapted artwork from the output folder, review it, and correct it where required.
Set Up the Adaptations (If Required)
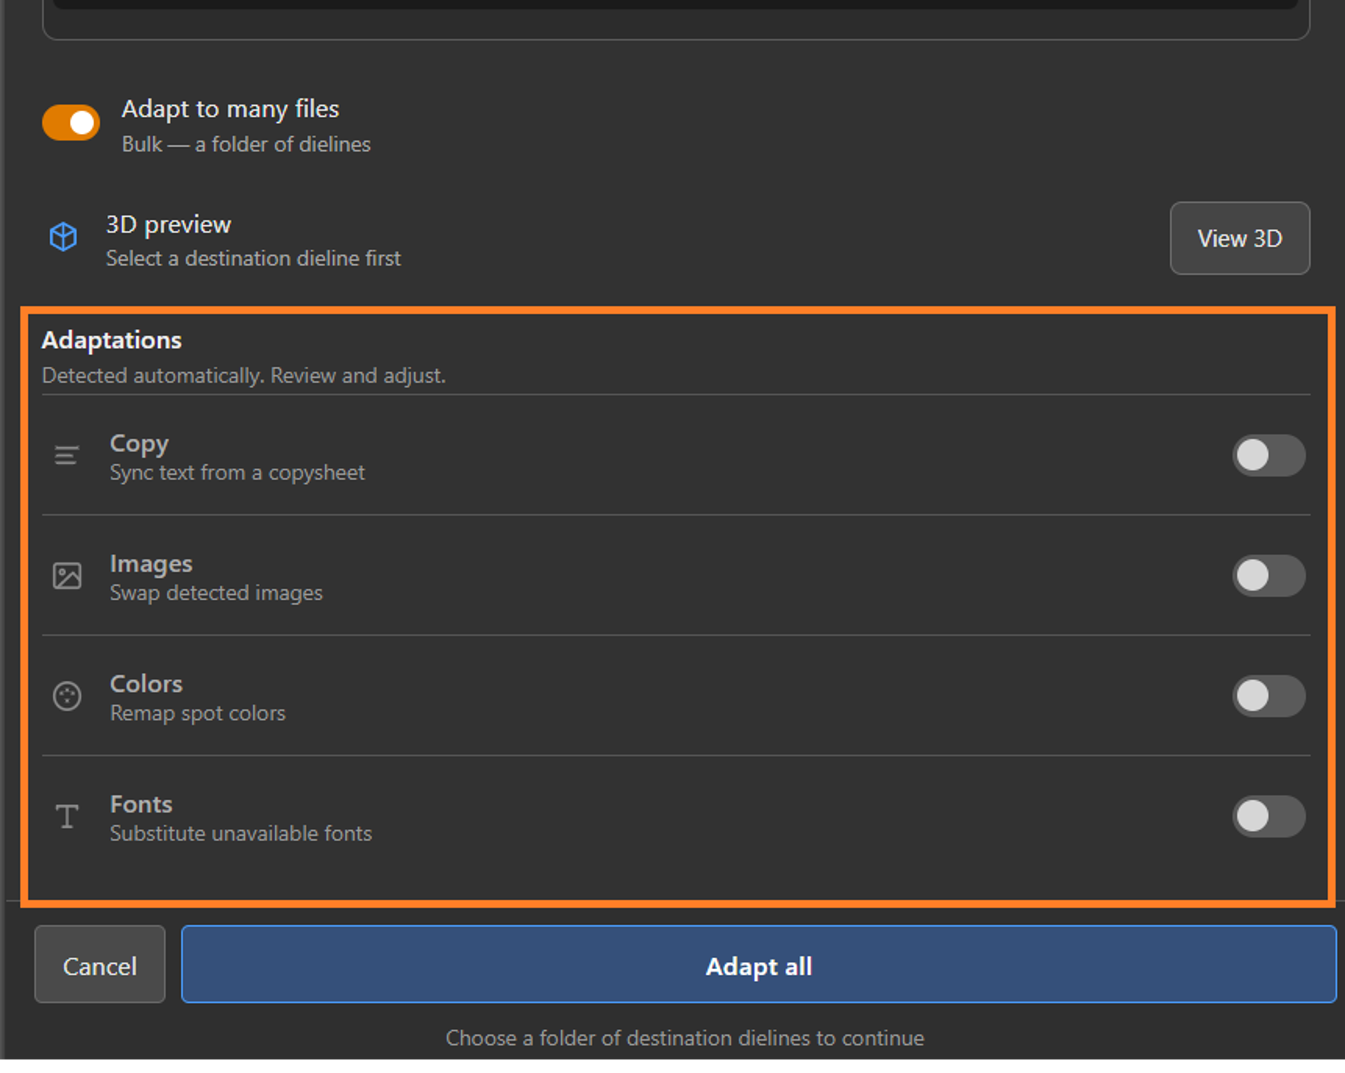
The Adaptations section allows you to change the copy, images, colors, and fonts of the source artwork while it is adapted. The system lists the images, spot colors, and fonts used in the source artwork so that users can replace them. Each adaptation is independent and is controlled by its own toggle.
An adaptation that is left disabled carries the corresponding elements of the source artwork into the adapted artwork without any change.
| Adaptation | Description |
| Copy | Replaces the text used in the source artwork with the text that you select for the destination variant, read from the source and destination copy sheets. For example, if the source artwork carries the copy of the 750 ml pack and the adapted artwork requires the copy of the 250 ml pack, you can select the copy sheet of the 250 ml pack and the system applies its text. |
| Images | Replaces the images used in the source artwork with the image files that you supply for the destination variant. For example, if the source artwork uses the 750 ml pack image and the adapted artwork requires the 250 ml pack image, you can browse to the 250 ml image file and the system applies it. |
| Colors | Replaces the spot colors used in the source artwork with the spot colors that you specify for the destination variant. For example, if the source artwork uses Pantone 368 C and Pantone 369 C, and the adapted artwork requires Pantone 368 C in place of Pantone 369 C, you can map Pantone 369 C to Pantone 368 C and the system applies the replacement. |
| Fonts | Replaces the fonts used in the source artwork with the fonts that you specify for the destination variant. For example, if the source artwork uses Arial and the adapted artwork requires Open Sans, you can map Arial to Open Sans and the system applies the replacement. |
Apply to all and Per file
In the one-to-many mode, each enabled adaptation provides two additional options:
- Apply to all – applies the same settings to every dieline in the selected folder.
- Per file – lists every file in the selected folder so that the adaptation is configured separately for each file.
Select Apply to all or Per file before configuring the adaptation. The configuration steps are the same in both cases; with Per file, the steps are repeated for each file in the list.
| Note: Apply to all and Per file appear only when the Adapt to many files toggle is enabled. |
To Sync the Copy
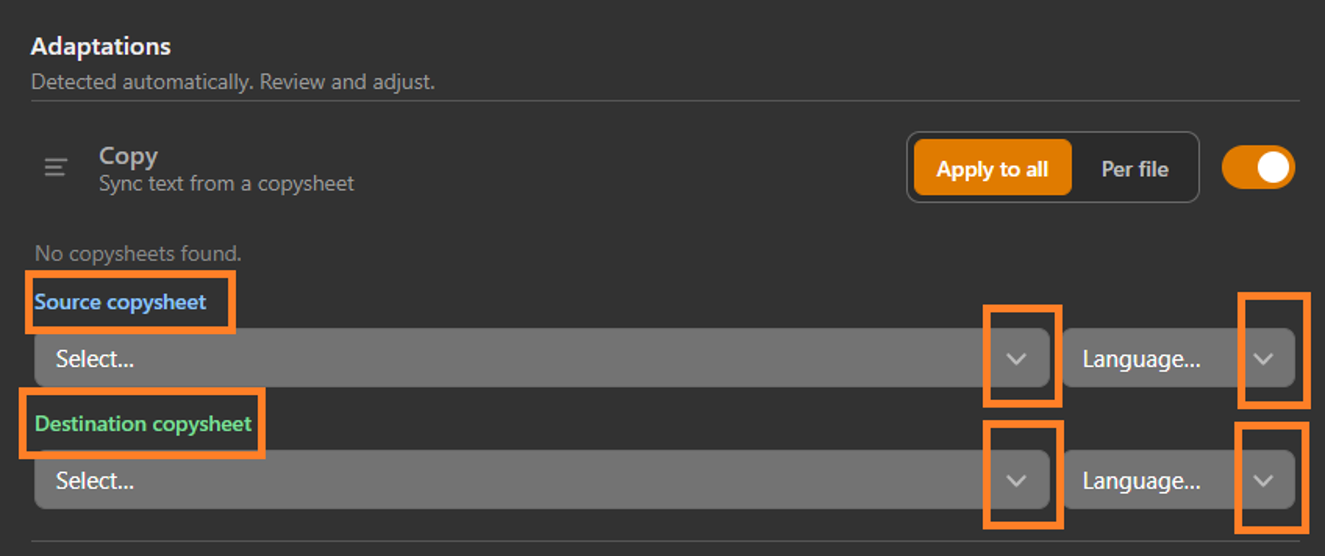
- Turn on the toggle next to Copy.
- Select the Source copysheet drop-down list.
- Select the copy sheet the source artwork was made from.
- If the copy sheet has more than one language, in the Language drop-down list next to it, select the language.
- Select the Destination copysheet drop-down list.
- Select the copy sheet of the destination variant.
- If the copy sheet has more than one language, in the Language drop-down list next to it, select the language.
Note:
|
To Swap the Images
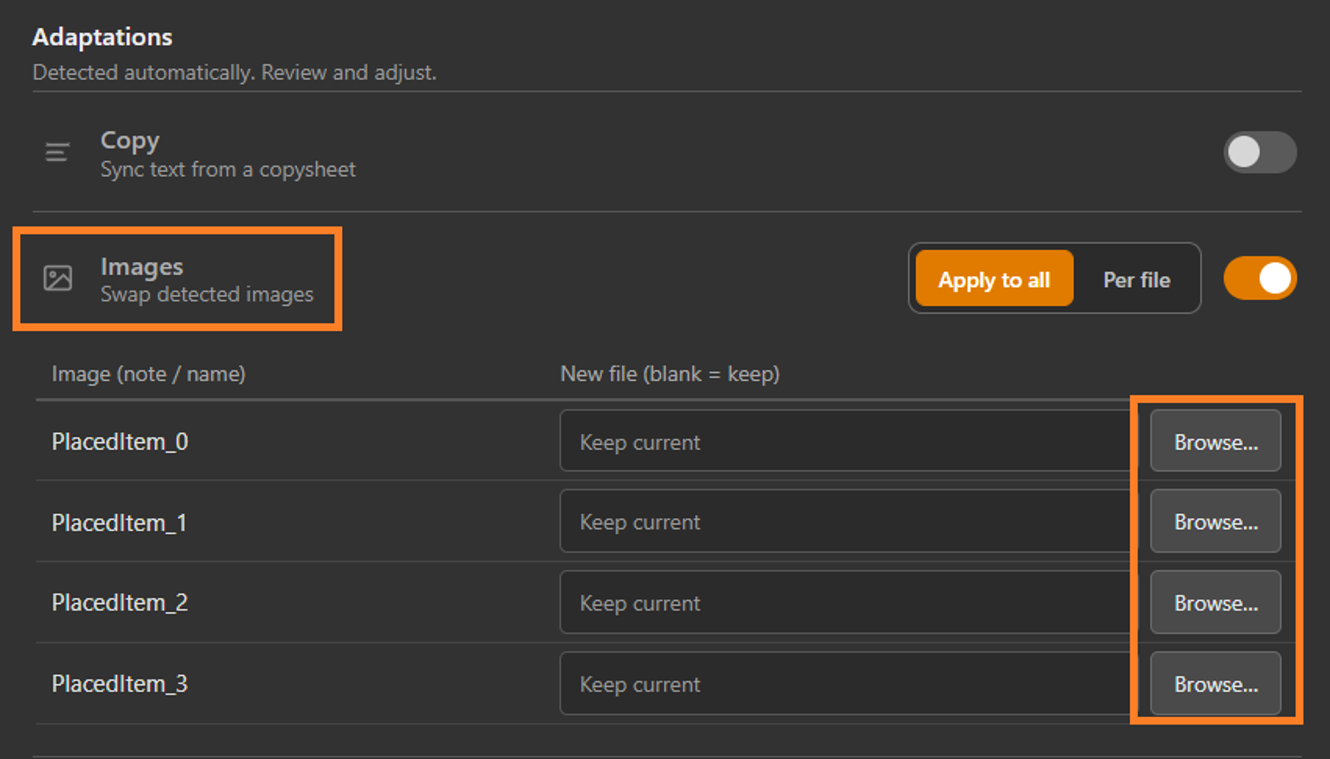
- Turn on the toggle next to Images. The system lists every image detected in the source artwork under Image (note / name), for example PlacedItem_0.
- Next to the image to be replaced, select Browse....
- In the file selection dialog box, browse to and select the new image file.
- Select Open.
- Repeat steps 2 to 4 for each image to be replaced. For example, if the artwork has four images and the variant needs two new ones, browse for those two only.
Note:
|
To Remap the Spot Colors
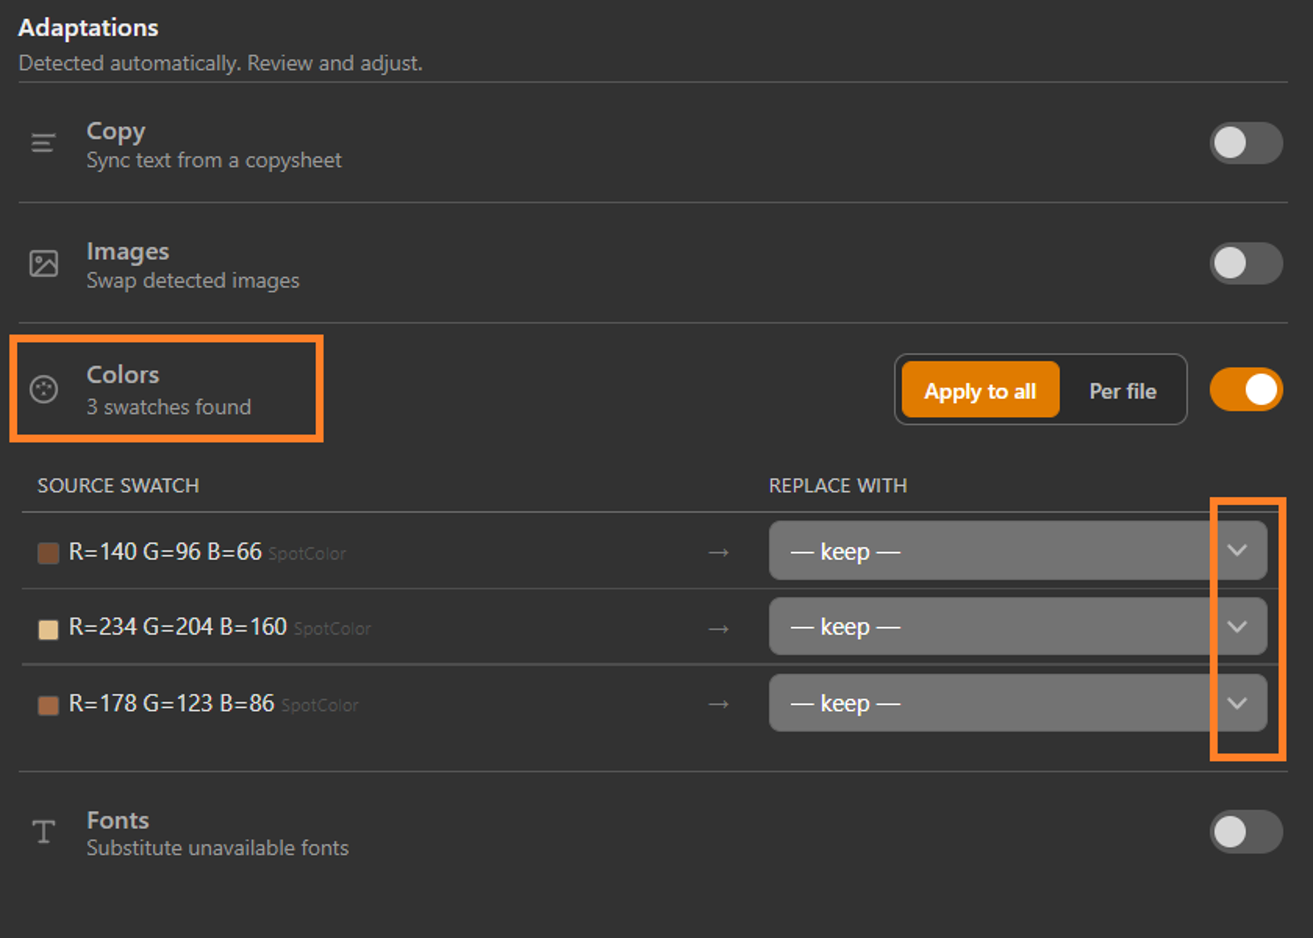
- Turn on the toggle next to Colors. The system lists every spot color detected in the source artwork under SOURCE SWATCH, and shows the number found, for example 3 swatches found.
- Next to the swatch to be replaced, select the REPLACE WITH drop-down list.
- Select the new swatch.
- Repeat steps 2 and 3 for each swatch to be replaced.
Note:
|
To Substitute the Fonts
- Turn on the toggle next to Fonts. The system lists every font detected in the source artwork under SOURCE FONT (USED IN DOC), and shows the number found, for example 7 fonts found.
- Next to the font to be replaced, select the REPLACE WITH drop-down list.
- Select the new font.
- Repeat steps 2 and 3 for each font to be replaced.
Note:
|