
GS1 Profile Snapshot
The GS1 Profile Snapshot feature enables you to generate GS1-compliant product images from your 3D dieline artwork using predefined configuration profiles. It automates image generation by applying the correct naming conventions, metadata, and orientation — reducing manual effort and minimising errors.
How to Use GS1 Profile Snapshot
01. Access GS1 Profile Snapshot
 | Note: GS1 Snapshot is an enhanced feature available in the Web Viewer. This feature is accessible only when the artwork is part of a dieline-linked component. The 3D option is available only for projects configured with a 3D Dieline workflow. |
- Sign in to your ManageArtworks account.
- Navigate to Project Views.
- Select the relevant Dieline Linked Project.
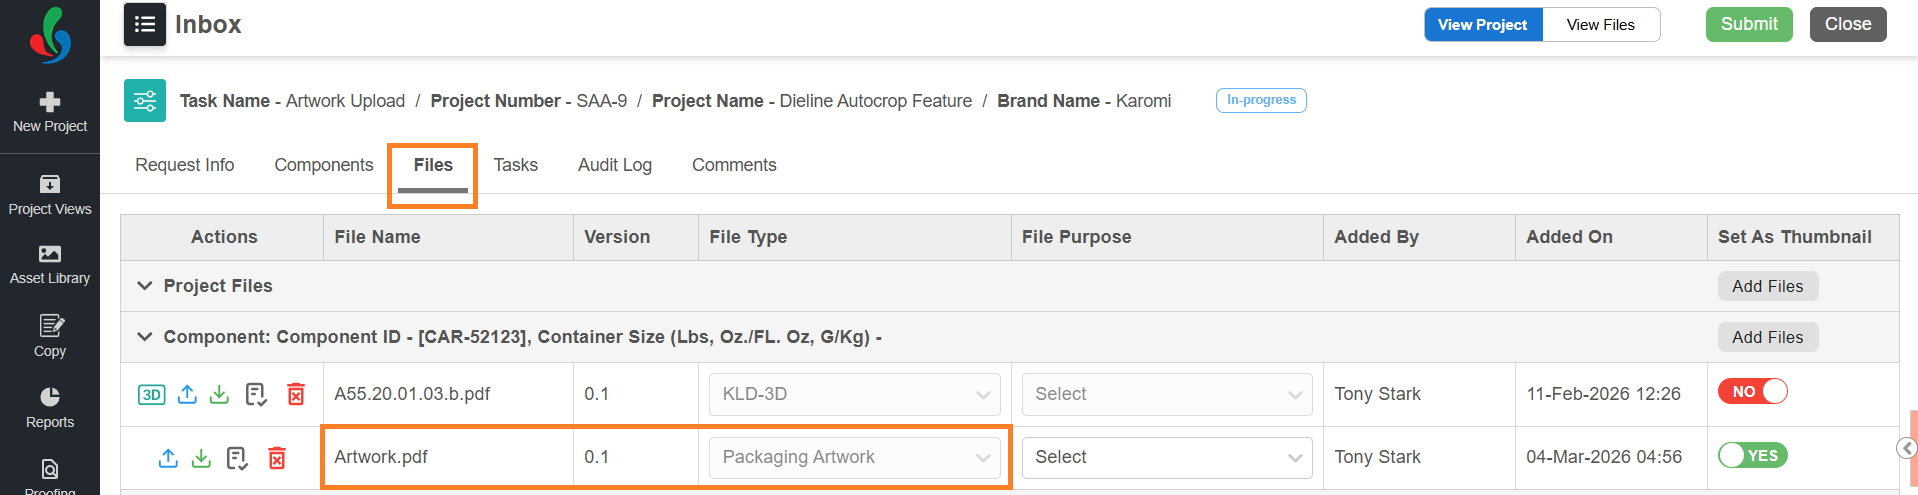
- Go to the Files tab.
- Select the required artwork file from a dieline-linked component to open it in Web Viewer.
- Select the 3D drop-down menu and choose 3D Simulation.
Note: The 3D menu is available only for artwork files configured for dieline support in Web Viewer. To configure supported file or asset types, refer to Dieline Parameter Configuration in the Admin module.

02. Initiate GS1 Profile Snapshot
- Select 3D Snapshot.
- Choose GS1 Snapshot from the available options.
- The system opens the GS1 Snapshot workspace. The GS1 Snapshot workspace is divided into three sections:

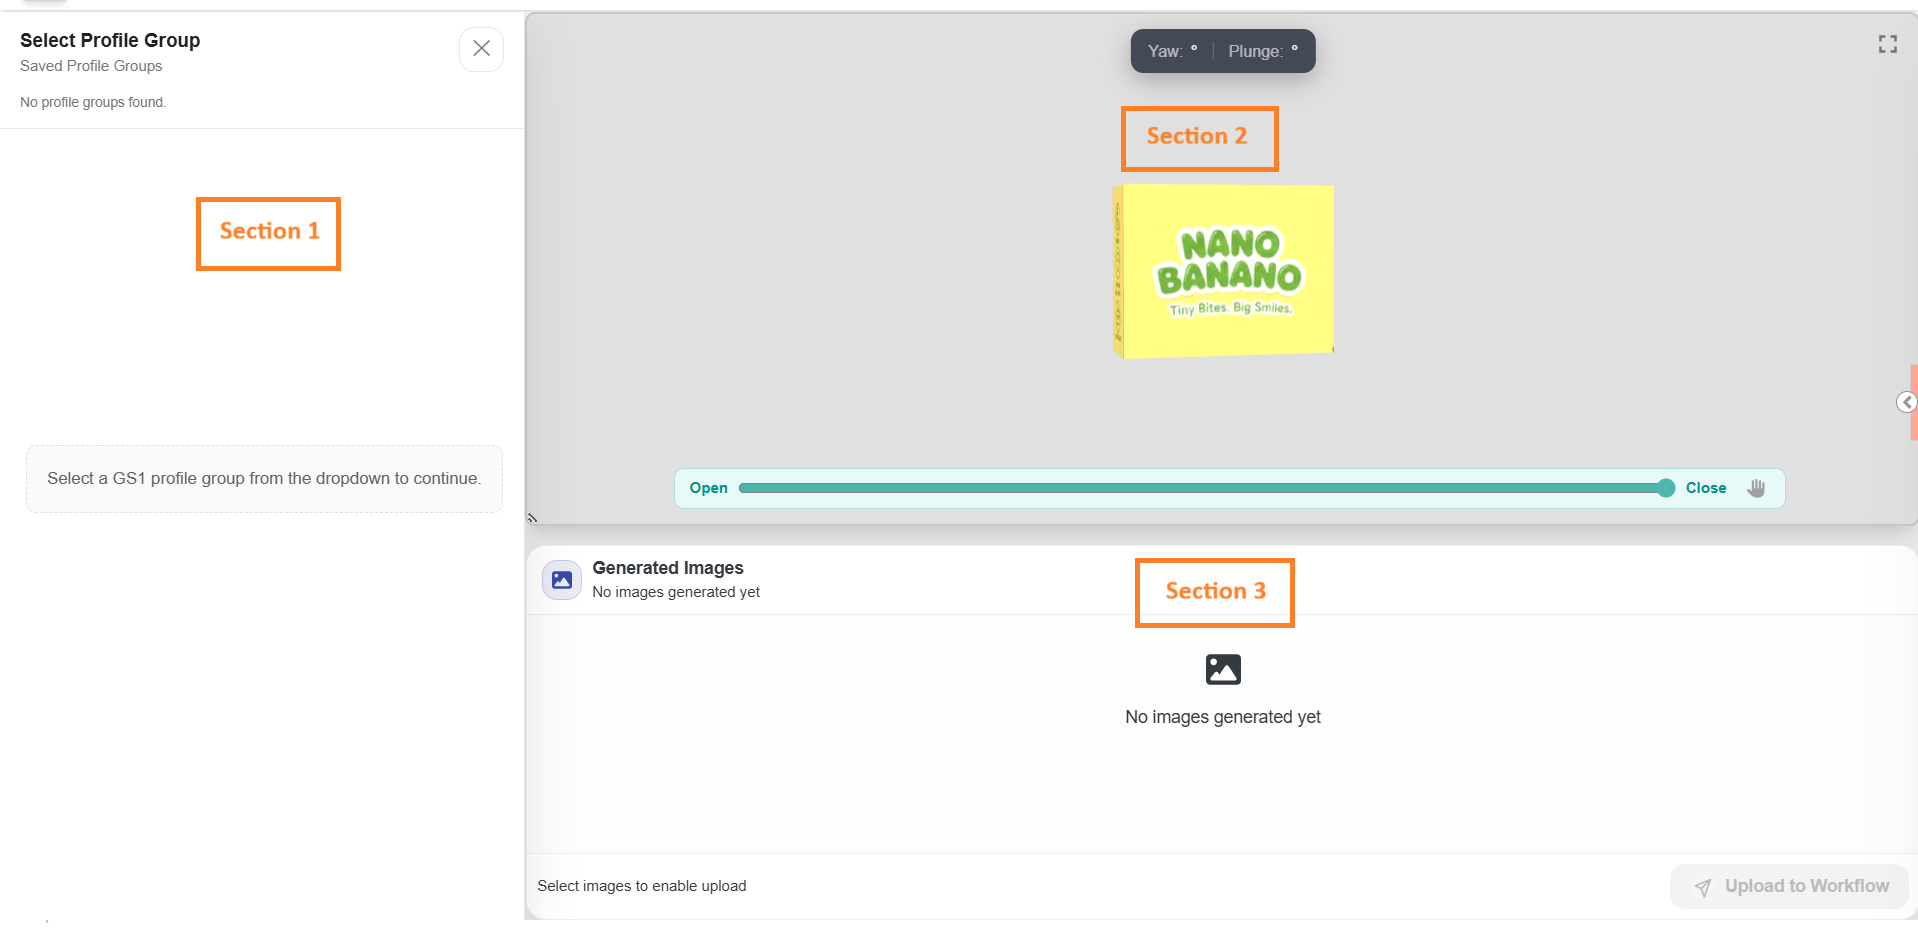
| Section | Functionality |
|---|---|
| Section 1: Profile Selection and Configuration Panel (Left Panel) | Allows you to select a GS1 profile and manage image generation settings. Based on the selected profile, the system automatically loads predefined configurations. |
| Section 2: Real-Time 3D Preview Window (Center Panel) | Displays a live 3D preview of the artwork. The view updates instantly when Facing or Orientation is changed, allowing you to adjust the camera and ensure the image meets desired requirements. |
| Section 3: Generated Images Section (Bottom Panel) | Displays all images generated after rendering. You can review the images, select the required ones, and attach them to the workflow. |
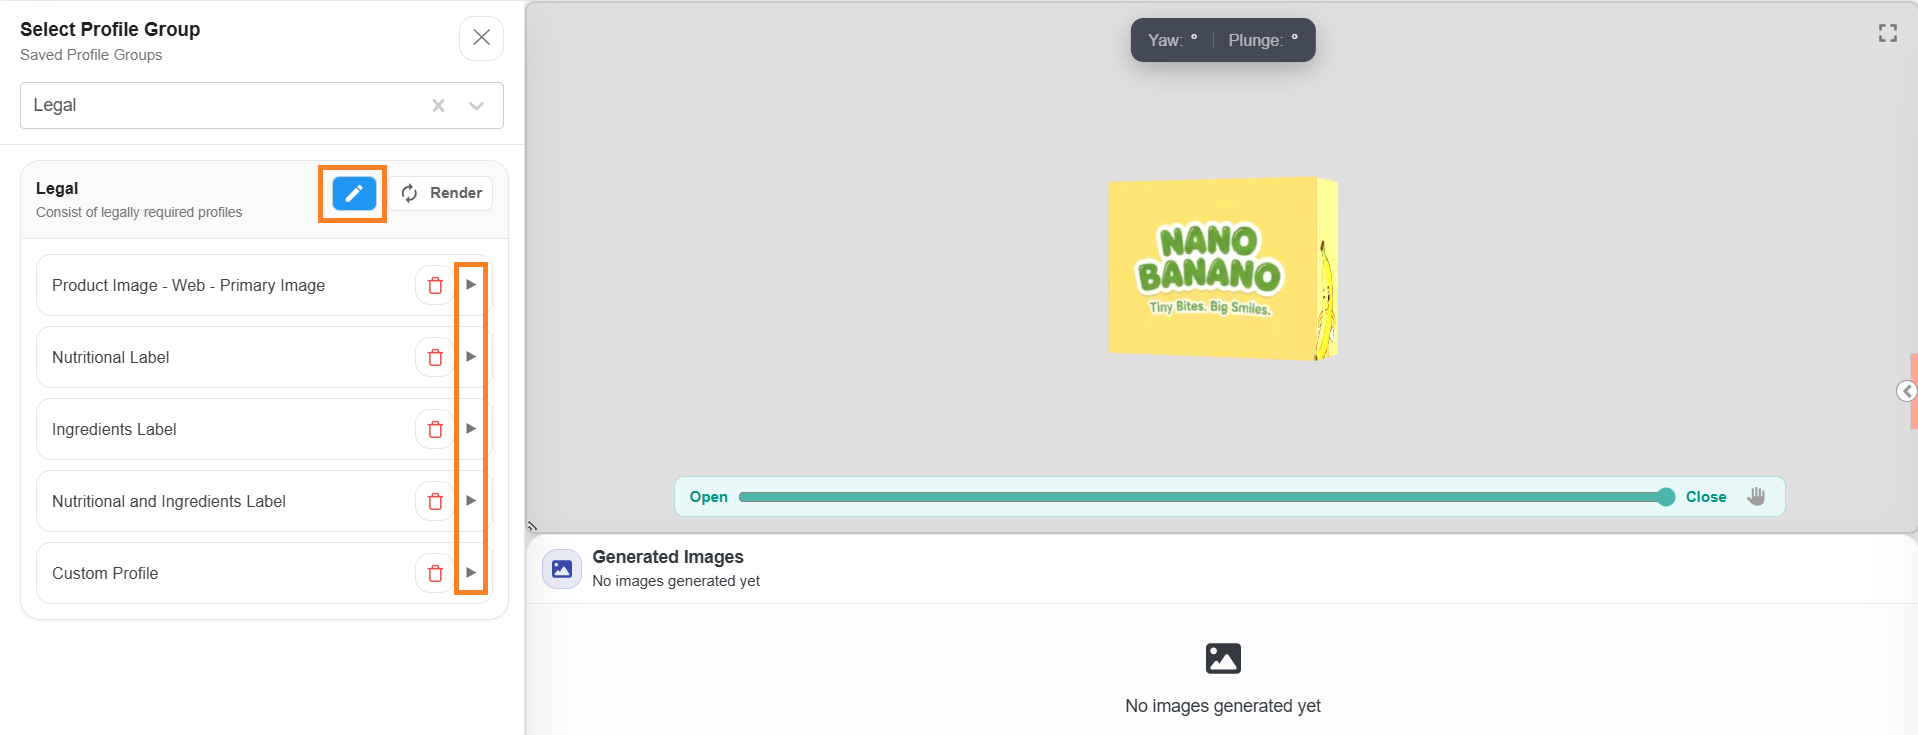
03. Select Profile Group
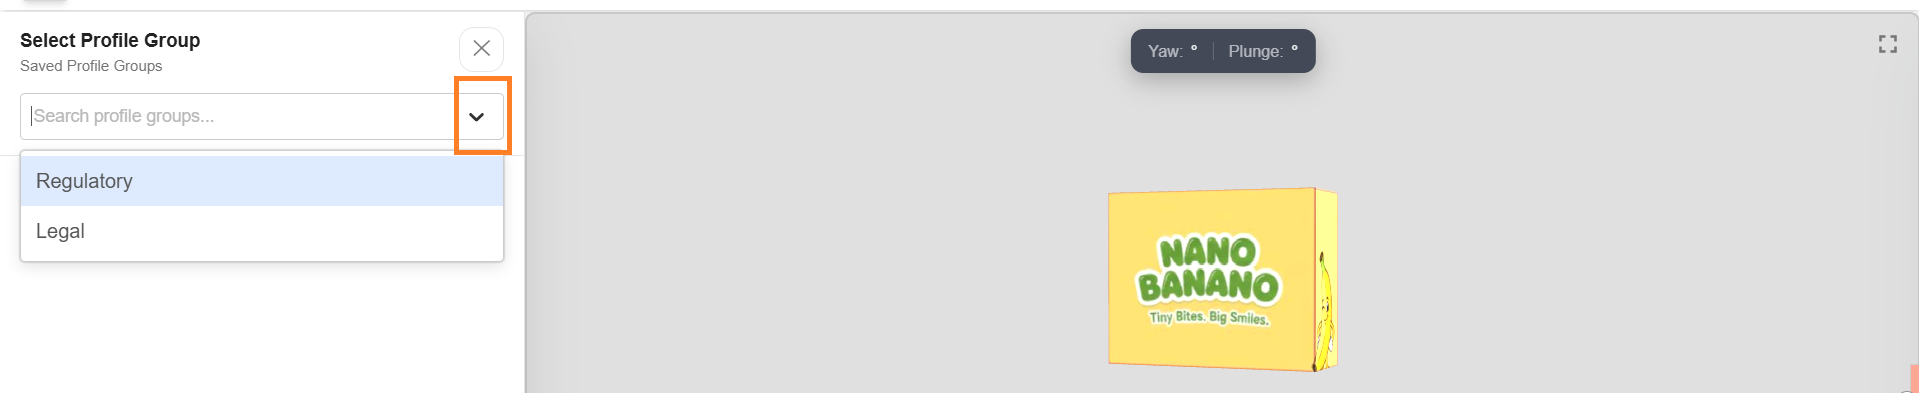
| Note: GS1 Profile Groups must be configured in the Admin module before they can be used in Web Viewer. If no Profile Groups are available, the selection option will not be displayed. Only one Profile Group can be selected at a time. |
- You can select a Profile Group using either of the following methods:
- Search
- Enter the profile group name in the search field. Matching results are displayed automatically.
- Select the required profile group.
- Dropdown Selection
- Select the Profile Group drop-down menu.
- Select the required profile group from the lists.
- Search
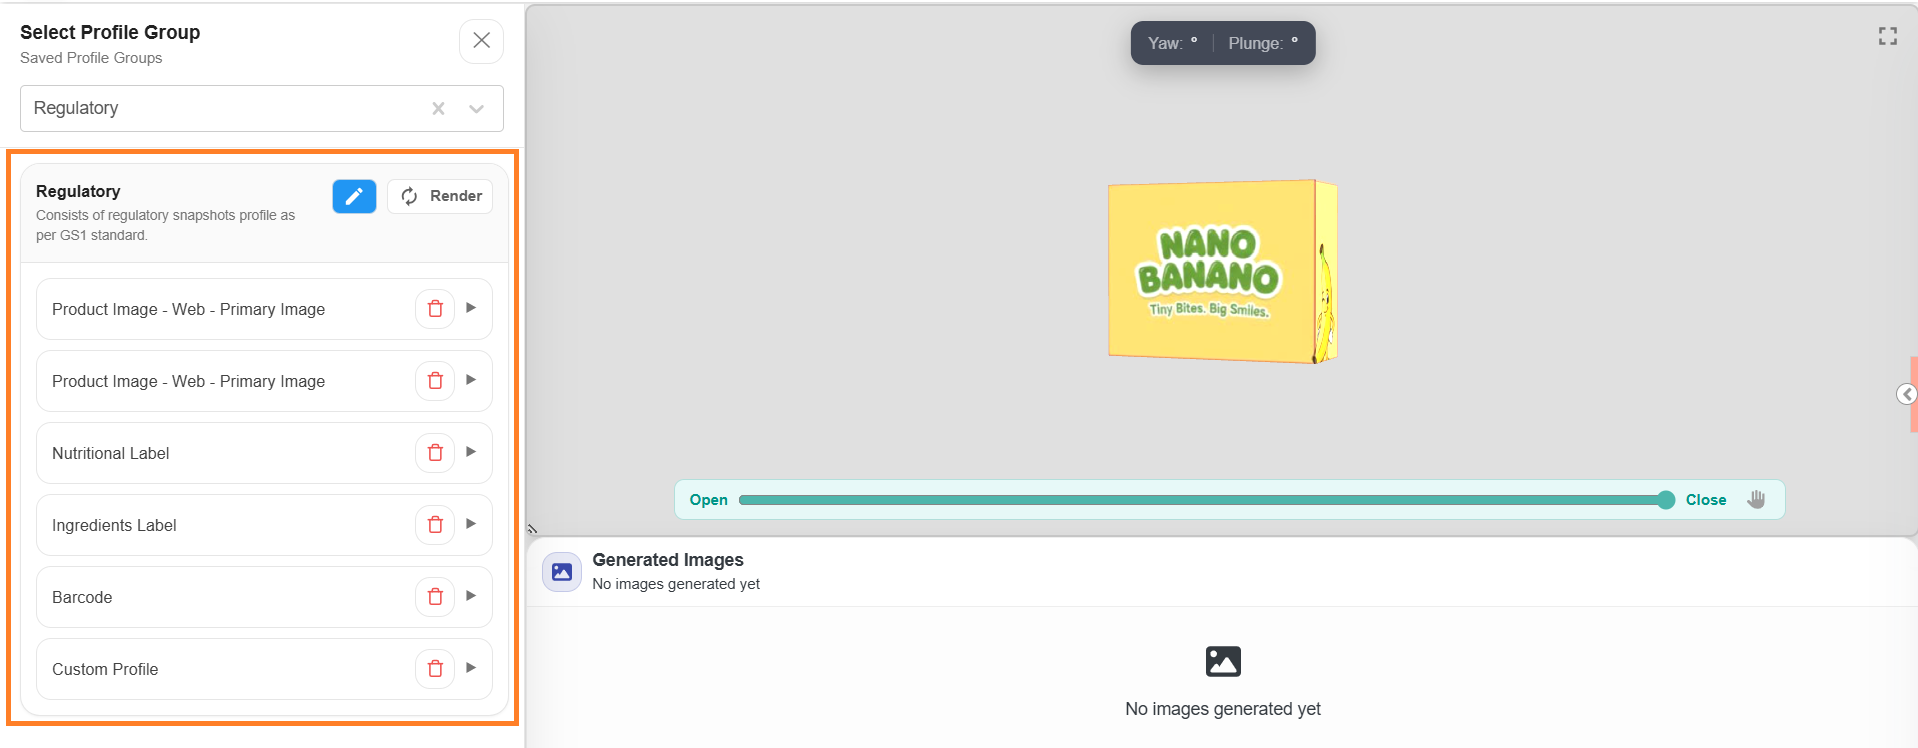
- Upon selecting a Profile Group, the system displays the following details:
- Profile Group Name: The name of the selected configuration profile.
- Description: A brief summary of the profile's purpose and usage.
- Associated Image Categories: The image types linked to this profile (for example, Product Image – High Resolution).
- The following action buttons will also be available:
- Edit: Allows you to enable editing mode for the selected Profile Group. Once activated, all associated profiles become editable.
- Render: Allows you to generate images based on the selected Profile Group.
- Delete: Allows you to remove a specific profile from the selected Profile Group.

 | Note: Select the arrow (▶) icon next to any profile to view its configured settings. To modify the settings, select the Edit button first. This enables editing across all associated profiles. You can then select the arrow (▶) icon next to any category to expand it and adjust its settings before rendering. For more details, refer to the Edit Profile Group section. |
04. Edit Profile Group (Optional)
If you want to review or modify profile settings before rendering, you can edit the selected Profile Group as needed.
- Select the Edit icon associated with the selected Profile Group. This enables editing across all associated profiles.
- Select the arrow (▶) icon next to any profile to expand it and adjust its settings.
Note: You can only modify allowed configuration values within each image profile category. Locked (non-editable) fields cannot be changed.
a. Modifying Primary Image Category Profile(s)
Fields available under a Primary Image category profile are described below.
- Generated File Name: Automatically updates based on the values entered in the associated profile fields. This field cannot be edited manually.
- File Format: Defines the image format used during image generation.
Note: This is auto-filled based on GS1 standards and cannot be changed. - Width and Height: Defines the dimensions of the generated image. Default values are imported from the Admin module but can be modified within the allowed limits.
Note: Supported range: 2401–4800 px. - DPI: Defines the image quality. For Primary Images category profiles, this is always set to 300 and cannot be modified.
- Background: Allows you to define the background colour of the image.
- #FFFFFF – White
- #F0F0F0 – White Smoke (a neutral shade of grey, also referred to as Grey94)
- Naming (Mandatory)
- GTIN: The Global Trade Item Number. Enter a 14-digit numeric value.
Note: Only numeric values are accepted. The GTIN must be exactly 14 digits in length. - Image Type: Denotes the image type. This is auto-filled based on GS1 standards and cannot be changed.
- Facing: Denotes the side of the 3D model to be captured. The default value is imported from the Admin module but can be changed using the drop-down menu.
Note: Once a Facing is selected, the 3D preview updates in real time to reflect the selected side of the product. - Orientation: Allows you to adjust the camera angle for the selected facing within permitted ranges.
- To configure Facing and Orientation:
- Select a Facing from the drop-down menu.
- Select the corresponding Orientation.
- Adjust the camera angle within the permitted range for the selected facing.
Note: If No Plunge Angle is selected, the system restricts camera tilt and the snapshot represents a flat 2D view of the selected facing.
- State: Denotes the state of the snapshot. For Primary Images, this is always set to In Packaging and cannot be changed.
- GTIN: The Global Trade Item Number. Enter a 14-digit numeric value.
- Naming (Optional)
Optional values are automatically appended to the generated file name.- Language: Enter the desired language code (for example, en-US).
- Image End Date: Select a date using the calendar tool.
- Serialisation: Enter the serial value.
- Rendered Image: Select R.
- CPV (Consumer Product Variant): Enter the CPV value.
Note: CPV accepts up to 20 alphanumeric characters.
b. Modifying Secondary and Technical Image Category Profile(s)
Fields available under a Secondary Image category profile are described below.
- Generated File Name: Automatically updates based on the values entered in the associated profile fields. This field cannot be edited manually.
- File Format: Defines the image format used during image generation. Select the required file format from the dropdown menu.
- Width and Height: Defines the dimensions of the generated image. Default values are imported from the Admin module but can be modified within the allowed limits.
Note: Supported range: 600–1600 px. - DPI: Defines the image quality. For Secondary Images category profiles, this is always set to 300 and cannot be modified.
- Naming (Mandatory)
- GTIN: The Global Trade Item Number. Enter a 14-digit numeric value.
Note: Only numeric values are accepted. The GTIN must be exactly 14 digits in length. - Image Type: Denotes the image type. This is auto-filled based on GS1 standards and cannot be changed.
- GTIN: The Global Trade Item Number. Enter a 14-digit numeric value.
- Naming (Optional)
Optional values are automatically appended to the generated file name.- Language: Enter the desired language code (for example, en-US).
- Serialisation: Enter a two-digit number after 's' (e.g., 's01')
- CPV (Consumer Product Variant): Enter the CPV value.
Note: CPV accepts up to 20 alphanumeric characters.
c. Modifying Custom Profile Image Category
Fields available under a Custom Profile category are described below.
- File Format: Defines the image format used during image generation. Select the required file format from the drop-down menu.
- Width and Height: Defines the dimensions of the generated image. Default values are imported from the Admin module but can be modified within the allowed limits.
Note: Supported range: 300–4800 px. - DPI: Defines the image quality. Enter the desired DPI value.
Note: Supported rage: 150-300. - Naming (Mandatory)
- File Name: Enter the desired name for the snapshot. Unlike other image categories, the Custom Profile allows you to define a file name of your choice.
- File Name: Enter the desired name for the snapshot. Unlike other image categories, the Custom Profile allows you to define a file name of your choice.
Orientation Permitted Range
| Orientation | Horizontal (Yaw) Range | Vertical (Plunge) Range |
|---|---|---|
| Left | -75° to -15° | 0° only |
| Right | 15° to 75° | 0° only |
| Centre | 0° only | -15° to +15° |
| No Plunge Angle | 0° only | 0° only |
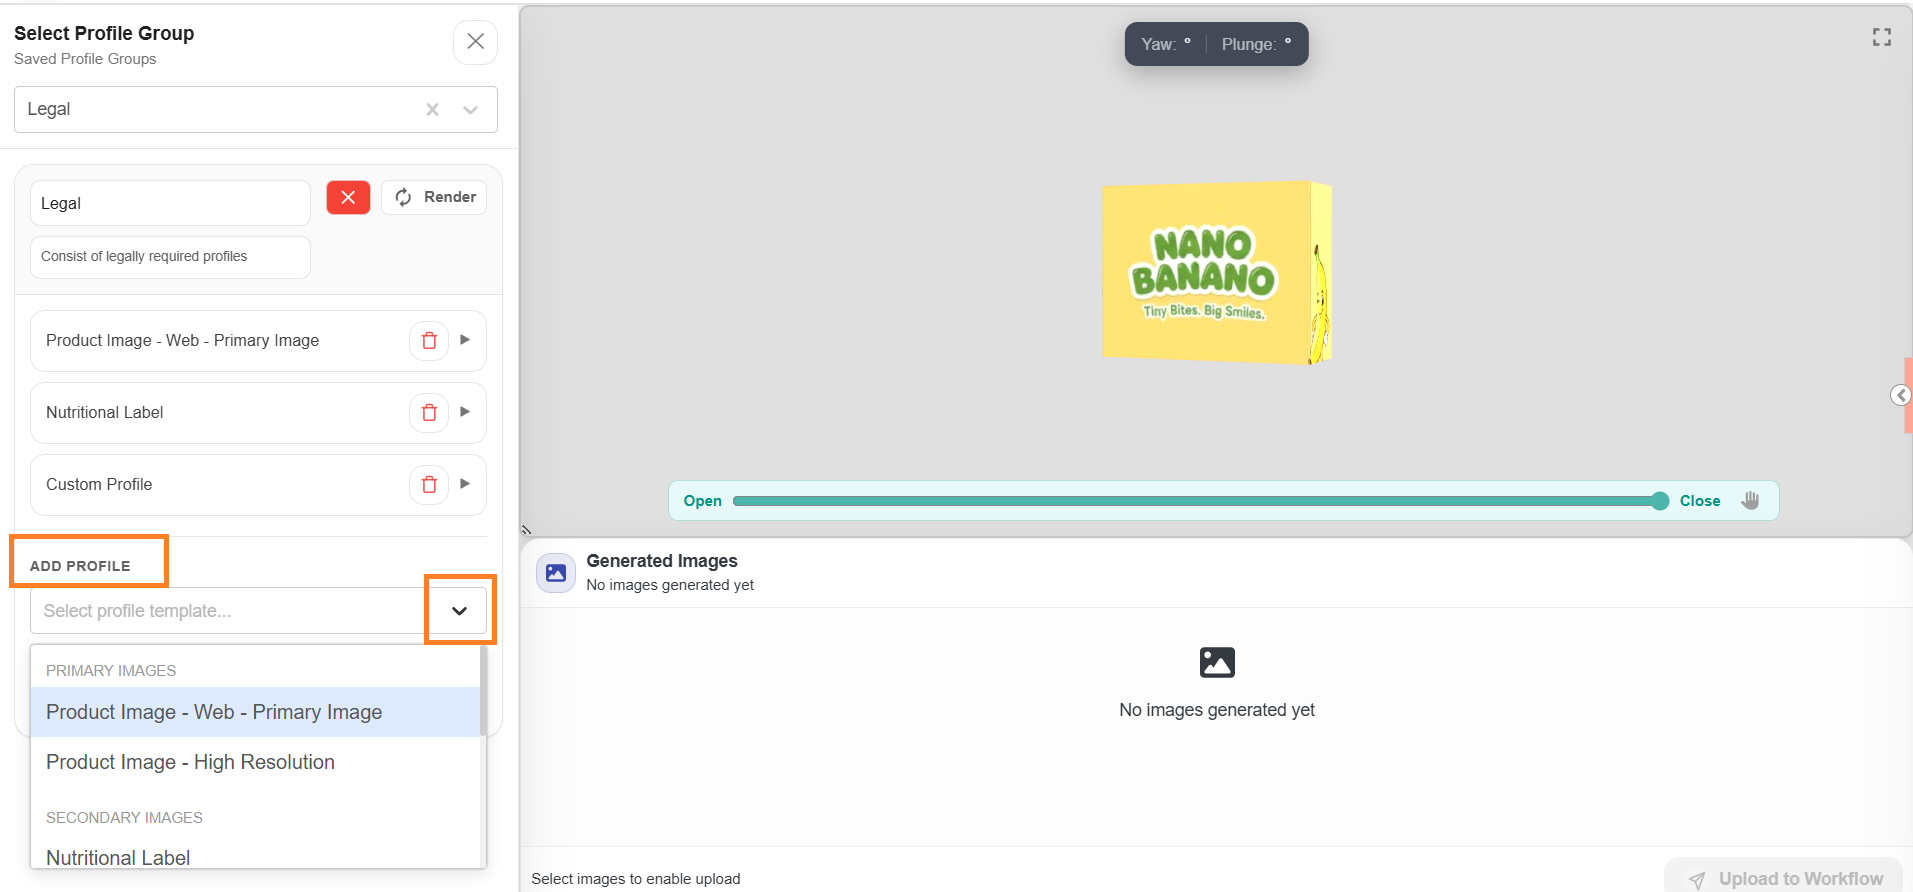
05. Add Profile (Optional)
You can add additional image profiles to the selected Profile Group before rendering. This allows you to generate multiple image types in a single render action.
| Note: To learn more about the different profile types, refer to Supported Profiles. |
- Select the Edit icon associated with the selected Profile Group.
- Under the selected Profile Group, navigate to the Add Profile section.
- Select the Select Profile Template drop-down menu.
- Choose the desired image profile from the available options. The selected image category is added to the current Profile Group session, and default configuration values are auto-populated.
- Modify the editable fields as required.
- For Primary Image category profiles, refer to Modifying Primary Image Category Profile(s).
- For Secondary and Technical Image category profiles, refer to Modifying Secondary and Technical Image Category Profile(s).
- For Custom Profile image categories, refer to Modifying Custom Profile Image Category.
- Repeat the above steps to add multiple image categories before rendering.
- Each added category is listed individually within the Profile Group. When rendered, images will be generated for all active categories in the list.

Save Configuration
After adding or modifying image categories, you can save your changes using one of the following options:
- Save
Updates the existing Profile Group with the changes made. The modified configuration will apply to all subsequent rendering actions.- Select Save to update the current Profile Group configuration.
- Save As
Creates a new Profile Group based on the modified configuration, leaving the original Profile Group unchanged. The new Profile Group will be available in the Saved Profile Groups list.- Enter a new name for the Profile Group in the name field.
- Select Save As to save it as a new Profile Group.
06. Render Profile Group
Once you have reviewed and configured all profile settings, you can render the selected Profile Group to generate images.
- Select the Render button associated with the selected Profile Group.

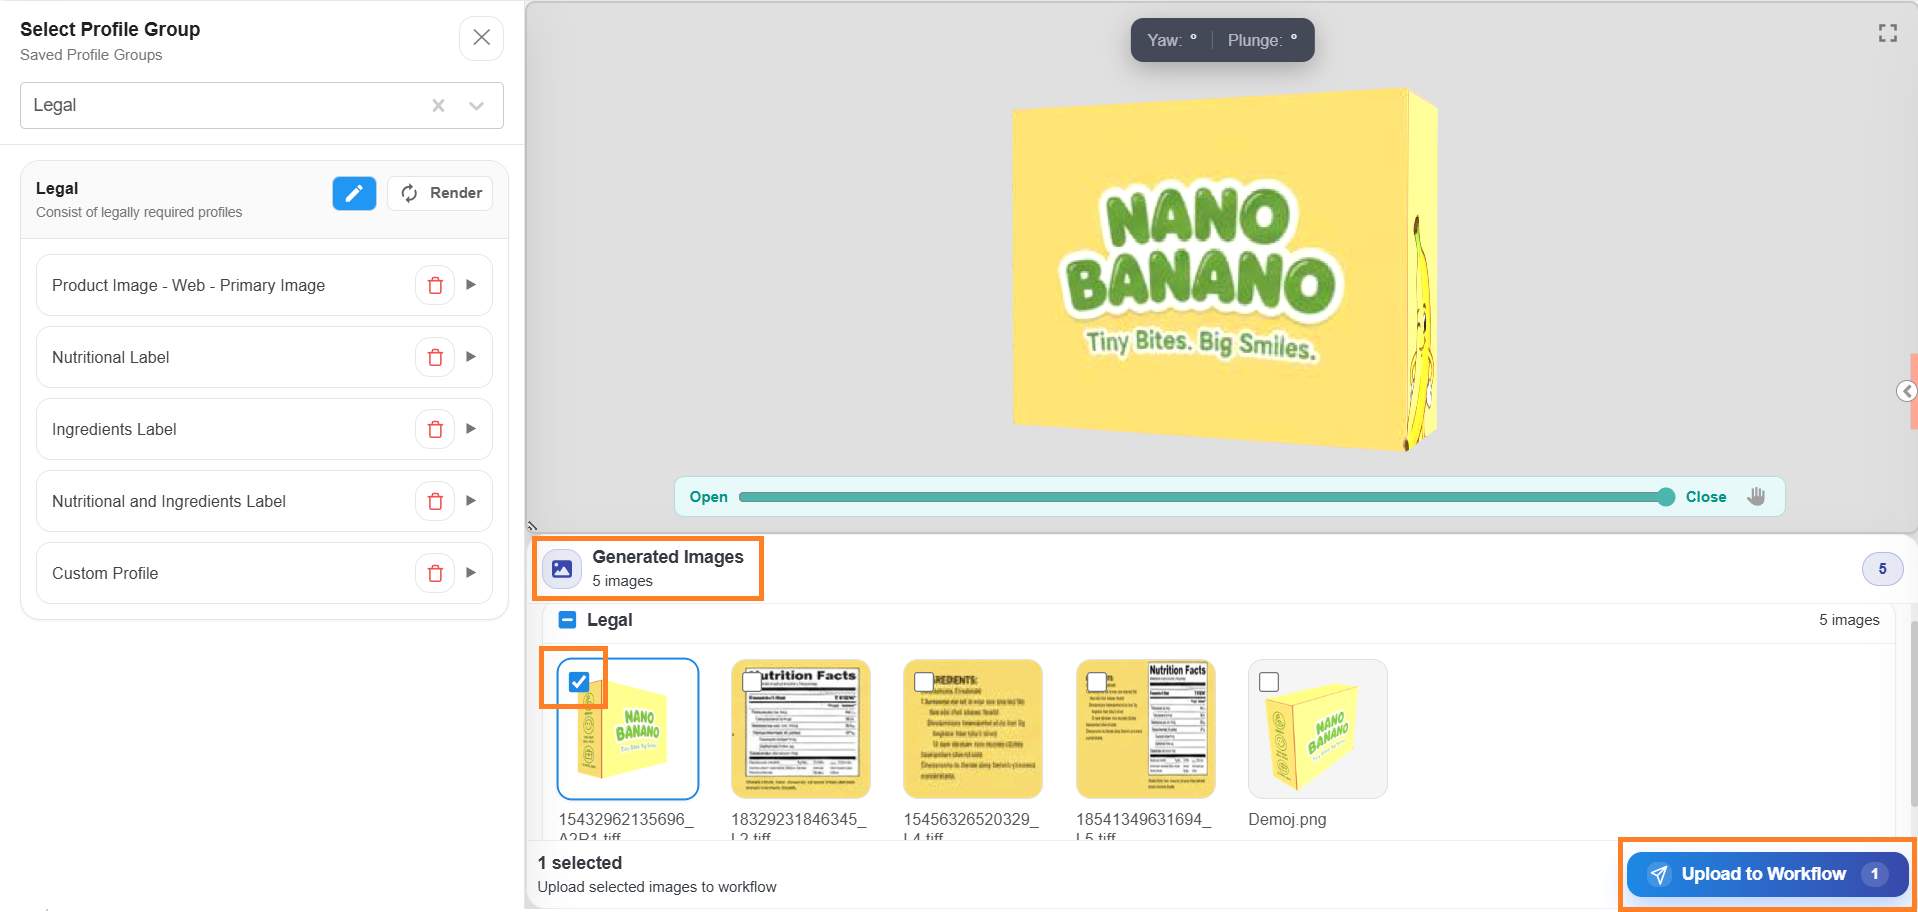
The system generates images for all image categories included in the selected Profile Group. Once rendering is complete, the generated images are displayed in the Generated Images section, grouped by their respective image category or profile.
07. Attach Snapshot to Workflow
After images are generated, you can attach them directly to the workflow.
- In the Generated Images section, select one or more images using the associated checkboxes.
- Select the Upload to Workflow button.
- The selected images are attached to the workflow as the Packshot file type under the respective component.
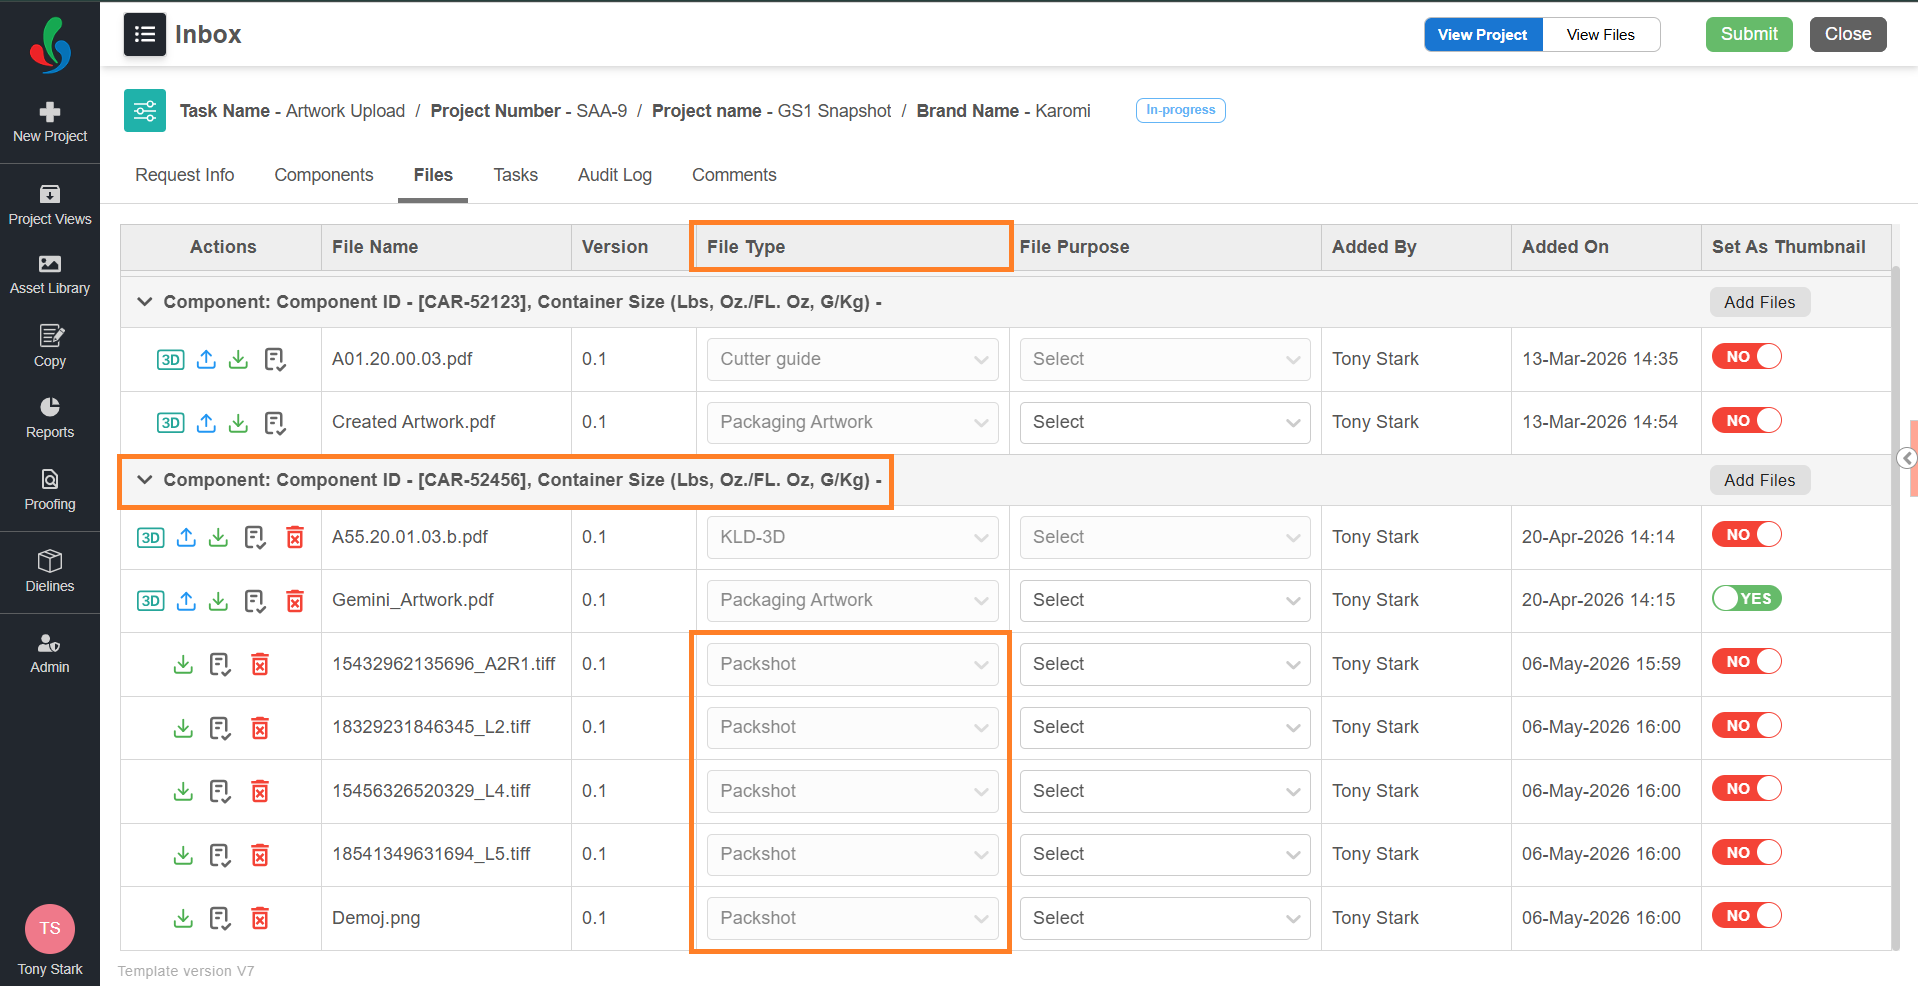
08. Publish Packshot to Asset Library (Optional)
Packshot files are published to the Asset Library based on the project's publish configuration settings, similar to other workflow publish configurations.
If you wish to customise when a Packshot should be published — such as after the completion of a specific task or upon workflow completion — contact the ManageArtworks Support Team for assistance in setting up the appropriate configuration.