Cartons and Labels
| Note: The use cases highlighted in this article represent common situations where this file type and its combinations are useful. However, depending on your artwork structure and review objectives, other valid use cases may also apply. |

The Cartons and Labels file type offers the most comprehensive comparison capabilities in Compare Mode.
This makes it suitable for validating packaging artworks that contain:
- Live text
- Curved text
- Graphics, illustrations, icons, dieline elements
- Regulatory or marketing content
Cartons and Labels comparisons are commonly used during artwork versioning, regulatory updates, label corrections, print inspection, print proof and pre-production approval cycles.
Comparison Methods Supported
Cartons and Labels support two comparison workflows:
1. Automatic Compare (Whole File)
- The system automatically compares the entire artwork.
- Evaluates all visible elements without requiring manual region marking.
- Ideal for full-artwork validation.
2. Manual Compare (Select Regions Before Comparing)
- Users manually mark specific regions to compare.
- Only those regions are analyzed.
- Ideal when focusing on targeted corrections or specific artwork areas.
Both comparison methods are available across the following Review Modes:
- Artwork Review – For live/curved text and design elements
- Print Proof – For curved text verification before print output
- Print Inspection – For scan-based artwork validation
Optional add-ons (e.g., Remove Layers, Choose Specific Pages) can be applied depending on your configuration. For detailed behavior, refer to About Add-ons (Optional Controls).
Supported Combinations
The table below lists all supported comparison combinations for Cartons and Labels. Select any Ref. ID to view its detailed description and usage context.
Note: The availability of add-ons depends on the File Type, the selected sub-section, and the Compare Type. In each detailed combination explanation, the core behaviour is described without add-ons because add-ons function the same way across all combinations. For complete details about how each add-on works, refer to About Add-ons (Optional Controls). |
Ref. ID | Compare Mode | Content Type | Review Option | Compare Option | Add-ons | Compare Type |
|---|---|---|---|---|---|---|
Single Up | Live/Curve Text | Artwork Review | Whole File | Remove Layers / Select Pages | Pixel and/or Text | |
Single Up | Live/Curve Text | Artwork Review | Select Regions | Remove Layers / Select Pages | Pixel and/or Text | |
Single Up | Curve Text | Print Proof | Whole File | Remove Layers / Select Pages | Pixel and/or Text | |
Single Up | Curve Text | Print Proof | Select Regions | Remove Layers / Select Pages | Pixel and/or Text | |
Single Up | Scan Image | Print Inspection | Whole File | Remove Layers / Select Pages | Pixel Only | |
Single Up | Scan Image | Print Inspection | Select Regions | Remove Layers / Select Pages | Pixel Only | |
Multi Up | N/A | N/A | Select Regions | Select Pages | Pixel Only |
Artwork Review
Combination 1 — Whole File (Automatic Compare)
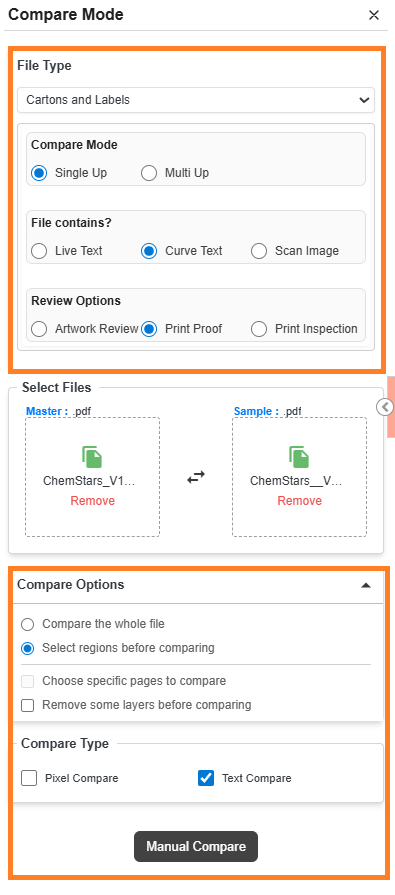
Cartons/Labels + Single Up + Live Text/Curve Text + Artwork Review + Compare the whole file + Pixel Compare + Text Compare
Artwork Review is used when an artwork goes through revisions—whether due to design refinements, regulatory updates, or content changes—and the revised file must be validated against the approved reference version. This review mode helps identify both visual and textual differences to ensure the updated artwork aligns with the approved design.
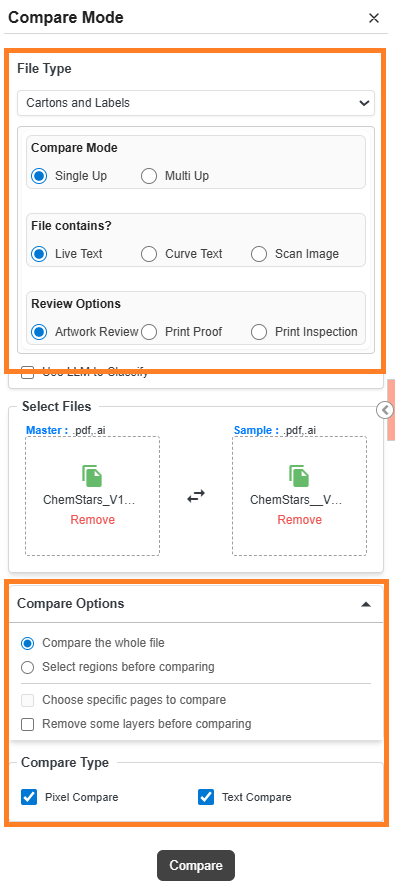
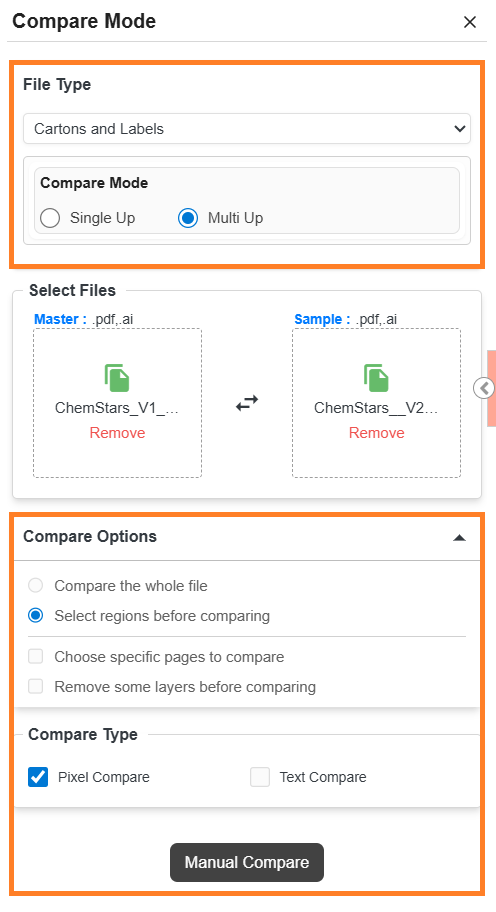
Configuration Details
To run this combination:
- Select the options in Compare Mode exactly as shown in this combination (Cartons/Labels + Single Up + Live Text/Curve Text + Artwork Review + Compare the whole file + Pixel Compare + Text Compare).
- Select the desired Master and Sample files.
- This configuration uses Automatic Compare, meaning:
- No manual region selection is required.
- The system compares the full artwork as soon as you select Compare.
- Since both comparison types are supported, in this example we select both, allowing the system to detect:
- Visual deviations (colors, shapes, icons, graphics, spacing, layout elements)
- Text deviations (added, modified, or removed text)
Note: Although both Pixel Compare and Text Compare are available in this combination, you may choose to run either one or both based on your scenario. In certain cases, Pixel Compare may surface irrelevant or redundant differences (false positives), and in other cases Text Compare may not be necessary. For guidance on when to use each comparison type, refer to the Help available within the Web Viewer. |
When This Combination Is Useful
Use this combination when the objective is to validate full artwork integrity, including both design elements and textual content.
It is especially useful for:
- Artwork version updates
- Regulatory or label content changes
- Branding or marketing revisions
- Layout realignments, spacing corrections, or stylistic adjustments
What Happens After You Select Compare
 | Add-on Behavior: If you selected Remove Some Layers Before Comparing, the system opens the Layer Panel before running the comparison. Refer to About Add-ons (Optional Controls) for full workflow details. Or If you selected Choose Specific Pages to Compare, you must first choose page pairs before the comparison proceeds. See About Add-ons (Optional Controls) for more details. |
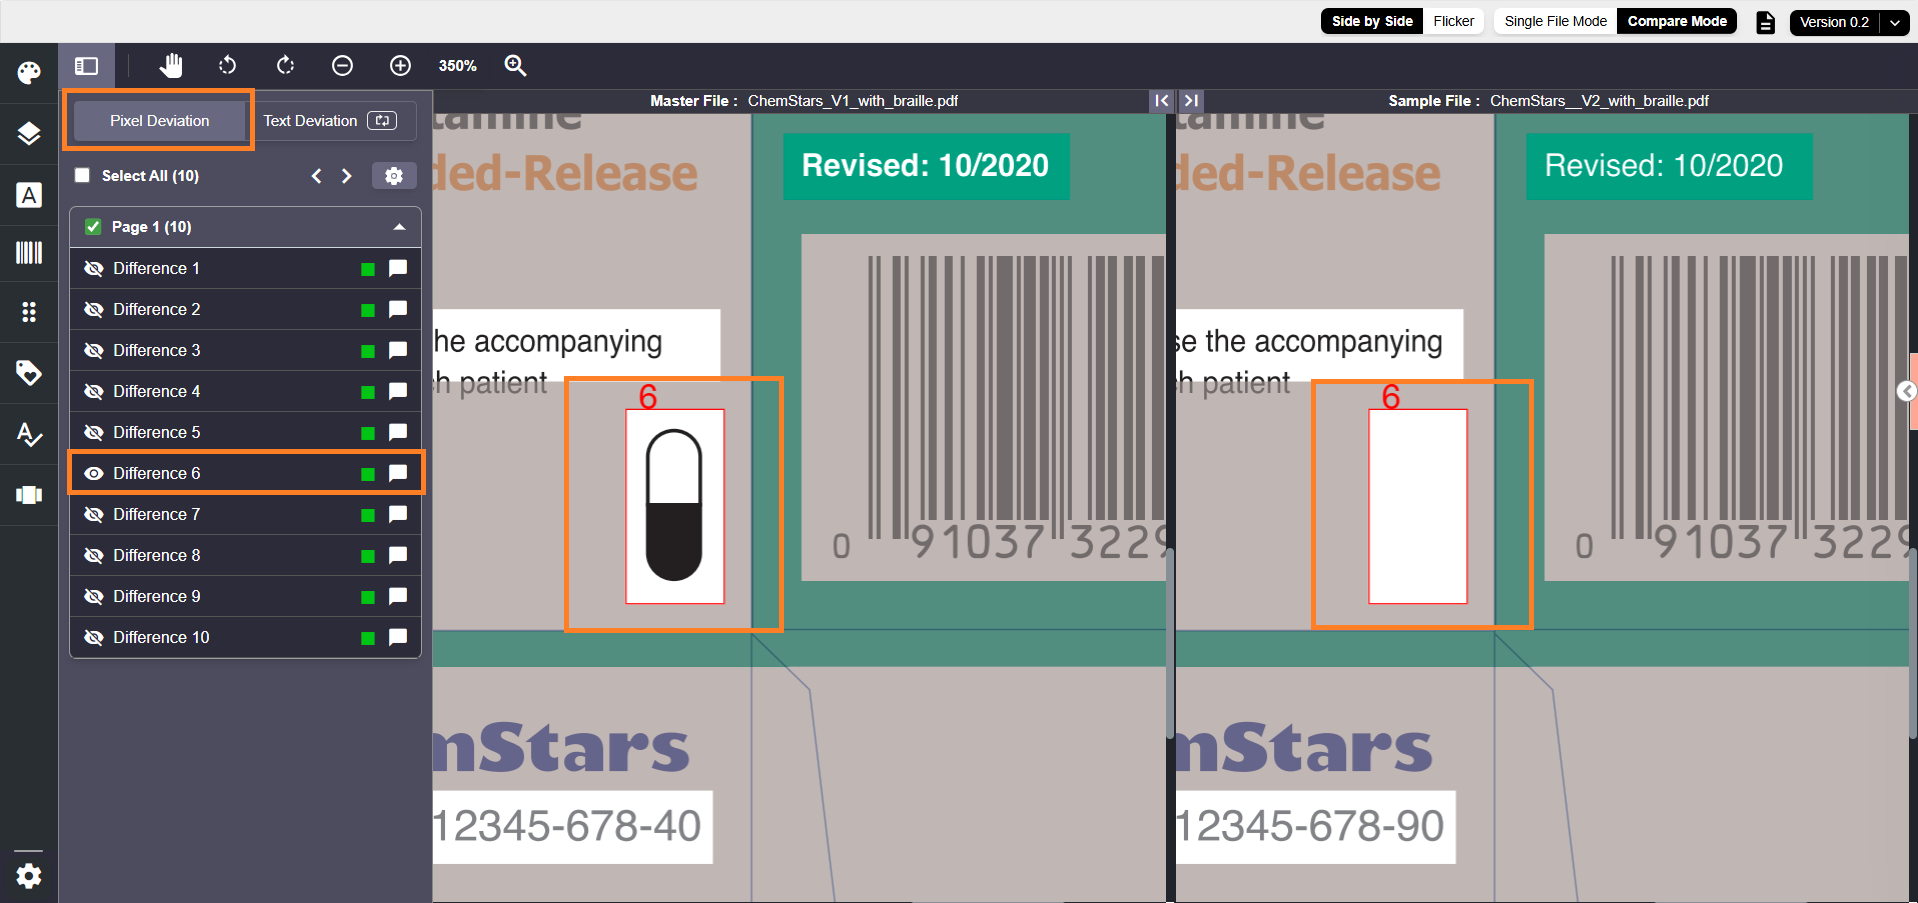
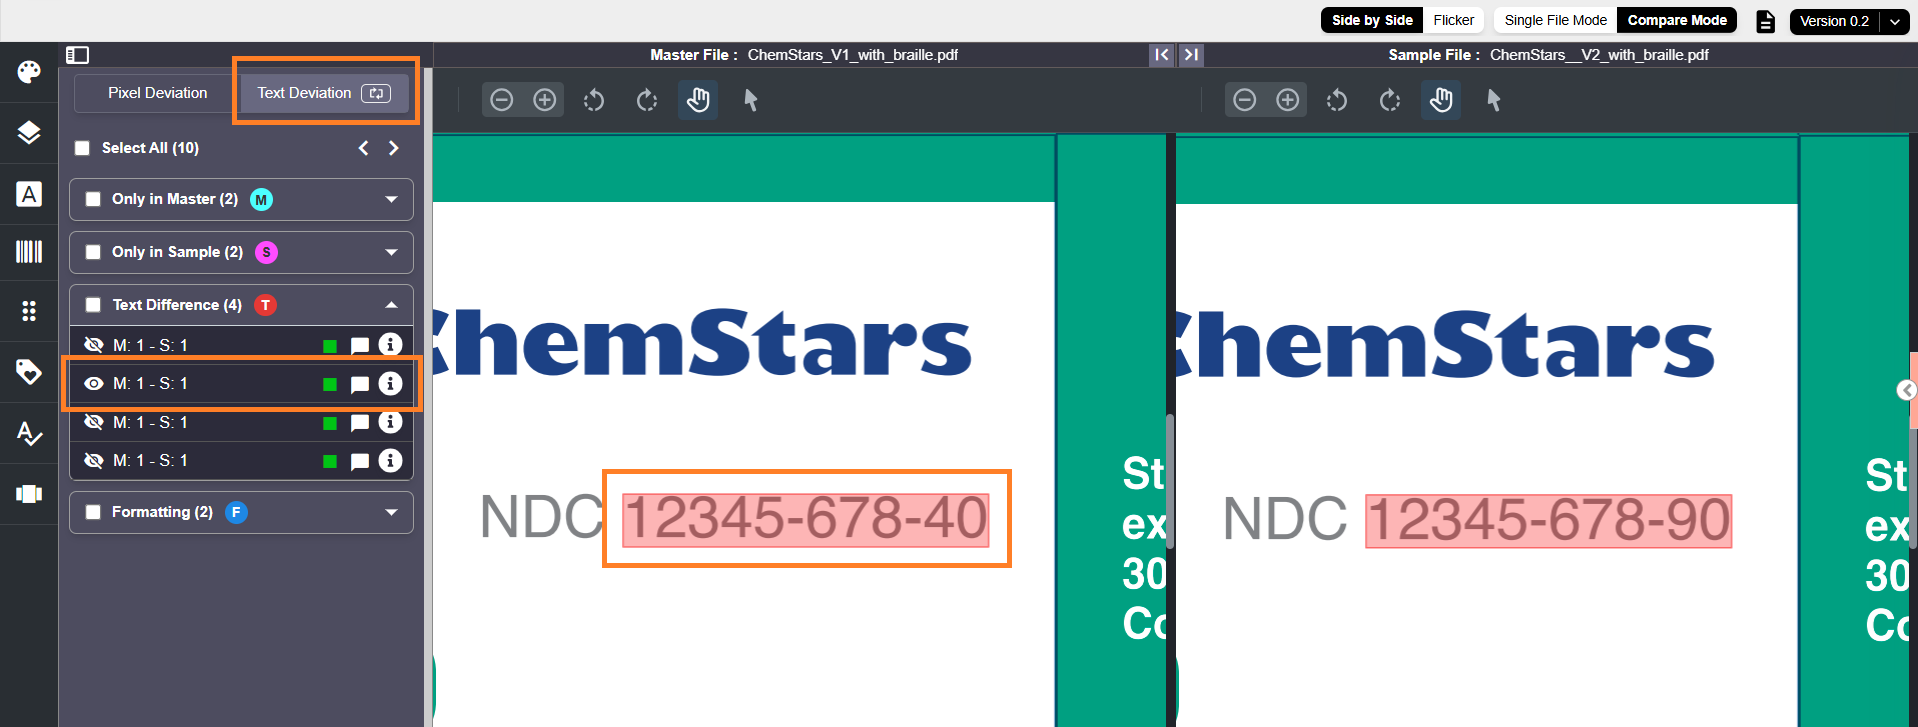
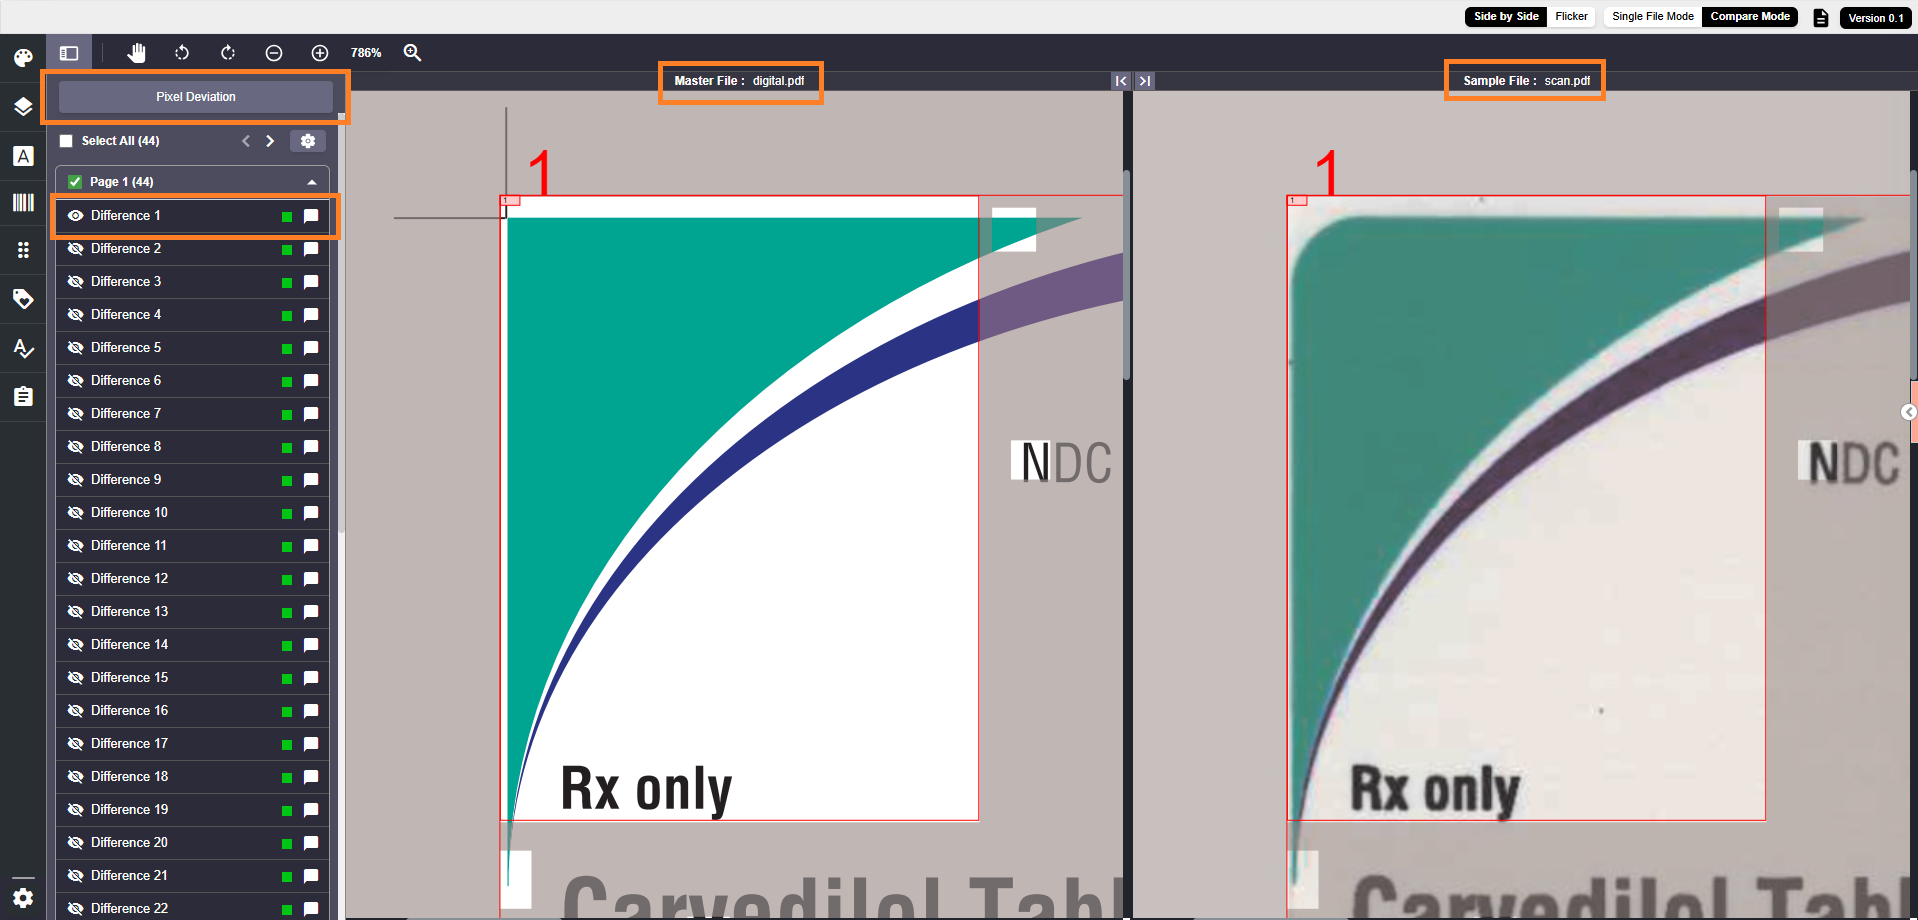
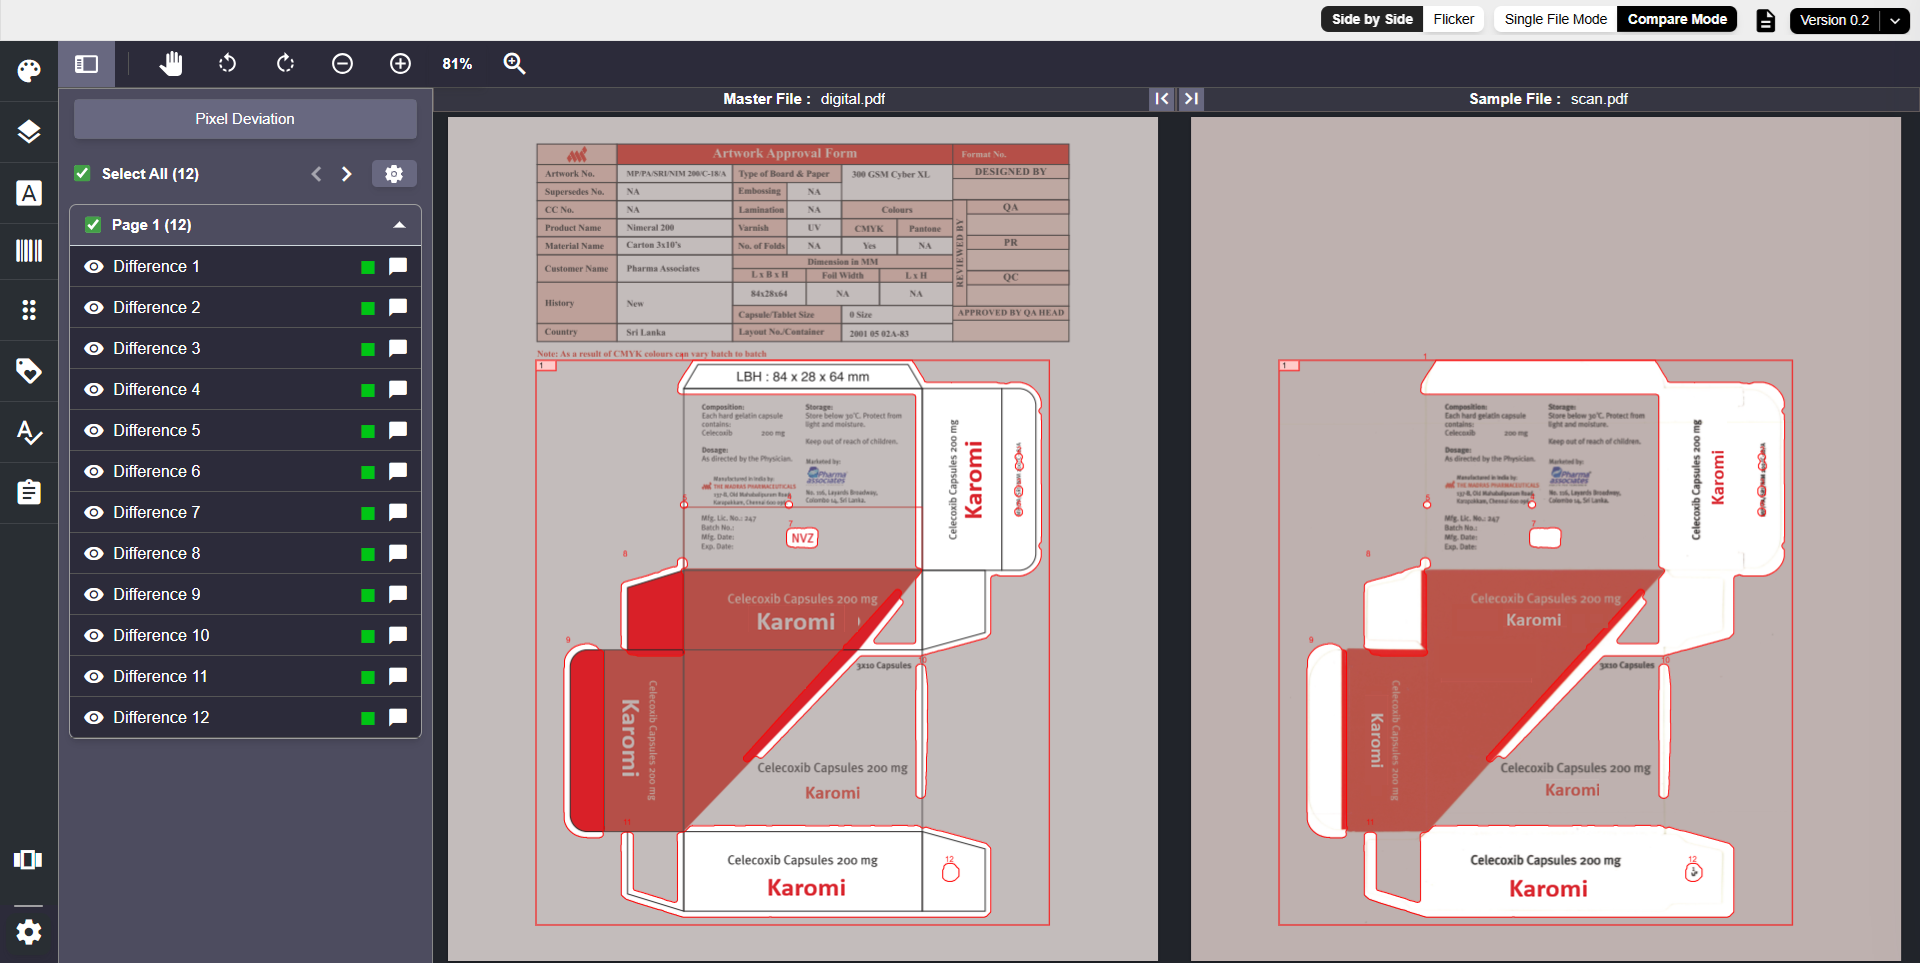
The system analyzes both the visual and textual components of the artwork and displays all identified deviations in the Deviation Panel.
Each deviation entry can be selected to navigate directly to the affected region in the artwork.
| Note: Only the tabs relevant to the comparison you performed will appear. For example, if you ran only a pixel comparison, only the Pixel Deviation tab is displayed. |
Combination 2 — Select Regions (Manual Compare)
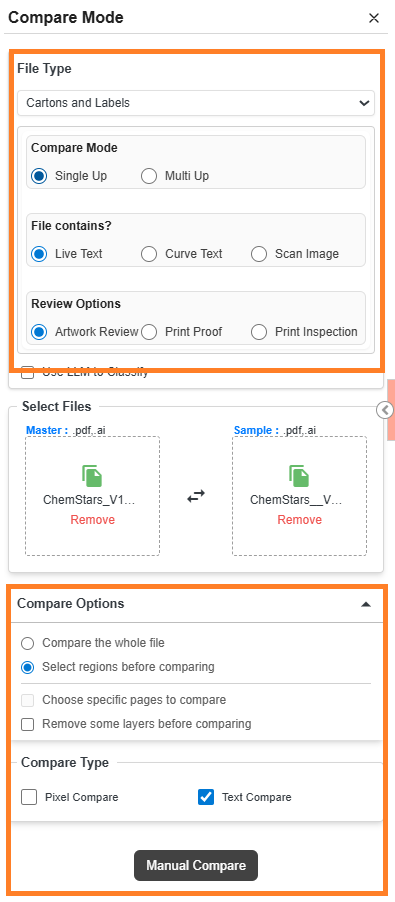
Cartons/Labels + Single Up + Live Text/Curve Text + Artwork Review + Select region before comparing + Pixel Compare and/or Text Compare
This combination is also used in situations similar to Artwork Review (Automatic Compare)—for example, when artwork undergoes design refinements, regulatory updates, or content changes and must be validated against an approved reference version. It still supports identifying both visual and textual differences within the artwork.
The key difference is that you control which areas of the artwork are compared. Instead of analyzing the entire file, you manually draw comparison regions. This helps focus on specific updates and avoids unnecessary differences elsewhere.
Configuration Details
To run this combination:
- Select the options in Compare Mode exactly as shown in this combination (Cartons/Labels + Single Up + Live Text/Curve Text + Artwork Review + Select region before comparing + Pixel Compare + Text Compare).
- Select the desired Master and Sample files.
- This configuration uses Manual Compare, meaning:
- You control which areas of the artwork will be compared.
- The system analyzes only the regions you select and displays deviations based on those regions.
- Since it is a manual comparison, the Compare button label changes to Manual Compare.
- Both comparison types are supported for this combination, but in this example we only Text Compare, because multiple region selection is not supported for Pixel Compare. If you need to compare multiple specific regions, ensure that only Text Compare is selected as Compare Type.
- Text deviations (added, modified, or removed text)
Note: Although both Pixel Compare and Text Compare are available in this combination, you may choose to run either one or both based on your scenario. In certain cases, Pixel Compare may surface irrelevant or redundant differences (false positives), and in other cases Text Compare may not be necessary. For guidance on when to use each comparison type, refer to the Help available within the Web Viewer. |
When This Combination Is Useful
Use this configuration when you want to validate only specific areas instead of the full artwork. Ideal scenarios include:
- Only a portion of the artwork has changed
- You want to avoid detecting irrelevant deviations
- You are validating isolated fixes or panel-level updates
- Designers request verification of a specific panel, callout, or content block
What Happens After You Select Manual Compare
| Add-on Behavior: If you selected Remove Some Layers Before Comparing, the system opens the Layer Panel before running the comparison. Refer to About Add-ons (Optional Controls) for full workflow details. Or If you selected Choose Specific Pages to Compare, you must first choose page pairs before the comparison proceeds. See About Add-ons (Optional Controls) for more details. |
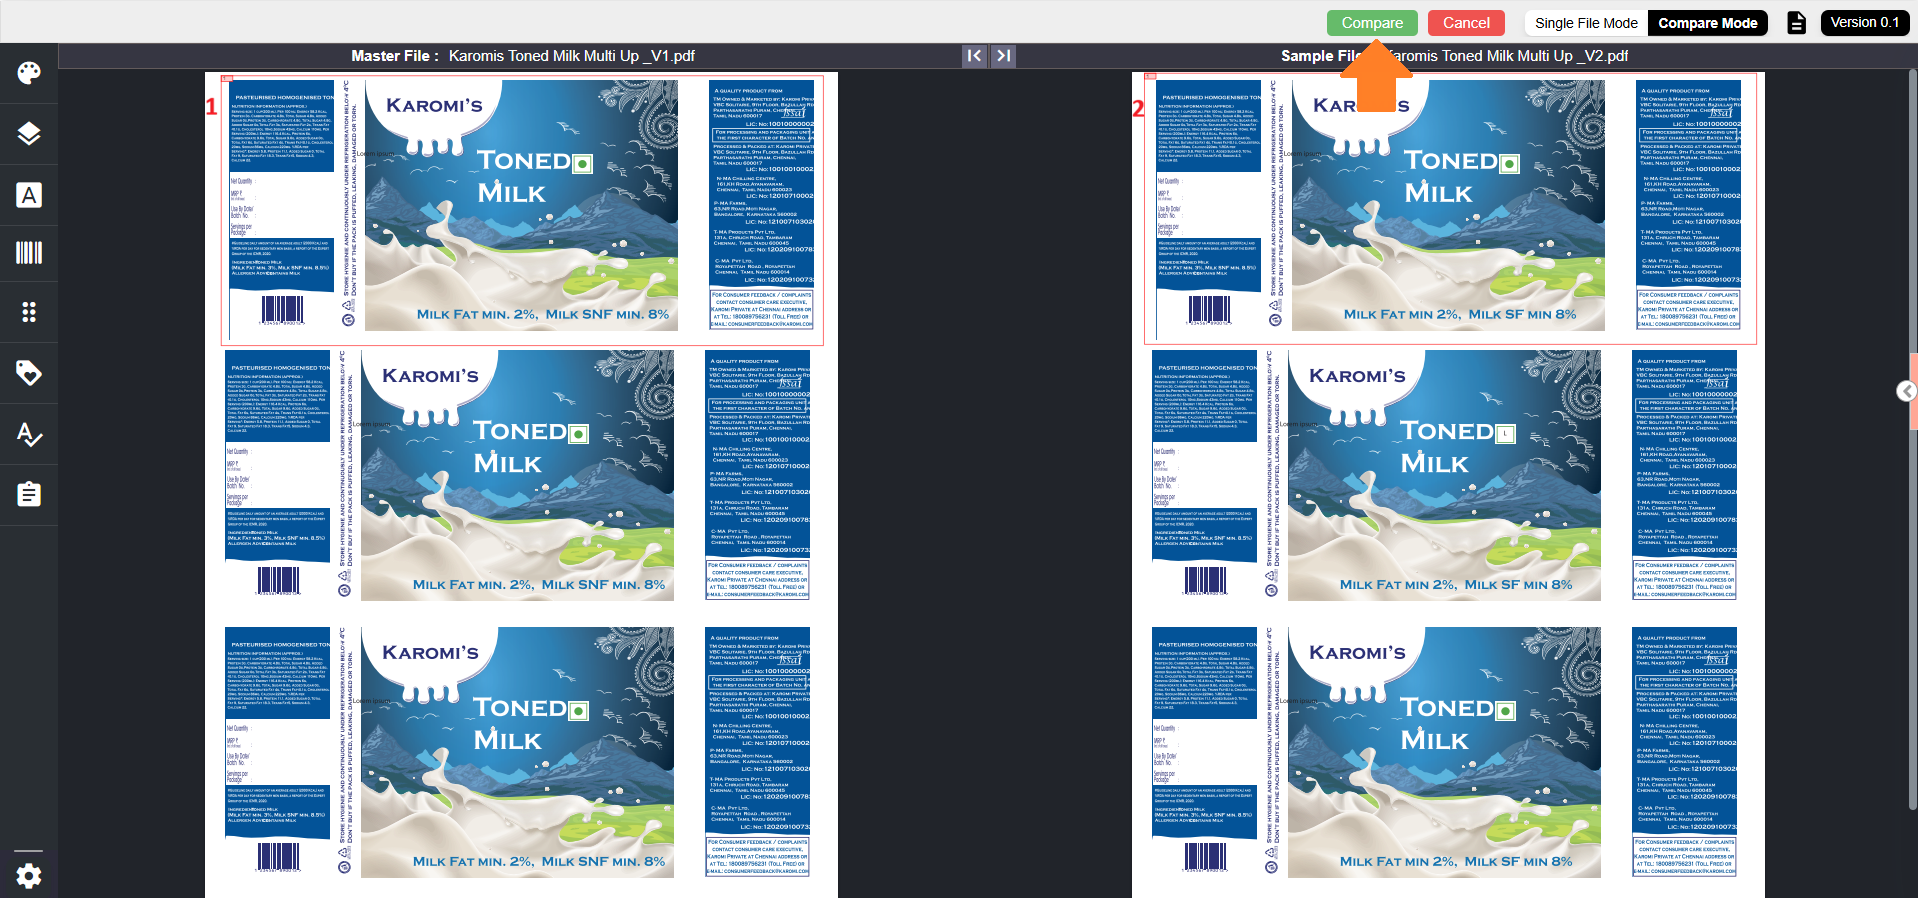
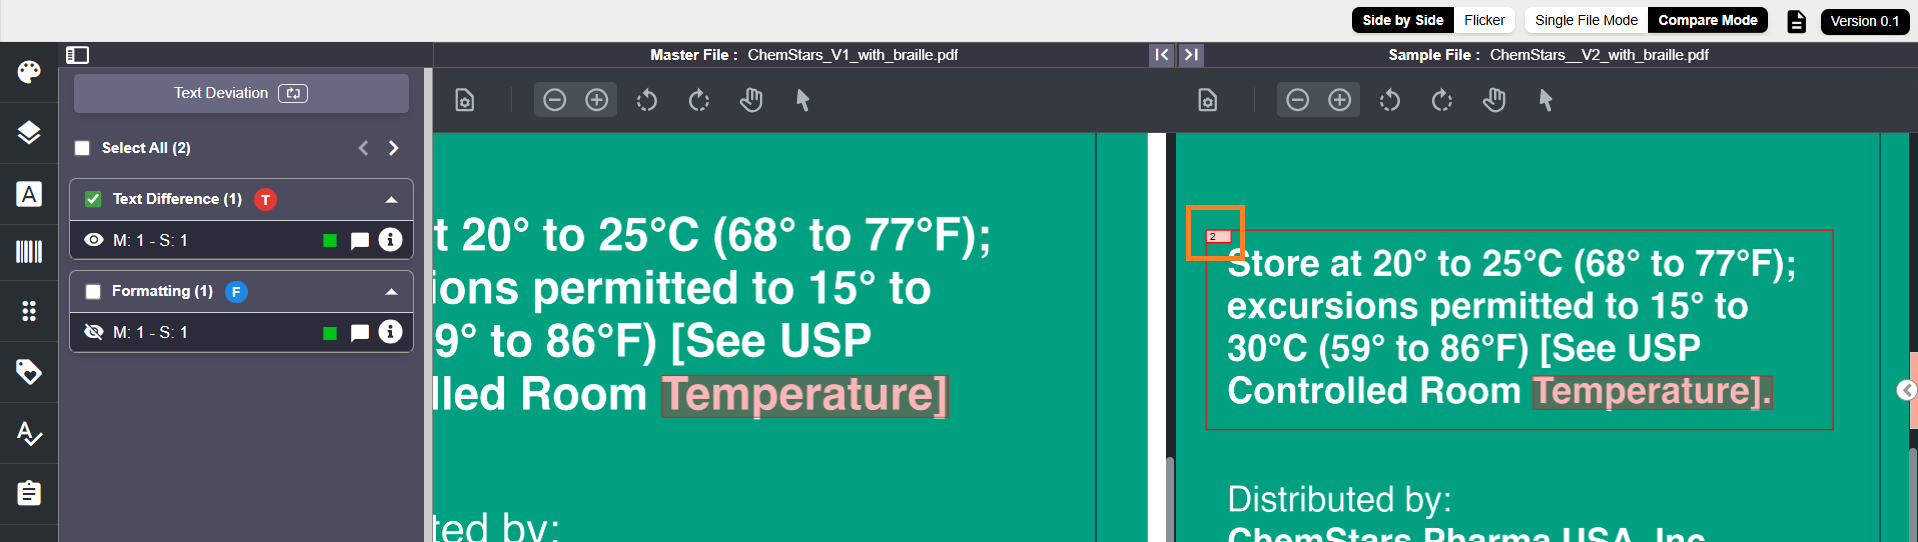
When you select Manual Compare, the system displays the Master and Sample artwork. You must now define the regions where comparison should occur.
How region selection works:
- Use your mouse to draw a bounding box around each region you want to compare in both the Master and Sample files.
Note: Multiple region selection is not supported for Pixel Compare. If you need to compare multiple specific regions, ensure that only Text Compare is selected as the Compare Type. - Each bounding box is automatically numbered in both files (1, 2, 3, etc.).
- During comparison, the system matches regions by their assigned number:
- 1 ↔ 1
- 2 ↔ 2
- And so on
- After marking all required regions, click Compare from the toolbar near Single File Mode.
Note: Multiple region selection is not supported for Pixel Compare. If you need to compare multiple specific regions, ensure that only Text Compare is selected as the Compare Type. - The system analyzes only the selected areas and displays all identified deviations in the Deviation Panel.
- Each deviation entry can be selected to navigate directly to the affected region in the artwork.
| Note: Only the deviation tabs relevant to the comparison you performed will appear. For example, if you ran only a pixel compare, only the Pixel Deviation tab will be displayed. |

Print Proof
Combination 3 — Whole File (Automatic Compare)
Cartons/Labels + Single Up + Curve Text + Print Proof + Compare the whole file + Pixel Compare + Text Compare
Print Proof is used when an artwork has completed all revisions and the final version is approved, flattened (live text converted into curves), and sent to the printer as a print-ready file. The printer processes this file and returns a print proof for final verification.
At this stage, it is essential to ensure that the flattening or print-preparation process has not introduced any unintended changes. Pixel Compare and Text Compare help confirm that the print proof still matches the approved artwork, both visually and textually, before it proceeds to production.
Why File Contains? must be Curve Text
- Curve Text allows verification of both live text and curved text.
- Live Text allows verification of only selectable text.
- Since print proofs typically contain a mix of live and curved text elements, Curve Text is the only valid selection under File Contains? for Print Proof.
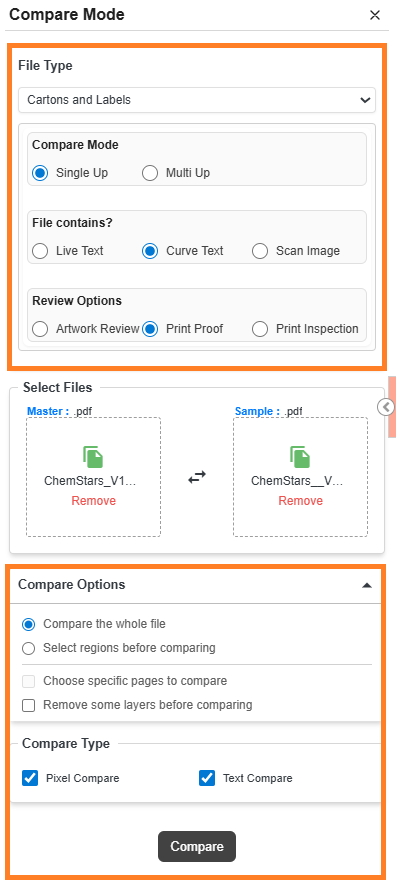
Configuration Details
To run this combination:
- Select the options in Compare Mode exactly as shown in this combination (Cartons/Labels + Single Up + Curve Text + Print Proof + Compare the whole file + Pixel Compare + Text Compare).
- Select the desired Master and Sample files.
- This configuration uses Automatic Compare, meaning:
- No manual region selection is required.
- The system compares the full artwork as soon as you select Compare.
- Since both comparison types are supported, in this example we select both, allowing the system to detect:
- Visual deviations (colors, shapes, icons, graphics, spacing, layout elements)
- Text deviations (added, modified, or removed text)
Note: Although both Pixel Compare and Text Compare are available in this combination, you may choose to run either one or both based on your scenario. In certain cases, Pixel Compare may surface irrelevant or redundant differences (false positives), and in other cases Text Compare may not be necessary. For guidance on when to use each comparison type, refer to the Help available within the Web Viewer. |
When This Combination Is Useful
Use this combination when the objective is to validate full artwork integrity, including both design elements and textual content.
It is especially useful for:
- Artwork version updates
- Regulatory or label content changes
- Branding or marketing revisions
- Layout realignments, spacing corrections, or stylistic adjustments
What Happens After You Select Compare
| Add-on Behavior: If you selected Remove Some Layers Before Comparing, the system opens the Layer Panel before running the comparison. Refer to About Add-ons (Optional Controls) for full workflow details. Or If you selected Choose Specific Pages to Compare, you must first choose page pairs before the comparison proceeds. See About Add-ons (Optional Controls) for more details. |
The system analyzes both the visual and textual components of the artwork and displays all identified deviations in the Deviation Panel.
Each deviation entry can be selected to navigate directly to the affected region in the artwork.
| Note: Only the tabs relevant to the comparison you performed will appear. For example, if you ran only a pixel comparison, only the Pixel Deviation tab is displayed. |
Combination 4 — Select Regions (Manual Compare)
Cartons/Labels + Single Up + Curve Text + Print Proof + Select region before comparing + Pixel Compare and/or Text Compare
This combination is used in scenarios similar to the Print Proof (Automatic Compare) workflow. After an artwork completes all revisions and the final version is approved, it is typically flattened (live text converted into curves) and sent to the printer as a print-ready file. The printer then returns a print proof for final verification.
At this stage, it is essential to confirm that no unintended changes were introduced during text flattening or print preparation. Pixel Compare and Text Compare help verify that the print proof still matches the approved artwork visually and textually before it moves to production.
The key difference in this configuration is that you choose which areas of the artwork should be compared. Instead of analyzing the entire file, you manually draw comparison regions, allowing you to focus on specific updates and avoid irrelevant differences elsewhere.
Configuration Details
To run this combination:
- Select the options in Compare Mode exactly as shown in this combination (Cartons/Labels + Single Up + Curve Text + Print Proof + Select region before comparing + Pixel Compare and/or Text Compare).
- Select the desired Master and Sample files.
- This configuration uses Manual Compare, meaning:
- You control which areas of the artwork will be compared.
- The system analyzes only the regions you select and displays deviations based on those regions.
- Since it is a manual comparison, the Compare button label changes to Manual Compare.
- Both comparison types are supported for this combination, but in this example we only Text Compare, because multiple region selection is not supported for Pixel Compare. If you need to compare multiple specific regions, ensure that only Text Compare is selected as Compare Type.
- Text deviations (added, modified, or removed text)
Note: Although both Pixel Compare and Text Compare are available in this combination, you may choose to run either one or both based on your scenario. In certain cases, Pixel Compare may surface irrelevant or redundant differences (false positives), and in other cases Text Compare may not be necessary. For guidance on when to use each comparison type, refer to the Help available within the Web Viewer. |
When This Combination Is Useful
Use this configuration when you need to validate only specific areas of the print proof rather than the entire artwork. It is particularly useful in situations such as:
- Only certain elements or panels need verification after flattening
- You want to confirm that a specific text block, callout, or symbol was not altered during print preparation
- Minor corrections were made, and only those updated sections require validation
- The design team requests validation of a targeted area instead of full-page comparison
- You want to reduce noise in the output by comparing only the sections that changed
This approach helps ensure accuracy while avoiding unnecessary deviations from parts of the proof that remain unchanged.
What Happens After You Select Manual Compare
| Add-on Behavior: If you selected Remove Some Layers Before Comparing, the system opens the Layer Panel before running the comparison. Refer to About Add-ons (Optional Controls) for full workflow details. Or If you selected Choose Specific Pages to Compare, you must first choose page pairs before the comparison proceeds. See About Add-ons (Optional Controls) for more details. |
When you select Manual Compare, the system displays the Master and Sample artwork. You must now define the regions where comparison should occur.
How region selection works:
- Use your mouse to draw a bounding box around each region you want to compare in both the Master and Sample files.
Note: Multiple region selection is not supported for Pixel Compare. If you need to compare multiple specific regions, ensure that only Text Compare is selected as the Compare Type. - Each bounding box is automatically numbered in both files (1, 2, 3, etc.).
- During comparison, the system matches regions by their assigned number:
- 1 ↔ 1
- 2 ↔ 2
- And so on
- After marking all required regions, click Compare from the toolbar near Single File Mode.
Note: Multiple region selection is not supported for Pixel Compare. If you need to compare multiple specific regions, ensure that only Text Compare is selected as the Compare Type. - The system analyzes only the selected areas and displays all identified deviations in the Deviation Panel.
- Each deviation entry can be selected to navigate directly to the affected region in the artwork.
| Note: Only the deviation tabs relevant to the comparison you performed will appear. For example, if you ran only a pixel compare, only the Pixel Deviation tab will be displayed. |
Print Inspection
Combination 5 — Whole File (Automatic Compare)
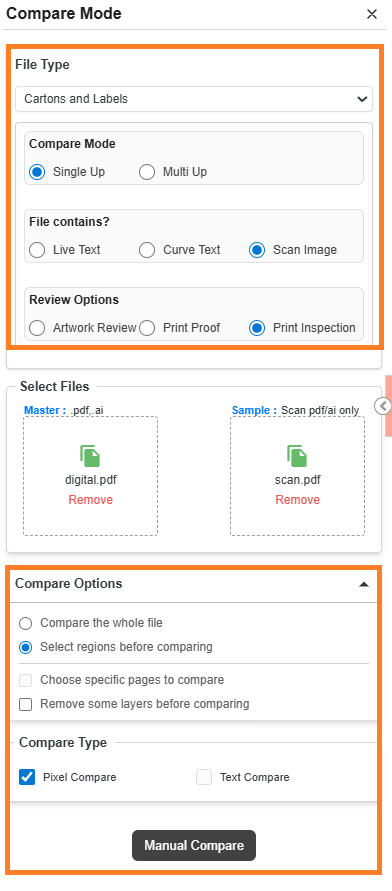
Cartons/Labels + Single Up + Scan Image + Print Inspection+ Compare the whole file + Pixel Compare
Print Inspection is used during post-printing validation. At this stage, the printed artwork is physically produced, scanned, and then compared against the approved artwork or the print proof to ensure the final printed output meets quality expectations.
Since scanned print files do not contain live text and may introduce slight distortions due to scanning devices or lighting conditions, visual comparison becomes the primary focus.
Using Pixel Compare helps detect printing-related issues such as:
- Ink smudges or streaks
- Missing or faint text
- Misalignment or registration issues
- Color variations or uneven ink distribution
- Artifacts introduced during the printing or scanning process
This ensures that the printed result accurately reflects the approved artwork before mass production begins.
Why File Contains? must be Scan Image
- Scanned print outputs do not contain live text, so Live Text/Curve Text options are not applicable.
- Print Inspection workflows typically involve scanned PDFs or scanned image-based AI files.
- Therefore, Scan Image is the only valid and supported option under File Contains? for Print Inspection.

Configuration Details
To run this combination:
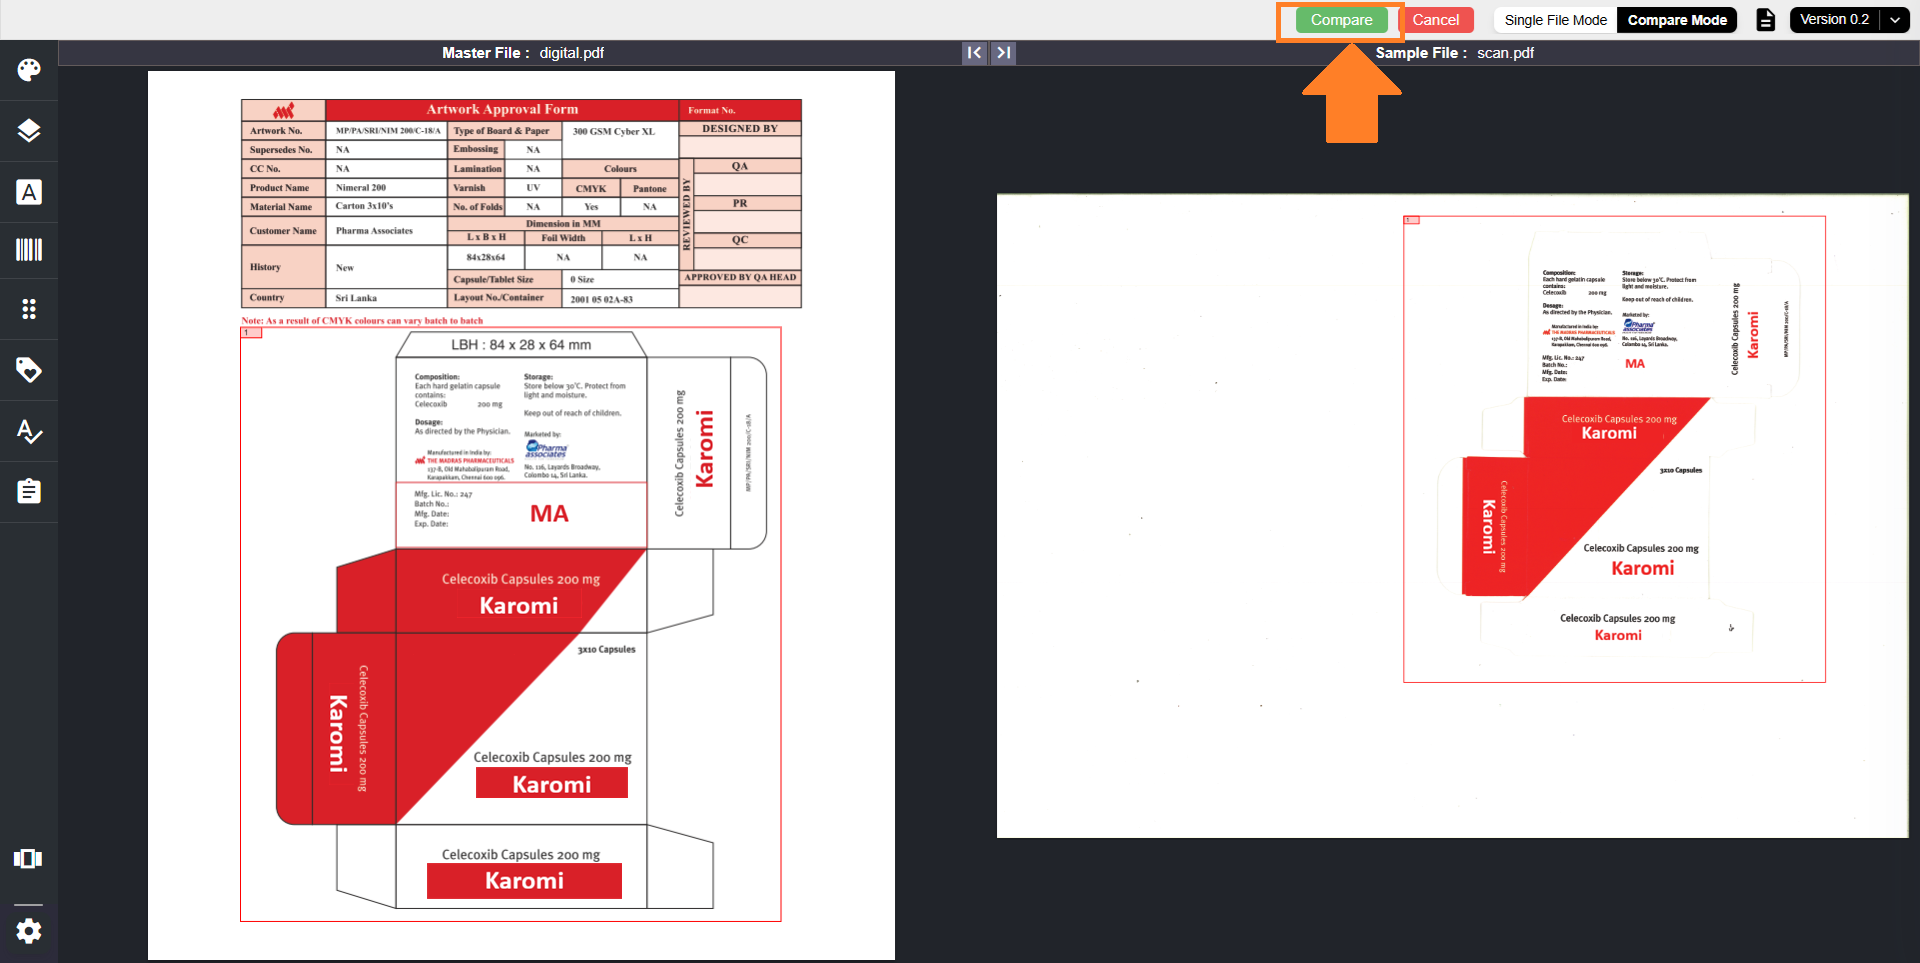
- Select the options in Compare Mode exactly as shown in this combination (Cartons/Labels + Single Up + Scan Image + Print Inspection+ Compare the whole file + Pixel Compare).
- Select the desired Master and Sample files.
- This configuration uses Automatic Compare, meaning:
- No manual region selection is required.
- The system compares the full artwork as soon as you select Compare.
- Since Print Inspection supports only Pixel Compare, this combination focuses solely on detecting visual deviations such as:
- Ink smudges or streaks
- Missing or faint text caused by printing defects
- Misalignment or registration issues
- Color inconsistencies or scanning artifacts
| Note: For Print Inspection, Pixel Compare is the only supported Compare Type. Text Compare is not available because scanned print files contain no live text. |
When This Combination Is Useful
Use this configuration when you need to verify the final printed output against the approved artwork or print proof. It is especially useful in situations such as:
- Checking for printing defects introduced during the physical print process
- Verifying that no visual distortion occurred due to flattening, trapping adjustments, or press calibration
- Ensuring that registration, alignment, and color consistency meet quality standards
- Confirming that text, graphics, and symbols appear clearly and are not faded, broken, or smudged
- Identifying any deviations caused by scanning, such as shadows, noise, or uneven contrast
- Performing quality checks before approving mass production of printed materials
This combination helps ensure that the final printed result accurately reflects the approved artwork and is ready for distribution or production.
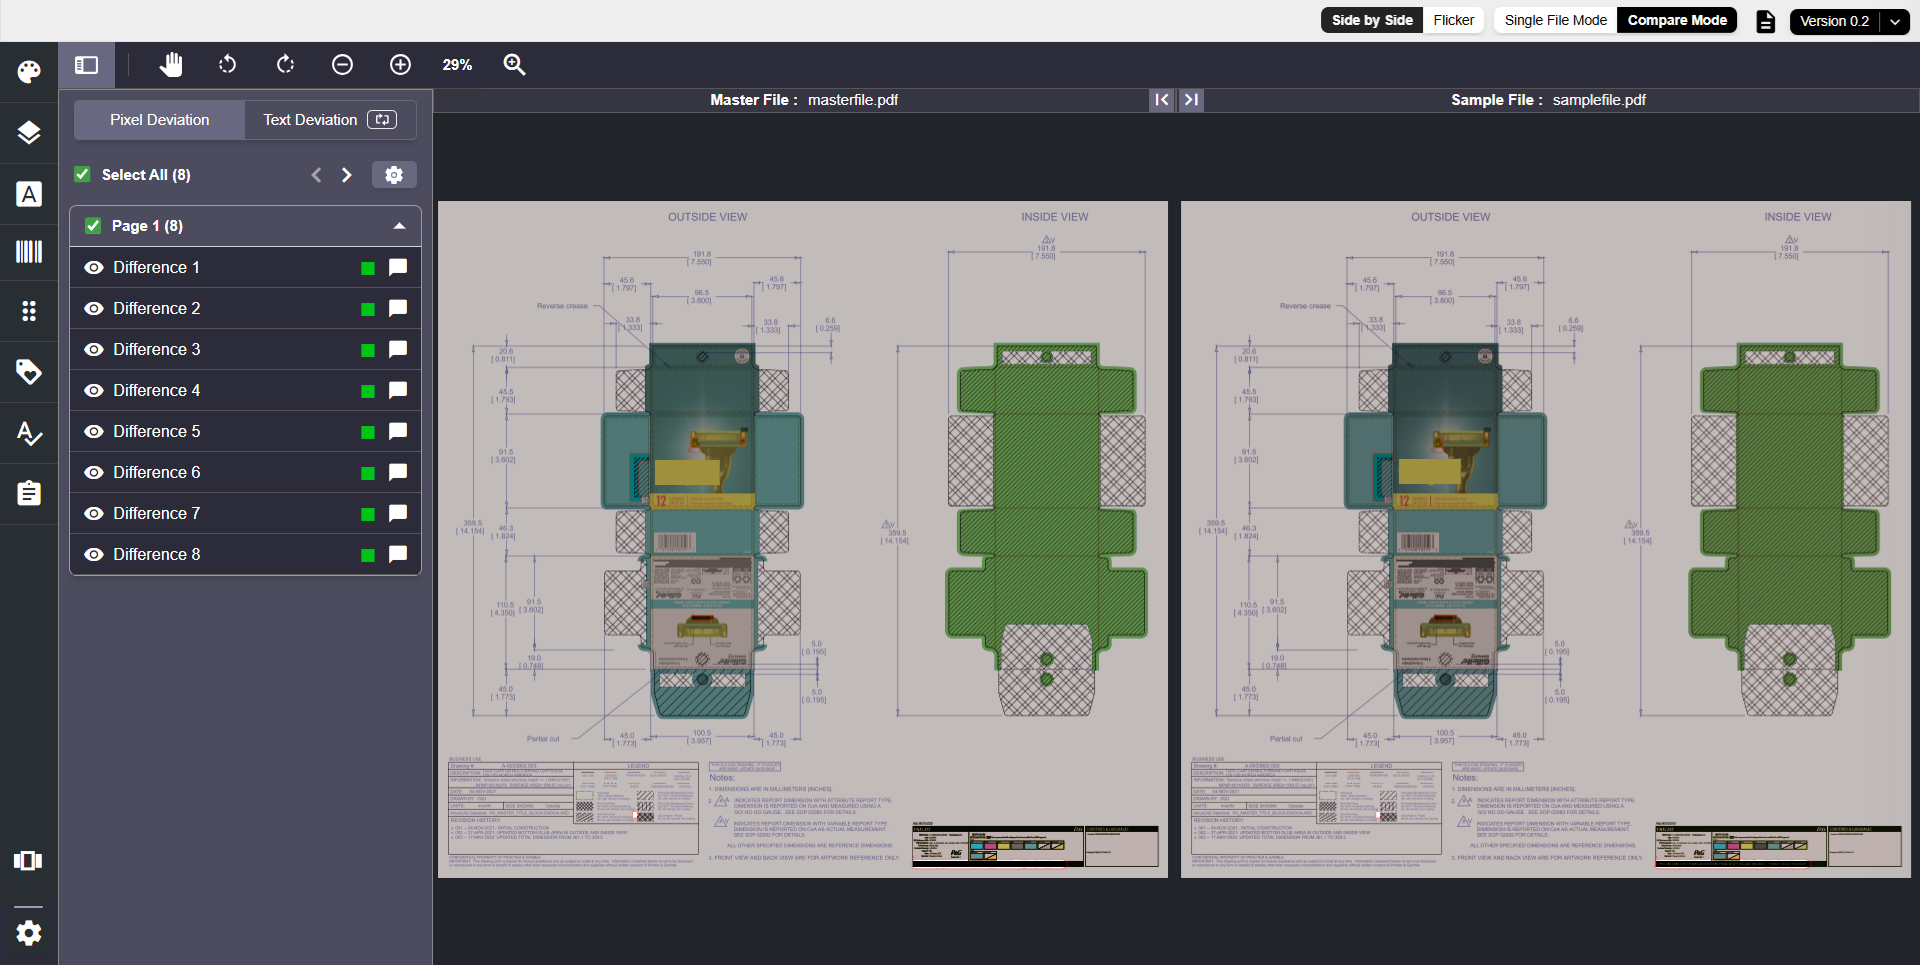
What Happens After You Select Compare
| Add-on Behavior: If you selected Remove Some Layers Before Comparing, the system opens the Layer Panel before running the comparison. Refer to About Add-ons (Optional Controls) for full workflow details. Or If you selected Choose Specific Pages to Compare, you must first choose page pairs before the comparison proceeds. See About Add-ons (Optional Controls) for more details. |
The system analyzes the visual components of the artwork and displays all identified deviations in the Deviation Panel.
Each deviation entry can be selected to navigate directly to the affected region in the artwork.
Combination 6 — Select Regions (Manual Compare)
Cartons/Labels + Single Up + Scan Image + Print Proof + Select region before comparing + Pixel Compare
This combination is used in scenarios similar to the Print Inspection – Automatic Compare workflow. The printed artwork is physically produced, scanned, and then compared against the approved artwork or print proof to ensure that the final printed output meets quality expectations.
Because scanned print files do not contain live text and may include slight distortions from scanning devices or lighting conditions, visual comparison is the primary focus.
Using Pixel Compare helps detect printing-related issues such as:
- Ink smudges or streaks
- Missing or faint text
- Misalignment or registration issues
- Color variations or uneven ink distribution
- Artifacts introduced during printing or scanning
This helps confirm that the printed output accurately reflects the approved artwork before mass production begins.
The key difference in this configuration is that you decide which areas of the scanned artwork should be compared. Instead of analyzing the entire file, you manually draw bounding boxes to define comparison regions. This allows you to focus on specific problem areas or areas more likely to contain print defects while avoiding irrelevant differences elsewhere.
Configuration Details
To run this combination:
- Select the options in Compare Mode exactly as shown in this combination (Cartons/Labels + Single Up + Scan Image + Print Proof + Select region before comparing + Pixel Compare).
- Select the desired Master and Sample files.
- This configuration uses Manual Compare, meaning:
- You control which areas of the artwork will be compared.
- The system analyzes only the regions you select and displays deviations based on those regions.
- Since it is a manual comparison, the Compare button label changes to Manual Compare.
- Print Inspection supports only Pixel Compare, so this combination focuses solely on detecting visual deviations.
Note:
|
When This Combination Is Useful
Use this configuration when you need to validate a specific part of the printed output rather than the entire scanned artwork. This is especially useful in scenarios such as:
- A defect or printing inconsistency needs targeted verification
- Only a particular panel, callout, or graphic element shows potential print issues
- You want to focus on areas where smudging, fading, or misalignment is more likely to occur
- The production or QA team identifies a specific section of the printed sample that requires closer inspection
- You want to avoid unnecessary deviations from the rest of the printed page and review only the region of concern
By manually selecting the region to inspect, this approach helps isolate printing defects and ensures that the critical portion of the printed artwork matches the approved design.
What Happens After You Select Manual Compare
| Add-on Behavior: If you selected Remove Some Layers Before Comparing, the system opens the Layer Panel before running the comparison. Refer to About Add-ons (Optional Controls) for full workflow details. Or If you selected Choose Specific Pages to Compare, you must first choose page pairs before the comparison proceeds. See About Add-ons (Optional Controls) for more details. |
When you select Manual Compare, the system displays the Master and Sample artwork. You must now define the regions where comparison should occur.
How region selection works:
- Use your mouse to draw a bounding box around the region you want to compare in both the Master and Sample files.
Note: Print Inspection supports only Pixel Compare, and multiple regions are not supported. Draw only one bounding box in the Master file and one in the Sample file. - Each bounding box is automatically numbered in both files (1, 2, 3, etc.).
- During comparison, the system matches the bounding box in the Master file with the corresponding bounding box in the Sample file.
- After selecting the region, click Compare from the toolbar near Single File Mode.
Note: Multiple region selection is not supported in Print Inspection. Only one region can be compared per comparison session. - The system analyzes only the selected areas and displays all identified deviations in the Deviation Panel.
- Each deviation entry can be selected to navigate directly to the affected region in the artwork.
Multi Up
Combination 7 — Select Regions (Manual Compare)
Cartons/Labels + Multi Up + Select region before comparing + Pixel Compare
Multi Up is used in printing scenarios where multiple repeats of the same artwork appear on a single sheet. This format is common in production workflows where several copies are printed together before cutting or finishing. In such cases, you may need to:
- Compare the multi-up sheet against the approved single artwork, or
- Compare two different multi-up sheets from different print batches to check consistency.
When you select Multi Up as the Compare Mode:
- The File Contains? section is hidden, as Multi Up comparisons do not rely on text-type classification.
- The Artwork Review subsection is also hidden, since this review mode is not applicable in Multi Up comparison.
- Only Select Regions (Manual Compare) is available—Automatic Compare is not supported for Multi Up layouts.
- Only the Choose Specific Pages to Compare add-on is available (when applicable).
- Only Pixel Compare is supported for Multi Up. Text Compare is not available, as Multi Up workflows focus solely on visual consistency across repeated artwork blocks.
This configuration ensures Multi Up workflows remain focused on visual comparison, allowing users to manually target specific repeat blocks or areas of the sheet to verify consistency and detect print-related deviations.
Configuration Details
To run this combination:
- Select the options in Compare Mode exactly as shown in this combination (Cartons/Labels + Multi Up + Select region before comparing + Pixel Compare).
- Select the desired Master and Sample files.
- This configuration uses Manual Compare, meaning:
- You control which areas of the artwork will be compared.
- The system analyzes only the regions you select and displays deviations based on those regions.
- Since it is a manual comparison, the Compare button label changes to Manual Compare.
- Multi Up supports only Pixel Compare, so this combination focuses entirely on detecting visual deviations across repeated artwork blocks.
Note:
|
When This Combination Is Useful
Use this configuration when you need to validate a specific artwork repeat within a Multi Up sheet rather than reviewing the entire layout. This is particularly helpful in scenarios such as:
- Verifying that a single repeat block matches the approved artwork
- Inspecting one repeat from a sheet where a defect is suspected
- Comparing a Multi Up sheet from a new batch against a previous batch to detect print inconsistencies
- Checking alignment, registration, or color issues within a specific repeat
- Focusing on one area of the sheet to avoid unnecessary deviations across all repeats
- Investigating isolated defects such as ink smudges, broken text, or shifted artwork within one repeat
By manually selecting the region you want to inspect, this configuration allows you to zoom in on a single repeat for detailed validation—ensuring print quality and consistency across the Multi Up layout.
What Happens After You Select Manual Compare
| Add-on Behavior: If you selected Choose Specific Pages to Compare, you must first choose page pairs before the comparison proceeds. See About Add-ons (Optional Controls) for more details. |
When you select Manual Compare, the system displays the Master and Sample artwork. You must now define the regions where comparison should occur.
How region selection works:
- Use your mouse to draw a bounding box around the region you want to compare in both the Master and Sample files.
Note: Multi Up supports only Pixel Compare, and multiple regions are not supported. Draw only one bounding box in the Master file and one in the Sample file. - Each bounding box is automatically numbered in both files (1, 2, 3, etc.).
- During comparison, the system matches the bounding box in the Master file with the corresponding bounding box in the Sample file.
- After selecting the region, click Compare from the toolbar near Single File Mode.
Note: Multiple region selection is not supported in Multi Up. Only one region can be compared per comparison session. - The system analyzes only the selected areas and displays all identified deviations in the Deviation Panel.
- Each deviation entry can be selected to navigate directly to the affected region in the artwork.