Step 2: Create Workflow Template
Watch a quick video tutorial
01. Select Your Template Creation Method
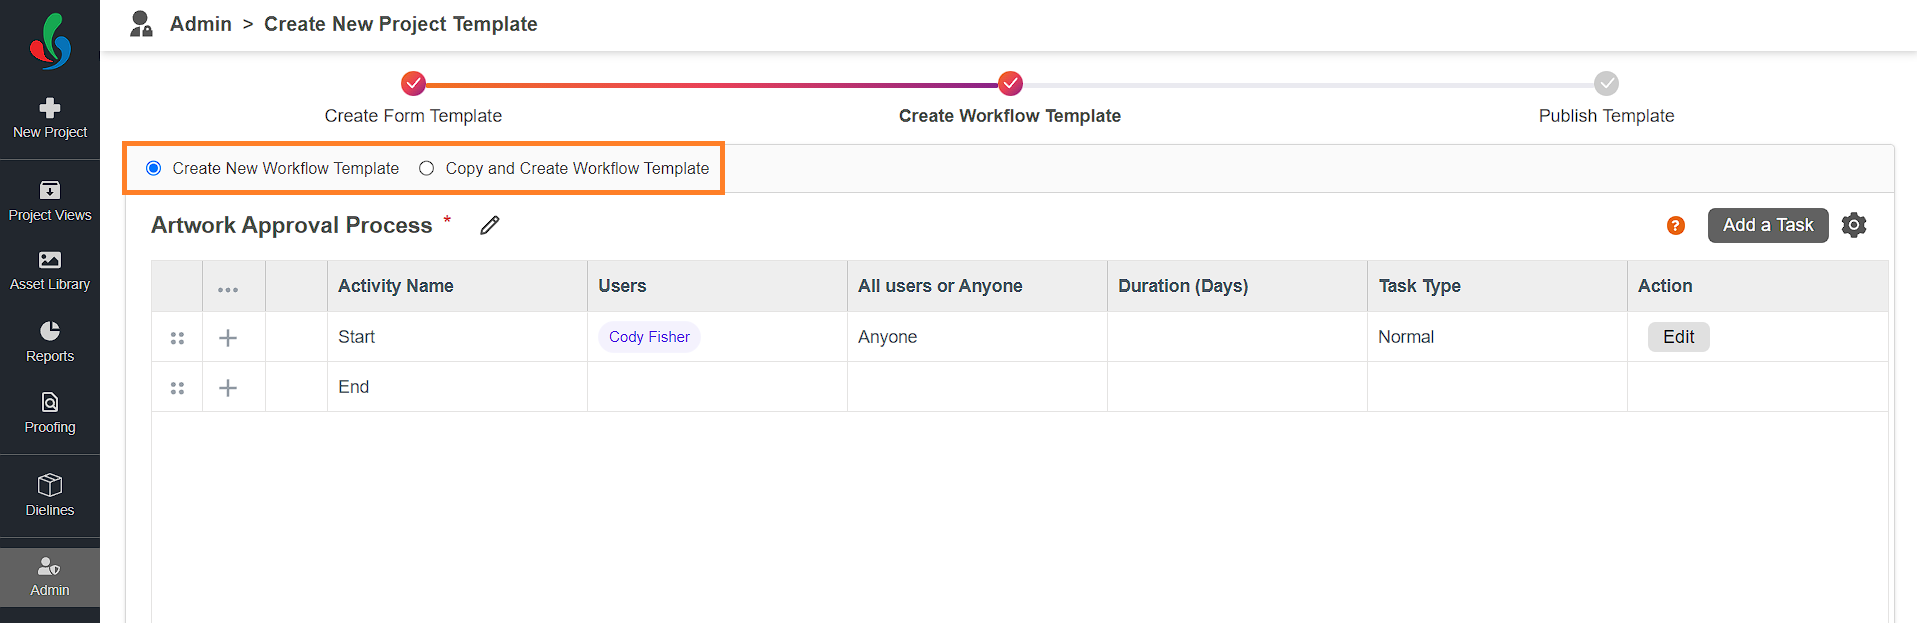
Choose between two options:
- Create New Workflow Template: Build a workflow from scratch, ideal for unique processes.
- Copy and Create Workflow Template: Modify an existing workflow, saving time and adapting familiar structures.
02. Build Your Workflow (Create New Workflow Template Method)
- Choose Create New Workflow Template.
- Click the edit icon next to the placeholder name and enter a descriptive name (e.g., Artwork Approval) for your workflow template.
- Configure the Start Activity:
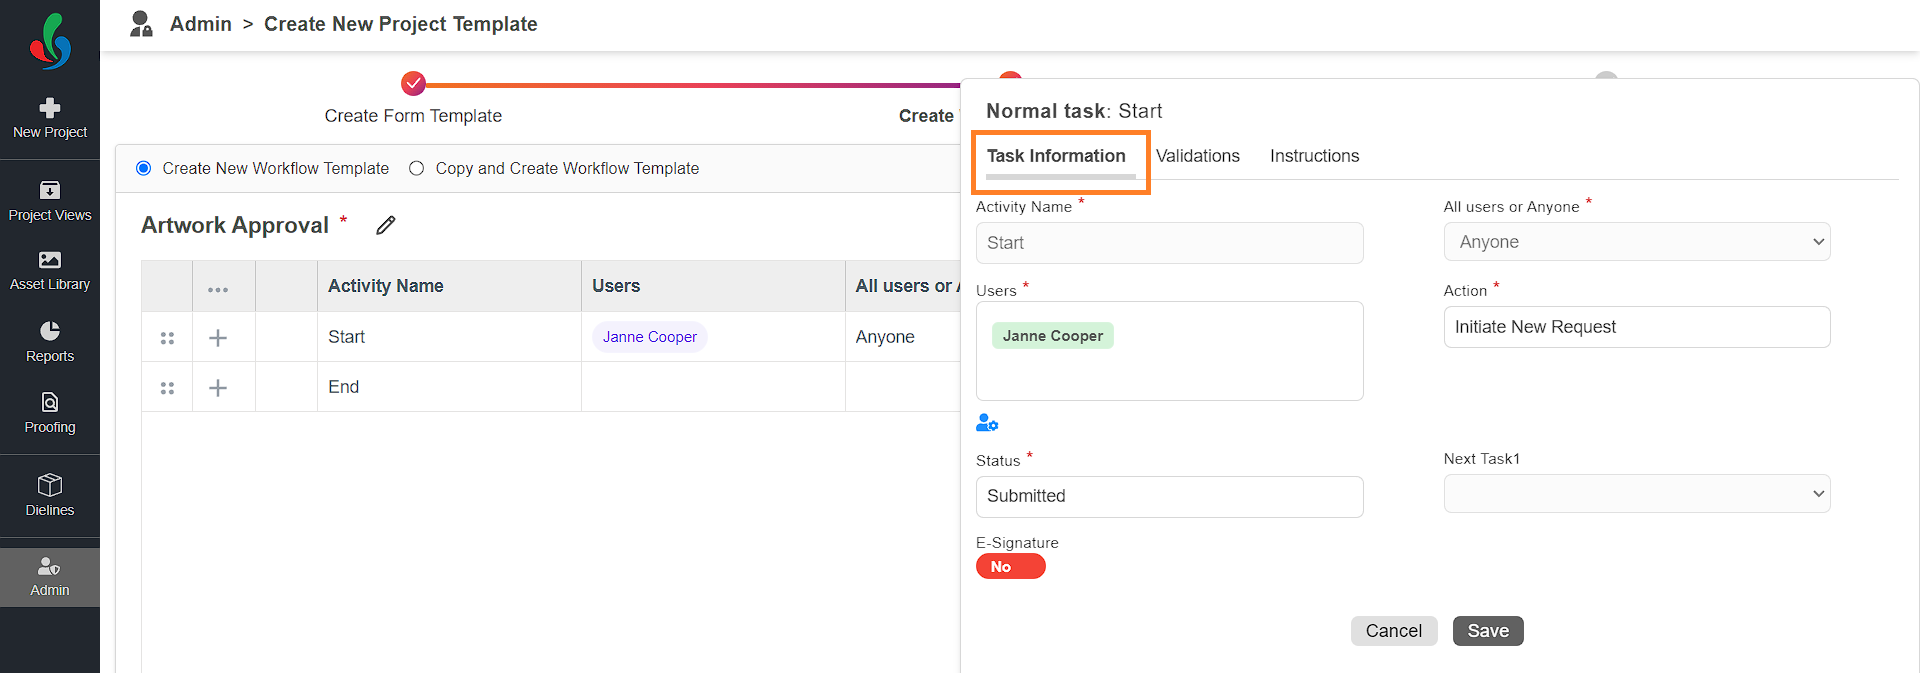
- Click the Edit button in the action column associated with the Start activity. This is where you define who can initiate the project using this template. Here, you'll see three tabs for customization.
Note: Users must configure the start activity, specifying who can initiate the project. Only users added to the Start activity can see the template and initiate the project. - Task Information Tab:
- Fill in the Task Information tab:
- User: Click the drop-down icon and assign specific users responsible for initiating the project. If your system includes the task assignment add-on feature, you will see a User Settings icon instead of the drop-down. Refer to step 5.b. to know more about user settings.
- Action: Define the button text users click to initiate the project (e.g., Initiate New Request).
- Status: Specify the outcome after clicking the Action button (e.g., Initiated).
- Next Task 1: Choose the workflow path after clicking Action. By default the first task will be selected as next task.
- E-Signature (Add-on): When E-signature is enabled, an additional verification step is triggered for the user initiating the project. This step requires the user to reconfirm their identity by entering their password.
- Fill in the Task Information tab:
- Validation Tab (Optional):
- This tab allows you to set restrictions similar to normal and decision tasks. Refer to step 5.c. to know more this tab.
- Instructions Tab (Optional):
- Add clear instructions to guide users on initiating the project.
- Once the Start activity has been configured as desired, click Save to apply the configurations.
- Click the Edit button in the action column associated with the Start activity. This is where you define who can initiate the project using this template. Here, you'll see three tabs for customization.
- Click Add a Task to choose a task type:
- Normal Task: For uploading deliverables, completing actions, etc.
- Decision Task: For approvals, rejections, or branching workflows.
- Normal Tasks:
- You'll see three tabs to customize the task:
- Task Information
- Validation
- Instructions.
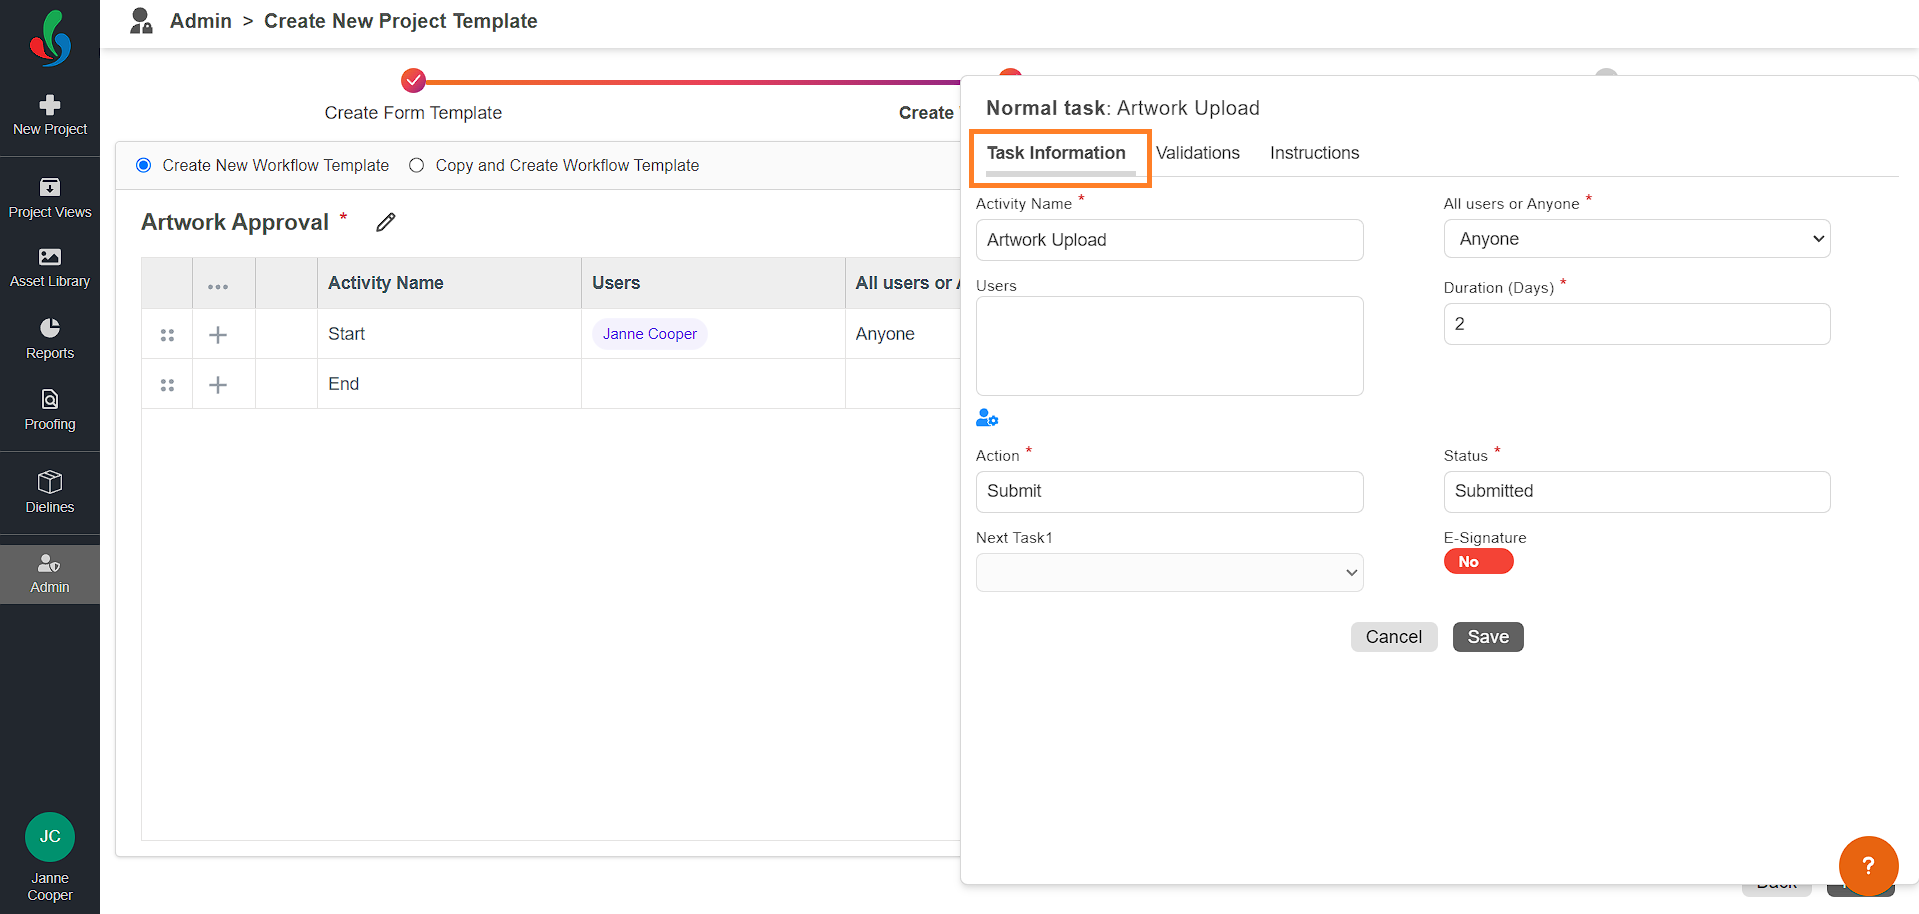
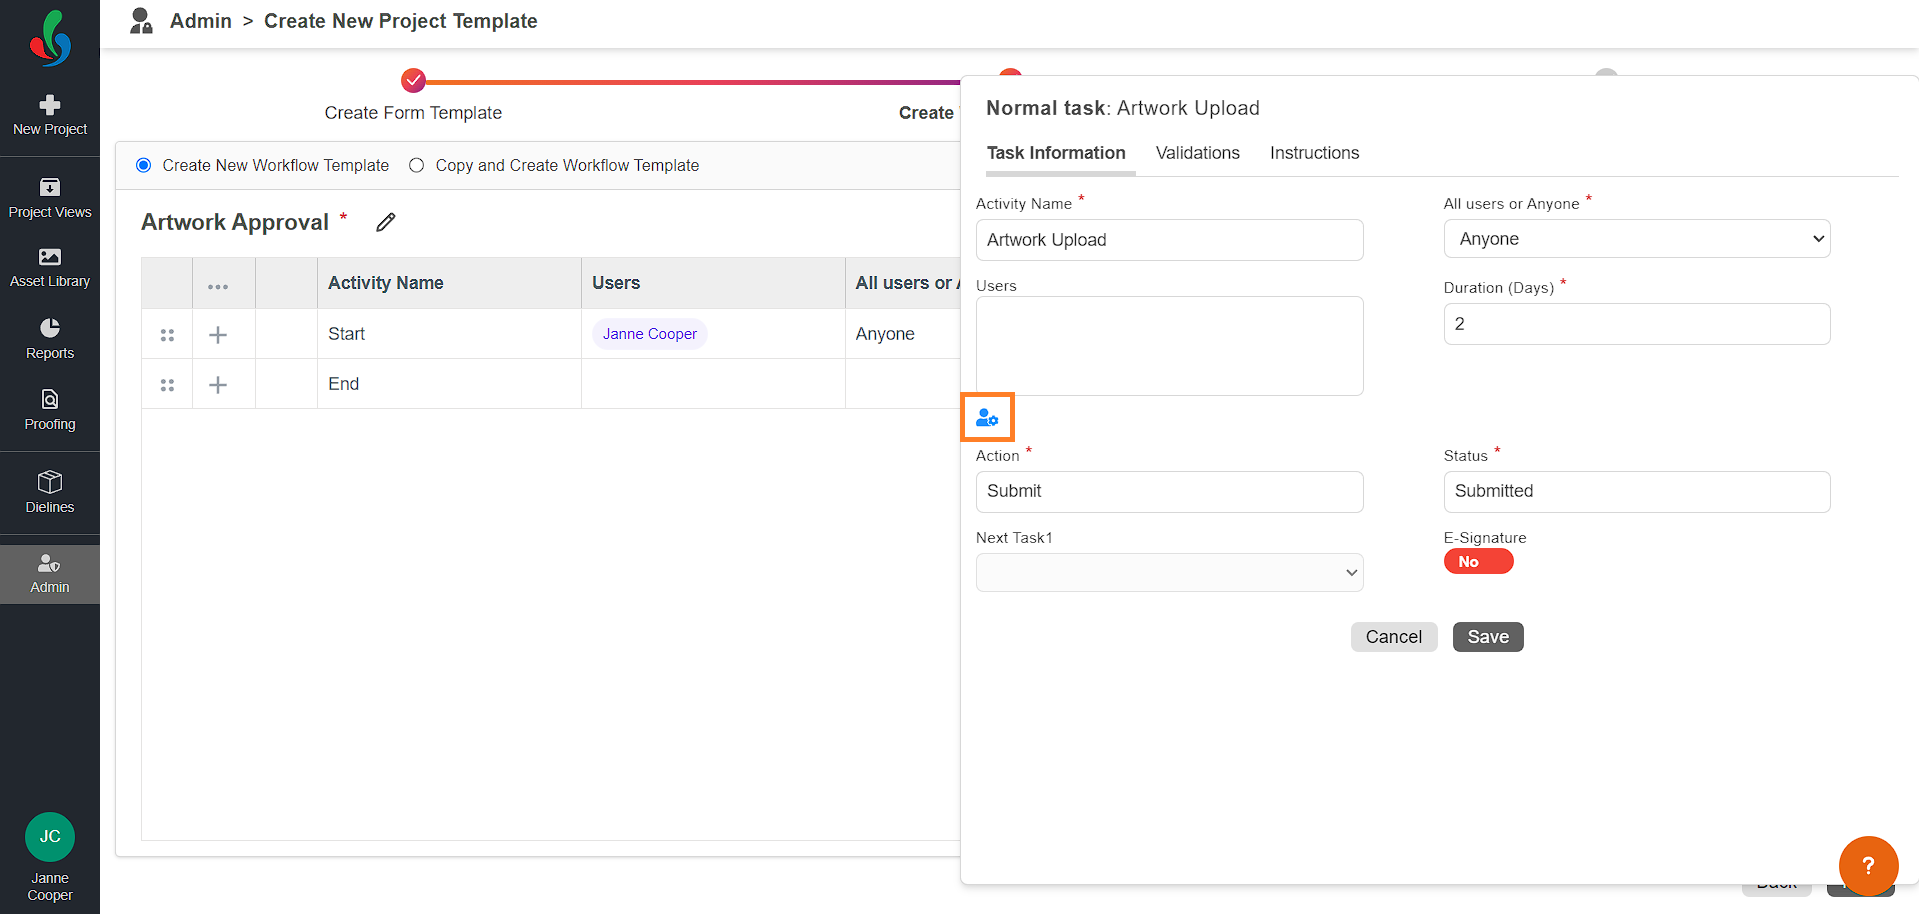
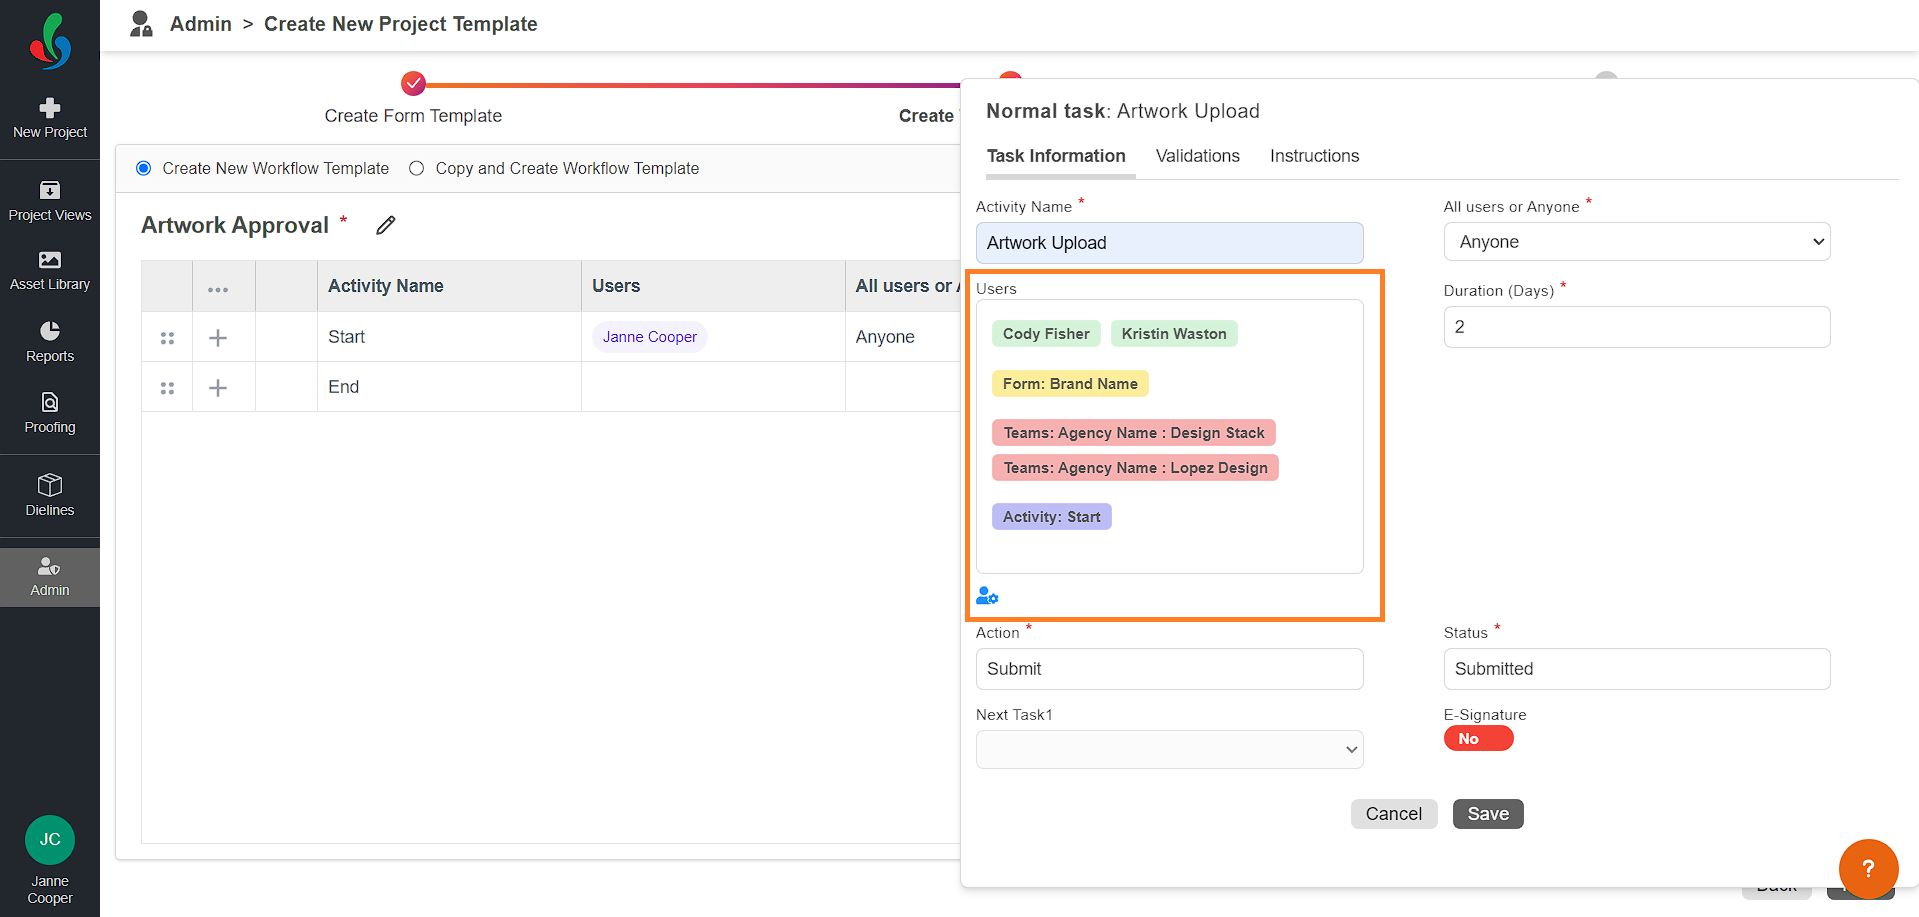
- Task Information Tab:
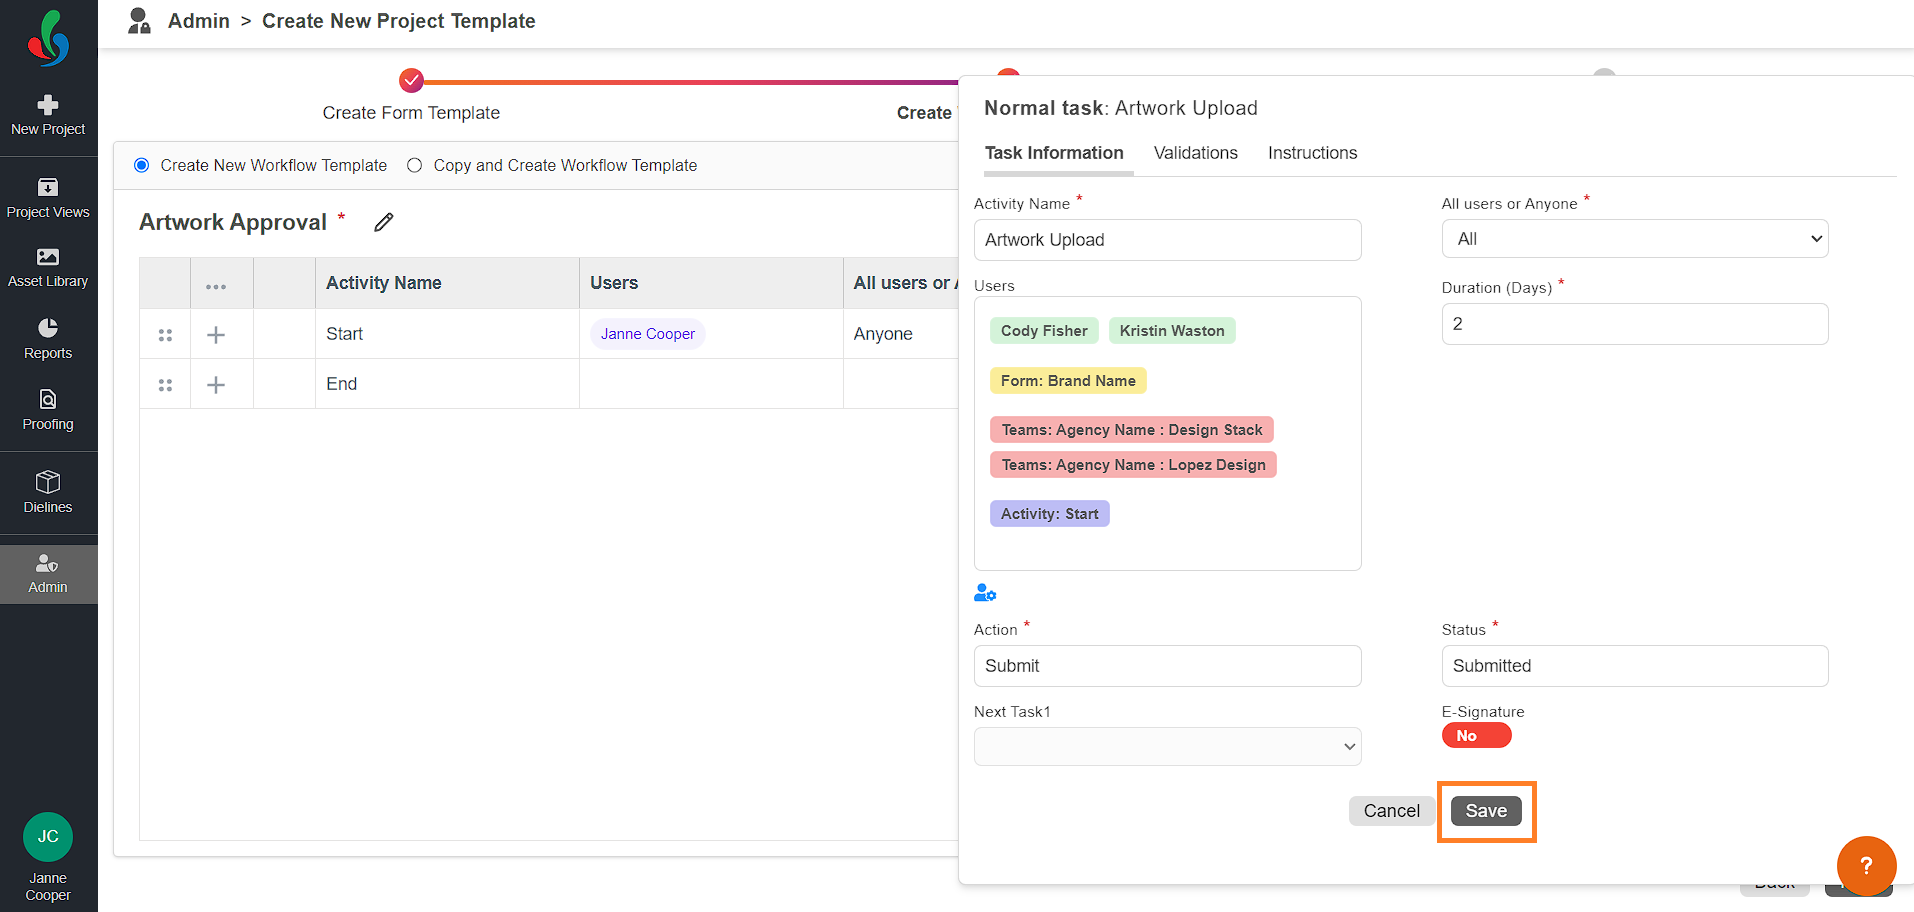
- Fill in the Task Information tab:
- Activity Name: Enter a descriptive name for the task (e.g., Artwork Upload).
- All or Anyone: Choose if all assigned users must complete the task or any one.
- User: Click the drop-down icon and assign specific users responsible for the task. If your system includes the task assignment add-on feature, you will see a User Settings icon instead of the drop-down. For detailed instructions on using the User Settings icon, refer to the "Task Assignment Options" section below.
- Duration (Days): Set a deadline as desired.
- Action: Define the button text users click to complete the task (e.g., Submit).
- Status: Specify the outcome after clicking the Action button (e.g., Submitted).
- Next Task 1: Choose the workflow path after clicking Action.
- E-Signature (Add-on): When E-signature is enabled, an additional verification step is triggered for the user submitting the project. This step requires the user to reconfirm their identity by entering their password.
- Task Assignment Options:
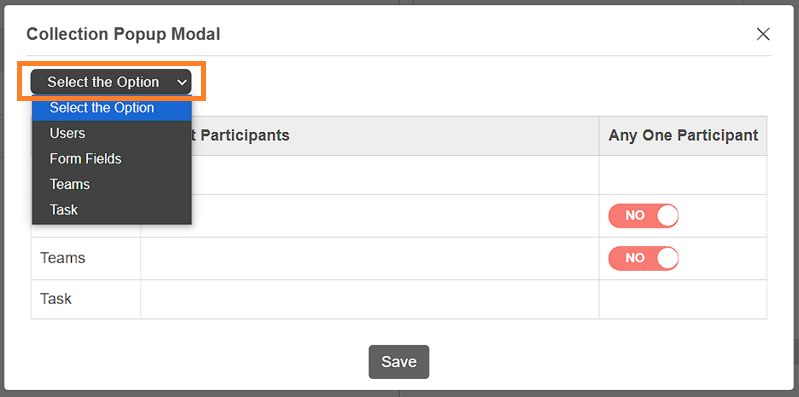
Assign the task to specific users, teams, form fields, or based on previous tasks.- Click the User Settings icon.
- A Collection Popup Modal will appear. Click the "Select the Option" drop-down menu to choose from the following assignment options:
- Users: Select specific users from the system.
- Form Fields: Assign tasks based on metadata fields inputs.
- Teams: Assign tasks to teams (e.g., marketing, sales). For example, if you select both marketing and legal teams, the task will be assigned to all members of both teams.
- Task: Assign the task to users who were assigned to a previous task. Only previous tasks can be selected.
Note: For the start activity, task assignment options are limited to Users and Teams only.
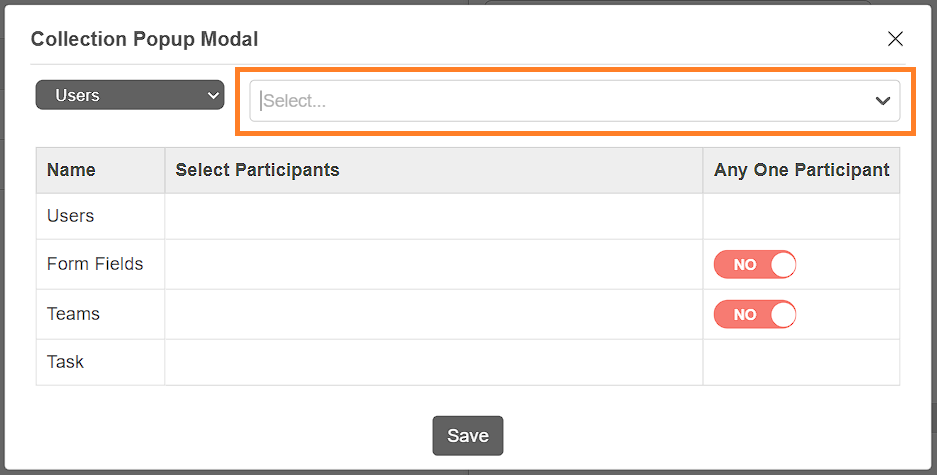
- After selecting a task assignment option (e.g., Users), a drop-down will appear. Click the drop-down icon to see all available users, and select the desired user(s).
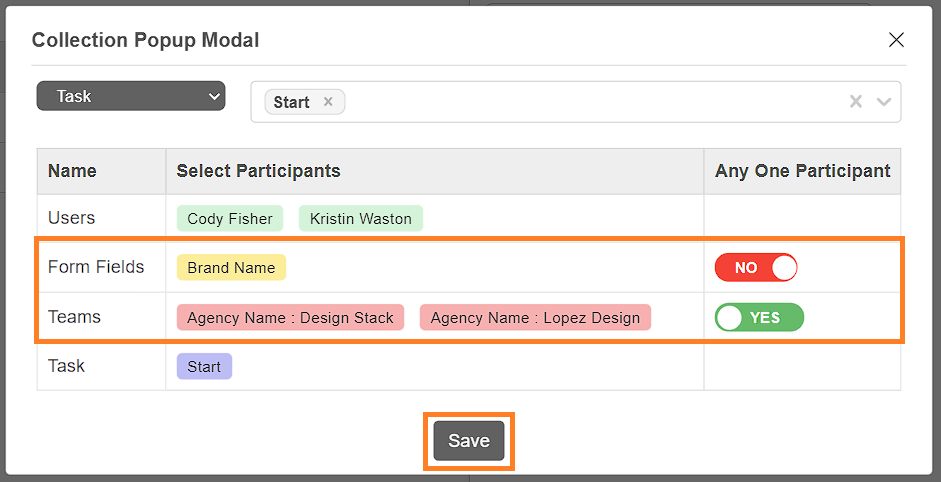
- You can configure any combination of these assignment options. If you choose all four options (Users, Form Fields, Teams, and Task), the task will be assigned to all users in the selected options. Each user must approve/submit the task before it can proceed to the next stage. To reduce the number of required approvals, consider enabling the Any One Participant option.
Note: The Any One Participant option is available only for Form Fields and Teams. - If "Any One Participant" option enabled, any one member from each selected team must approve/submit the task for it to proceed. For example, if the task is assigned to two teams with five members each, approval from any one member of each team will move the task to the next stage.
Note: If the "Anyone" setting is selected under All or Anyone, the task will move to the next stage once any one user from the selected options approves the task, regardless of whether the Any One Participant option is enabled. - After configuring the task assignment, click Save to finalize the user assignment settings.
- Click the User Settings icon.
- Fill in the Task Information tab:
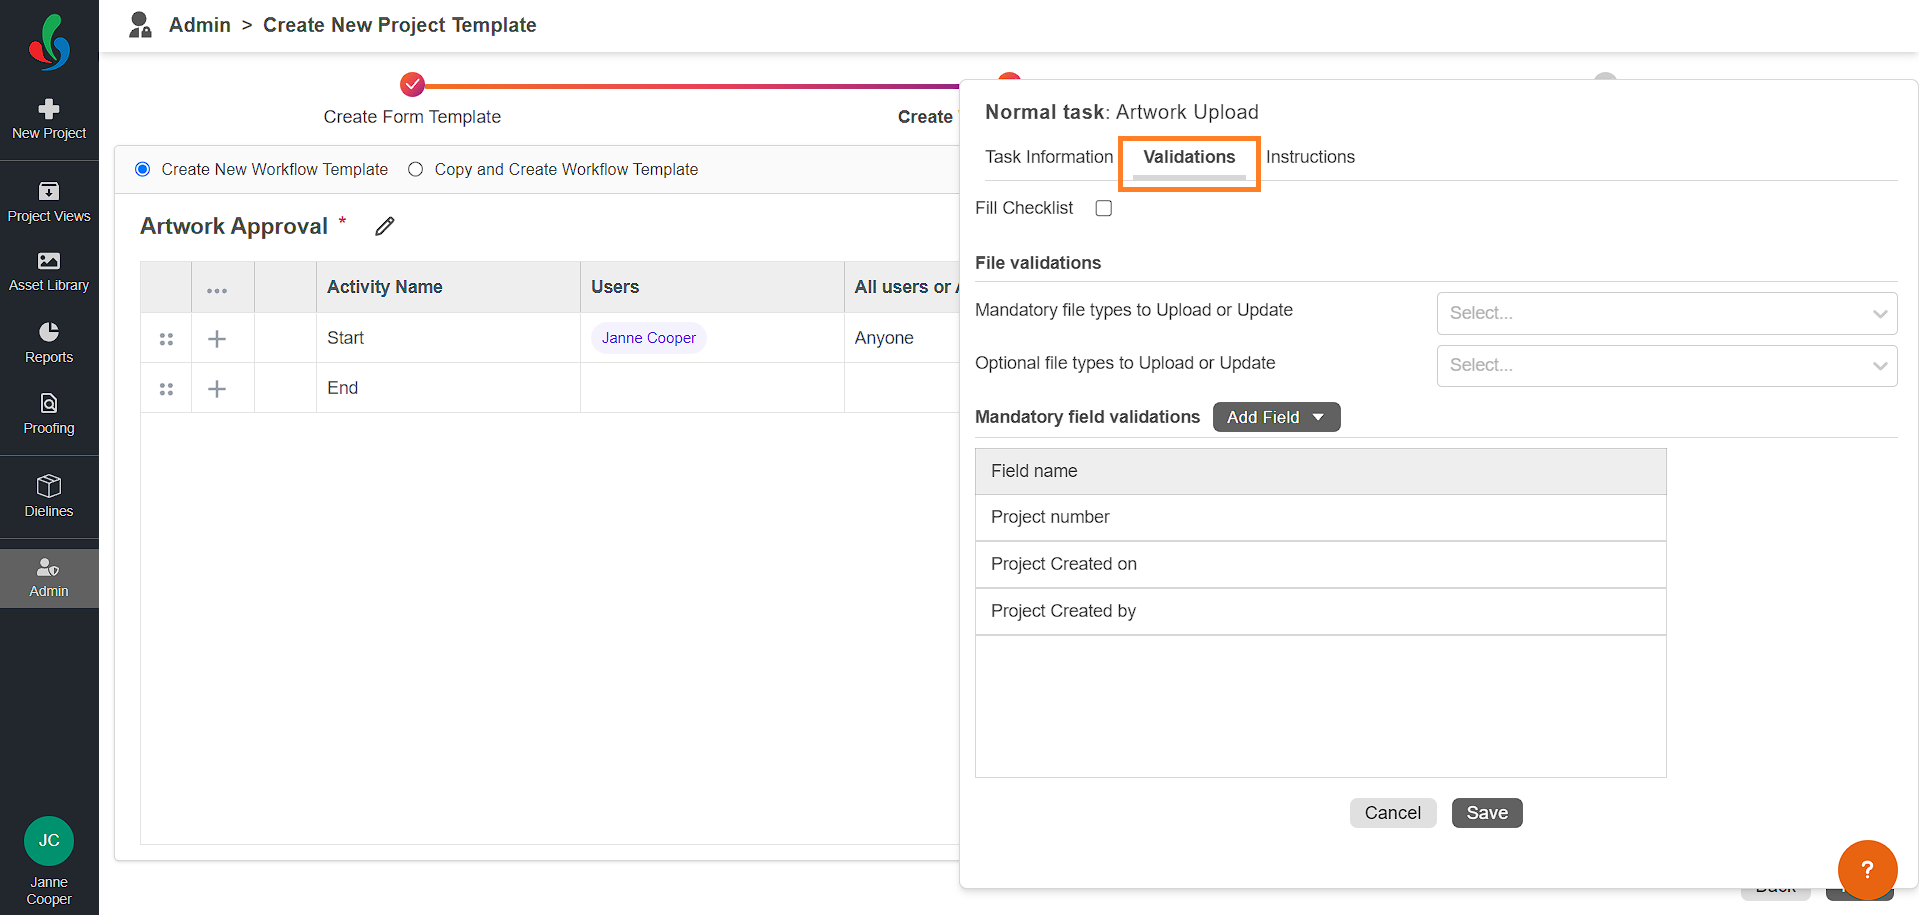
- Validation Tab (Optional):
- This tab allows you to set specific requirements for the task:
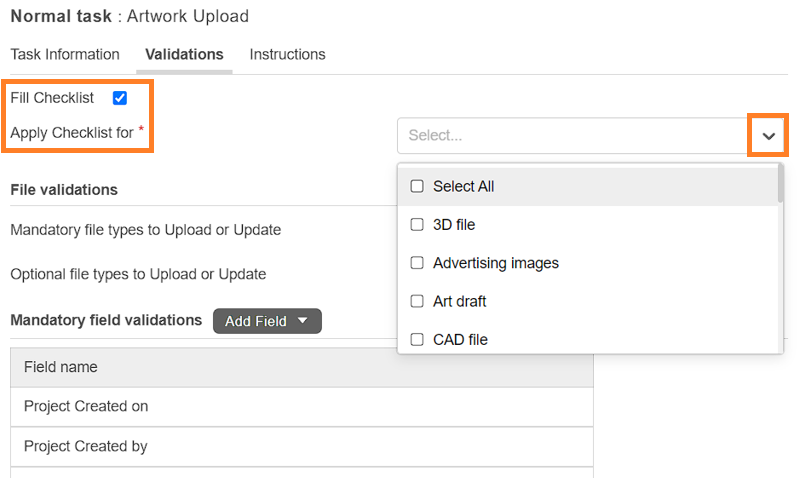
- Fill checklist: Enable or disable checklists for this task. When enabled, you must select the asset type to which the checklist applies. For example, selecting the "Packaging Artwork" asset type will display checklist items relevant to that type. Checklists are pre-configured based on asset type and department to ensure tasks are completed correctly. Checklists are helpful for tasks requiring specific steps (e.g., Approval tasks). To configure the checklists, refer to Checklists: Access, Create and Edit.
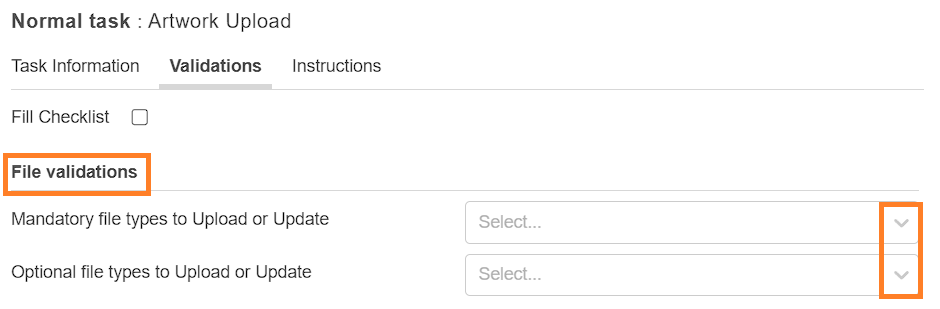
- File Validation: Restrict the file types users can upload or update for the task. There are two options:
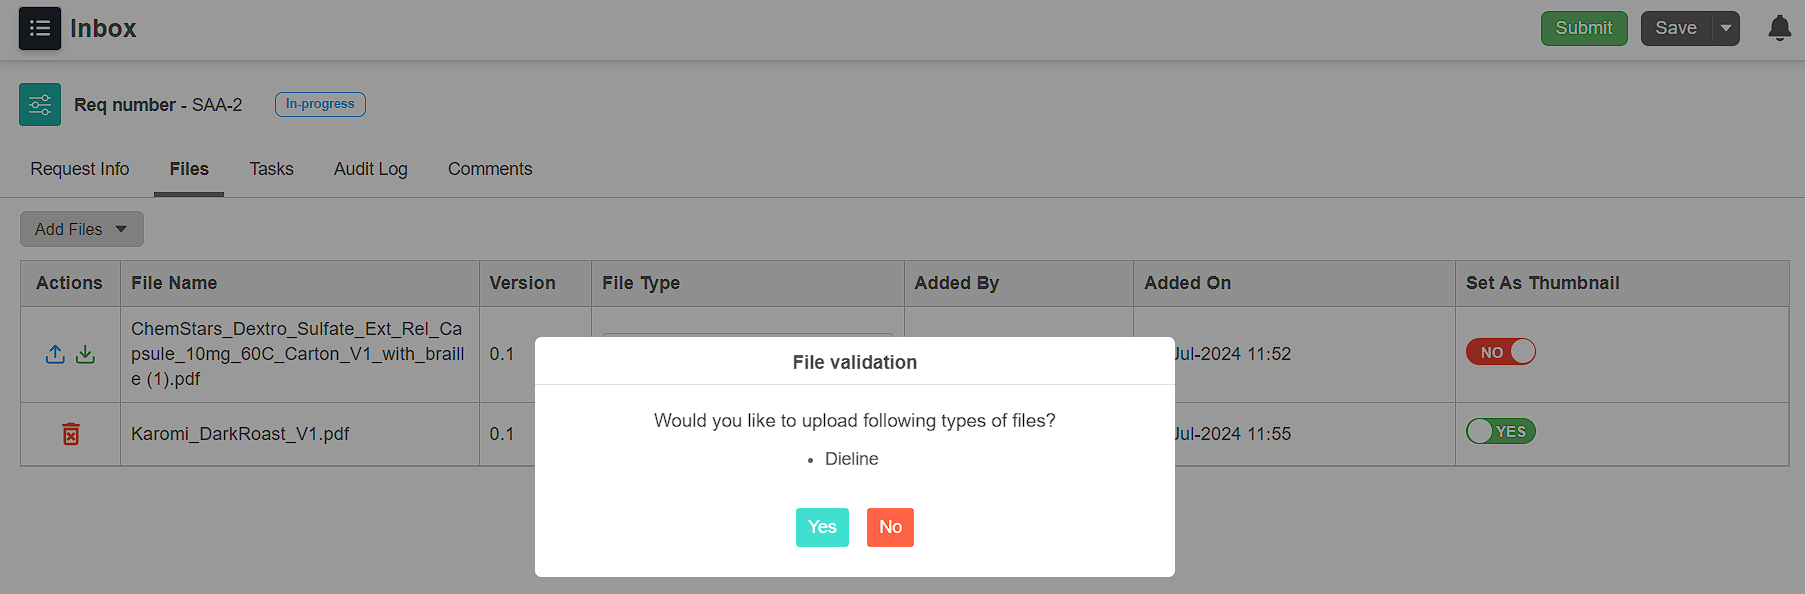
- Mandatory file types to Upload or Update: Use the drop-down option and select the specific file types users must upload to complete the task. For example, if a task requires "Packaging Artwork" and "Dieline" files, you could choose these as mandatory file types.
- Users attempting to submit the task without these file types will see a warning message reminding them to upload the required files.
- They cannot submit the task until they upload or update the mandatory file types.
- Optional file types to Upload or Update: Use the drop-down option and select file types users can optionally upload to provide additional information for the task. These files are not essential for completion. For instance, a task might allow uploading optional "3D model" or "KLD" files for reference.
- If a user uploads any of these optional file types, no warning appears.
- Users can still submit the task even if they don't upload any optional files.
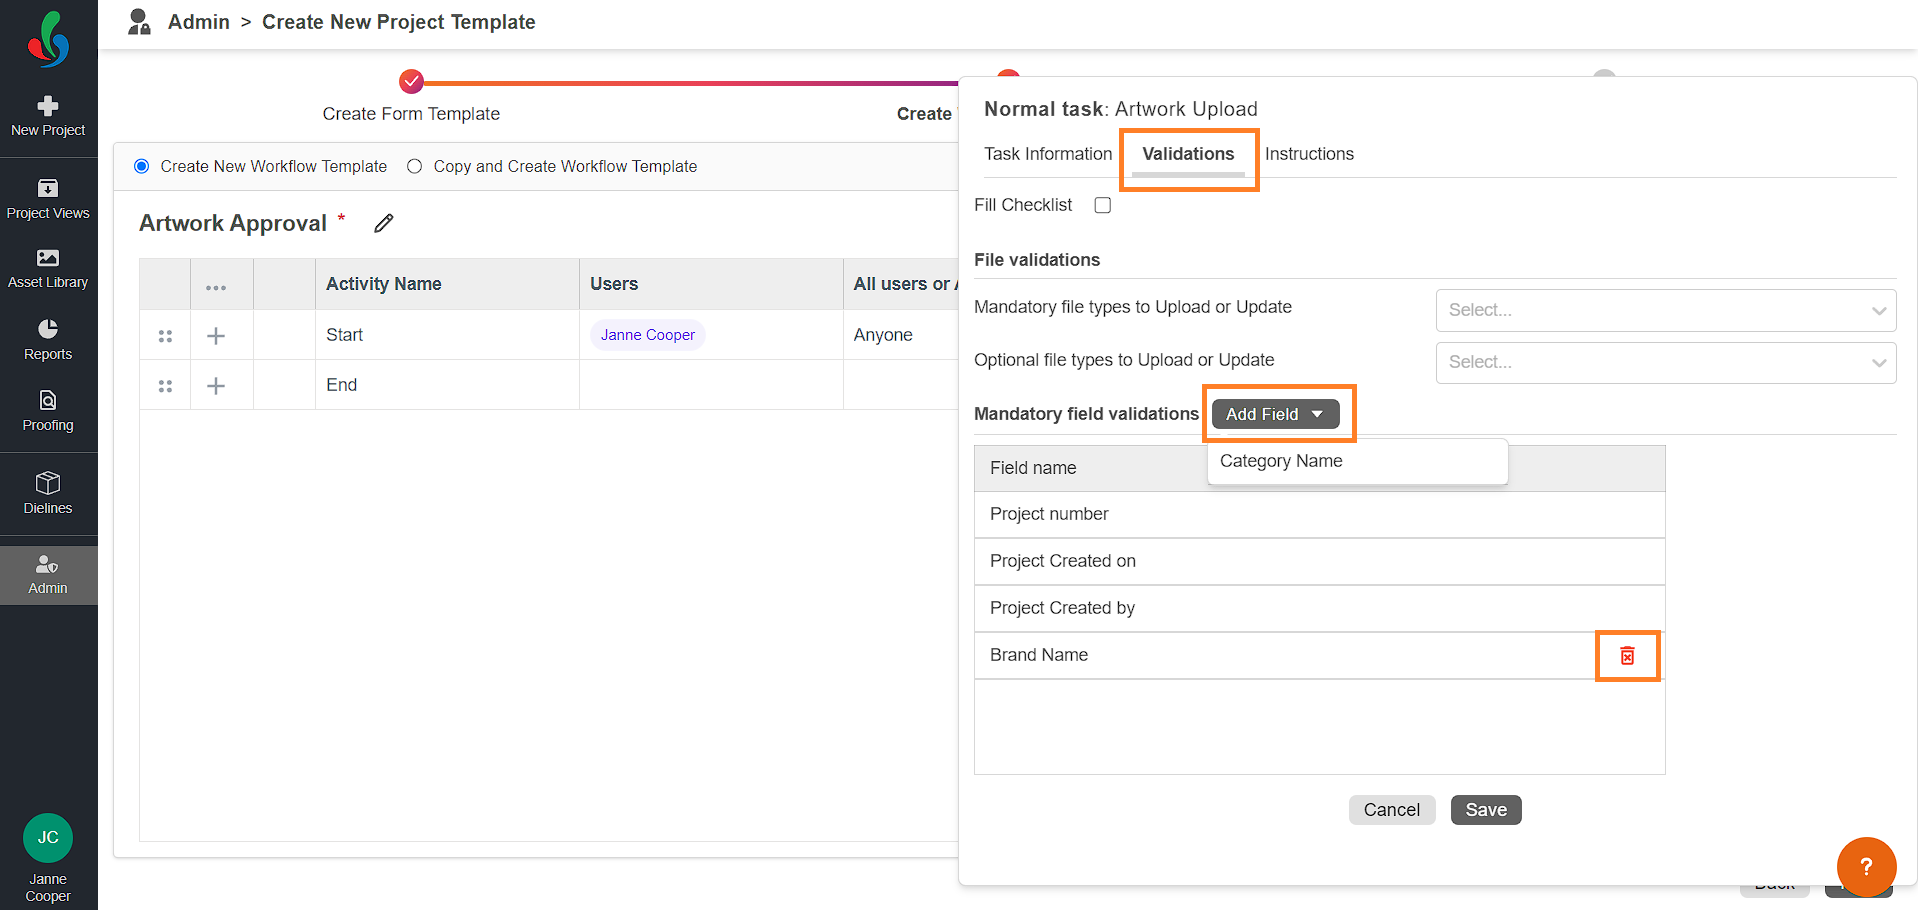
- Mandatory field validations: Set mandatory fields users must complete before moving to the next activity. This is similar to the mandatory fields in the Start activity but applies to this specific task. To set Mandatory form fields to move to the next activity:
- Click "Add Field" next to "Mandatory field validations."
- Choose the desired form fields from the list. These will appear under "Mandatory field validations."
- To remove the added form fields from mandatory list, simply click the delete icon available next to the field name.
Note: Pre-existing Mandatory Fields: Any fields set as mandatory in the Start activity or previous activity automatically carry over and cannot be removed in current activity.
- Mandatory file types to Upload or Update: Use the drop-down option and select the specific file types users must upload to complete the task. For example, if a task requires "Packaging Artwork" and "Dieline" files, you could choose these as mandatory file types.
- Fill checklist: Enable or disable checklists for this task. When enabled, you must select the asset type to which the checklist applies. For example, selecting the "Packaging Artwork" asset type will display checklist items relevant to that type. Checklists are pre-configured based on asset type and department to ensure tasks are completed correctly. Checklists are helpful for tasks requiring specific steps (e.g., Approval tasks). To configure the checklists, refer to Checklists: Access, Create and Edit.
- This tab allows you to set specific requirements for the task:
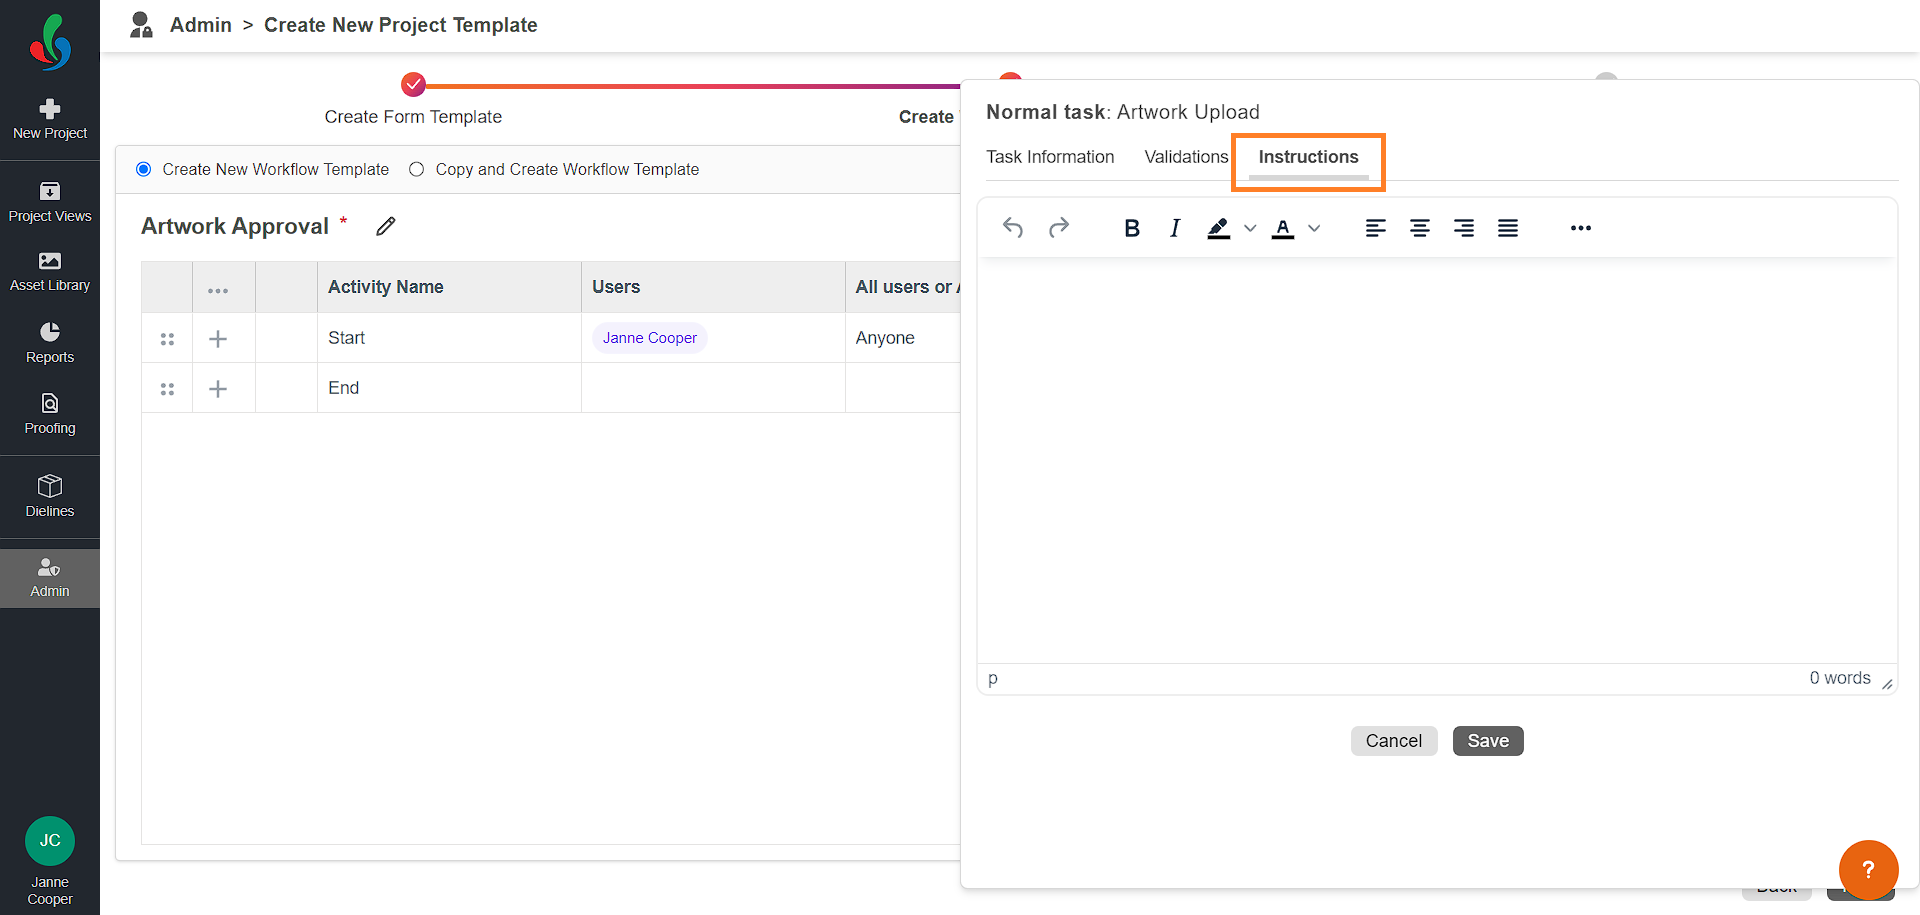
- Instructions Tab (Optional):
- Add clear instructions to guide users on completing the task.
- Add clear instructions to guide users on completing the task.
- You'll see three tabs to customize the task:
- Click the Save button to add the task.
- Decision Tasks:
- You'll see three tabs to customize the task:
- Task Information
- Validation
- Instructions.
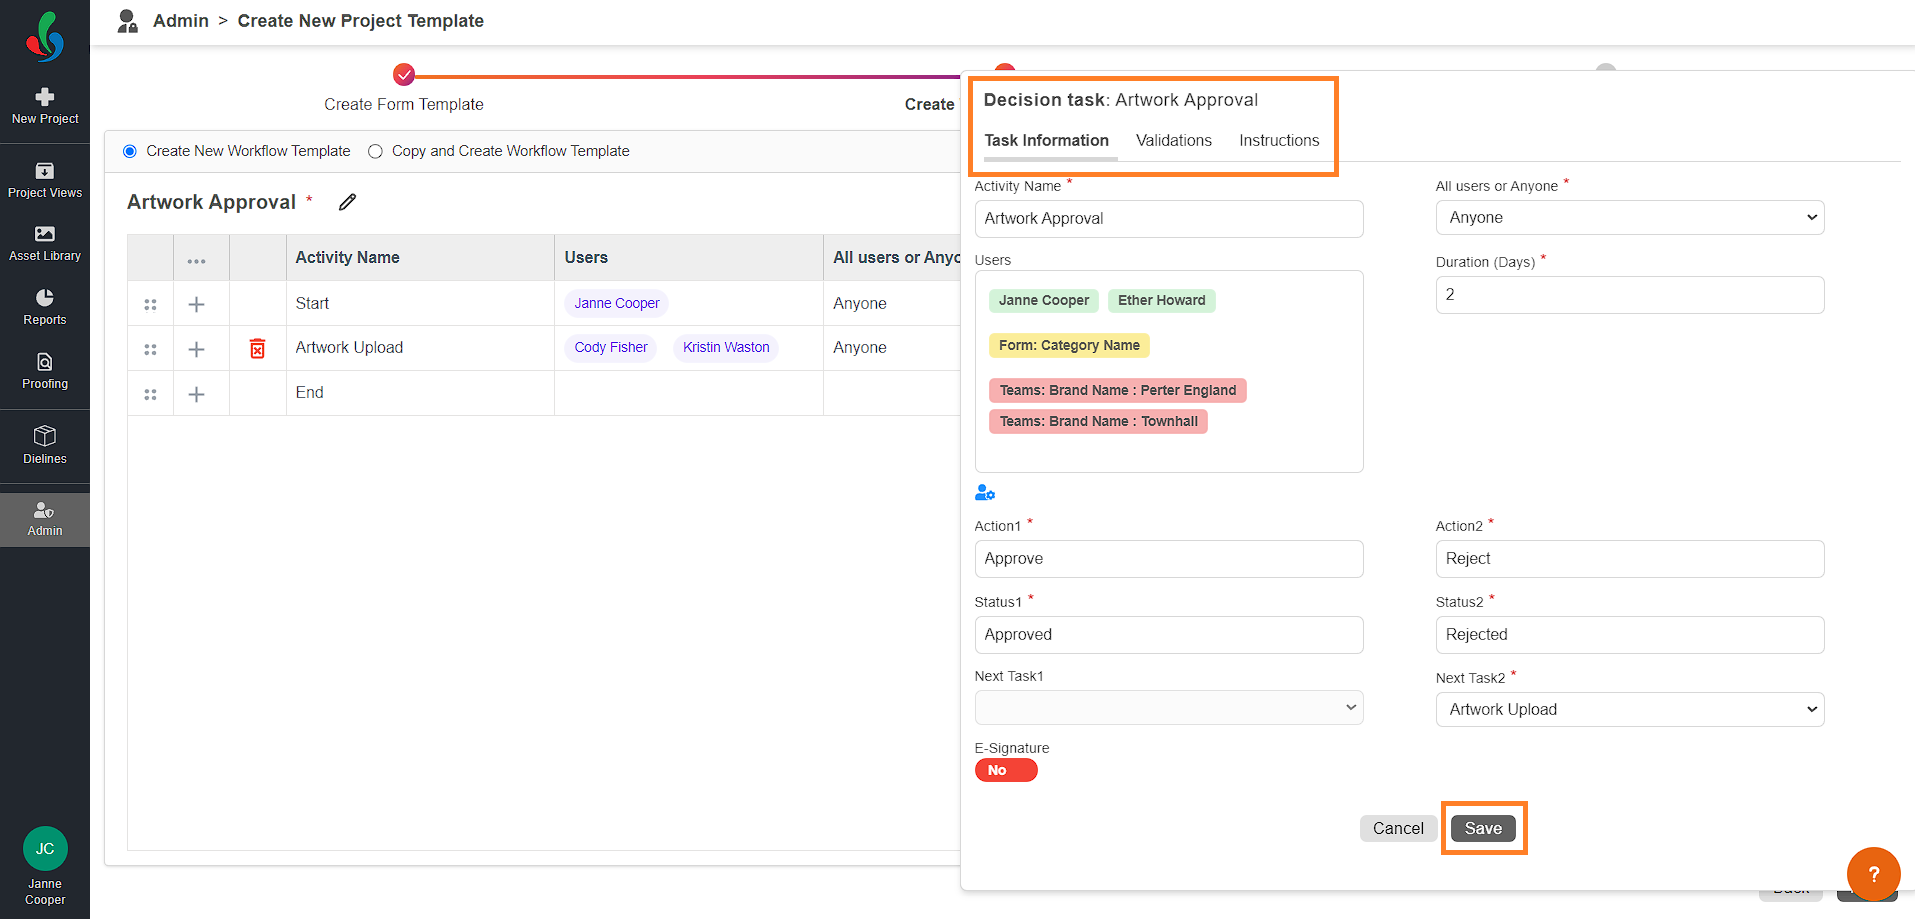
- Task Information Tab:
- Fill in the Task Information tab:
- Activity Name: Enter a descriptive name for the task (e.g., Artwork Approval).
- All or Anyone: Choose if all assigned users must complete the task or just one.
- User: Click the drop-down icon and assign specific users responsible for the task. If your system includes the task assignment add-on feature, you will see a User Settings icon instead of the drop-down, similar to normal tasks. Refer to step 5.b. to know more about user settings.
- Duration (Days): Set a deadline as desired.
- Action 1 and Action 2: Define the text for both decision buttons (e.g., Approve, Reject).
- Status 1 and Status 2: Specify the outcomes based on each Action button click (e.g., Approved, Rejected).
- Next Task 1: Select the workflow path that follows after clicking Action 1.
- Next Task 2: Select the workflow path that follows after clicking Action 2.
- E-Signature (Add-on): When E-signature is enabled, an additional verification step is triggered for the user approving or rejecting the project. This step requires the user to reconfirm their identity by entering their password.
- Fill in the Task Information tab:
- Validation Tab (Optional):
- This tab allows you to set restrictions on the task, similar to normal tasks. Refer to step 5.c. to know more this tab.
Note: By default, the Fill Checklist option will be enabled for Decision tasks, with all asset types selected. Users can remove an asset type by clicking the close icon next to its name.
- This tab allows you to set restrictions on the task, similar to normal tasks. Refer to step 5.c. to know more this tab.
- Instructions Tab (Optional):
- Add clear instructions to guide users on making the decision.
- You'll see three tabs to customize the task:
- Click the Save button to add the task.
- Repeat steps 4-8 to add more tasks as needed, connecting them logically with the workflow template.
- Rearrange: Use the drag icon (⋮⋮) to adjust task order.
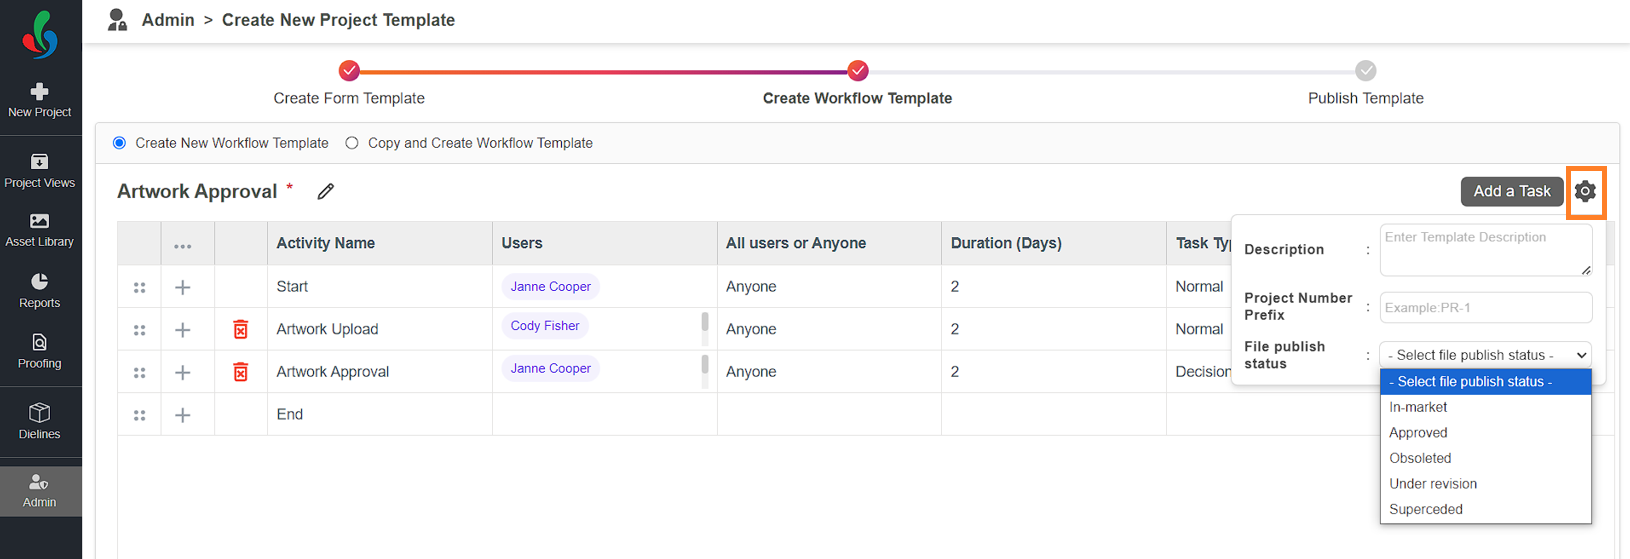
- The End activity is automatically added, marking the workflow completion.
- Click the Settings icon (optional) to configure additional details:
- Template Description: Add a helpful description for your template.
- Project Number Prefix: Assign unique prefixes based on the template used.
- File Publish Status: Set the default status for files completed with this workflow (e.g., Approved).


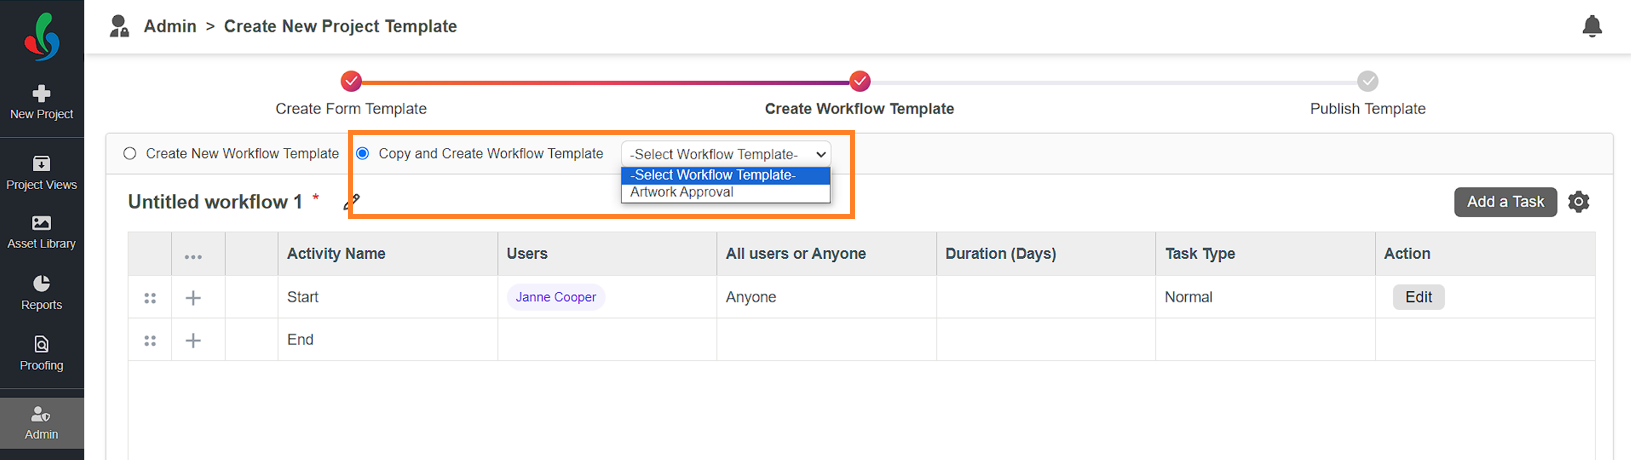
03: Build Your Workflow (Copy and Create Workflow Template Method)
- Select an Existing Template:
- Choose Copy and Create Workflow Template.
- Click Select Workflow Template and choose the template you'd like to modify.
- Customize the Workflow:
- Enter a descriptive name for the new template (e.g., Artwork Approval v2).
- Modify tasks as needed:
- Delete tasks: Click the delete icon associated with the task and confirm deletion.
- Add tasks: Follow the same steps as in Step 03 for adding Normal or Decision tasks.
- Rearrange: Use the drag icon (⋮⋮) to adjust task order.
- Refine Settings (Optional):
- Click the Settings icon to configure additional details:
- Template Description: Provide a helpful overview of the template's purpose.
- Project Number Prefix: Assign unique prefixes for organization.
- File Publish Status: Set the default status for completed files (e.g., Approved).
- Click the Settings icon to configure additional details:
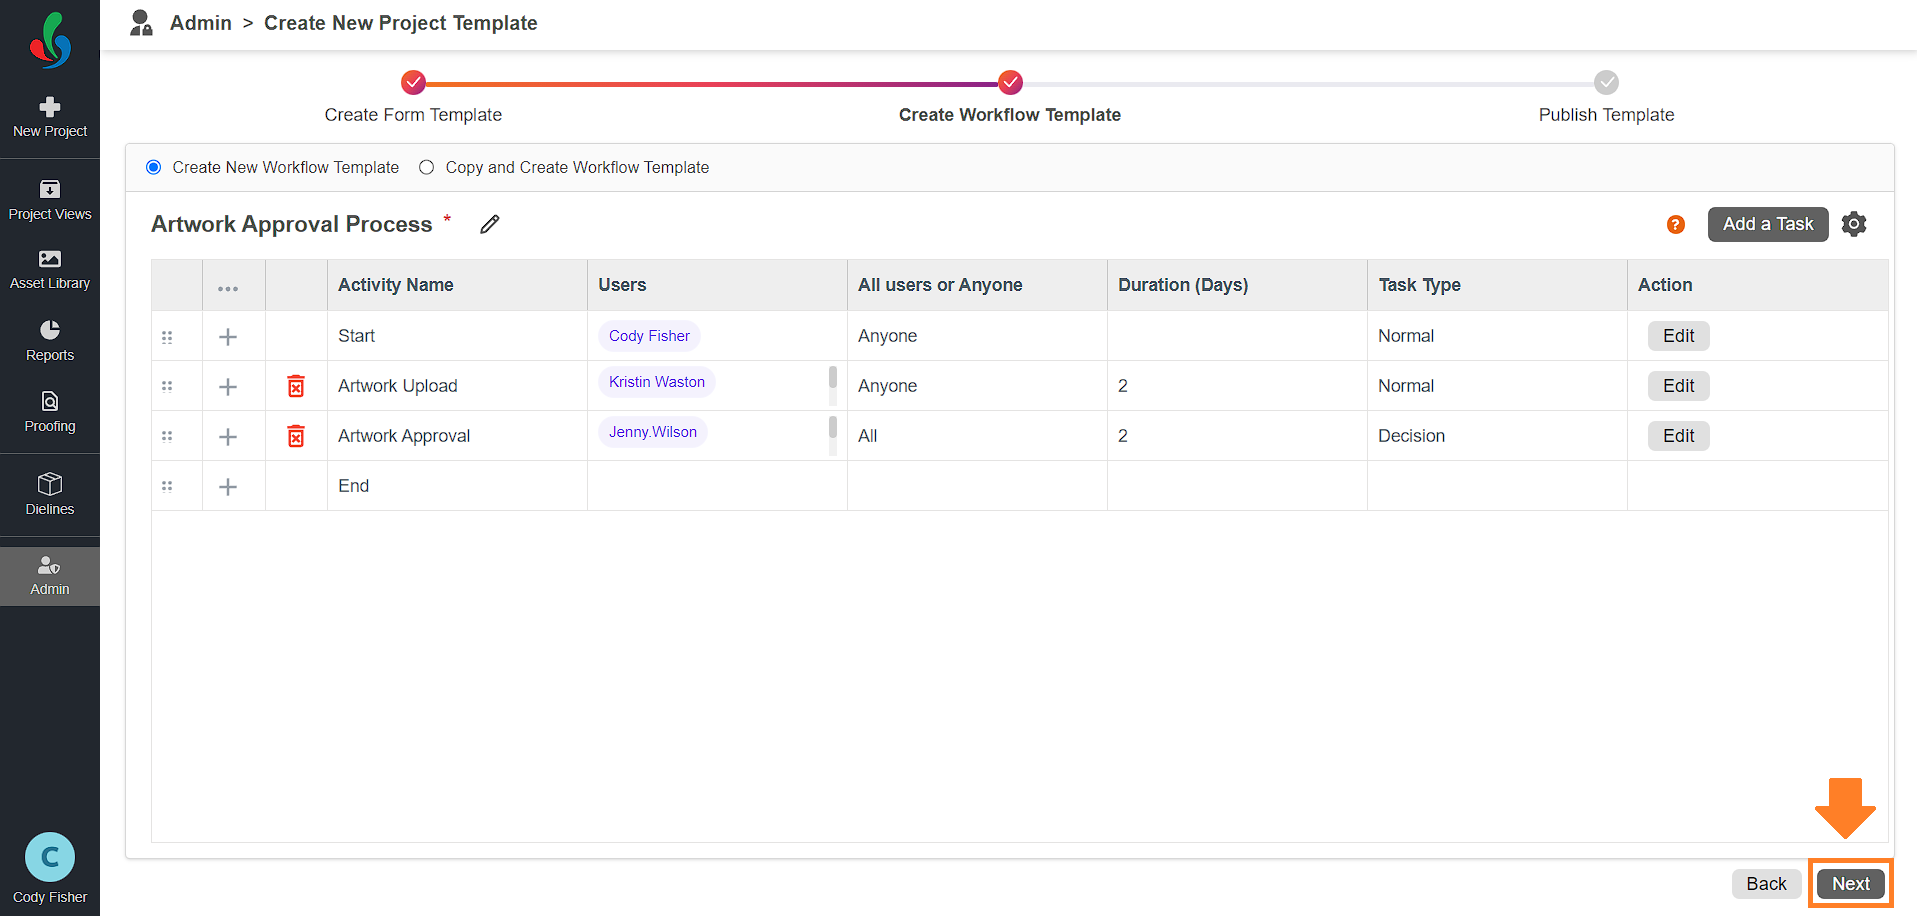
04. Proceed to Publish Template
- Once your workflow is configured, click Next at the bottom right to move on to publishing your project template. If you still need to edit the form, click Back and adjust it as needed before publishing.