---
title: "Start a New Project (Enterprise Plan)"
url: "https://help.manageartworks.com/en/article/start-a-new-project-enterprise-plan"
language: "en"
last_updated: "2026-01-21T03:47:42.214Z"
---
# Start a New Project (Enterprise Plan)
|  | **Note:** Starting a new project follows a similar process in both the **Growth** and **Enterprise** plans. However, certain tabs and configurations differ. This article explains how to start a new project in the **Enterprise Plan**. To start a project in the Growth Plan, see [Start a New Project (Growth Plan)](https://help.manageartworks.com/en/article/start-a-new-project-growth-plan).
For more information about ManageArtworks plans, click [here](https://www.manageartworks.com/pricing). |
| --- | --- |
> How do I start a new project with the enterprise plan?
## 01\. Access the Project Templates
1. Sign in to your [ManageArtworks](https://app.manageartworks.com/karomi/global/build/login) account.
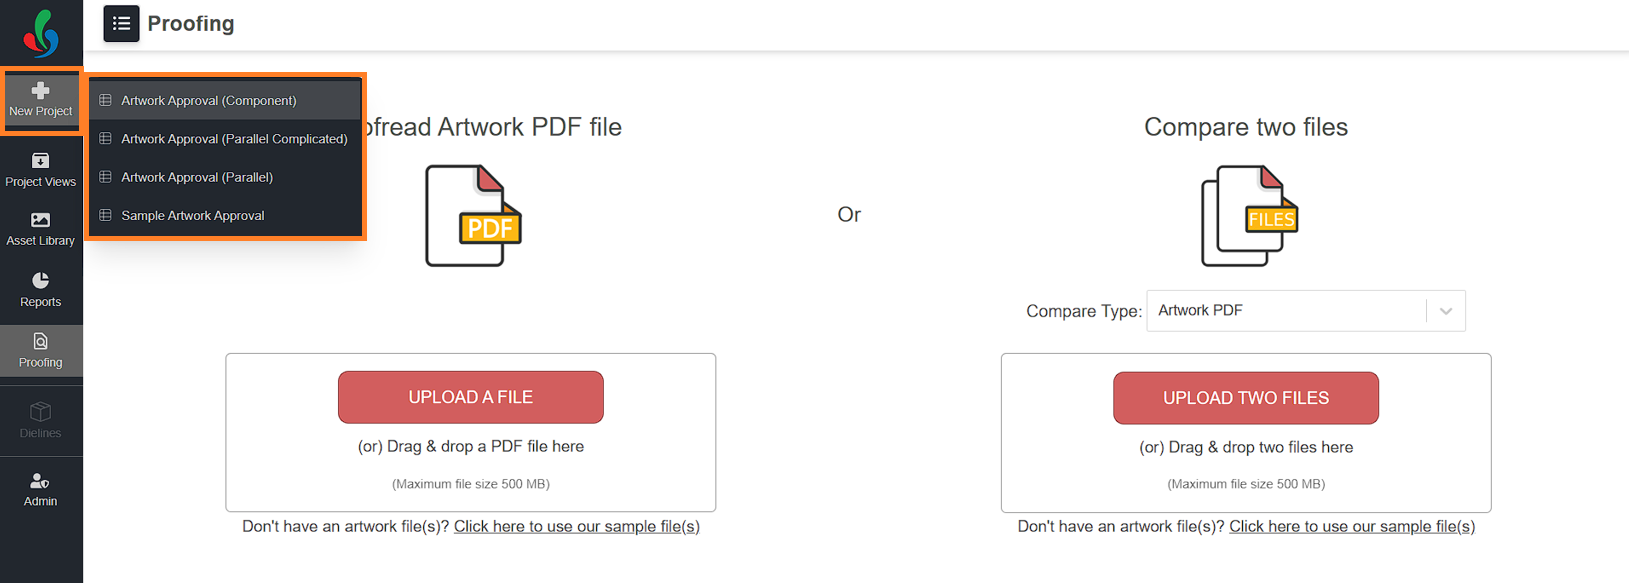
2. Hover over the **New Project** module in the left pane.
3. A list of available workflow templates appears.
4. Select the required **workflow template** to initiate the project.
**Note:** You can view and select a workflow template only if you are assigned to the **Start activity** of the workflow template you intend to use.
## 02\. Configure Project Details
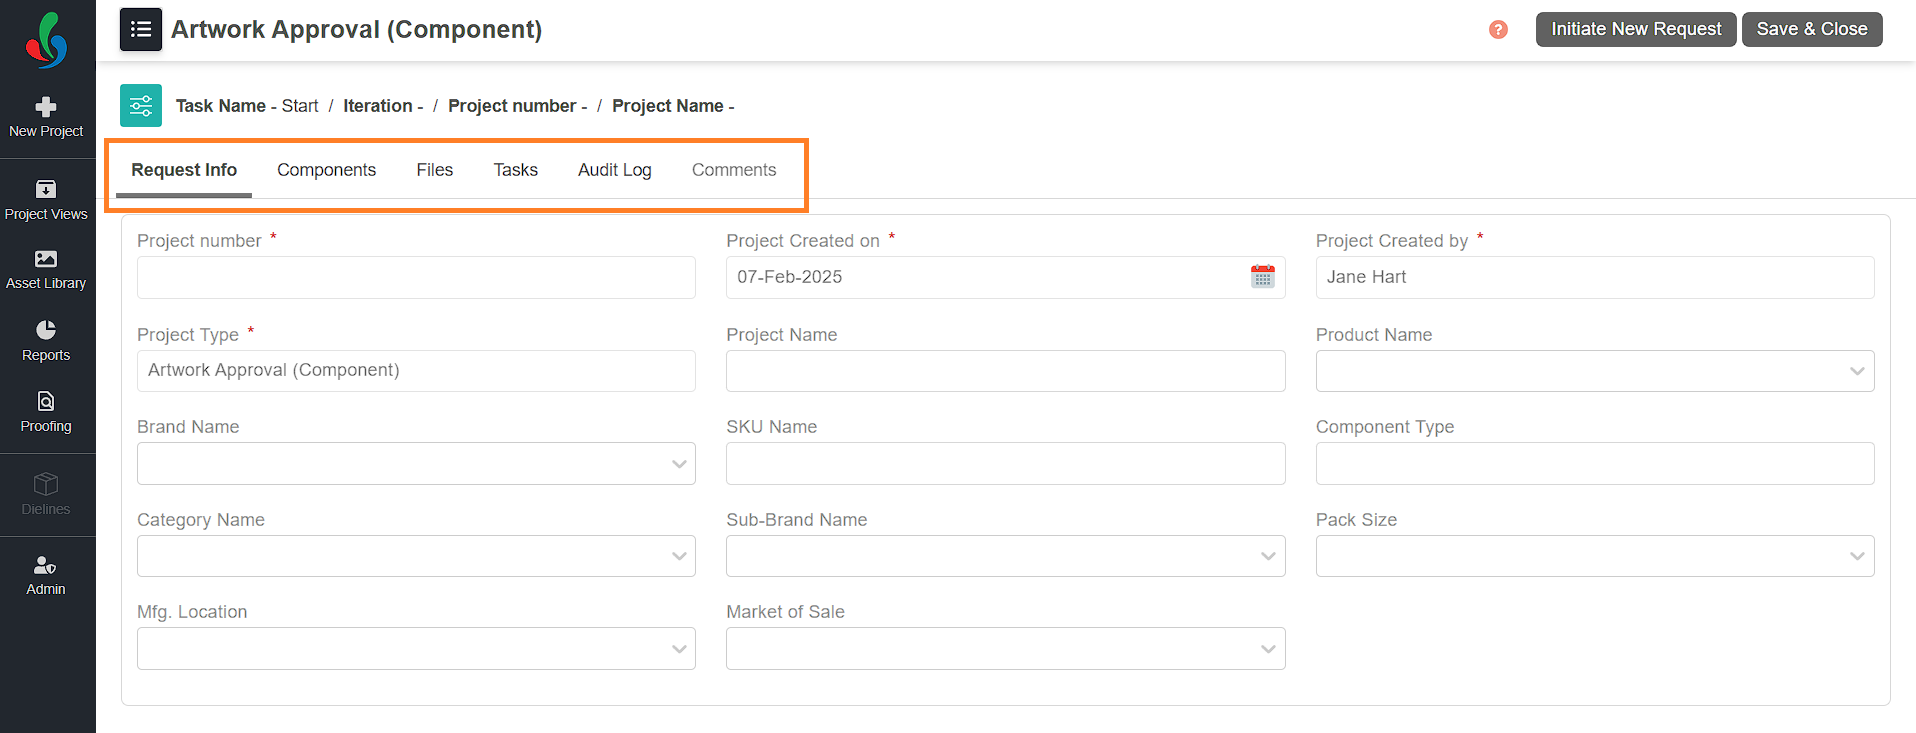
The **New Project** page includes the following configuration tabs:
- Request Info
- Components
- Files
- Tasks
- Audit Log
- Comments
- Copy
|  | **Note:** The **Copy** tab is applicable only when **Copy Manager** is enabled for the selected workflow template.
The tab becomes visible only after the project is initiated. For more information, refer to [Copy Manager Workflow](https://help.manageartworks.com/en/article/manage-copy-through-project-workflows). |
| --- | --- |
### Request Info Tab
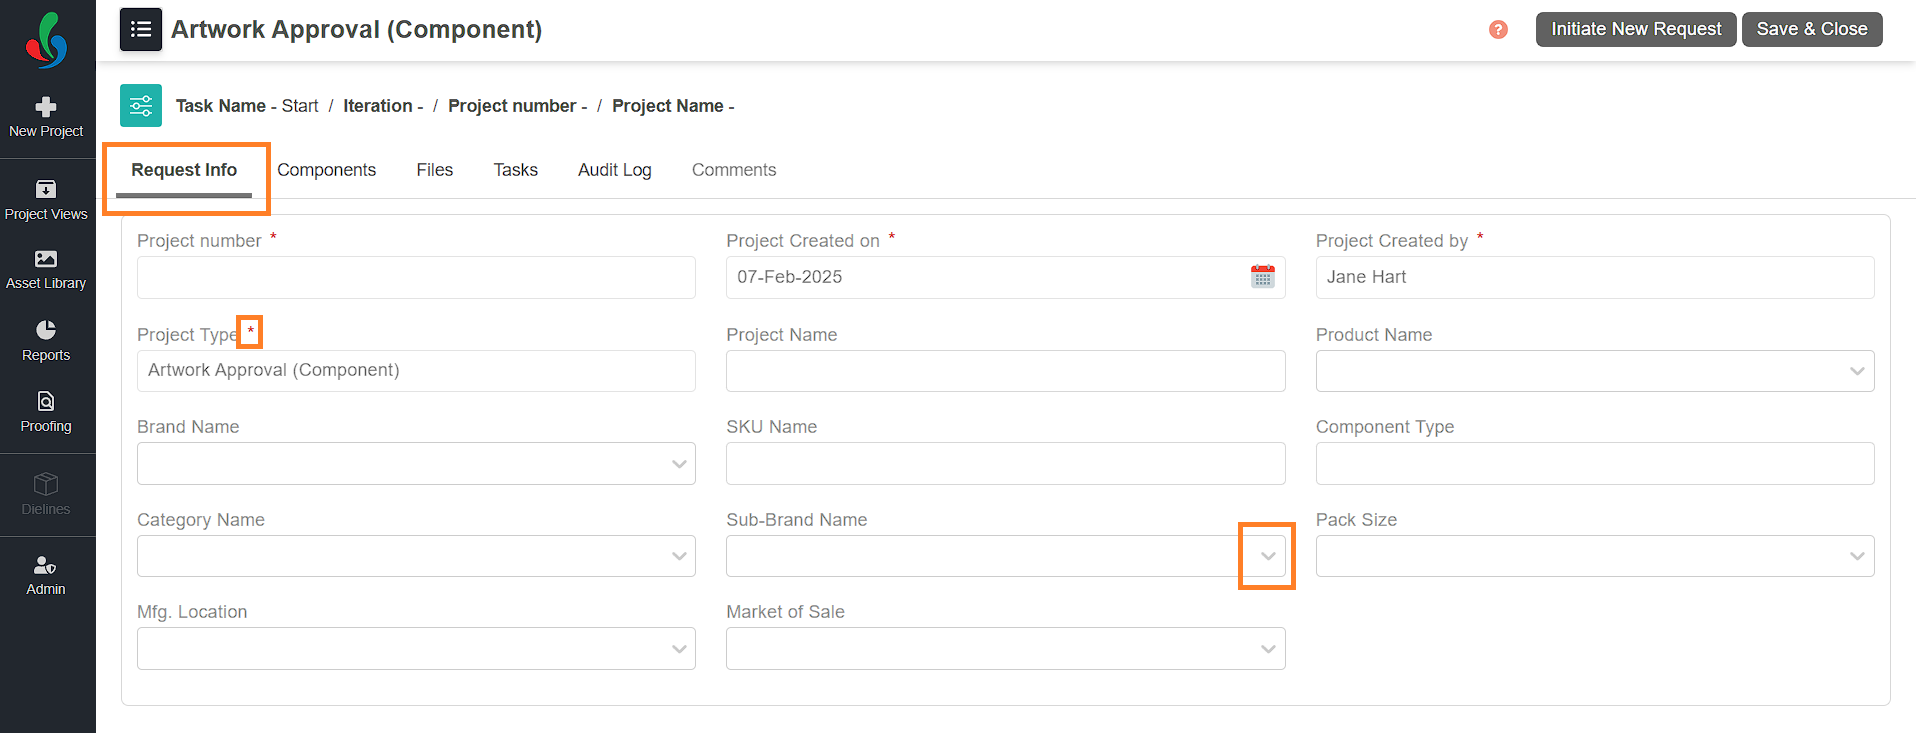
Request Info tab allows you to fill out the basic information for the project.
Fill out the required form fields based on the selected workflow template configuration.
|  | **Note:** Fields marked with a red asterisk (**\***) are mandatory and must be completed to proceed. |
| --- | --- |
Based on the workflow template configuration:
- Some fields may appear as **drop-down fields**, allowing only predefined values to reduce data entry errors.
- Some fields may be configured as **dependency fields**, where available values depend on other field selections.
- Some fields may be configured as **unique fields**. These fields are automatically treated as mandatory fields. For more information, see [Unique Fields](https://help.manageartworks.com/en/article/unique-fields).
### Components Tab
The **Components** tab allows you to add and manage multiple **variants or SKUs** within a single project. This eliminates the need to create separate projects for each variant.
For example, if a project includes related components such as **carton** and **label** artworks, you can manage them as individual components within the same project instead of creating separate projects for each.
Depending on the workflow template configuration:
- The project may automatically split into multiple **sub-projects (child projects)** based on the number of components added.
- If project splitting is **not enabled**, you can still use the Components tab to manage multiple components within the same project.
When components are added:
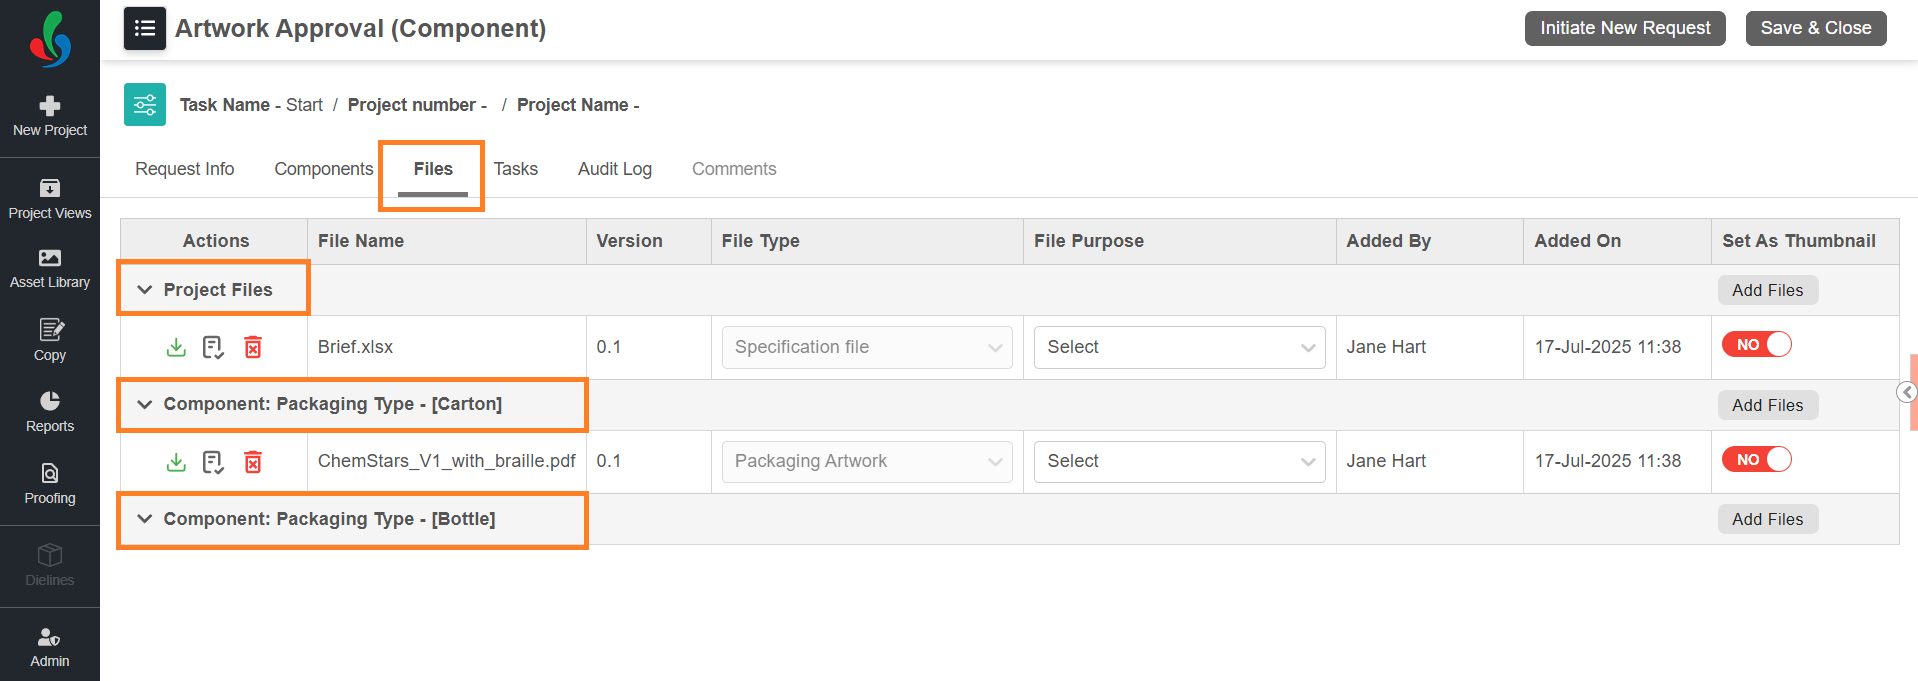
- The **Files** tab displays a separate row for each component.
- This allows users to upload and manage files **specific to each component** independently.
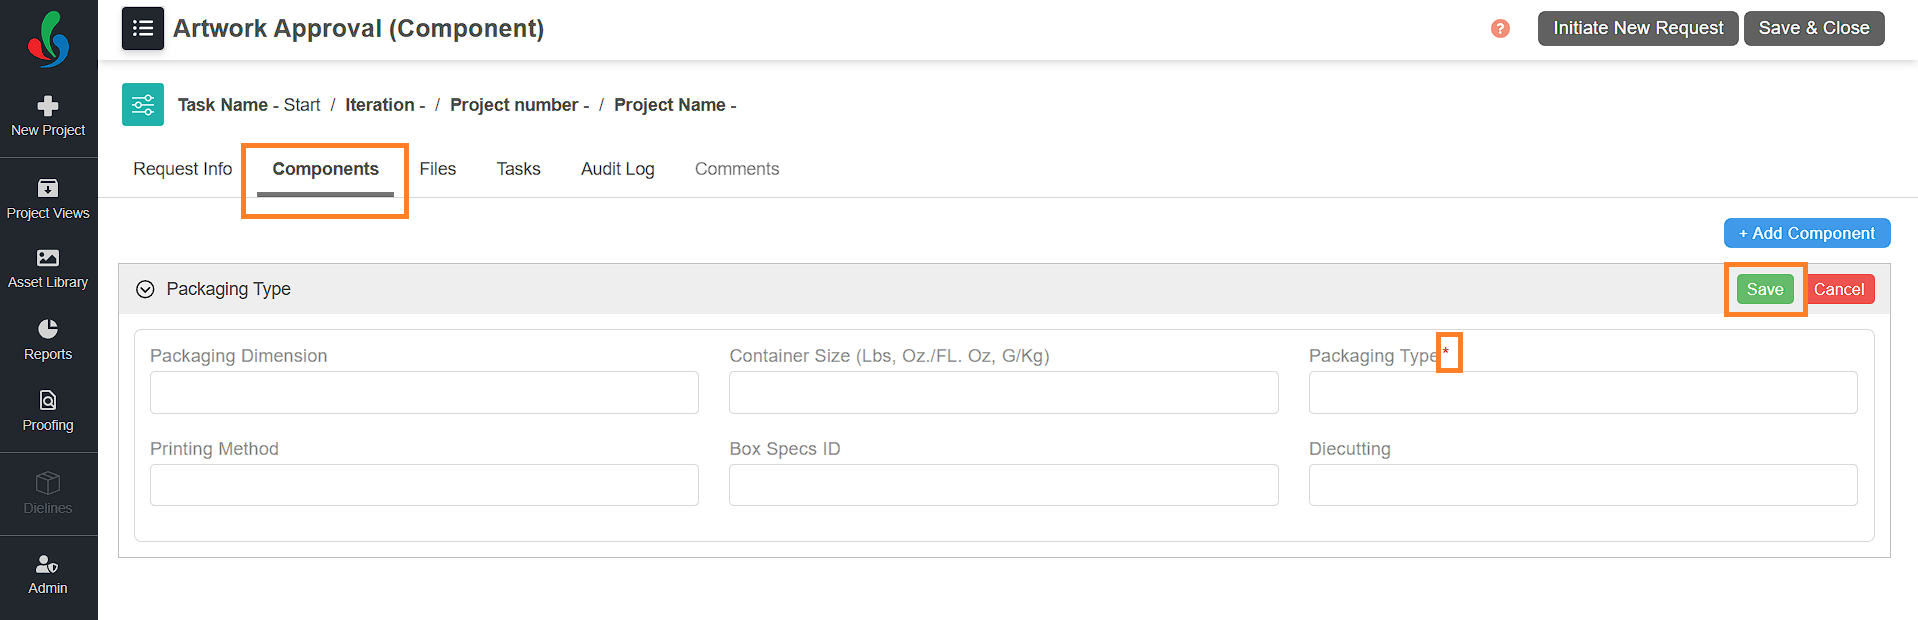
#### **To Add a Component**
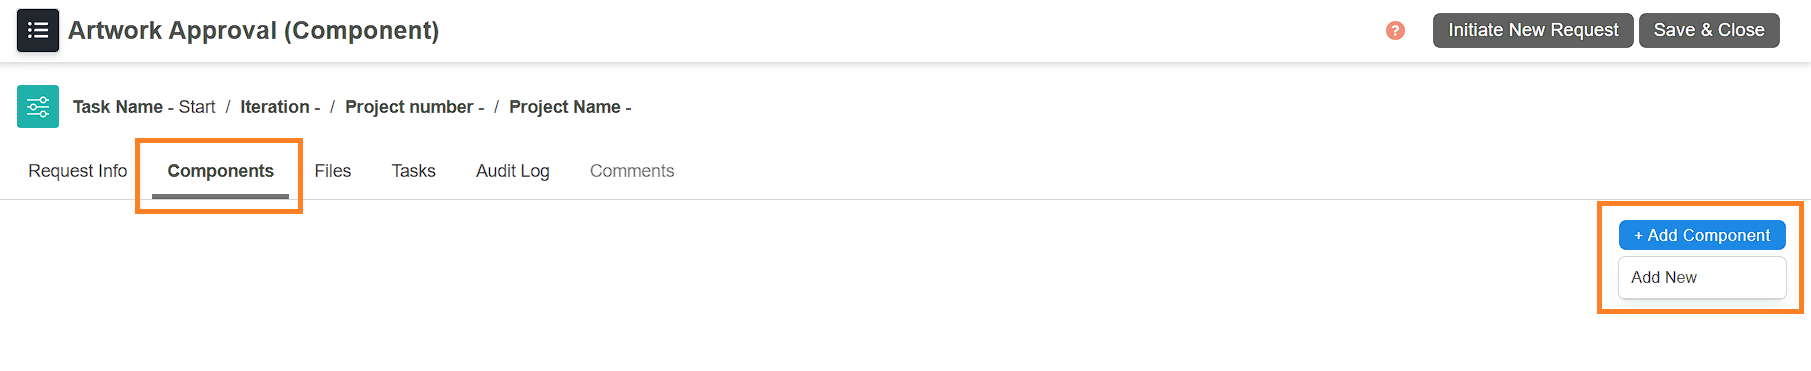
1. Select the **Components** tab.
2. Select **Add Components**, then select **Add New**.
3. Fill out the required form fields.
**Note:** Fields marked with a red asterisk (**\***) are mandatory.
- Based on the workflow template configuration:
- Some fields may appear as **drop-down fields**, allowing only predefined values to reduce data entry errors.
- Some fields may be configured as **dependency fields**, where available values depend on other field selections.
- Some fields may be configured as **unique fields**. These fields are automatically treated as mandatory fields. For more information, see [Unique Fields](https://help.manageartworks.com/en/article/unique-fields).
4. Select **Save** to add the component to the project.
You can add multiple components by repeating these steps.
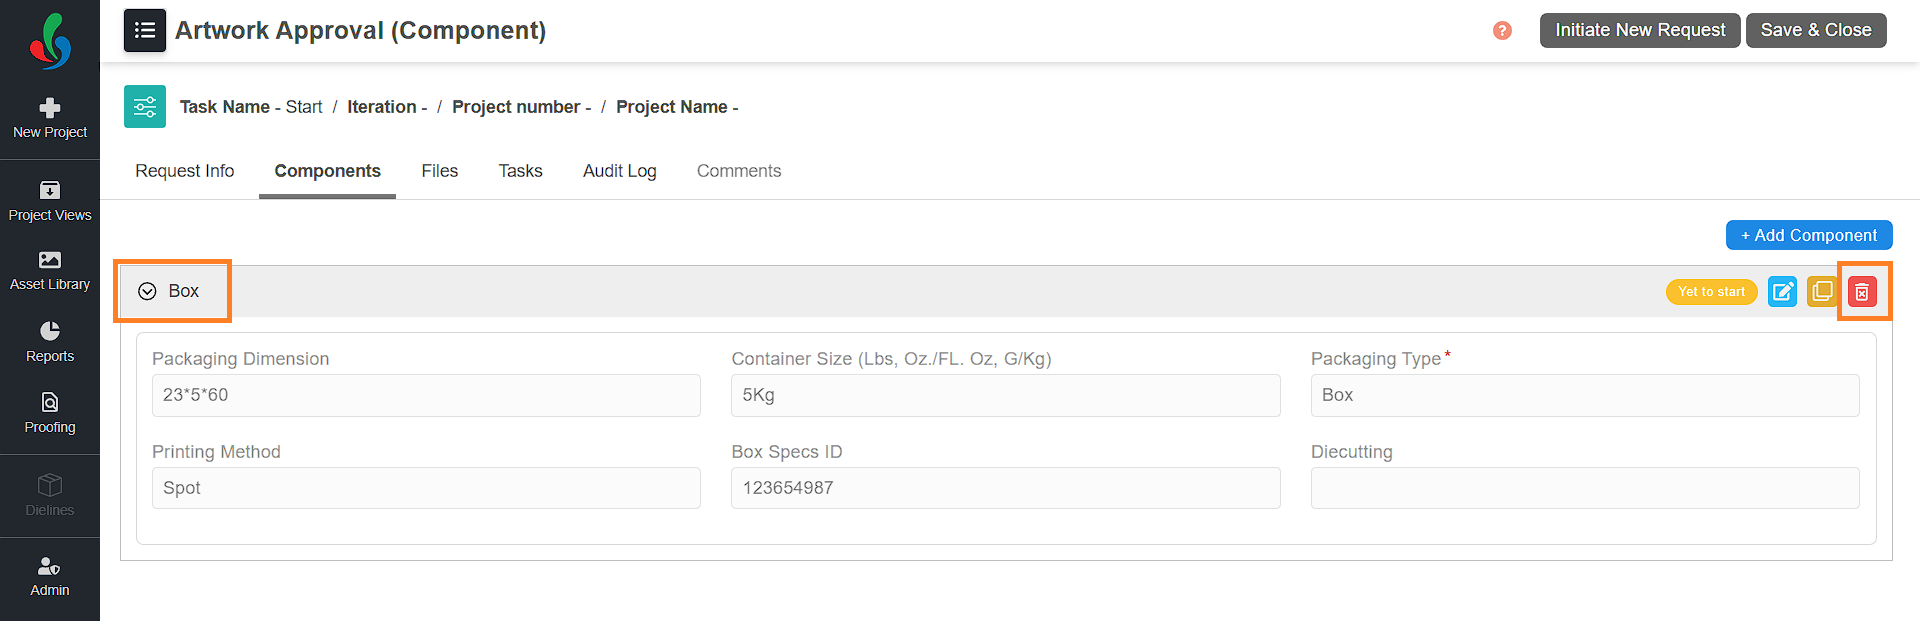
#### **To Delete a Component**
1. Select the component you want to delete.
2. Select the **Delete** icon associated with the component.
3. In the confirmation dialog, select **Ok**.
#### **To Duplicate a Component**
Duplicating a component allows you to reuse existing component details and make quick adjustments. For example, if you have added a "Carton" component for a 33 oz item and need to add one more similar component for a 50 oz item, you can duplicate the existing component and adjust the details instead of creating another component from scratch.
1. Select the component you want to duplicate.
2. Select the **Copy** icon.
3. Modify the component details as needed.
4. Select **Save** to add the duplicated component to the project.

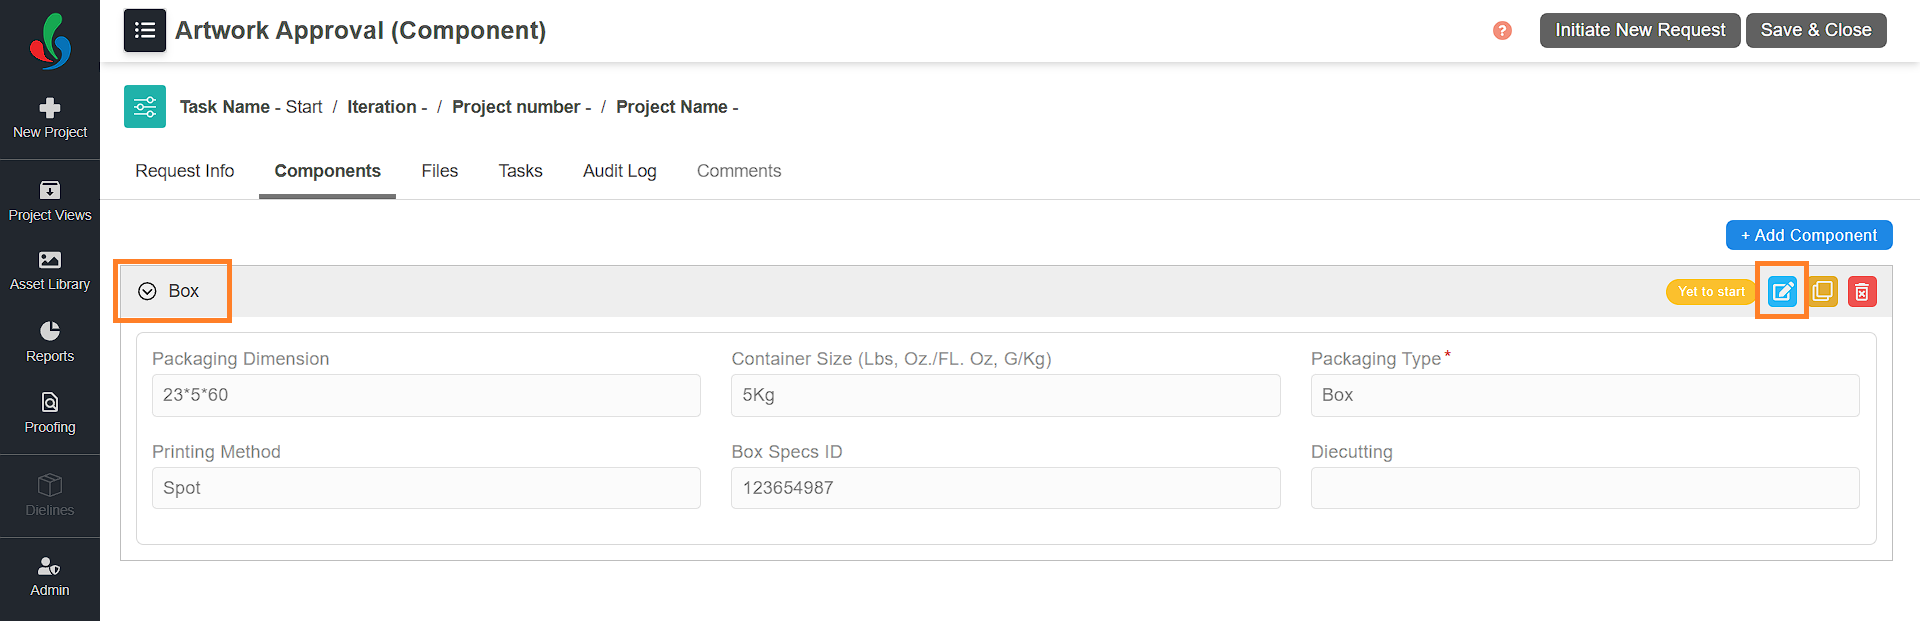
#### **To Edit a Component**
1. Select the component you want to edit.
2. Select the **Edit** icon associated with the component.
3. Make the necessary changes.
4. Select **Save** to update the component.
### Files Tab (Optional)
The **Files** tab allows you to upload and manage supporting or reference files related to the overall project and its individual components. Some projects may require mandatory or optional files to upload before proceeding to the next activity based on how the template is configured; in these cases, a warning pop-up will prompt you to upload the necessary files.
You can upload files either at the **Project level** or for specific **Component(s)**:
- **Project Files**: Upload general files applicable to the entire project.
- **Component Files**: Upload files specific to each component (e.g., Carton, Bottle).
|  | **Note**: The **Component rows** become visible only after components have been added under the **Components** tab. The number of rows depends on the number of components added.
If the project does **not include components**, only the **Project Files** row will appear in the components tab. |
| --- | --- |
#### **Upload File(s)**
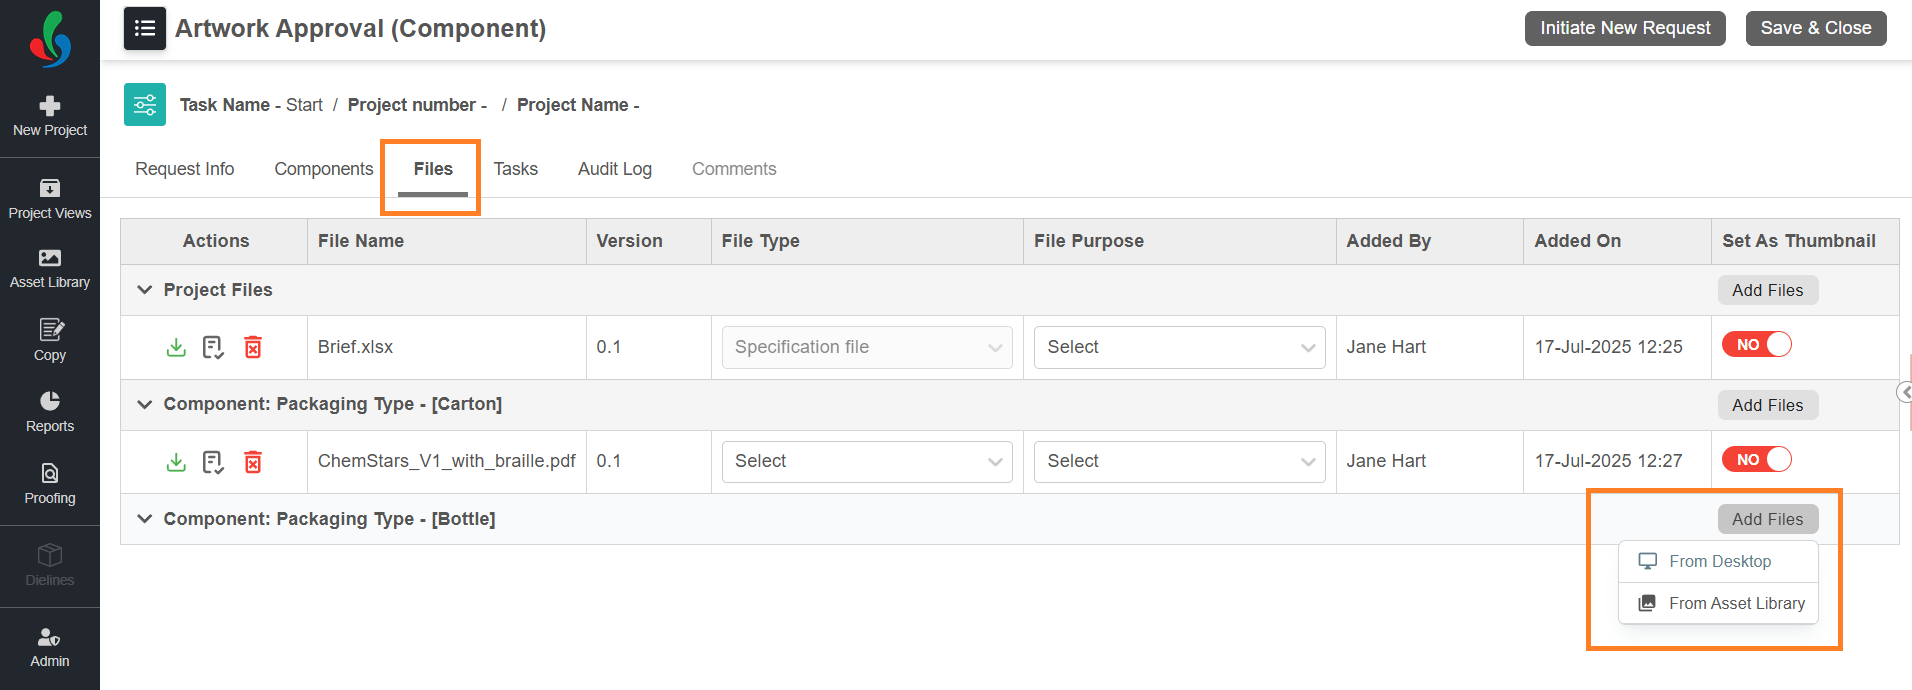
1. Navigate to the **Files** tab.
2. Choose where you want to upload the file:
1. For general files, use the Project Files row.
2. For component-specific files, use the respective Component row.
3. Hover over the **Add Files** button corresponding to the desired section.
4. Select the file(s) using one of the following method:
1. **From Desktop:** Allows you to browse and select files from your local system.
1. Select "**From Desktop**."
2. Locate and select your desired files.
3. Select "**Open**."
2. **Asset Library:** Select existing files from the Asset Library.
1. Select "**From Asset Library.**"
2. Choose the desired file(s) from the File Selection window.
3. Select "**Attach Files**" to add them to your project files.
#### **After Uploading Files**
Once the file is uploaded, perform the following actions:
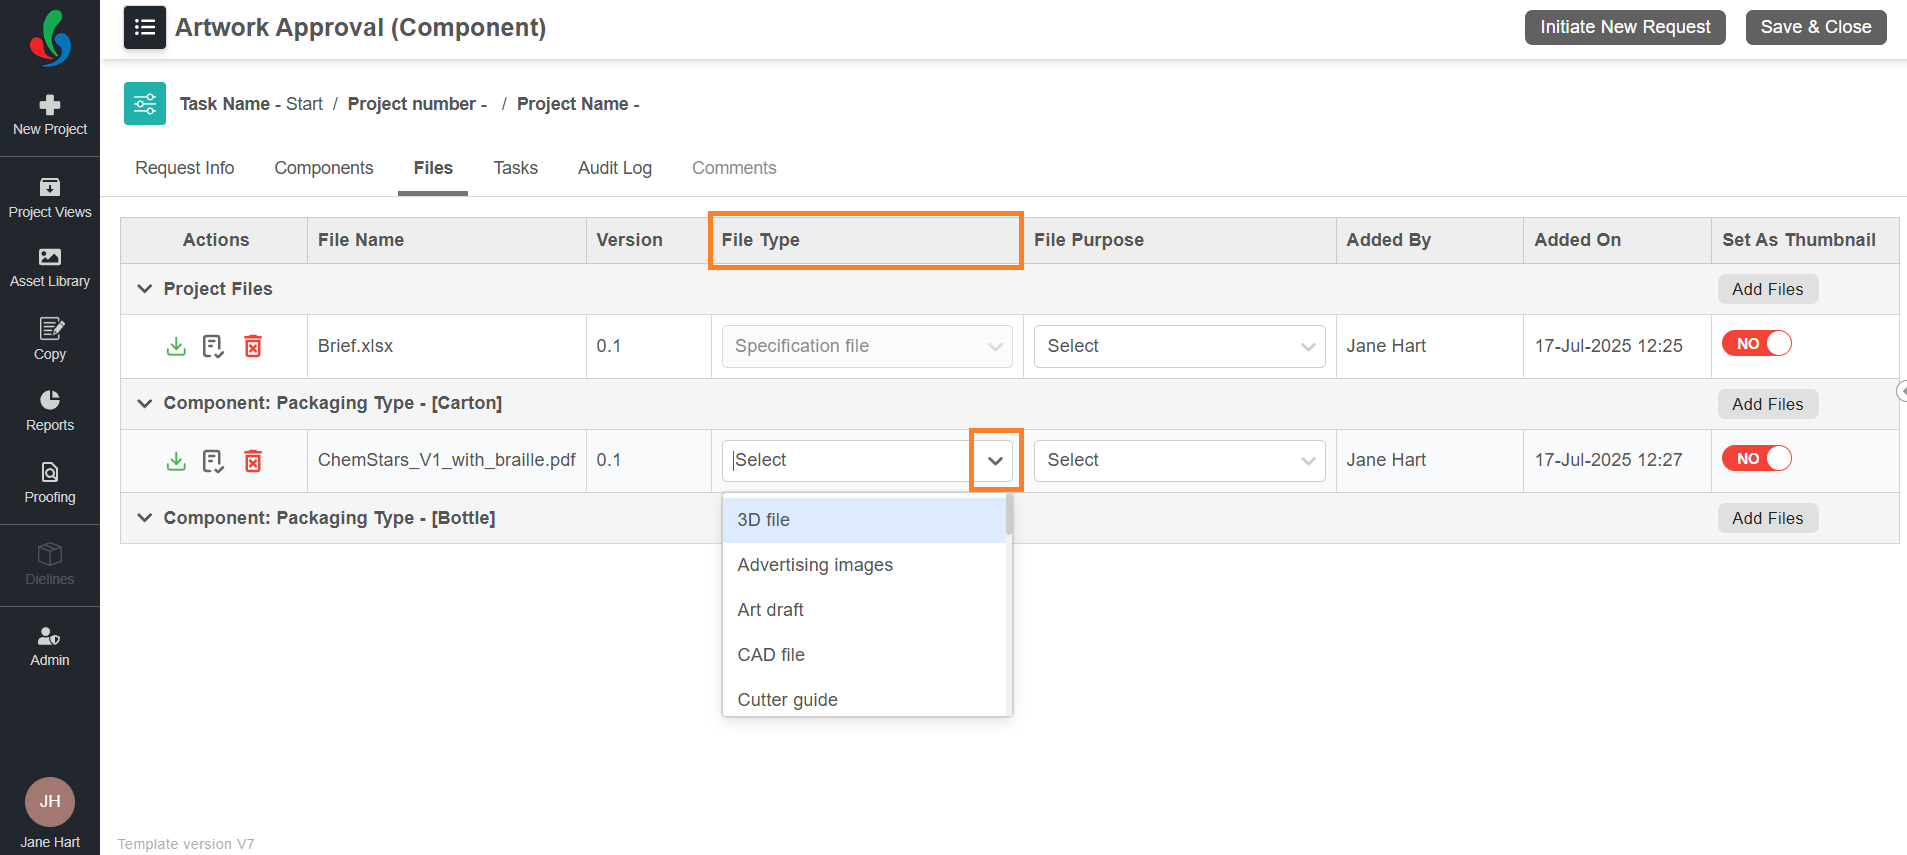
1. **Assign File Type (Mandatory)**
1. Select the File Type drop-down menu and select the appropriate file type from the list.
**Note:** If the file is selected from the Asset Library, the File Type is automatically populated based on metadata and cannot be changed.
2. **Specify File Purpose (Only If Revising a File)**
1. If you're uploading a revised version of an existing file, select the relevant File Purpose from the drop-down menu.
2. Refer to the [File Revision](https://help.manageartworks.com/en/article/file-revision-enterprise-plan) for more details.
3. **Set as Thumbnail (Optional)**
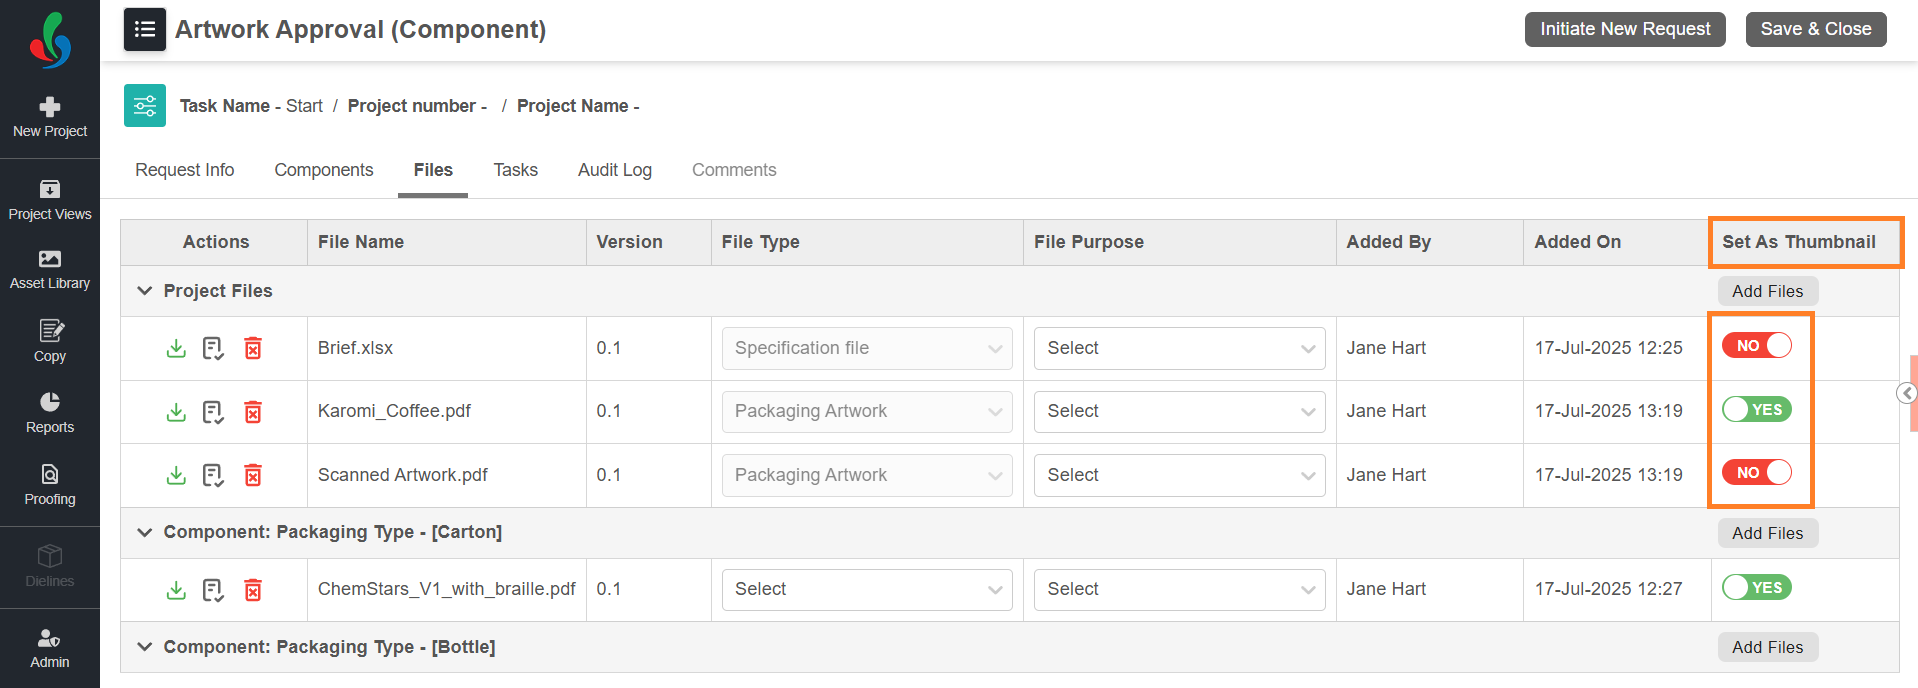
You can mark one file as a **thumbnail** for each section (Project or Component) to visually represent the content.
1. Locate the file you want to mark as a thumbnail.
2. In the **Set As Thumbnail** column, toggle the switch from **NO** to **YES**.
**Note:** Only one file can be set as a thumbnail per section (Project or Component). Selecting a new thumbnail will automatically deselect the previously set file in that section.
3. Project-level thumbnails represent the overall project, while component-level thumbnails apply only to the respective component.
#### **File Publish**
All files uploaded under the **Files** tab—whether at the **project level** or **component level**—are published to the **Asset Library** based on the project's configuration settings.
If you wish to customize when and which file types should be published—such as after the completion of a specific task or upon workflow completion—please contact the **ManageArtworks Support Team** for assistance in setting up the appropriate configuration.
### Tasks Tab
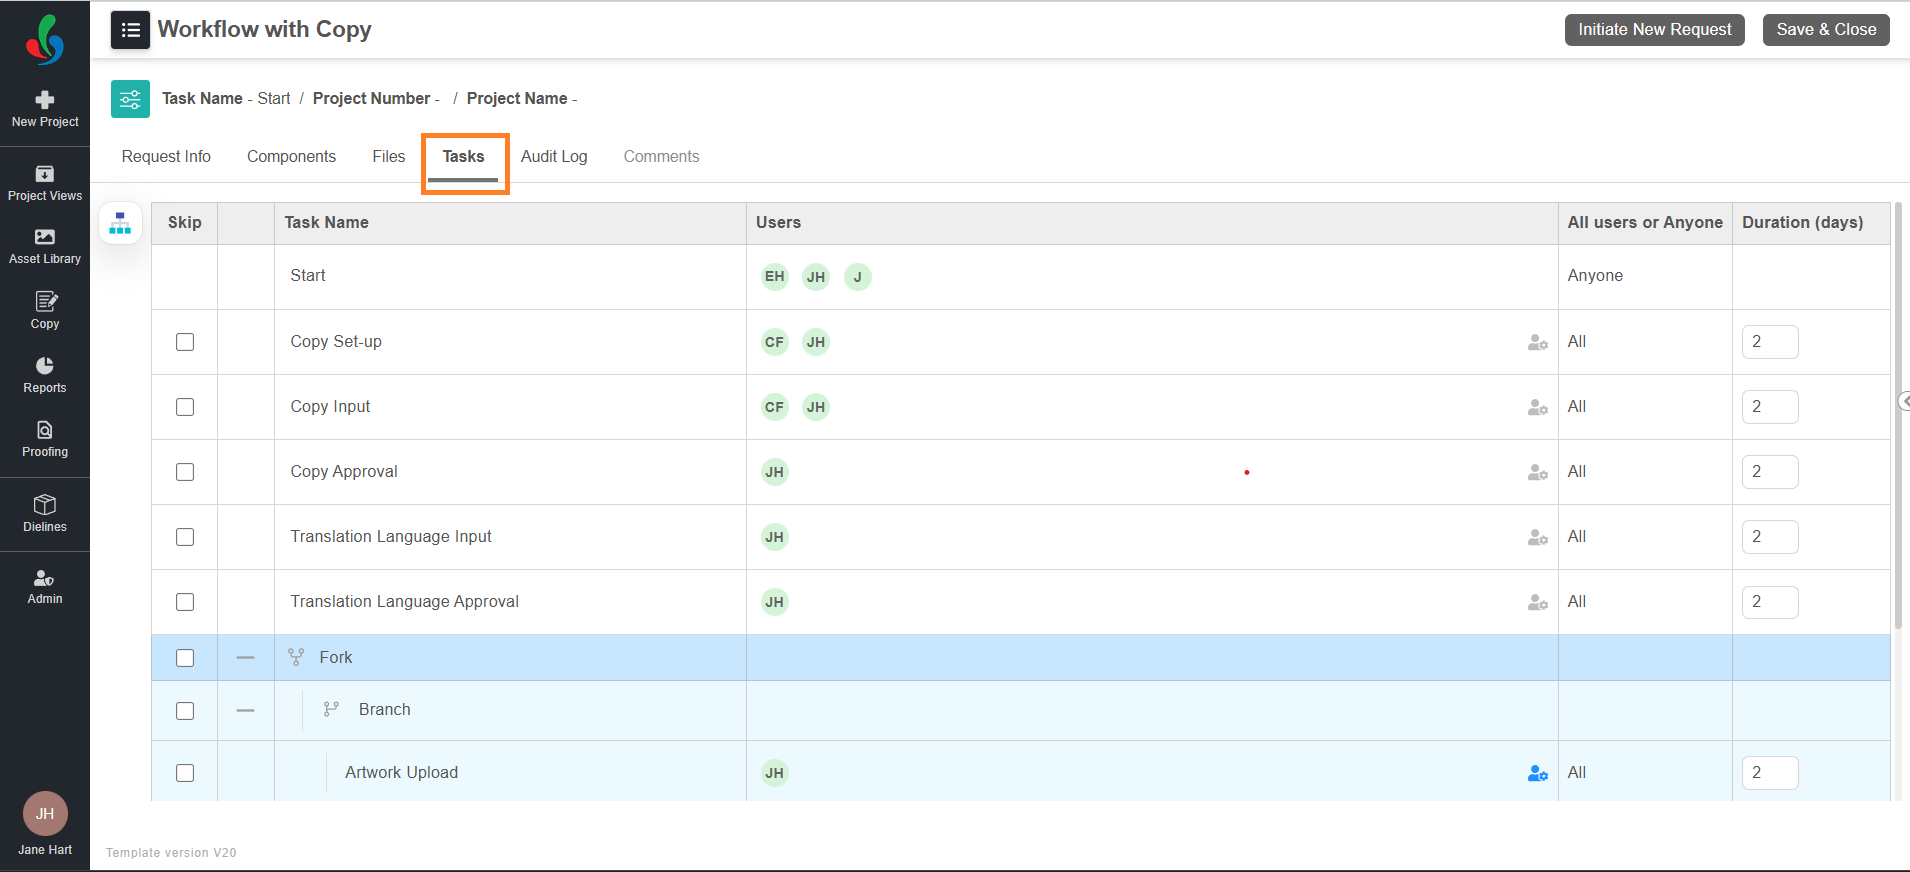
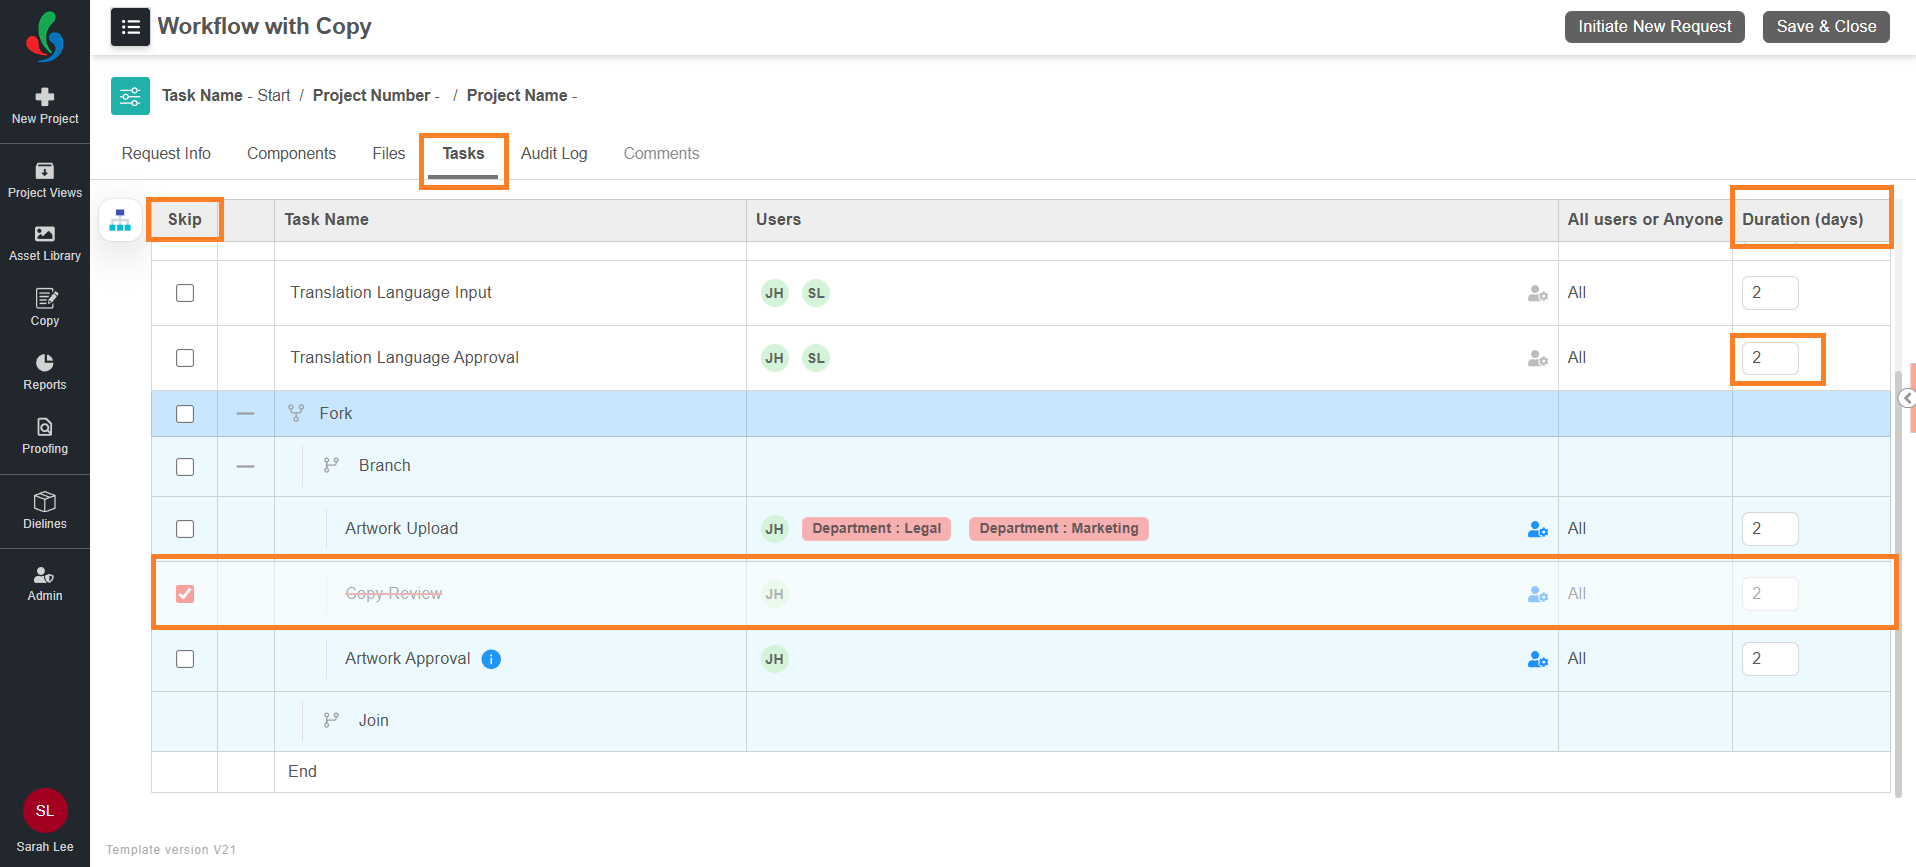
The **Tasks** tab displays all activities associated with the project. From this tab, you can assign users or teams, modify task durations, and skip tasks as required. The tab also provides a **Pictorial View** of the project, allowing you to visually track **task status** and **project progress**. Default user assignments and durations inherited from the workflow template can be updated, except for the **Start activity**.
#### **Assign Users and/or Teams to Tasks**
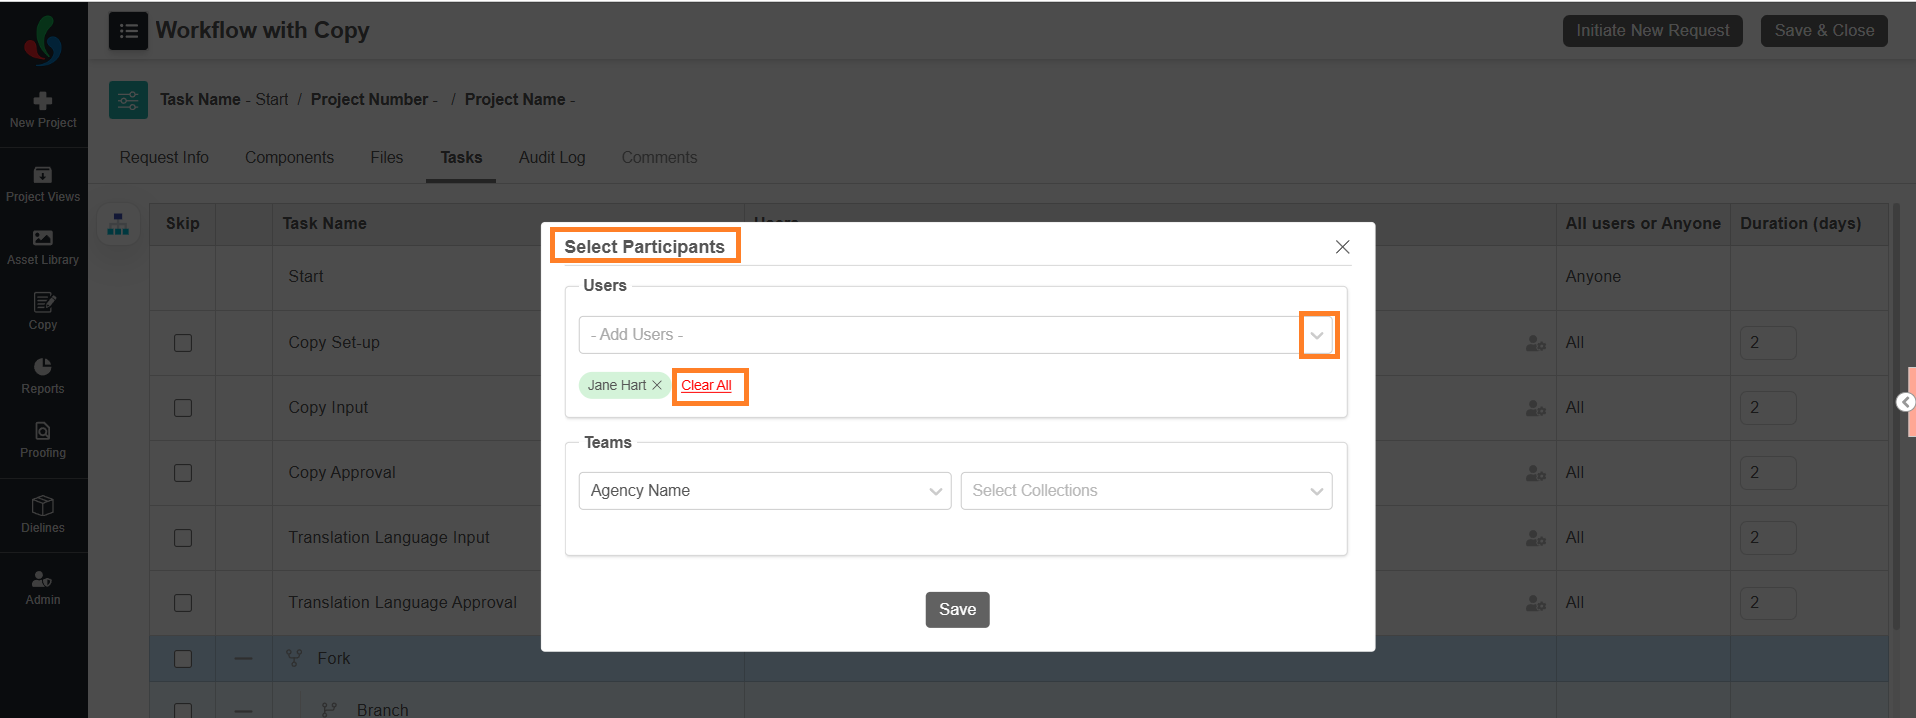
Select the **User Settings** icon for the required task. The **Select Participants** pop-up opens.
- **Add Users:** Allows you to select specific users from the system.
- **Add Teams:** Allows you to assign tasks to entire teams (e.g., Marketing, Sales).
#### 
**Assign Users to a Task**
1. Select the **Add Users** drop-down menu to view available users.
2. Select the desired user(s) from the list.
3. To remove a selected user(s), select the Close icon next to their name.
4. To remove all the selected users, select **Clear All**.
#### 
**Assigning Teams to a Task**
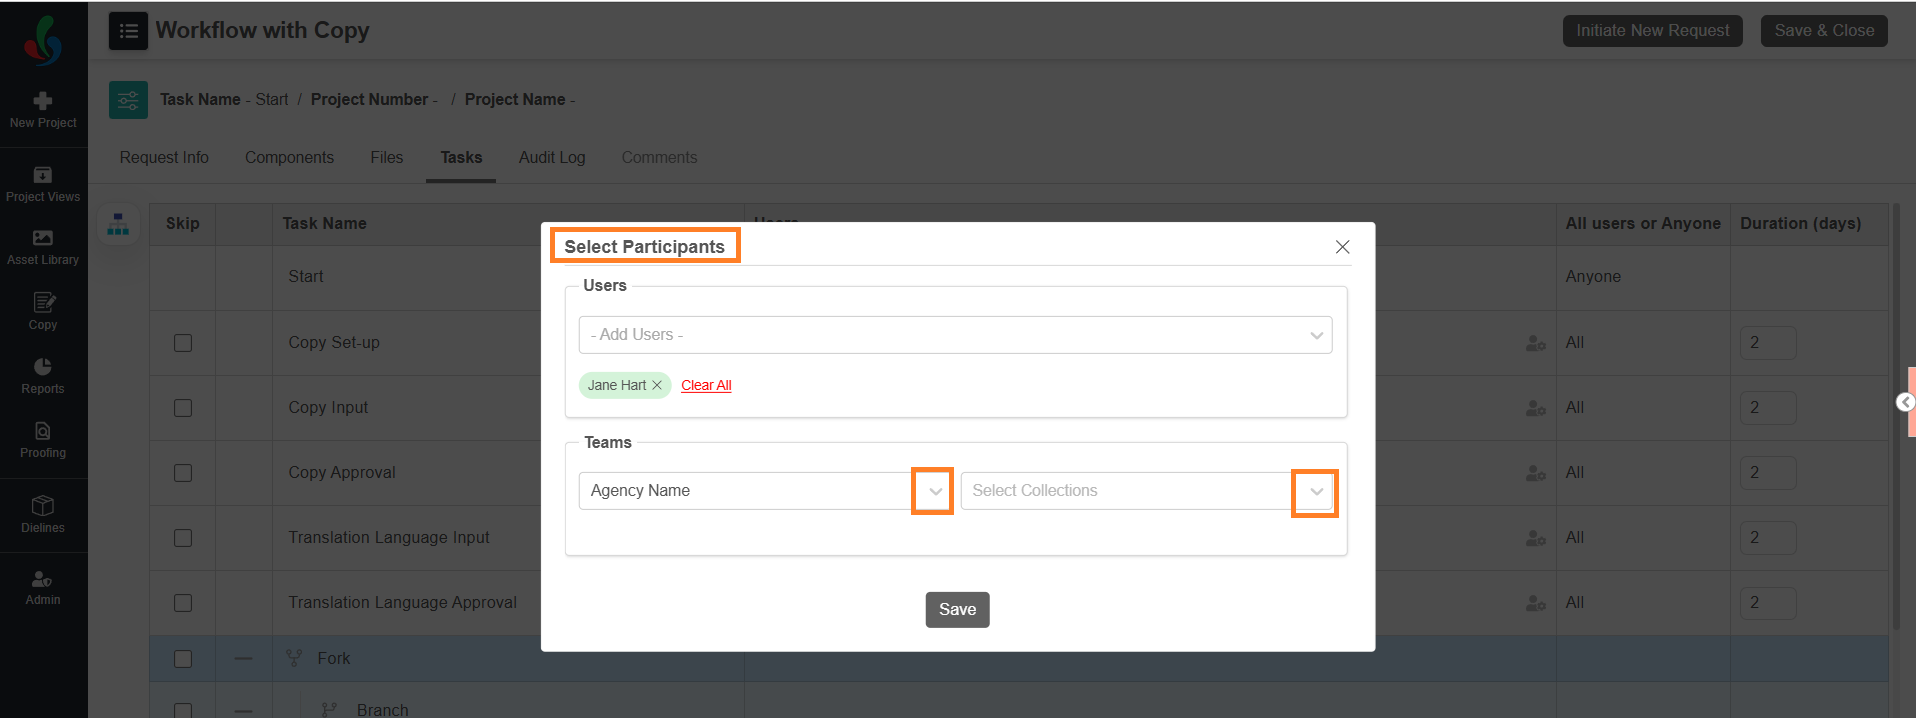
1. Select the **Team Attribute** drop-down menu and select the desired attribute (e.g., "Department").
2. Next, select the **Collections** drop-down menu and choose the specific collection(s) (e.g., "Marketing").
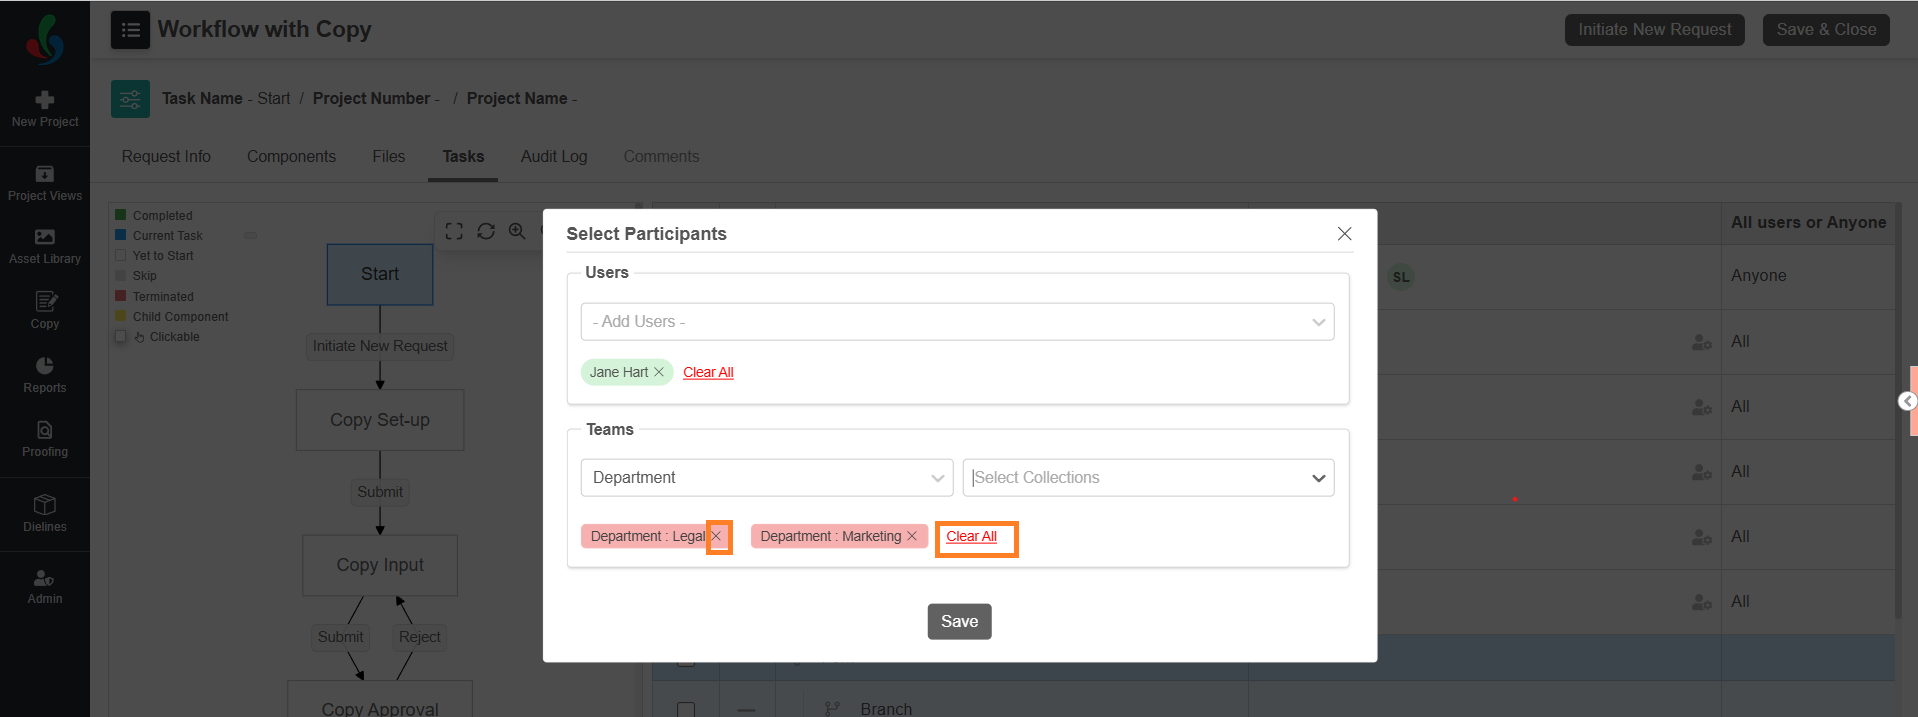
3. To remove a selected team(s), select the Close icon next to the team’s name.
4. To remove all the selected teams, select **Clear All**.
5. Select **Save**, then confirm by selecting **Yes** in the confirmation dialog.
6. Select Specific Users (If enabled in Workflow Template):
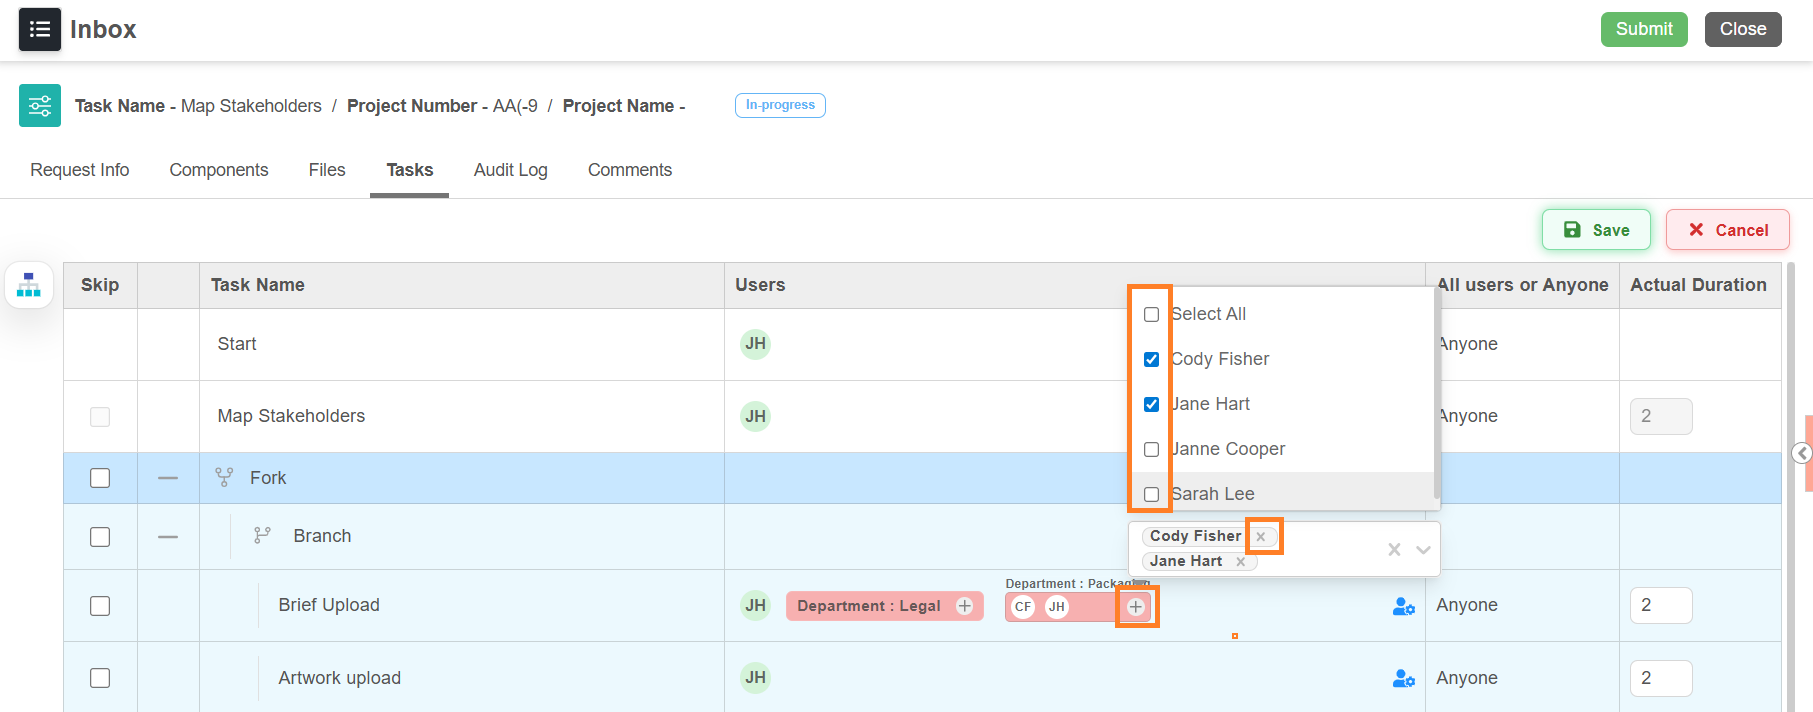
If **Allow User Selection** is enabled in the workflow template configuration, you must manually select specific users within the assigned teams. This prevents tasks from being assigned to all team members by default.
1. Select the plus (+) icon associated with the assigned team.
2. From the list, select the checkbox next to the required user names.
3. To assign all users in the team, select "**Select All**".
4. To remove a selected user, select the Close (x) icon next to user's name.
#### **Set Task Duration**
1. Click the duration box in the **Duration (days)** column associated with the desired task.
2. Enter or adjust the duration.
**Note:** A minimum duration of 1 day is mandatory for all tasks.
#### **Skip Tasks**
In some situations, not all tasks in a project need to be completed, and you may want to skip certain tasks. You can easily do this from the Tasks tab.
1. To Skip a Task:
1. Select the checkbox in the **Action** column next to the task.
2. The task appears with a strike-through, indicating it will be skipped once the project is initiated.
3. To unskip a task, simply uncheck the box in the Action column. The strike-through will be removed, indicating that the task will be included.
#### **Pictorial View Reference**
The **Pictorial View**, displayed alongside the task list, provides a visual representation of the workflow. Color-coded diagrams help you quickly identify task status and project progress.
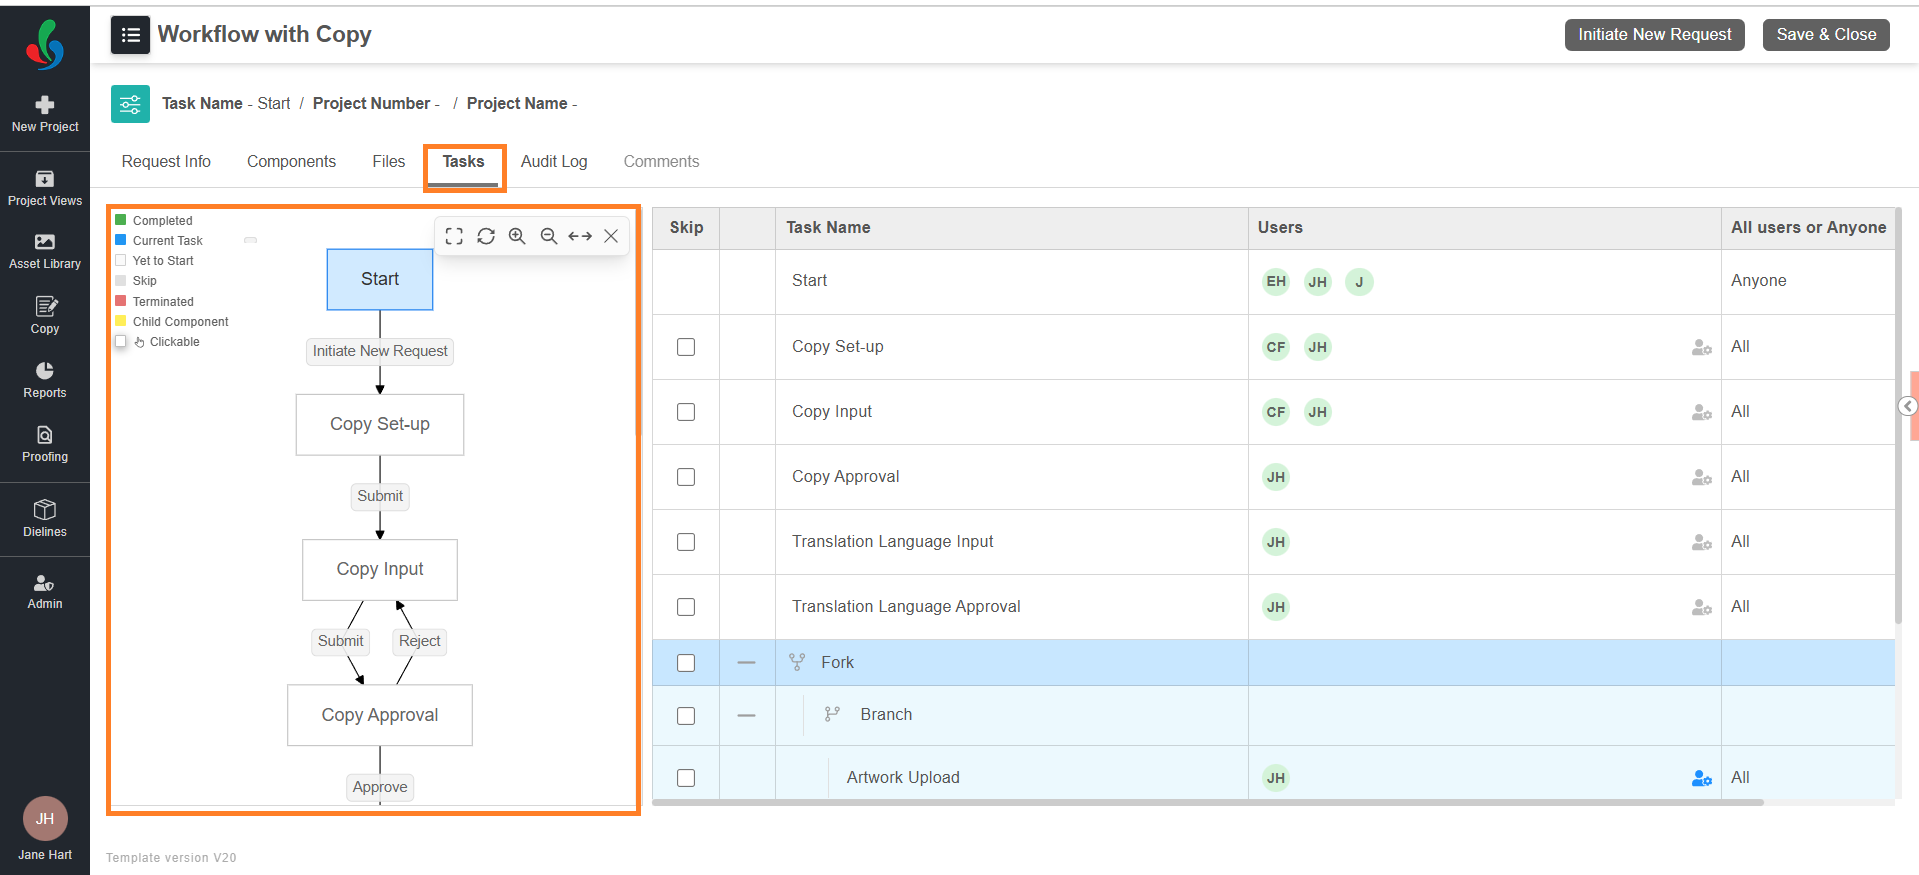
**Color Notations**
| **Status** | **Color** | **Meaning** |
| --- | --- | --- |
| **Completed** | Green | Task is completed |
| **Current Task** | Blue | Task currently in progress |
| **Yet-to-Start** | No Color | Task not started yet |
| **Skipped** | Greyed out with dotted line | Task intentionally skipped |
| **Terminated** | Red | Task terminated |
| **Child Component** | Yellow shadowed border | Clickable child component |
Selecting a child component displays the **Child Component Flowchart** linked to that activity.
### Audit Log Tab
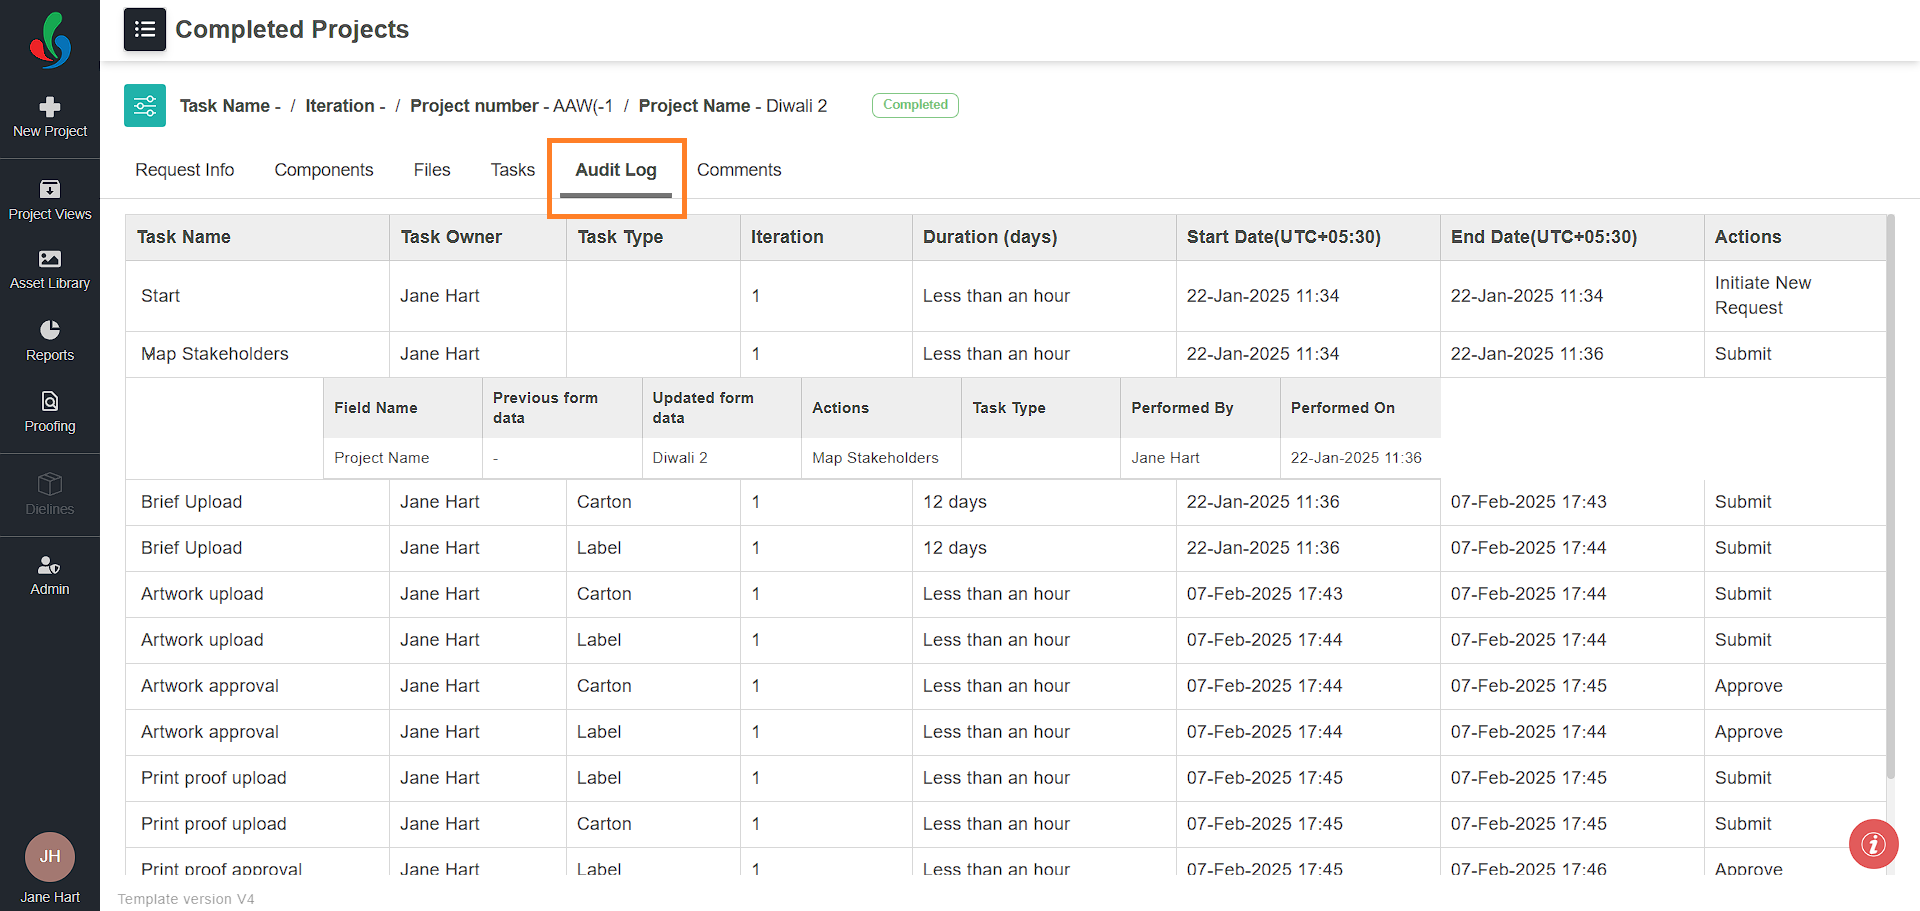
The **Audit Log** tab provides complete visibility into project activity for transparency and accountability. You can view:
- Who initiated the project
- Changes made during the project lifecycle
- Timestamps for each action
Once the project is initiated, **all actions are tracked automatically** in this tab.
### Comments Tab
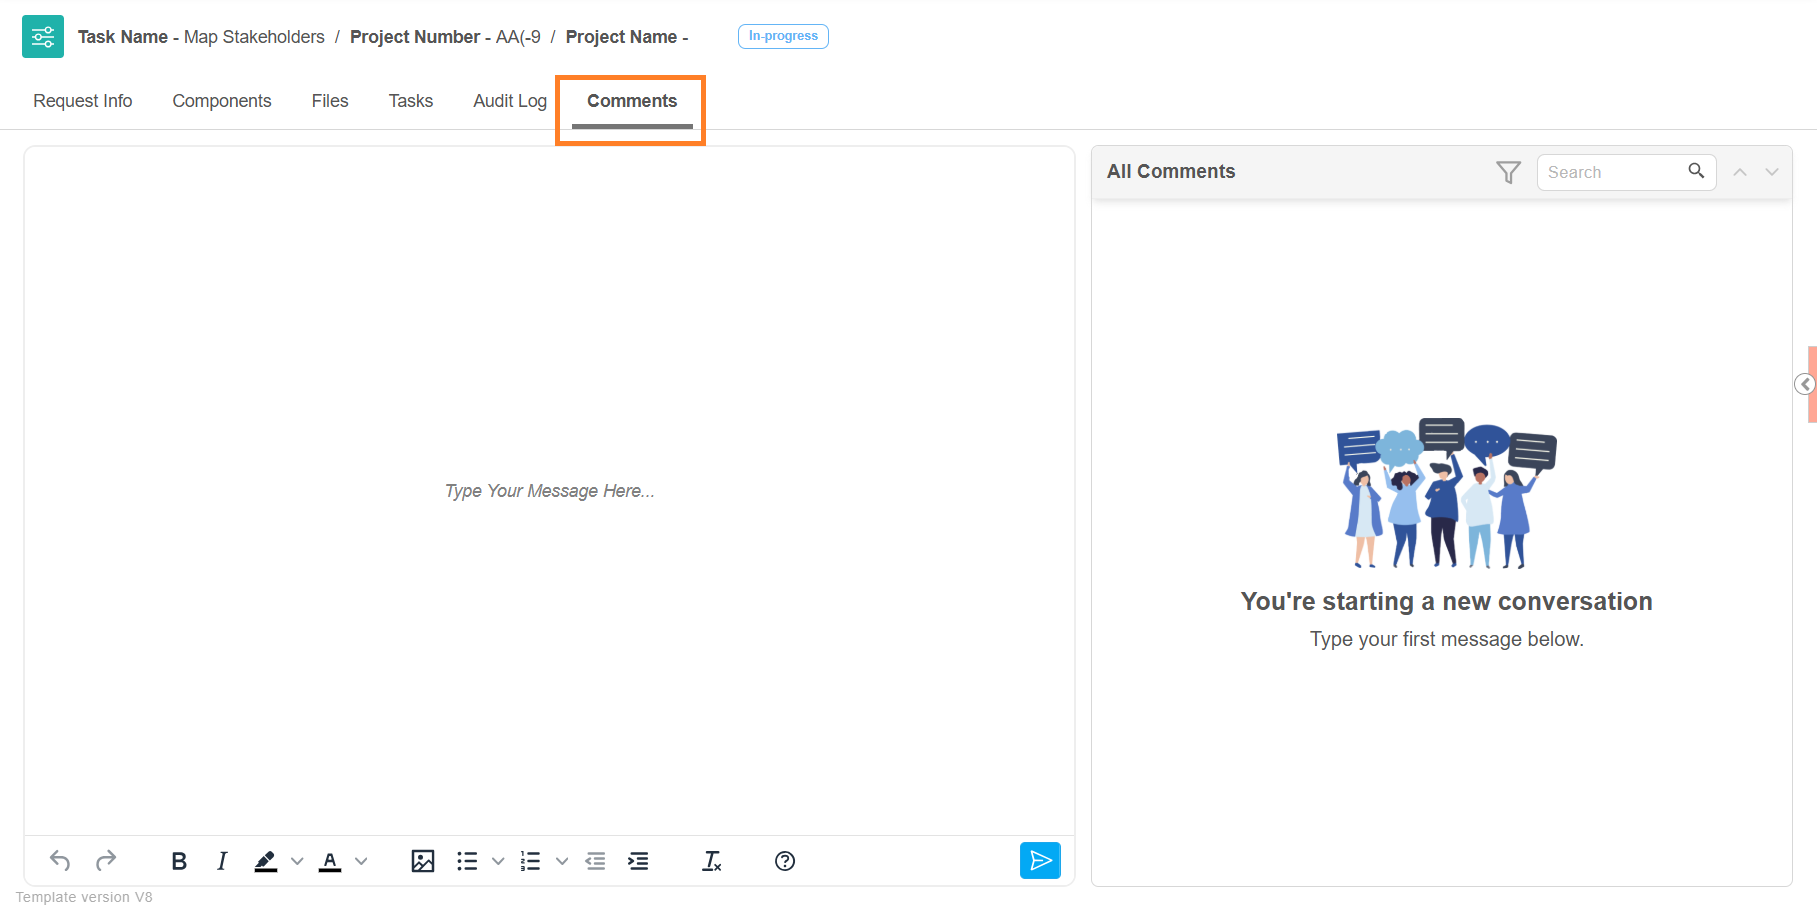
After the project is initiated, assigned users can access the Comments tab to add remarks, share insights, and collaborate.
### **Dieline**
If **Dieline** is enabled for your account, you can attach a dieline to the project from the **Files** tab **after the project is initiated**.
The attached dieline can then be used as part of the project workflow for further processing and review.
For more information, refer to [Dieline and 3D Simulation](https://help.manageartworks.com/en/article/dieline-and-3d-simulation) and [Dieline Workflow](https://help.manageartworks.com/en/article/dieline-workflow).
## 03\. Initiate the Project
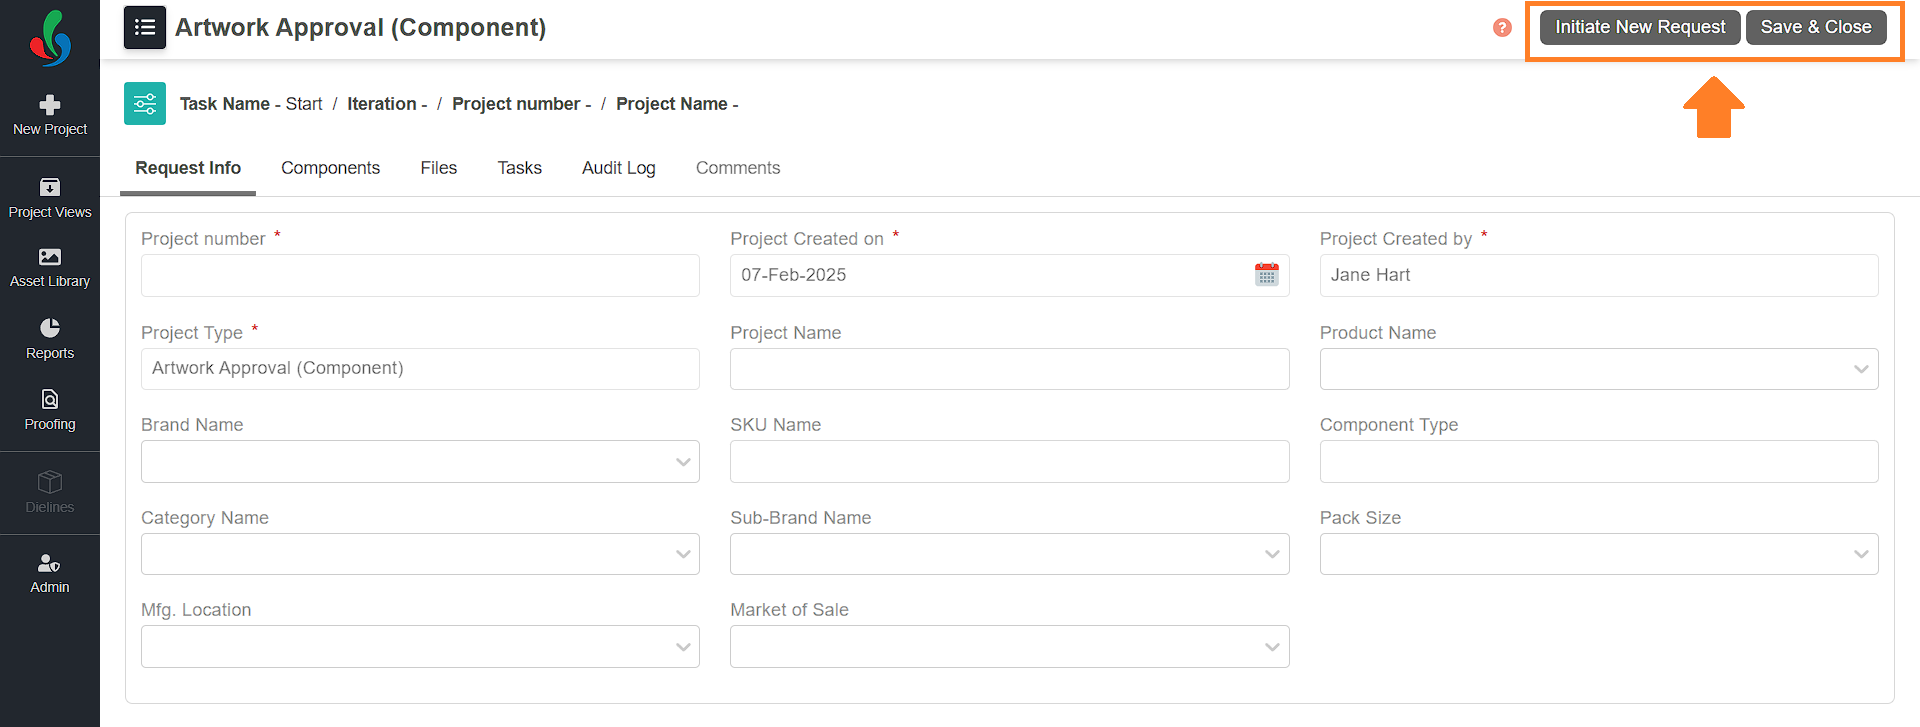
1. After completing the required fields and configurations, select **Initiate New Request** in the upper-right corner of the screen to start the project.
2. If you are not ready to proceed, select **Save & Close** to save your progress and return to the project later.
[Track Projects and their Status](https://help.manageartworks.com/en/article/track-projects-and-their-status)