---
title: "Bulk Find and Replace Text Across Artworks"
url: "https://help.manageartworks.com/en/article/bulk-find-and-replace-text-across-artworks"
language: "en"
last_updated: "2026-10-15T06:19:23.088Z"
---
# Bulk Find and Replace Text Across Artworks
A text correction rarely affects one artwork. A regulatory change, a company rename or a revised copy sheet usually applies to every artwork in a range, a brand or a market. Opening each file, finding every occurrence, fixing the text and saving a new copy is slow, and one missed occurrence reaches print.
With **Bulk Find & Replace Text**, designers update the text in many artworks in one operation, without opening them. It works like *Replace All* in a word processor, but across a folder of files instead of one document.
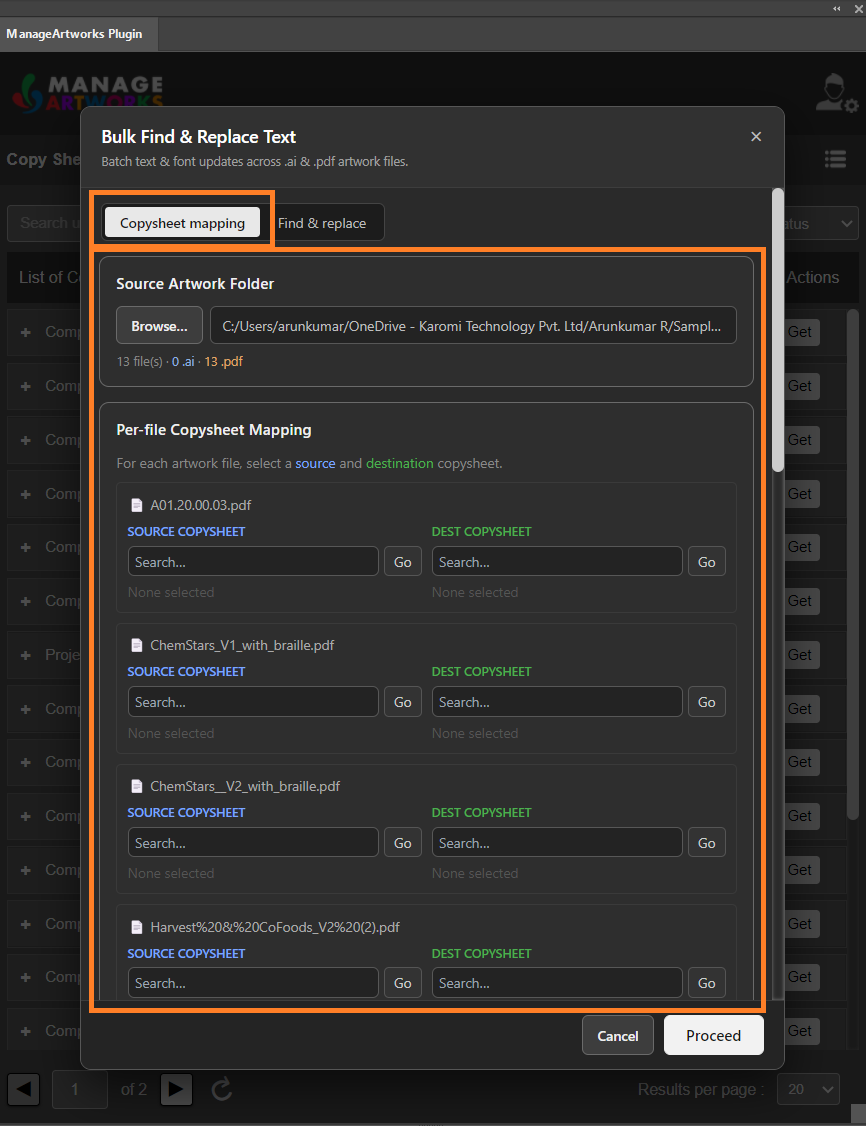
There are two ways to define the change, each on its own tab in the **Bulk Find & Replace Text** dialog box:
| Tab | What it does | Use it when |
| --- | --- | --- |
| **Find & replace** | Replaces the text you enter in **Find text** with the text you enter in **Replace with**, in every selected file. For example, replace *Marketing Address* with *Manufacturing Address* on all pack artworks of a brand. | You know the exact text to change and the exact text to change it to. |
| **Copysheet mapping** | Replaces the artwork content that came from a copy sheet with the content of the revised copy sheet you select. For example, map Version 3 of a copy sheet to artworks built from Version 2, and every element the revision changed is updated. | The artwork was made from a copy sheet, and that copy sheet has since been revised. |
|  | Some terms used in this article:
- **Source folder:** the folder that holds the artworks to update.
- **Output folder:** the folder where the updated artworks are saved. It must be a different folder from the source folder.
- **Replacement:** one pair of **Find text** and **Replace with** values. You can add as many replacements as you need and apply them all in one operation.
- **Filename suffix:** text added to the end of each updated file's name, for example *Banner\_V2.pdf*.
When you select **Proceed**, the plugin updates the selected files, saves the updated copies in the output folder with the filename suffix, and opens them in Illustrator. The original files in the source folder are not changed.
**Supported files:** Adobe Illustrator (.ai) files, and PDF files saved as PDF compatible files from Illustrator or InDesign. Other files in the folder are not listed. |
| --- | --- |
|  | **Note:**
- Make sure that you are signed in to the plugin. **Bulk Find & Replace Text** is not available before sign-in.
- Make sure that no file is open in Illustrator. Close every artwork and work from the Illustrator home screen. |
| --- | --- |
## 01\. Open Bulk Find & Replace Text
1. Make sure you are signed in to the plugin. For more information, refer to [Sign In to the ManageArtworks Plugin](https://help.manageartworks.com/en/article/sign-in-to-the-manageartworks-plugin).
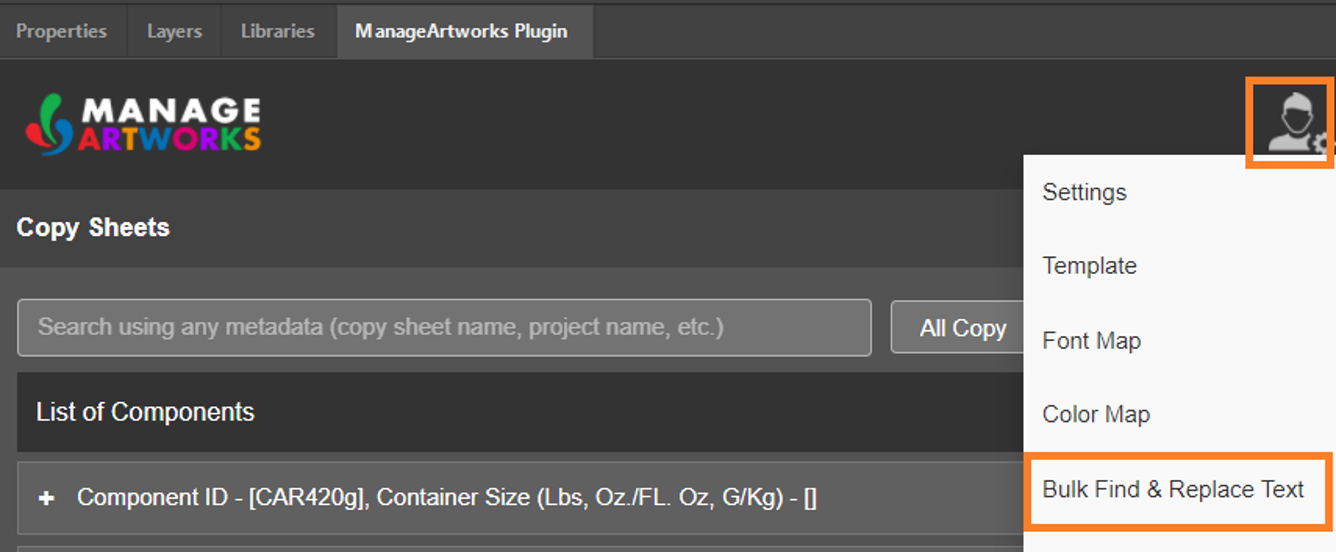
2. Hover over the **Settings** icon in the upper-right corner of the panel.
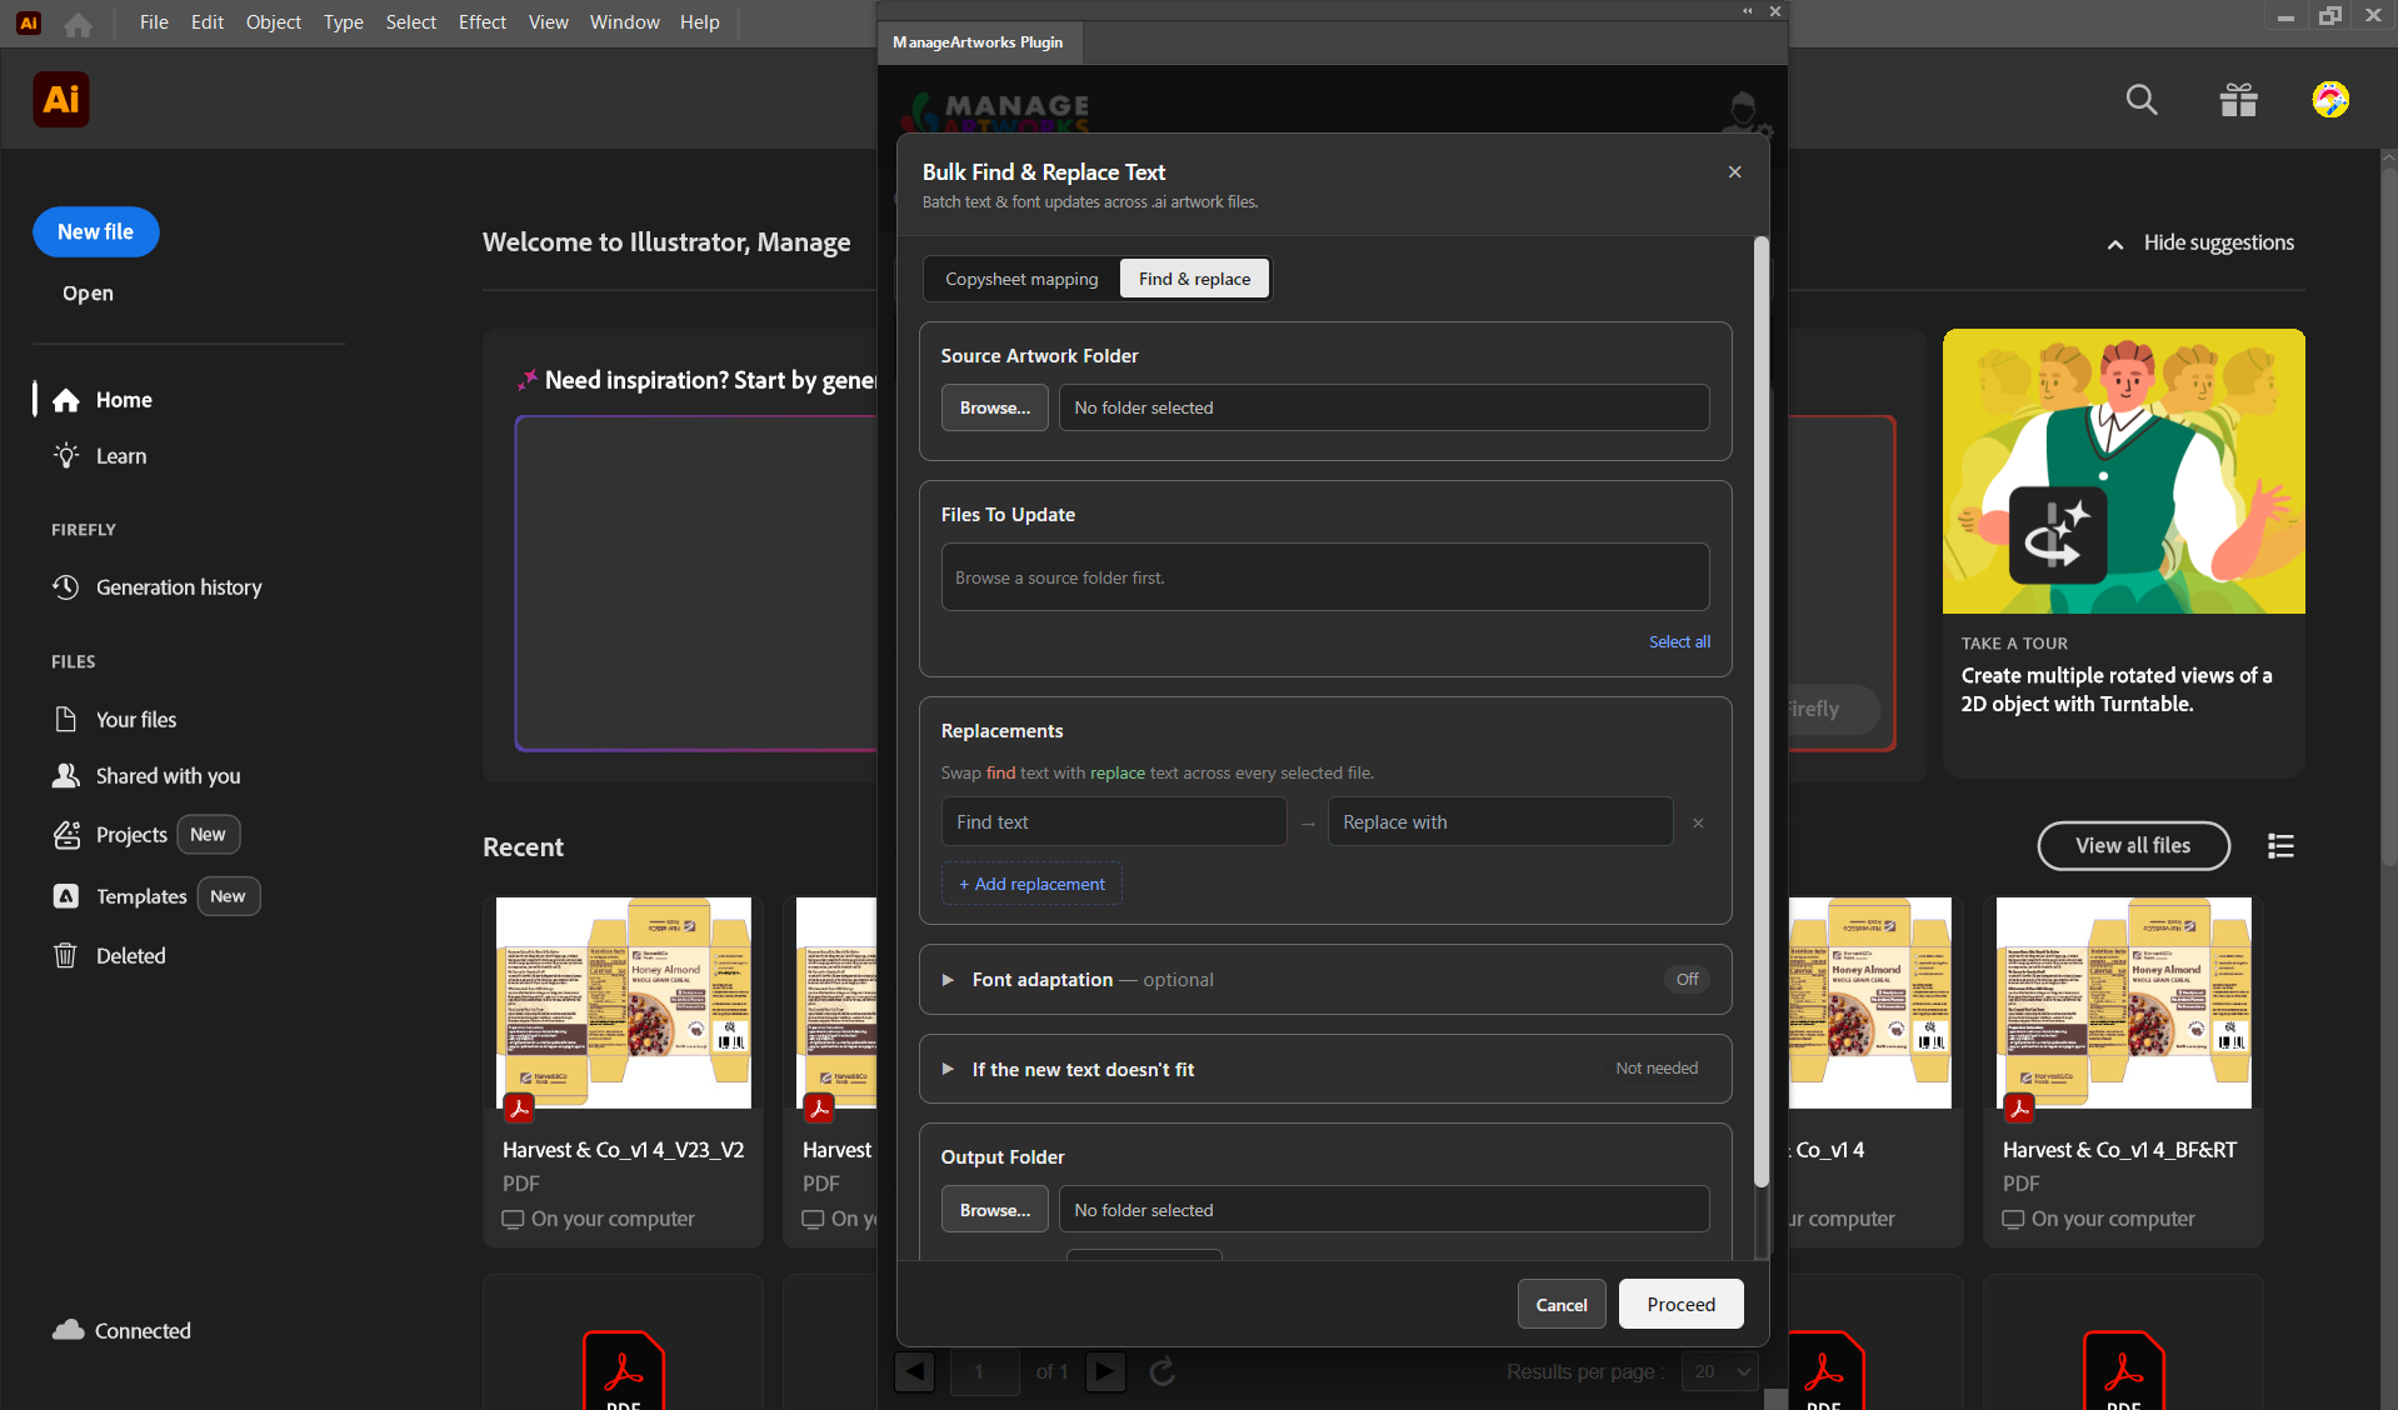
3. Select **Bulk Find & Replace Text**. The **Bulk Find & Replace Text** dialog box opens, with the **Find & replace** tab selected.
4. To replace text you enter yourself, go to *02\. Find and Replace Text*.
5. To update artworks from a revised copy sheet, go to *03\. Replace Text Using a Copy Sheet*.
## 02\. Find and Replace Text
Make sure that the **Find & replace** tab is selected. It is selected by default.
### 1\. Select the Source Folder
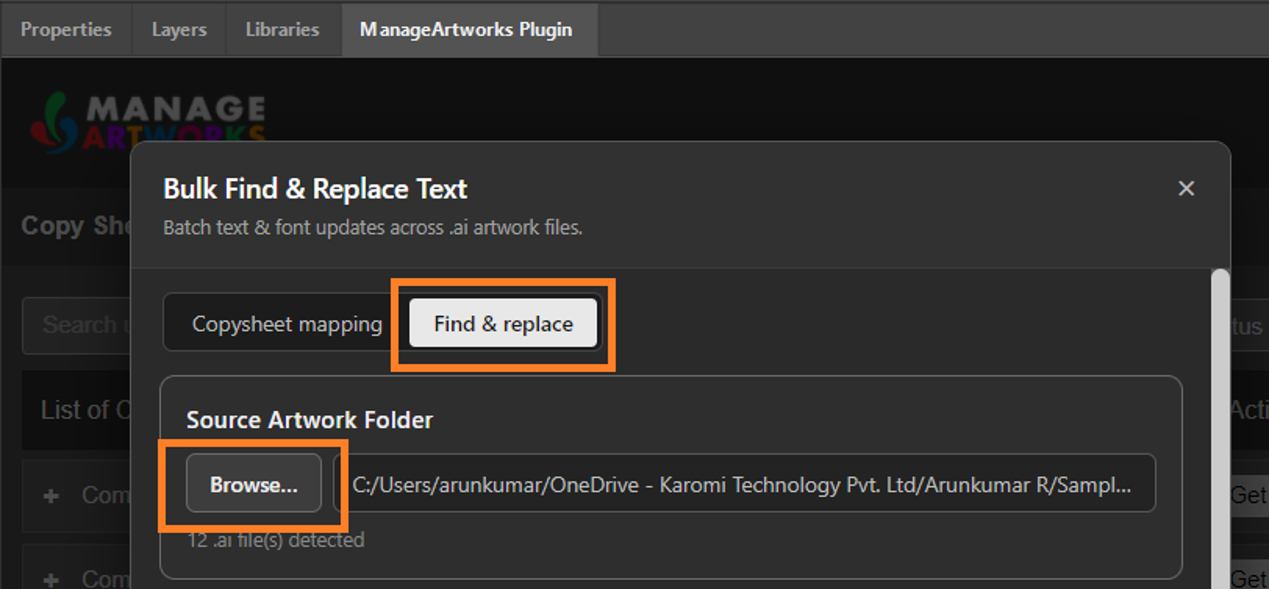
1. In the **Source Artwork Folder** section, select **Browse**.
2. In the dialog box that opens, browse to and select the required folder.
3. Select **Open**.
4. The system displays the folder path, displays the number of files detected, and lists the files in the **Files To Update** section.
**Note:** The system lists only the supported files. Unsupported files are not listed.
### 2\. Select the Files to Update
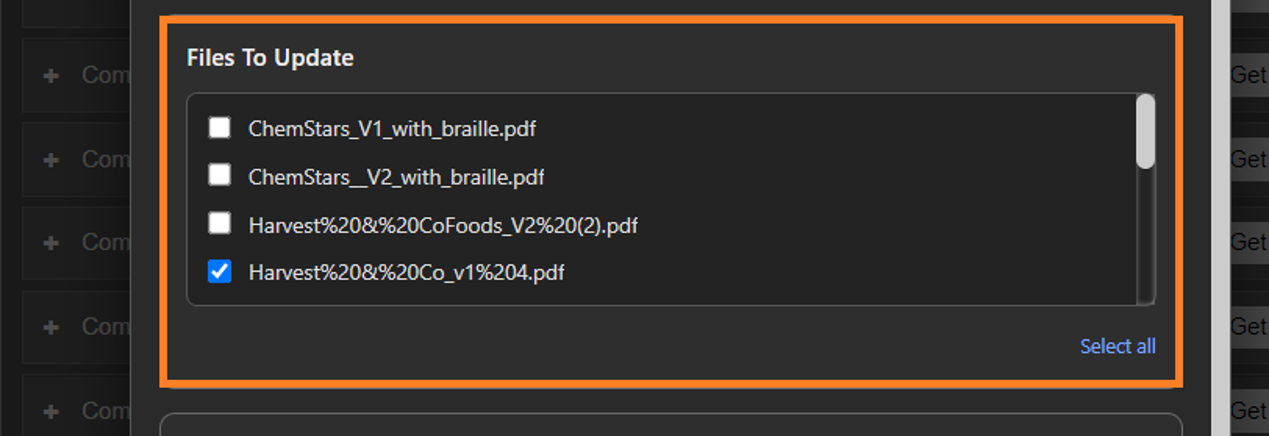
1. By default, the system selects every file in the folder.
2. Clear the checkbox next to a file to exclude it from the update.
3. Select the checkbox next to a file to include it in the update.
4. Select **Select all** to include every file in the list. The link changes to **Deselect all**.
**Note:** There is no limit to the number of files you can update at one time.
### 3\. Enter the Replacements
1. In the **Replacements** section, in the **Find text** box, enter the text to be replaced.
**Note:** Matching is case sensitive. For example, *Marketing Address* does not match *marketing address*. You can use special characters in the **Find text** box, as long as the font used for that text in the artwork supports them.
2. In the **Replace with** box, enter the replacement text.
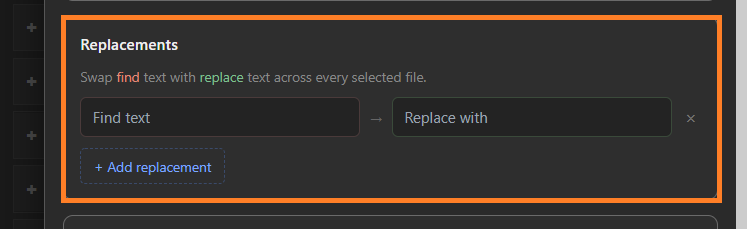
3. If required, add another replacement:
1. Select **\+ Add replacement**. A new pair of **Find text** and **Replace with** boxes appears.
2. In the new **Find text** box, enter the text to be replaced.
3. In the new **Replace with** box, enter the replacement text.
4. To remove a replacement, select the close icon (**×**) next to it.
### 4\. Choose What Happens When the New Text Does Not Fit (If Required)
| ###  | If the replacement text is not longer than the text it replaces, the "**If the new text doesn't fit**" section shows *Not needed*, and you can skip this step. If the replacement text is longer, the section shows a **Required** badge, and you must select an option before you proceed. |
| --- | --- |
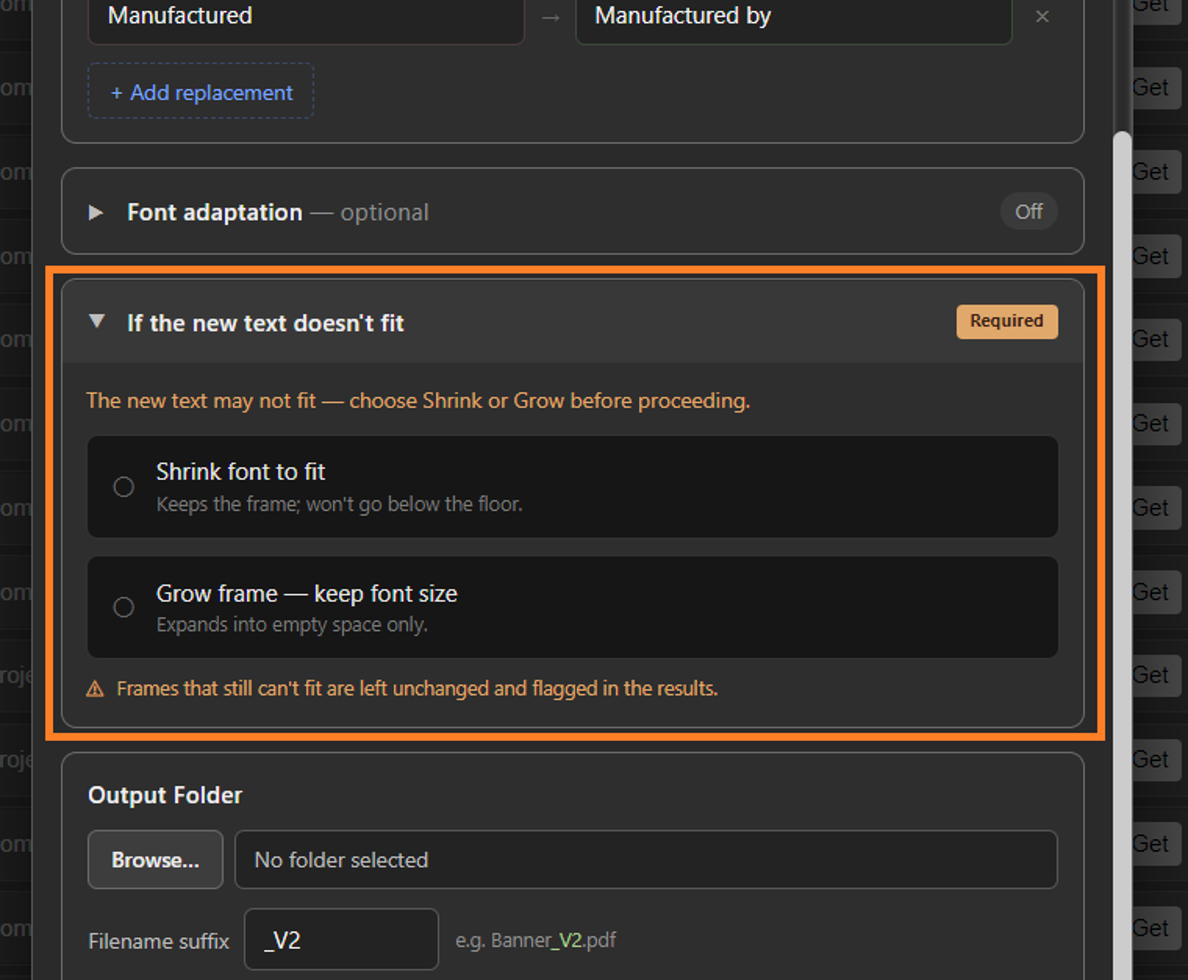
1. Expand the **If the new text doesn't fit** section.
2. Select one option:
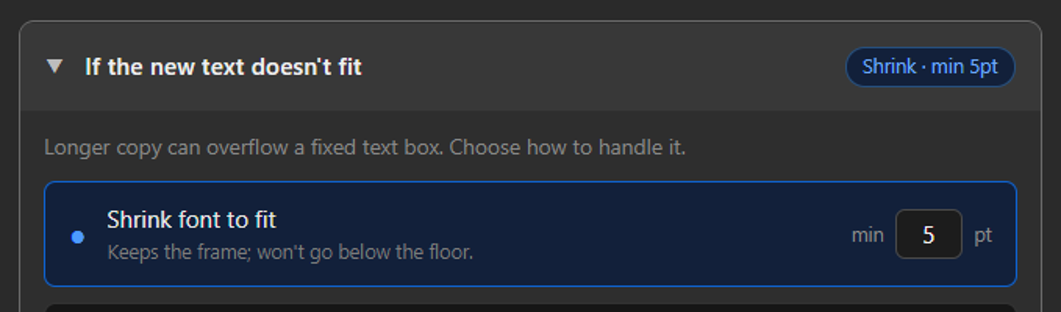
- **Shrink font to fit**: the text frame keeps its size and the font size of the replaced text is reduced.
1. In the **min** box, enter the smallest font size, in points, that the text can be reduced to.
**Note:** The system does not reduce the font size below this value.
- **Grow frame — keep font size**: the font size is kept and the text frame grows.
1. Select **Horizontal** or **Vertical** to set the direction the frame grows. **Horizontal** is selected by default. You can select any one direction.

|  | **Note:** When the text still does not fit, overflow text in an area text frame is hidden inside the bounding box, and overflow text in a point text frame extends beyond the frame. The plugin displays an error message in the results for the frames that do not fit. |
| --- | --- |
### 5\. Change the Font of the Replacement Text (If Required)
1. By default, the replacement text keeps the font properties of the artwork. To change the font properties of the replacement text, expand the **Font adaptation** section and turn on the required attributes.
1. If required, change the font family:
1. Turn on **Font family**.
2. In the **Font family** drop-down list, select the required font.
2. If required, change the font style:
1. Turn on **Font style**.
2. In the **Font style** drop-down list, select the required style.
3. If required, change the font size:
1. Turn on **Font size**.
2. In the **Font size** box, enter the required size in points.
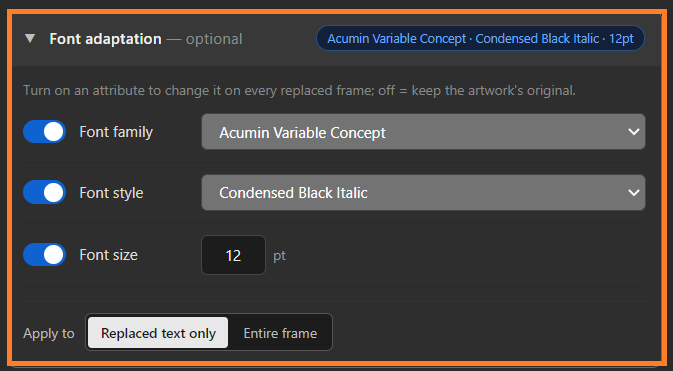
2. Against **Apply to**, select where the font change applies:
- **Replaced text only**: changes the font of the replacement text.
- **Entire frame**: changes the font of all the text in that frame.
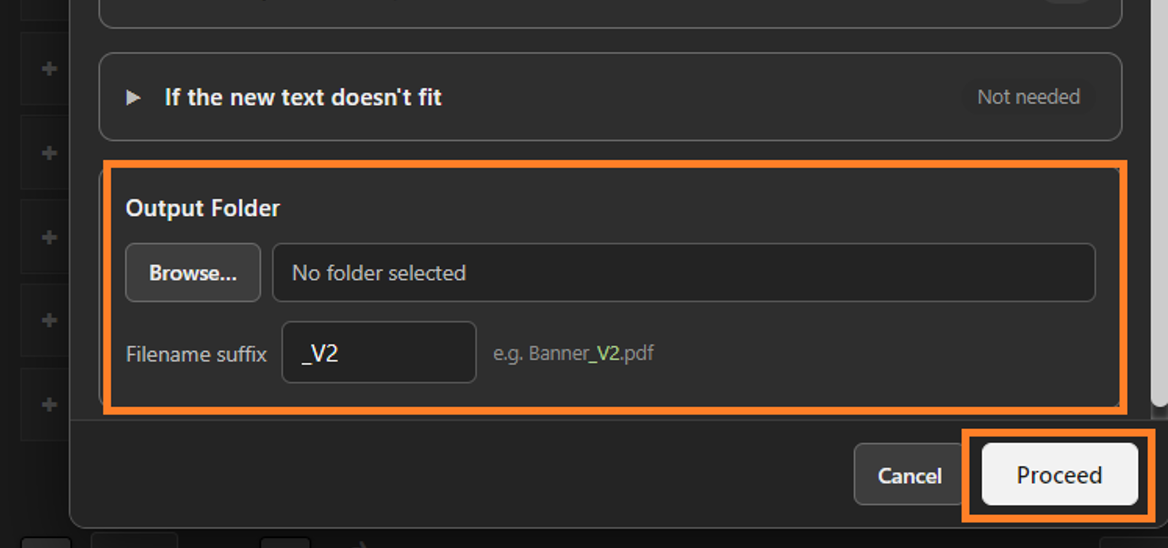
### 6\. Select the Output Folder
1. In the **Output Folder** section, select **Browse**.
2. In the file selection dialog box, browse to and select the required folder.
3. Select **Open**.
**Note:** You cannot use the source folder as the output folder.
4. In the **Filename suffix** box, enter the suffix for the updated files. The box shows *\_V2* by default. The system appends the suffix to the original file name, for example *Banner\_V2.pdf*.
**Note:** If the output folder already has a file with the same name, the system replaces that file without warning.
### 7\. Run the Replacement
1. Select **Proceed**. The text is replaced in the selected files, the updated files are saved in the output folder, and they open in Illustrator.
**Note:** If a selected file does not contain the **Find text**, it is not changed.
## 03\. Replace Text Using a Copy Sheet
Make sure that the **Copy sheet mapping** tab is selected.
| ###  | **Note:** The **Font adaptation** and **If the new text doesn't fit** options are not available for this method. |
| --- | --- |
### 1\. Select the Source Folder
|  | **Note:** You cannot choose which files to update on this tab; every file in the source folder is updated. Make sure that the folder holds only the artworks you want to update. |
| --- | --- |
1. In the **Source Artwork Folder** section, select **Browse**.
2. In the file selection dialog box, browse to and select the required folder.
3. Select **Open**.
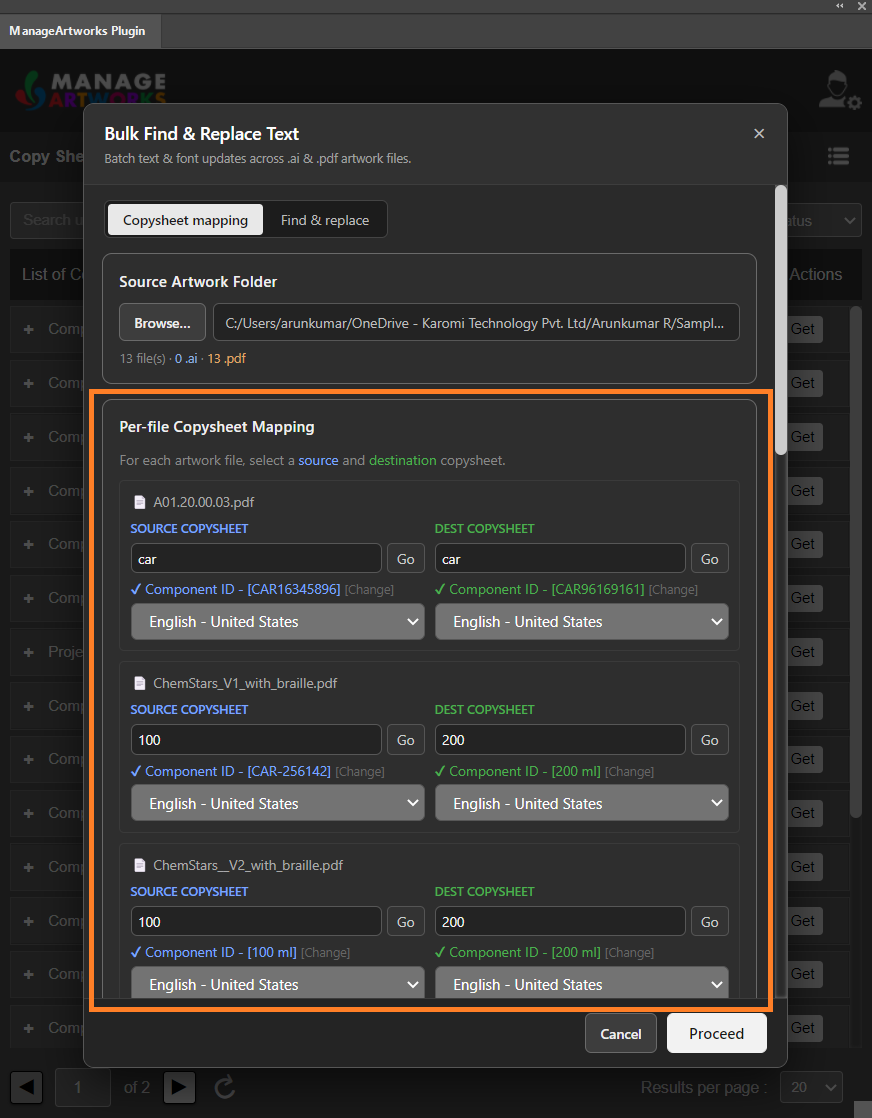
4. The system displays the number of files detected, and lists one mapping row for each detected file in the **Per-file Copysheet Mapping** section.
| ###  | **Note:** The system lists only the supported files. Unsupported files are not listed. The artwork does not need to have been made through Copy Manager, but it must contain the copy sheet content. |
| --- | --- |
### 2\. Select the Source Copy Sheet
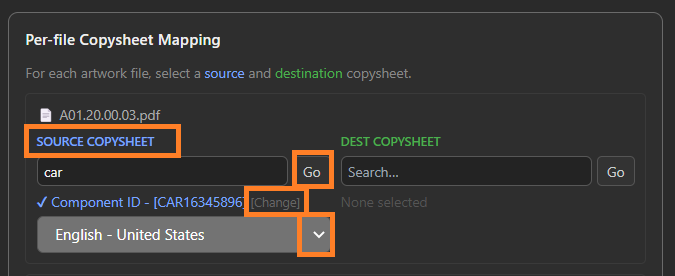
1. For the first file in the list, in the **SOURCE COPYSHEET** box, enter the name of the copy sheet required.
2. Select **Go**. The system lists the copy sheets that match the search text.
3. Select the required copy sheet from the list.
4. If required, in the language drop-down list, select the language of the copy sheet.
5. If required, change the selected copy sheet:
1. Select **Change** next to the copy sheet name. The selected copy sheet is removed.
2. Select the source copy sheet again, as in steps a to c.
### 3\. Select the Destination Copy Sheet
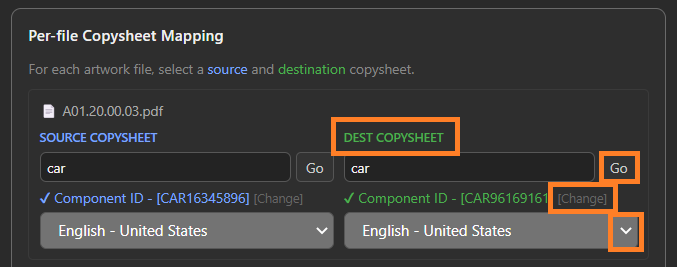
1. For the same file, in the **DEST COPYSHEET** box, enter the search text.
2. Select **Go**. The system lists the copy sheets that match the search text.
3. Select the revised copy sheet from the list.
4. If required, in the language drop-down list, select the language of the copy sheet.
5. If required, change the selected copy sheet:
1. Select **Change** next to the copy sheet name. The selected copy sheet is removed.
2. Select the source copy sheet again, as in steps a to c.
### 4\. Map the Remaining Files
1. For the next file in the **Per-file Copysheet Mapping** section, select the source copy sheet as in *2\. Select the Source Copy Sheet*.
2. For the same file, select the destination copy sheet as in *3\. Select the Destination Copy Sheet*.
3. Repeat steps a and b for every remaining file. For example, if the folder has five artworks, map five rows.
| ###  | **Note:** You need to map both copy sheets for at least one file. If a file is missing its source or destination copy sheet, that file is not changed. The other files are still updated. |
| --- | --- |
### 5\. Select the Output Folder
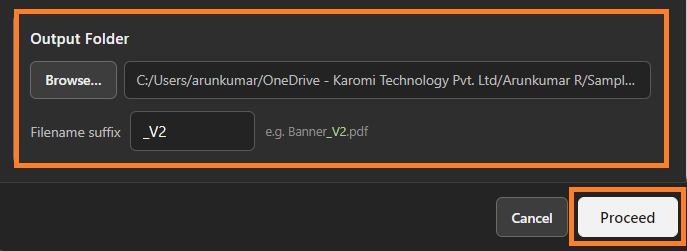
1. In the **Output Folder** section, select **Browse**.
2. In the file selection dialog box, browse to and select the required folder.
3. Select **Open**.
**Note:** You cannot use the source folder as the output folder.
4. In the **Filename suffix** box, enter the suffix for the updated files. The box shows *\_V2* by default. The system appends the suffix to the original file name, for example *Banner\_V2.pdf*.
**Note:** If the output folder already has a file with the same name, it is replaced without warning.
### 6\. Run the Replacement
1. Select **Proceed**. The system replaces the content that differs between the source copy sheet and the destination copy sheet in each mapped file and writes the updated files to the output folder. The system opens the updated files in Adobe Illustrator.
| ###  | **Note:** Content that is the same in both copy sheets is not changed. When the replacement content is longer than the original content, overflow text in an area text frame is hidden inside the bounding box, and overflow text in a point text frame extends beyond the frame. |
| --- | --- |
## Related Articles
- [Sign In to the ManageArtworks Plugin](https://help.manageartworks.com/en/article/sign-in-to-the-manageartworks-plugin)
- [Change Fonts in an Artwork](https://help.manageartworks.com/en/article/change-fonts-in-an-artwork)
- [Change Colors in an Artwork](https://help.manageartworks.com/en/article/change-colors-in-an-artwork)
- [Drag and Drop Copy Content into Your Artwork](https://help.manageartworks.com/en/article/drag-and-drop-copy-content-into-your-artwork)