---
title: "Annotate on Files"
url: "https://help.manageartworks.com/en/article/annotate-on-files"
language: "en"
last_updated: "2025-10-26T22:17:51.365Z"
---
# Annotate on Files
Annotation helps to communicate ideas or provide feedback on the artwork files.
 Web Viewer provides easy-to-use marking and commenting tools in one location to manage everything without multiple email attachments or file versions.
## Annotate
### Highlight, underline , strikeout, or squiggly text

You can use the Highlight Text tool, Underline Text tool, Strikethrough Text tool, and the Squiggly Text tool to add comments by themselves or in conjunction with notes.
1. Choose **Annotate** to view the toolbar.
2. Select Highlight or Underline or Strikeout or Squiggly in the Annotate toolbar and select the text you want to highlight.
3. An annotation will be added to that highlight on the right pane.
4. If needed, click on the annotation created and add a comment.
5. Click **Save** to save the comment.
| To specify the line width, color, and other properties before you draw, select the desired tool, and set the desired options in the Presets toolbar.
 |
| --- |
### Edit a Comment
1. Select the comment you want to edit.
2. Click the three-dot icon.
3. Select **Edit** to edit the comment.
4. Click **Save** to save the comment.
### Delete a Comment
1. Select the comment you want to delete.
2. Click the three-dot icon.
3. Select **Delete** to delete the comment.
### Add a Free Text
1. Select Free Text in the Annotate toolbar and click where you want to place the note.
2. Type text and click **Save** to save the comment.
## Shapes
### Add a line, arrow, or shape
1. Choose **Shapes** to view the toolbar.
2. Add a line, arrow, or shape
3. When selecting a drawing tool, consider the effect you want.
- The Rectangle tool, Ellipse tool, Line tool, Polyline tool, Arrow tool, Arc tool let you create simple shapes.
- The Polygon tool, and Cloud tool create closed shapes with multiple segments.
- The Free Hand tool, and Free Hand Highlight creates free-form drawings.
| To specify the line width, color, and other properties before you draw, select the desired tool, and set the desired options in the Presets toolbar.
 |
| --- |
### Draw in the artwork file
- To create a cloud or polygon shape, click to create the start point, move the pointer, and click to create each segment. To finish drawing the shape, click the start point, or right-click and choose Complete from the menu.
- To draw a line, arrow, or rectangle, either drag across the area where you want the markup to appear.
- To draw a square or circle, or to draw a line that’s horizontal, vertical, or at a 45° angle, press Shift while you draw.
- To draw free-form lines using the Pencil tool, drag where you want to begin drawing. You can release the mouse button, move the pointer to a new location, and continue drawing.
- To edit or resize the markup, select it and drag one of the handles to make your adjustments.
| To delete a drawing markup, select it and press **Delete** on the pop-up. |
| --- |
## Insert
### Stamp an artwork file
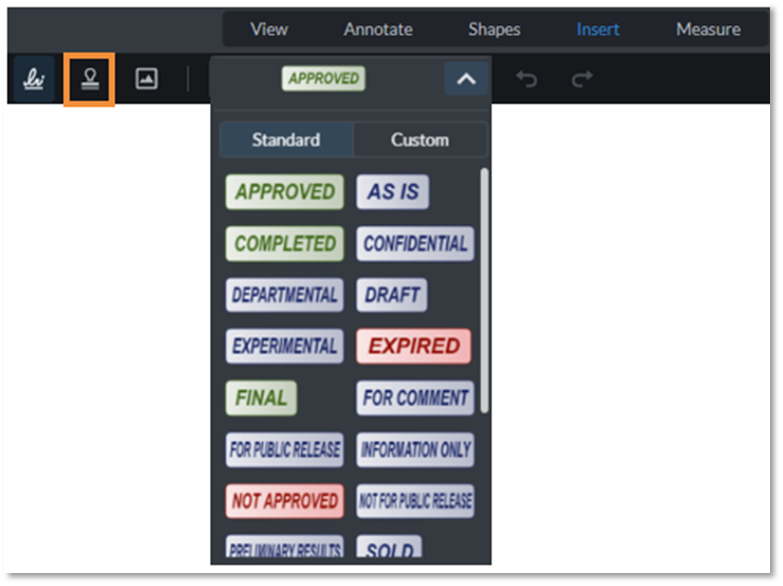
Apply a stamp to an artwork file in much the same way you apply a rubber stamp to a paper document. You can choose from a list of predefined stamps, or you can create your own stamps.
The Stamp tool appears in the Insert toolbar.
#### Apply a stamp
1. Select a stamp by doing one of the following:
1. Click the Stamp tool. The most recently used stamp is selected.
2. In the Stamps Palette, choose an appropriate stamp.
2. Click the document page where you want to place the stamp.
#### Change a stamp’s location or appearance
- To move a stamp, drag it to a new location.
- To resize a stamp, click it, and then drag a corner handle.
- To rotate a stamp, click it, move the rotation stamp icon.
- To delete a stamp, click it, and select Delete icon from the pop-up.
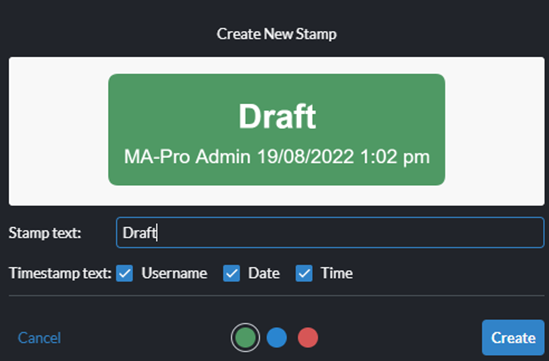
#### Create a custom stamp
1. Click the Stamp icon and select the drop-down icon.
2. Click **Custom**.
3. Enter the desired changes and click **Create** to create a custom stamp.
| To delete a stamp from the artwork file, select it and press **Delete** on the pop-up.
To delete a created custom stamp, go to **Custom** and click the delete icon next to the stamp. |
| --- |
### Sign an artwork file
Sign an artwork file, you can type, draw, or insert an image of your handwritten signature:
1. From the Insert toolbar, select the Signature.
2. If you've already added your signature or initials, just select it from the Sign options, and then click at the place in the artwork file where you want to add your signature. Skip to the next step.
3. If you are signing for the first time, you see the **Add New Signature** option. Click the **Add New Signature** option to open the signature panel.

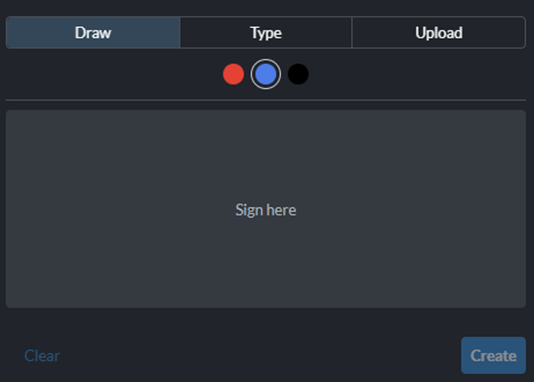
- **Draw**: Draw your signature in the field.
- **Type**: Type your name in the field.
- **Upload**: Browse and select an image of your signature.
4. Click **Create**, and then click where you want to place the signature or initial.
5. To move the placed signature or initial, click and drag it.
6. To resize the signature, click it, and then drag a corner handle.
7. To rotate a signature, click it, move the rotation icon.
8. To delete a signature, click it, and select Delete icon from the pop-up.
### Insert an image into an artwork file
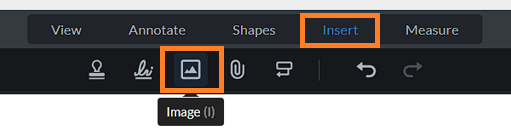
1. From the Insert toolbar, select the Image icon.
2. Click anywhere on the artwork file.
3. In the Open dialog box, browse and select the file from your desktop that you wish to attach.
4. Click **Open** to insert the image.
5. Use the bounding box handles to resize the image.
6. To move the image, click and drag it.
7. To rotate the image, click it, move the rotation icon.
8. To delete the image, click it, and select Delete icon from the pop-up.
### Attach a File to an Artwork
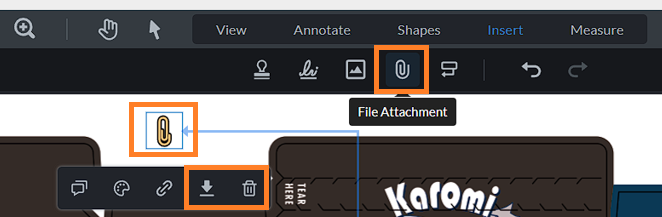
1. From the Insert toolbar, select the **Attach File** icon.
2. Click on the desired location within the artwork file.
3. In the Open dialog box, browse and select the file from your desktop that you wish to attach.
4. Click **Open** to attach the file to the artwork. The attachment will be represented by a pin icon in the Asset Library.
5. To download the attached file, click the pin icon and select **Download**.
6. To remove the attached file, click the pin icon, then select the **Delete** icon.
### Add comments in a text box or callout
You can use the **Callout** tool to create a box that contains text. You can position it anywhere on the page and adjust it to any size. A text box remains visible on the document page; it doesn’t close like a pop-up note.
You can use the **Callout** tool to create a callout text box. Callout text boxes are handy when you want to single out—but not obscure—a particular area of a document. Callout text boxes have three parts: a text box, a knee line, and an end-point line. You can resize each part by dragging a handle.
1. From the Insert toolbar, select the **Callout** icon.
2. Select a location in the PDF where you want to add the text and enter the text.
#### Set or change properties for the text box
1. Select the callout text and click the style icon to change the text color, alignment, font attributes for the text and the border and fill options.
2. To make further changes to the text box:
1. Using the **Select** tool, select an edge of the text box and then drag a corner to resize it. Right-click the text box to open the Text Box Properties.
2. Double-click the text box to edit the text or change the text attributes.
3. To delete the text box, select it and then press **Delete**.

## Measure
The measuring tools are useful for showing and verifying the distances and the areas associated with the designs or logos or text size and ensure that the artwork file has the proper dimensions. With the web viewer Measure tool, we can dump the manual process of taking printouts and verifying dimensions with measuring tape and scale. We can collaborate with the teams, to confirm the measurement before sending it to the printer department.

- Select the **Distance** tool to measure the distance between two points. Click the first point, move the pointer to the second point, and click again.
- Select the **Arc** tool to measure the distance of the curved path. Click the first point, move the pointer to the second point, and click again. Create the desired shape and click again.
- Select the **Perimeter** tool to measure a set of distances between multiple points. Click each point you want to measure. Then, double-click the last point.
- Select the **Area** tool to measure the area within that closed shapes (polygon or circle or square or cloud) that you draw.
### Measurement Info
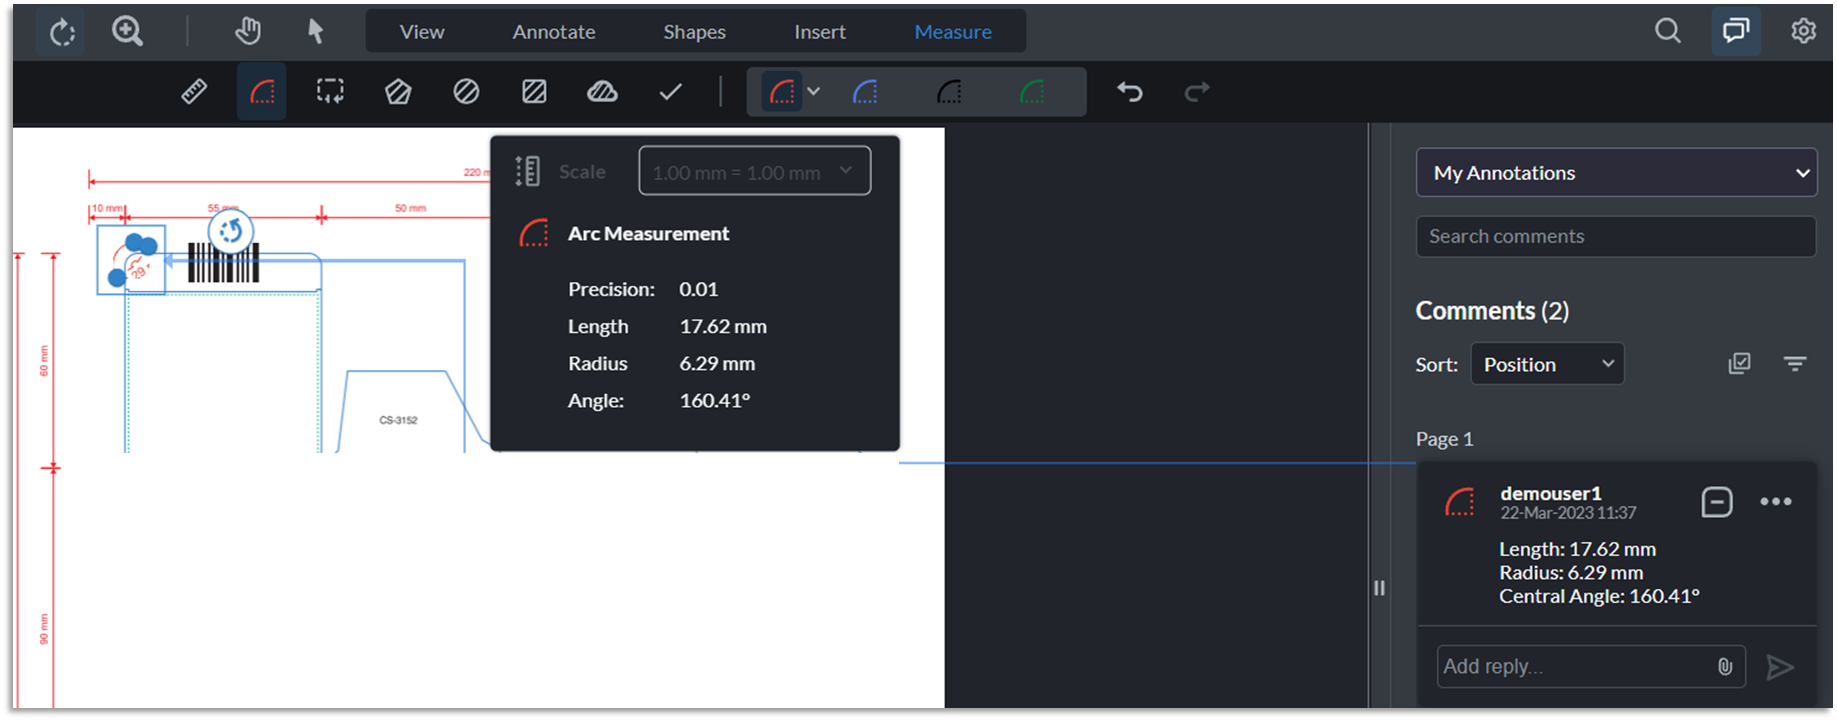
When you select the desired tool from measuring toolbar, a pop-up called "**Measurement Info**" will display information regarding the measurement, including precision, length, radius, and angle. As you measure the artwork using the selected tool, the measurement info will update in real time to show the current measurement. Web Viewer automatically insert comments with the calculated values for length, radius, and central angle.
[Compare Files](https://help.manageartworks.com/en/article/proofread-an-artwork)